What's new

DARWIN'S GUERILLA GROWING GUIDE

darwinsbulldog

Landrace Lover
Veteran
hey all, i wrote this up today/tonight as it was a topic i wanted to learn more about and the best way to do so is to research the shit out of it, think about everything you've just learned and put it on paper! so voila, i'm pretty much done. please feel free to critique it and add in any other ideas or knowledge you have on the subject, that would be much appreciated.

I will add to this and change parts as I learn more in the future.

******************************************************

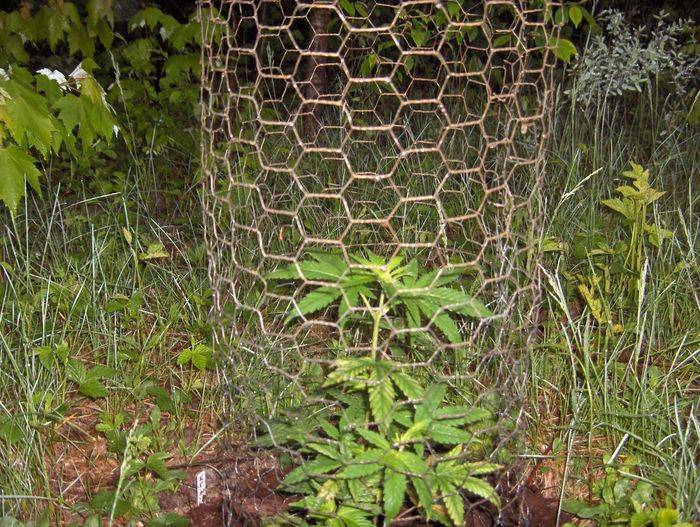
The term “Guerilla Growing” was first used in the 1970s and requires a great deal of strategy, time, patience and quite often physical ability. Depending where you live and the laws of that area, this form of growing in remote locations may be the only option available to you. Location and security are two main issues when choosing a location for growing. So choosing a place with limited access by the public is a must.


Looking for a location!
Google maps (satellite) is definitely a useful tool when looking for great locations to create a growing area. Look for locations where there’s restricted road coverage and tracks, the less people that visit these areas the better. So also take note to keep them away from recreational areas that are often found out in these areas. Be sure to check information via the net or otherwise about local use of these areas whether it’s scouts, fishermen, hunters, hikers, bike riders, motor cyclists, 4wders, bird watchers, whomever. The more isolated the better.

Be sure to check the wind patterns for the area you plan on growing in. In the south of aus for example, most winds are from the south heading to the north. So it’s best to plant (if on the coast) a few kms inland away from these winds, and covered by mountains or forest etc. Windbreaks will protect your plant from wind damage, heat and water loss. So do your homework before choosing a site to get started. Also make sure the lighting will be right for your plants (I will discuss this more below).

attachment.php


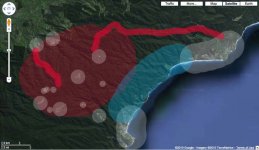
This photo illustrates how coastal winds act in this area. Coastal winds tend to blow inland during the day creating cool zones shown by these light blue arrows. At night, coastal winds tend to blow from land out to sea. Valleys and exposed hillsides generally receive more wind. (click to enlarge)

attachment.php


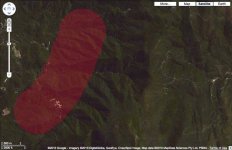
This above photo is an example of finding a growing area near a coastline. (click to enlarge)

The light blue area shows the region closest to the coast that will receive temperature fluctuations as well as increased wind activity due to its proximity to the coastline. The white areas denote populated regions, the two major towns on the coast, middle bottom and top right corner, as well as a few smaller farms/homes dotted in the forest. The red lines denote sections of main roads. The red area shows where the region with less wind activity and temperature fluctuation, as it’s further inland away from the coast line by ~2km. It’s well protected as it’s located on the opposite side of the mountains lining the coast.

The location should be selected and prepared up to 6 months in advance to when you plan on planting your grow (spring time most often). So work out where you want to plant that is convenient to you, look for the closest but most secluded/protected spot. You want it to be as close to you as possibly obviously, but also secluded enough that it will go unnoticed by thieves or the law, etc. So be smart about it, don’t just jump your neighbours fence and plant some of your finest strains in their veggie patch.

Wind/Weather Links for Australia
- http://www.ozwind.com.au/
- http://www.bom.gov.au/
- http://www.bom.gov.au/climate/averages/wind/wrselect.shtml
- http://www.bom.gov.au/climate/averages/maps.shtml


086282-9amAnnual.gif

This is a "wind rose" for melbourne australia, a city located on the south east coast. It shows that the majority of winds move from the south to the north and are thus "southerly" winds (originating from the south).

this link will give you a map of Australia where you can click on specific cities to get their individual wind roses! very handy indeed! http://www.bom.gov.au/climate/averages/wind/selection_map.shtml

windrosegb6_new.gif


you can also get tables of climatic averages for hundreds of locations all over Australia. http://www.bom.gov.au/climate/averages/ just click this link then select your state and then town where you'll be growing close to and voila, average temps, winds (for 9am and 3pm times of day), humidity, rainfall etc for all months of the year! definitely worth a look if you're serious about getting the perfect grow location.

here's an example - Campbeltown in NSW
attachment.php
 

Attachments

  • Picture 21.jpg
    Picture 21.jpg
    49.9 KB · Views: 25
  • Picture 31.jpg
    Picture 31.jpg
    39.2 KB · Views: 32
  • Immag0238!
    Immag0238!
    60.2 KB · Views: 38

darwinsbulldog

Landrace Lover
Veteran
Sunlight
"Here's a little link for those contemplating an outdoor grow this summer. Not only does it give sunrise and sunset times but more importantly, the length of the day. Any where in the world." - HighCountry

http://www.timeanddate.com/worldclock/sunrise.html

When planning a guerrilla grow it’s very important to take into account available sunlight your grow area will receive. Make sure the patch where your plants will be growing will be able to receive at least 5-6 hours of direct sunlight a day or more in order to survive.

If planning and developing your grow space while in the months preceding summer, one needs to realise shadows cast in these months with a lower sun will be different from those cast in summer with a higher sun and to account for this.

Clear the immediate area of any tall foliage that either already casts too much shade on your patch or looks like it has potential to grow substantially in the coming few months before you start your grow providing a future issue. Don’t go overboard as you want the clearing to remain a subtle part of the forest/area, not attracting to much attention from any above air traffic. After all, a large symmetrical clearing will arose attention if in the middle of an otherwise uniform forest (see stealth and security for more info).

The angle of the sun climbs during the summer and also becomes brighter as the light has less atmosphere to travel through. When visiting a site in earlier months to summer for scouting, make sure to try and visualise the path the sun will take in summer as it will be higher in the sky. Make sure shadows won’t be cast over your patch by other objects, large trees, rocks, mountains, etc. Rocky terrain, hillsides, grasslands are all areas that will receive great sunlight if facing the right direction.

Angle of the sun is important! The more direct sunlight the plant is getting the better. Plants are designed to receive maximum light when the sun is above. When light hits the plant on an angle, the steeper the angle the less light the plant gets over all as more leaves will fall into shadow on the opposite side of the plant. This affects the amount of glucose/sugars and thus energy the plant can convert from photosynthesis, reducing its growth.

attachment.php


This photo is of a forest in the southern hemisphere located at ~42o latitude. (click to enlarge)

This area coloured red above is the ideal zone to look for prime growing space. Notice also the shadow that these mountains cast to the north. The sun gets to a maximum 48% high in the sky during the summer months (Nov-Jan) in this location (900 - 42o latitude). This causes shadows to be cast to the south, so always plant on the north side (facing towards the equator). This means they’re able to get sunlight the entire day. Also, at such a low latitude (42o) average temperatures are lower in summer and other months, therefore it is important to plant them further down the mountain as temperatures drop with increased altitude. These areas will receive less intense winds and reduced temperature fluctuations between day and night.

In the northern hemisphere you want to plant on a patch of land that is facing south if in a mountainous region, whereas in the southern hemisphere it needs to be placed on a north facing side.

This matters less and less the closer one’s proximity to the equator. Below shows the position of the sun during the day at different latitudes and its subsequent affect on shadow and the amount of direct light plants are exposed to. Remember the closer the sun is to directly over head, the more leaves there are on your plant that will receive this light. Leaves in shadow receive much less light and are thus not living to their full potential. Latitudes well beyond 50o will be relatively hard, if not impossible, to grow outdoors in because of a few factors; sunlight will be less intense causing slow growth, seasons will see much different hours of sunlight compared to equatorial areas (12-12 won’t occur with over the same amount of time or with the same light intensity to induce flowering), temperatures and winds will be much harsher in these regions too, and night frosts will occur in cooler seasons, which cannabis doesn’t respond well to at all when grown outdoors. That said zielonylass’s grow is at 52o latitude, link is below.

attachment.php


The further you are away from the equator, the higher your latitude, the better off you’ll be by planting on a hill facing the equator, north facing if you’re in the southern hemisphere for example. This way your plants will receive more direct sunlight.
 

Attachments

  • Picture 21.jpg
    Picture 21.jpg
    49.9 KB · Views: 15

darwinsbulldog

Landrace Lover
Veteran
attachment.php


In this diagram the green arrows are pointing to where the sun sits in the sky. (click to enlarge) the higher the latitude you live at, the more important choosing your grow patch's topography well becomes. make sure to plant them on the right side of a hill, where plants will receive sunlight all day and not be shadowed by other hills.

Equipment and Soil
Materials and equipment to cultivate and create your patch for growing your plants
• organic nutrients to be mixed in with natural soil
o nitrogen rich guano, chicken manure, blood and bone, worm castings are good (suss out Tom Hill link below for soil ratios that work outside)
o ph adjusting substances, eg lime, if needed
• coco medium can be used if one is able to get to the area often to provide
• pest control products, if they become an issue
• items for camouflaging plants/pots (see stealth and security below)
• nutrients to the plants,
o whether organic nutes put over the surface
o or chemical nutes added to water
• water, if in a dry location where rainfall is infrequent. Carry in sufficient water supplies every visit or whenever is required. Some people may have the ability to set up a tank and fill it from their vehicle via hoses each time.
• tools – shovel, pitch fork, trowel. For digging up, cultivating and planting.
• GPS for marking your grow patch or patches as well as getting back to your car/the road, and then getting back to your patches on following visits
• Raincoat and gloves if planted around or near stinging nettles, poison ivy and the like. Clean these after each use.

While digging be sure to cut back the roots of competing vegetation in the area so your plants get the best out of the soil. Also, when possible allow amended soil to sit for up to a month before planting. If you have a home nearby with similar soil in the backyard it is a great idea to plant a similar plant (eg. Tomatoes) with the same soil used etc to be able to keep track of the health of your other plants (you’ll notice if it becomes nute def or burnt etc, and if your grow patch in the forest is kept in the same conditions you’ll have to make sure your plants there remain healthy).

Water’s very important and if your grow patch isn’t located somewhere with sufficient rainfall it’s important to make sure it’s planted near a water source that doesn’t dry up over summer, unless you have the ability to bring in your own water supply.

It’s important to look up or examine the soils of the selected area to make sure that it’s suitable for growing cannabis, ie. it has the correct ph, isn’t too high in salts (if close to the coast), etc. If not these things need to be resolved. One can bring their own soil, organic nutrients, lime to reduce ph if too high, etc, into the grow area and prepare their patch with it to assure plants will survive better in their preferred medium. Another way is to bring in pots full of the right soil mix for plants to live in. Be prepared for the physical side of things if your selected grow location is a distance away from any road/track.

Things can be carried in to the site each time you visit so you don’t need to bring everything at once while preparing your patch. Also make sure that your equipment is covered up if you plan on leaving it there as to be protected from the elements as well as to be less conspicuous should anyone pass by your secret grow garden.

When ready to plant you’ll need an easy wait to carry in seedlings. Some people use trays or boxes with seedlings in pots ready to be transplanted into bigger pots or the soil at the location. I’ve also seen an illustration in Jorge cervantes’ grow bible with a layered backpack rig that plants sit in, leaving hands free for bush bashing. There’s no perfect way, just do whatever works for you.

picture.php

Picture showing a freshly cultivated patch in the forest - zielonylasss

picture.php

Picture showing freshly planted seedlings, spread out in a grid and labelled. - zielonylasss

Soil resources
- http://www.asris.csiro.au/index_other.html# (Australia)
- http://www.anra.gov.au/topics/soils/overview/index.html (Australia)

This below link is a great resource for soils all over the world!
- http://culter.colorado.edu:1030/~kittel/SoilsGeog_wkshp-I.html

Canada - http://www.soils.umn.edu/academics/classes/soil4505/doc/unit7can.htm
Mexico and Central America - http://www.soils.umn.edu/academics/classes/soil4505/doc/unit8mex.htm
South America - http://www.soils.umn.edu/academics/classes/soil4505/doc/unit9sam.htm
Africa - http://www.soils.umn.edu/academics/classes/soil4505/doc/unit10af.htm
Europe - http://www.soils.umn.edu/academics/classes/soil4505/doc/unit11eu.htm
Asia - http://www.soils.umn.edu/academics/classes/soil4505/doc/unit12as.htm
Australia and New zealand - http://www.soils.umn.edu/academics/classes/soil4505/doc/unit13az.htm
Pacific Islands - http://www.soils.umn.edu/academics/classes/soil4505/doc/unit14pi.htm

one can also just open up google, go to google images and do a search for your area. for example "Australia soil map" gave the picture below.

Map of soil types in Australia
soil_atlas.gif


Also it's important to check your local municpality or county website to see if they have GIS information posted. If they do, you can find out just about anything you want about your grow patch and surrounding area including who owns it.

Soil Acidity Info
- Australia - http://www.signposts4ag.com/signpos...od-and-fibre/soil/soil-chemistry/soil-acidity
- Australia - http://www.ga.gov.au/ausgeonews/ausgeonews201003/soil.jsp

Most forests are going to have a pretty decent pH that you'll be able to grow in considering that you'll be surrounded by other vegetation all thriving in the soil of the area. pH will only really become an issue if you're growing in more extreme environments that cannabis wouldn't be expected to grow well in, ie. arid zones or dunes/coastal areas etc. best method is to purchase a pH soil meter that is a small metal stake with a meter on the top that you simply push into the soil to get a reading. then you'll know if you have to add anything to the natural soil in order to tweak its pH. a guy named Brushtail has a great thread on it, see "links worth looking at" below.

Drainage
Whether you’re patch is located in a wet or dry climate it’s best to plant on a hillside. In a wet climate the hillside will allow excess water to drain away. Whereas, in a dry climate the hillside collects water. If you’re wanting to collect water you should dig a bowl and plant right in the middle of it. If you’re not wanting to collect water it’s best to create a bit of an “ant hill” around the base of your plants so water doesn’t collect.

for more info on drainage and soil watch the first few parts of jorge cervantes's dvd on youtube - http://www.youtube.com/watch?v=F0DnlD9j1Hk&feature=related

Choosing one or more Strains
This is a great opportunity to grow those fast and tall growing sativas you could never fit in your indoor grows! Research is the key here, you want to find a strain that fascinates you, that you would like to try if you haven’t already or one that’s close to your heart. But at the same time you need to work out which are going to survive the best when left to their own devices in the wild. There are a fast number of landraces as well as hybrids that would suit your needs. Landraces I’ve read are often really good at outside grows because they are, or are very close to, the natural strain that evolved in the wild. So afghan, African, Pakistani, chinese landraces will all thrive outside under the right conditions and are definitely a great place to start. These are also great for those beginner breeders as they are IBLs and act as a blank slate for those wanting to create their own strain. Thing to remember is that marijuana is a weed and knows how to survive, and will do so with most things thrown its way.
 

Attachments

  • angle to get direct sunlight.jpg
    angle to get direct sunlight.jpg
    12.2 KB · Views: 25

darwinsbulldog

Landrace Lover
Veteran
Plants
In the end there’s no one age or size of plant that is the “best” for guerrilla growing IMO. The older the plant, the more likely it is to survive obviously, though this can be a problem if creating a large grow. I personally would personally take nothing in any younger than 2 weeks as these seedlings would be fair game and easy targets to any native herbivore, especially when uncovered and thus not protected by surrounding foliage.

When you move the seedlings/clones outdoors to your grow patch it’s going to be a harsher climate. What you need to do before planting them in your patch is move clones outside for a couple of hours to get used to the climate, then back indoors. Then the following day put them outside for a few more hours than the previous day then back inside again. It’s best to do this for about 4-5 days. You’ll actually feel the leaves of the plant toughen up a little, by this time it will have acclimatised to the outdoor environment and be ready for transplanting into your grow patch.

It is important to plant in mid to late spring as the temperatures start to increase while summer is around the corner. Wait until average temperatures at night are high enough that there are no morning frosts, which will kill your seedlings. Nights of 10oC+ is worth aiming for. Plants will veg for up to 6+ months until the following winter arrives and plants receive 12-12 light regime for 2-3 months. While vegging be sure to visit your patch as often as possible (weekly/monthly depending on how self sufficient you’ve set it up) to make sure plants stay healthy and that your area is still well hidden. Surrounding foliage can change relatively quickly due to seasons. Plants will be ready to harvest when 75% or more of the trichomes on the buds have turned orange/brown.

Watering
It’s important to water in your freshly planted clone. Also once you’ve given it a few 100ml of water I’ve seen a few different methods used for drip watering it for the next 45-60 mins in order for the plant to get a nice dose of water. One way of doing this is creating a pvc collar (exactly as it sounds) that you can fill with water or connect a water bottle upside down to drain water from. You simply put together a square shaped pvc pipe collar from parts found at any hardware store and then put small holes in the bottom of this. These collars can be buried in the soil or placed on the surface. Another way, which is even simpler, is to get a large bottle of water and put a small hole in it. This can be done at the location with a pocket knife, or you can do it at home and then put duct tape over it until at your grow patch. It’s probably best to test out your chosen method before doing it to see how quickly the water drains out. There’s no exact amount that you should use as plants will change in size and require different amounts, but a few litres dripped out over 45-60mins won’t drown your plant if the soil has good drainage. You should do this 2 times a week, however, if your grow patch receives 1” or more of rainfall a week you don’t need to water at all. Unless in a really arid environment you'll only have to worry about watering for the first month or two after that they should be able to take care of themselves if they have a big enough root base. If in an arid environment, however, you may need to water once a week for the entire lifespan of the plant.

suss out this "how to make" guerilla water collar guide - https://www.icmag.com/ic/showthread.php?t=106606

38268silverback_0041.jpg


38268silverback_0071.jpg


Water Retention - if you have issues with water draining away too quickly, or living in an arid environment where water is scarce there're a few things you can do to help your plants out! there are crystals you can purchase from most hardware stores or nurseries which expand to 10s if not 100s of times their size by soaking up water, and they hold it for the plant to use. i bought 100g or something recently for about $10 i believe. what i also thought of recently was are there any other things from your home you could use that are cheap as chips??? and i came up with one idea, KITTY LITTER! the stuff is cheap as can be for 10s of litres, and it soaks up HEAPS of water and holds it. i'm sure mixing a bit of that in with your soil would work a treat! or even just putting it in/around your plants on the top surface as well!

WaterCrystals_0014_1_1a_small.jpg

http://www.watercrystals.com/

Stealth and Security
- Choose a site that doesn’t make your plants too obvious, try and select a location with similar sized plants around. Things like ferns, stinging nettles and blackberry bushes camouflage cannabis well and can act as a deterrent, people will want to steer clear of some of these plants. Try to find somewhere plants will blend in the best. Though with increased seclusion this becomes less important.
- Park your vehicle a discreet place away from the start of the trail that leads to your grow patch.
o If possible have someone drop you and others off at the location and come back to get you later. As a randomly parked car with no one around it in the forest may arouse suspicion.
- Cover the bottoms of your shoes with duct tape to hide the sole of your shoe so it can’t be traced back to you by police and so your track can’t be followed by potential thieves.
- Use strains like “Ducks Foot”, which has a leaf that looks much different from the standard marijuana leaf. As its name suggests its leaves resemble a duck’s foot.
- If done on a large property, a big dog will keep thieves away.
- Camouflage pots, if used, by painting or by purchasing camouflaged sleeves for them. This breaks up their appearance making them less conspicuous.
- Do not take the same path into your patch, always take a different route as to not create a track that leads straight to your grow. This is where a GPS will be very useful as it’s easy to get lost in dense forest.
- One may have a way of getting their hands on camouflage material that could be strung up around your grow, hiding it well.
- Also absolute secrecy is your best weapon against thieves. The chances of someone randomly stumbling upon your grow, if you’ve taken the right precautionary steps, are going to be slim. However, if you tell the wrong person who may tell others etc, chances of someone stealing your stuff goes up. So keep it on a need to know basis with those you can trust.
- Always have an alibi. Take fishing gear with you when you go out to your grow area, so if someone sees you you have a reason to be stuffing around in the forest. Probably best to make sure there’s a water source nearby as less people will go for this disguise if you’re kms from any river or lake. Also bird watching gear, books, cameras, etc. it may be paranoid but it isn’t going to hurt.
- Break up all symmetry in your grow patch if possible and thus obvious man made created shapes won’t be easily spotted to give away your location. If it’s of sufficient size, don’t plant in lines or shapes, spread things out in a random manner. The same way camouflage works on a soldier in the jungle to break up his outline and unnatural shape, if one applies the same theory to creating a grow area it will be less conspicuous from above or any other angle. This all comes down to one’s own discretion and how risk bound the area is. Better safe than sorry.

Animal issues

Mites, Gnats, Aphids, etc
Here are a few links for threads on this subject and protecting against and removal of these pests. It’s not the end of the world if you find them on your gear and I’d be surprised if you never ran into any of these sort of insects if growing outdoors. There’re a fair few products out there used to deal with these guys whether plant dips (dip you plant in a solution to kill pest) or insecticide sprays, etc. These are all easily purchased from your local home depot or hardware store etc.

Spider mites - https://www.icmag.com/ic/showthread.php?t=171657
Spider mites - https://www.icmag.com/ic/showthread.php?t=66865
Fungas Gnats - https://www.icmag.com/ic/showthread.php?t=142461
Fungas Gnats/Aphids - https://www.icmag.com/ic/showthread.php?t=159960&highlight=thrips
Thrips - http://www.ipm.ucdavis.edu/PMG/PESTNOTES/pn7429.html
Thrips insecticides for control of thrips - http://arkansasagnews.uark.edu/198su18.pdf
Thrips - https://www.icmag.com/ic/showthread.php?t=61807

This page has a good section on killing bugs - http://www.mellowgold.com/grow/begin/ suggesting that the insecticide “Fruit and Berry” made by Ilers is great for killing spider mites

Marijuana diseases, pests and plagues - http://www.marijuana-seeds.net/Marijuana-Pests.html

Slugs and Snails
Firstly I might add that not all of these guys are bad and will attack/eat your gear, so don’t commit mollusc-ocide with out the need. However, some of these guys can often be unwanted guests at your grow patch party out in the woods. There’re probably 100s of products on the net and in your local hardware store that can deal with these guys. Defender and Multiguard are two brands I found on google relatively quickly. Follow directions of use and utilize around your grow patch to remove these pests.

http://www.multicrop.com.au/mguard.htm
http://www.scottsaustralia.com.au/Defender/Defender_Snail_Slug

Info on deterring these guys - http://www.cheshirewildlifetrust.co.uk/documents/advice_slugs.pdf

another really easy way of keeping slugs and snails out is by creating lime rings around your plants, just as if you were keeping ghosts away from your bed with a circle of salt (lol or whatever the myth is) the slugs and snails won't touch the lime as it's highly acidic and being as moist as they are with permeable skin they'd absorb it and die if they tried to cross the it. i might add too that if you're using dolomite lime to do this you're always adding Cal and Mag to the soil as well as stabilizing the pH!

Herbivores – deer to kangaroos and burrowing bandits!
This can often be an issue where such animals exist in large population sizes around your grow patch. The easiest and most logical method I’ve seen around implemented to deal with these native thieves is to use chicken wire or something similar and stake it out around your plants, individually, or all of them if they’re close enough together and fencing off the area is doable. Be sure to have it pegged down well at the bottom so animals can’t get underneath the fencing and still get to the plant, but if you live in an area with burrowing herbivores like rabbits or goffers you’ll need to dig a trench around your plant for the fence to go in. Make sure it’s about 15-20cm deep and have the fencing curling out from the plant, making it hard for these digging thieves! Make sure to keep an eye on the plant as if left for a long period of time it’ll over grow the chicken wire fence and any buds/branches growing outside of it will be fair game to these wild weed poachers! Make sure too to paint the fencing green or black to keep camouflaged if people were to happen by. Spray paint's one easy option. another is to put the fencing in a fire for a minute to remove all the conspicuous shine from it.

Also it's best to be aware that new calvanised coated wire can be toxic to plants. it's best to do one of a few treatments to it: leave it in the weather for a long time; pour mild acid over it, vinigar will do; or as stated above put it on a bonfire for a few minutes. however fire treatment will reduce the life of the fence as it makes the metal more brittle and will most likely last only one season.

Wisco has some great examples of how this is done.
34029stalk.JPG

34029group_0708.JPG

34029wl2_0527.JPG


Wisco Links
https://www.icmag.com/ic/showthread.php?t=171716
https://www.icmag.com/ic/showthread.php?t=95119

also check out moppel's thread - https://www.icmag.com/ic/showthread.php?t=105108&page=3

i might also add that some people even go as far as to install makeshift electric fences to keep out deer, pigs, cows etc while their plants are still relatively small and easy to uproot and eat.

Vegetarians
In this case a big stick is recommended with a rabies ridden honey badger tied to the end of it, or if not into hands on work when it comes to protection buy or borrow a gun. If wanting to be a little more humane when dealing with vegoes, buy a large Doberman, always beat it daily with a salad sandwich on a stick, then starve it of meat for 2 weeks and tie it up near your grow patch (most effective method). (lol just to be clear this is a joke… I have nothing against these “people” :D, especially not if the majority of their diet is made up of weed haha)

Diseases, Nutrient Deficiencies, pH and Soil issues
This is a huge topic and I can’t really cover everything here, nor do I want to as a few people have done already. I’ve got a book on the topic called “Marijuana Garden Saver” by Ed Rosenthal, so if you can get your hands on that (I did via amazon) I definitely recommend you do! It’s really helpful. But this guy Mynamestitch has gone to a huge effort to write up a thread on the said topic and is full of pictures and info on almost all imaginable issues so definitely have this as your first port of call if having issues with your plant’s health.

Mynamestitch - https://www.icmag.com/ic/showthread.php?t=11688

Removing your harvest
I haven’t really read anything anywhere about this, so anything I say here is all me, I’m sure there’s more out there you just have to hit the books and google to find it.
- do as much of the harvesting / processing of the bud as possible at the grow patch as the less you have on you the better when transporting it back to your home or wherever you plan on storing it. doing this in several trips is definitely not a stupid idea, so be patient and don’t take any unnecessary risks
- prepare your stuff to be removed at times when there will be less traffic on the roads and thus less people about to see you. Do it in early morning (head out to area before sunrise) or at night (head out to area just before sunset), if you can deal with traipsing through the forest at night it will definitely help you do this as stealthily as possible
- put your stuff in inconspicuous bags, eg back packs or an esky. Carrying out large garbage bags of the bud will be pretty suspect if stumbled upon by others.
- Leave it in a hidden but more easily accessible place close to the road to reduce trip lengths and not having to run through the forest for 100s of meters if not kms each time.
- Cover over your grow area with a tarpaulin of natural colour (or cover over with a thin layer of dirt) if you’re planning on revisiting it in the future and don’t want to have to dig out/cut down surrounding foliage.

ALSO CHECK OUT OUTDOOR GROWING ETHICS BY JJSCORPIO BEFORE YOU GET OUT THERE! it's definitely well worth a read.

JJSCORPIO - https://www.icmag.com/ic/showthread.php?t=52061


Links worth looking at:

Zielonylasss - https://www.icmag.com/ic/showthread.php?t=170480
Brushtail - https://www.icmag.com/ic/showthread.php?t=59413 "Specifics of growing in Australia" has some great info on soil and ph etc
Julian - https://www.icmag.com/ic/showthread.php?t=62895&highlight=guerilla
Tom Hill - https://www.icmag.com/ic/showthread.php?t=159846&highlight=guerilla
Backcountry - https://www.icmag.com/ic/showthread.php?t=47579
Backcountry - https://www.icmag.com/ic/showthread.php?t=63715
PureSativa420 - https://www.icmag.com/ic/showthread.php?t=22702
PureSativa420 - https://www.icmag.com/ic/showthread.php?t=56995
Unknown - https://www.icmag.com/ic/showthread.php?t=58327
Wisco Outdoor Grow Links
https://www.icmag.com/ic/showthread.php?t=171716
https://www.icmag.com/ic/showthread.php?t=95119
Moppel - https://www.icmag.com/ic/showthread.php?t=105108&page=3

here's a doco for guerilla and commercial growing by Kog - A Grower's Lot
Part 1 - http://www.youtube.com/watch?v=mZCMb2LuJmA
Part 2 - http://www.youtube.com/watch?v=nFjrGRgInao
Part 3 - http://www.youtube.com/watch?v=rXIvAImhN5g
Part 4 - http://www.youtube.com/watch?v=Ej_Zaxv5nyw&feature=related
Part 5 - http://www.youtube.com/watch?v=g1N_3qSmKb4&feature=related
Part 6 - http://www.youtube.com/watch?v=-Wfx7pqFyeA&NR=1

Books worth reading
Marijuana Horticulture: The indoor/outdoor medical grower’s bible. – Jorge Cervantes (YOU CAN”T GO WRONG, GET IT!)
 

darwinsbulldog

Landrace Lover
Veteran
anyway that's it for now guys, hope it helps anyone who's interested in the subject! have a nice weekend people :D
 

darwinsbulldog

Landrace Lover
Veteran
fingers crossed, we'll be getting a guerilla grow up and running this coming spring and will have to post you guys all the info on it and put some practice behind the theory! have a good one all :D

darwin
 

Big L

New member
Really nice tutorial dude some helpful info that I had never come across before. -Thanks

I also had a question about breeding regular seeds with femenized seeds. Is this a no no? I really hate buying more seeds, and am thinking of force flowering some hybrids early july and collecting pollen to fertilize. Thanks again Darwin.
 

darwinsbulldog

Landrace Lover
Veteran
ummm i'm no expert on breeding, lol hopefully one day i'll get close. but check out this thread and you may be able to find some useful info

http://www.icmag.com/ic/showthread.php?t=172277

i actually just stumbled upon this about 10 mins ago.

i'd say you'll get seed from them if you breed with them for sure, but as to the quality of those seeds it may be affected by the fact that one of the parents was femmed. if this is the case then the F1, the initial offspring of this cross, may show a lot of variance and mutants/deformities like hermaphrodites, no vigor, etc as they probably won't be anywhere near stabilized (meaning a lot of the offspring won't represent their parents well gene wise), but if you're interested in breeding, you'll just be able to weed out all those shit ones and keep the strong ones and stabilize your own line if you can go through 5-6 generations. no harm in trying as you'll only learn more! sorry i can't give a better answer. best of luck with it though mate.
 

darwinsbulldog

Landrace Lover
Veteran
yeah i might add to it later this week about animals. thanks for pointing that out mate! :D have a nice one

darwin
 

clp

Member
GREAT post darwin - rep given - needed some more detailed Guerilla grow stuff on this website :)
 

darwinsbulldog

Landrace Lover
Veteran
GREAT post darwin - rep given - needed some more detailed Guerilla grow stuff on this website :)

thank you kindly for the complement and rep mate! means a lot, hope to keep adding to this and improving it over time! :D stay tuned mate

darwin
 

Moppel

Grower for Life
Veteran
cool. look at a thread of me from last year, i made the same cages and the basterds climbed over them.
 

darwinsbulldog

Landrace Lover
Veteran
lol no kidding?! haha yeah my grandparents had a farm with fruit trees and they'd fence them off each year, then come back every month or so to find them raided by the cunning kangaroos! lol i reckon they were standing on their tales reaching over the fence and ended up falling on it crushing it... bastards lol
 

wisco61

Member
One thing I would add is to stealth up your chicken wire/other fencing. Either get the green plastic coated stuff, spray paint it something dark, or throw it into a bonfire. New shiny wire really sticks out in the woods.
 
Top