What's new

Snowhigh Seeds

justabluez

Member
Veteran
Tan BD 2 month smpke report

Tan BD 2 month smpke report

My last bit of Tan BD bud......the longest cure so far.....a little over 2 months,...... I cant seem to let it sit.....my favorite smoke......after a couple months...Im tasting a powdered candy kind of fruity taste.....some citrus,.....fruity powdered candy taste.....vapor is full, thick, and spicy......not harsh....very smooth vapor......Im vaping right now.....this bud seems to give me the feeling of summer.....for some reason.......upbeat, bright, optimistic, creative feeling.....sooo smooth.......The buds were quite sticky after a couple months in the jars.....So sticky they felt wet......Make ya wanna lick ya fingers...-n- stuff.....

It smells like old skool weed. light funky....I think I can feel it in the head...and the body a bit.....I feel like a big ass church bell that just got rung...........that vibration.........yup.........me like it........

well....my vape session has ended, and I Dont Need Nooooooo Moooooooeeee!! Cuz I'm BLOWD!!!!:pimp3:
 

herblux

Active member
If you have trouble getting his seeds to pop I'd try to get a hold of him, send him an email. I mentioned it earlier in the thread, I met the guy and I asked him how old his stock was. Since I was concerned that with all his strains, they might be old or hard to pop being landrace types. He told me he'd made them within 6 months or less and I haven't had trouble getting them to pop, even now that it's years later. I wouldn't be surprised if some of his stock at the seed banks has gotten old. Either way I'd send him a message. Tell him you love exotic tropical strains, tell him you had trouble popping his seeds and mention what strain and it's likely he'd get back to you. Unless he has some personal shit, he was in good shape but he's getting old.

I'd make sure the temperature is 80-85 degrees F, very high humidity. In the spring with my regular stuff I start it at 68-75 degrees F, it's actually lower then that but I use a heat mat. It's fine for most regular seed but the landrace stuff probably needs hotter and wetter conditions. If you know how to crack or scuff the seeds, soak in peroxide, do all the little stuff that helps. There's nothing more disappointing then getting genetics you're excited about and getting shutout.

Thank you @therevverend.

I've ordered some of his varieties recently and he told me he's got some health issues (checked - he posted this on insta as well, so since he seems to be public about it, I think it's ok to mention it here).

He mentioned a germination tutorial for his landrace varieties and wrote he'd send it to me, when he's got some energy to do so. So I thought maybe can someone who's received it please post it here? I'm sure he has enough emails to answer and seeds to send out.
This way we might be able to save the man some energy, that he might need to take care of himself.

I want to mention that he has been a pleasure to deal with via email and he was very generous with freebies, which imo justifies the high prices...as well as the massive effort to preserve all these precious genetics while dealing with his health.

Cheers!
 

farm3r

Active member
Thank you @therevverend.

I've ordered some of his varieties recently and he told me he's got some health issues (checked - he posted this on insta as well, so since he seems to be public about it, I think it's ok to mention it here).

He mentioned a germination tutorial for his landrace varieties and wrote he'd send it to me, when he's got some energy to do so. So I thought maybe can someone who's received it please post it here? I'm sure he has enough emails to answer and seeds to send out.
This way we might be able to save the man some energy, that he might need to take care of himself.

I want to mention that he has been a pleasure to deal with via email and he was very generous with freebies, which imo justifies the high prices...as well as the massive effort to preserve all these precious genetics while dealing with his health.

Cheers!


I use the standard soak cup of water over night and then in the moist paper towels inside ziplock bag. Works every time.


But here is copy/paste of SnowHigh's method.


[FONT=Calibri Light, sans-serif]Germinating your seeds[/FONT]


[FONT=Calibri Light, sans-serif]Here is a list of supplies that you'll need: [/FONT]

• [FONT=Calibri, sans-serif]Water for germination[/FONT]
• [FONT=Calibri, sans-serif]Paper or cloth towels to germinate the seeds in[/FONT]
• [FONT=Calibri, sans-serif]Seed Starter Tray[/FONT]
• [FONT=Calibri, sans-serif]A bag of Organic Seed Starting Potting Mix[/FONT]
• [FONT=Calibri, sans-serif]and lastly, a supply of filtered water[/FONT]

[FONT=Calibri, sans-serif]Germination water — if your water comes from a municipal source, it contains oxidants like bleach and chloramines which maintain disinfection of the water in the lines, you can use it. If you use well or filtered water, we recommend adding a disinfectant to kill bacteria, viruses, and protozoans, that are frequently found in un-treated water supplies or reservoirs.[/FONT]

[FONT=Calibri, sans-serif]Use 1 part of 3% Hydrogen Peroxide to 4 parts of water. Alternatively, add 1 part of Laundry Bleach to 20 parts of water. We recommend using a disinfected water to help sanitize the outer shell of the seed. This formula is also beneficial to the seed in that it helps soften the outer layers and activate the seed to start growing.[/FONT]

[FONT=Calibri, sans-serif]Germination paper towels — paper towels provide a clean, moisture wicking environment for the seed to sprout. [/FONT]

[FONT=Calibri, sans-serif]Seed Starter Tray & Organic Seed Starting Potting Mix — there are several types of seed starter trays on the market. We prefer the multi-cell composite trays found at your local garden or warehouse store as they're affordable and easy to source. Along with the trays you'll need a bag of Organic Seed Starting Potting Mix to fill the cells in the starting tray. The potting mix contains beneficial microbes, nutrients, and amendments that seedlings need during this phase of their growth.[/FONT]

[FONT=Calibri, sans-serif]Lastly, you'll need a supply of water that you'll use after the seedling is in a starter pot or in the ground — Unlike the germination water, you’ll want clean filtered water, reverse osmosis or bottled water if your growing in a living soil. [/FONT]

[FONT=Calibri Light, sans-serif]So let's get started![/FONT]


[FONT=Calibri, sans-serif]The first step is the preparation of the seed starting tray. We recommend doing this step first as you want the soil in the trays at an even, damp, moisture level. Fill the appropriate number of trays you'll need with your organic potting mix. With a gentle touch, tamp the soil into each cell, ensuring that there are no voids in the soil. Next, with your filtered water, give the trays enough water to activate the organisms in the starting soil. [/FONT]

[FONT=Calibri, sans-serif]Sproutways seed packs contain both males and female seeds. While some companies provide feminized seeds, our breeders feel that process stresses the resulting plants and it eliminates the possibility of harvesting your own seeds. Generally, the mix of male and female seeds is roughly 50/50. [/FONT]

[FONT=Calibri, sans-serif]Therefore, to get three female plants you'll need to germinate at least six seeds with the hope the 50/50 rule applies. You'll also want to germinate two additional seeds in the event that a plant dies or the 50/50 rules is more like 40/60. With the extra plants, you're able to select the best plants based on health, and structure of branches.[/FONT]

[FONT=Calibri Light, sans-serif]Picking the best seeds to germinate[/FONT]


[FONT=Calibri, sans-serif]While we quality control our seeds before they're packaged, occasionally an immature seed escapes detection. Based on the strain, we either add one or two extra seeds to each pack to ensure you get your ten seeds. [/FONT]

[FONT=Calibri, sans-serif]The color of a cannabis seed varies with the strain. Tannins present in the seed are responsible for the iconic dark color of the seed with contrasting Tiger stripes. However, each strain has different levels of tannins and therefore, different exterior colors. In general, hybrids are lighter in color than landrace or heirloom varietals. So don't worry if the seeds you receive are not dark brown with richly contrasting Tiger stripes.[/FONT]

[FONT=Calibri, sans-serif]Immature seeds are easy to spot in that they will be far smaller and even lighter than the other seeds in your pack. Once again, we quality control all seeds before they're packed so you shouldn't receive one. Nevertheless, if you do, that's why we add extras into each pack.[/FONT]

[FONT=Calibri Light, sans-serif]Germination[/FONT]


[FONT=Calibri, sans-serif]Now that your seed starting tray is prepared, it's time to germinate the seeds you've selected.[/FONT]

[FONT=Calibri, sans-serif]Take a paper towel and fold it into thirds, like a letter, then spray it using the germination water that you prepared earlier so that the paper is evenly moist. Remove any excess water by squeezing or wringing out the paper. With the paper now evenly moist, take your seeds and place them on the paper in the center one-third of the folded paper. Then fold each of the ends over to encase the seeds.[/FONT]

[FONT=Calibri, sans-serif]Important: [/FONT]
[FONT=Calibri, sans-serif]Too much water will drown your seeds. Avoid this common mistake by ensuring that your paper is only moist, not wet, as the embryo is susceptible to mold with excessively high levels of moisture.[/FONT]

[FONT=Calibri, sans-serif]Place the package containing your seeds in a cool, to slightly warm, environment without direct sun. Typically, cannabis seeds germinate best at 78° F (25° C). Lower or higher temperatures can impair germination and growth. [/FONT]

[FONT=Calibri, sans-serif]Important: [/FONT]
[FONT=Calibri, sans-serif]On the outside of the container write, the strain name, date, time, and the number of seeds being germinated. Then set an alarm to remind you to check the seeds in 12 hours for signs of germination.[/FONT]

[FONT=Calibri Light, sans-serif]Inspecting the seeds for signs of germination[/FONT]


[FONT=Calibri, sans-serif]After 12-hours open your container of seeds for signs of germination. You're looking for a taproot emerging from the seed. [/FONT]

[FONT=Calibri, sans-serif]If you don't see any activity, check the temperature to make sure that it's at or near 78° F (25° C) and that the paper towel is moist. If the inside surfaces of your container have visible signs moisture, it's wet enough. Then re-check the seeds every 8-hours.[/FONT]

[FONT=Calibri, sans-serif]If after 48-hours you don't see signs of germination you may need to help the seed break through the shell. First, wash your hands, then take the seed and apply lateral pressure on the seed, similar to opening a pistachio shell, this adjustment will help moisture to enter the seed directly. [/FONT]

[FONT=Calibri, sans-serif]Important: [/FONT]
[FONT=Calibri, sans-serif]Coaxing out the seed is a delicate procedure. The goal is to provide a pathway for the moisture to enter the seed and not to divide the seed in half.[/FONT]
[FONT=Calibri, sans-serif]
[/FONT]
[FONT=Calibri, sans-serif]
[/FONT]

[FONT=Calibri, sans-serif] [/FONT] [FONT=Calibri Light, sans-serif]Transferring the germinated seeds to the seed starting trays[/FONT]


[FONT=Calibri Light, sans-serif]Here is a list of supplies that you'll need: [/FONT]

• [FONT=Calibri, sans-serif]A pair of tweezers[/FONT]
• [FONT=Calibri, sans-serif]Bottled or filtered water [/FONT]

[FONT=Calibri, sans-serif]Now that your seeds are germinated you want to move them into the seed starting trays as soon as possible. In general, transfer the seeds to the starting tray within 12 hours of germination as the taproot has a very fine network of immature roots growing off the main taproot. You want those hair thin roots to grow in soil not grow into your paper or cloth towel. As a rule, we move the germinated seed as soon as we see a healthy taproot emerging.[/FONT]

[FONT=Calibri, sans-serif]Important: [/FONT]
[FONT=Calibri, sans-serif]Be very careful when handling the germinated seed. Using tweezers is a common tool of choice to perform this task. If you're more comfortable using your fingers, that's fine as long as you wash your hands first. [/FONT]

[FONT=Calibri Light, sans-serif]Preparing a nest for the seed to grow[/FONT]


[FONT=Calibri, sans-serif]Using your thumb make an indent about a quarter-inch deep using the side of your thumb. The resulting indent is where you'll place the germinated seed. [/FONT]

[FONT=Calibri, sans-serif]Simply place the seed horizontally in the indent. The taproot will naturally curve the root to pierce the soil. Cover the seed with 1/8 inch (3mm) to no more than 1/4 inch (6mm) of potting mix from the cell containing your seed and then provide 2- to 3-drops of filtered or bottled water directly over the seed.[/FONT]

[FONT=Calibri, sans-serif]Important: [/FONT]
[FONT=Calibri, sans-serif]Don't cover the seed with more than 1/4 inch (6mm) of soil as it increases the potential the seed can't emerge from the soil, and they die. Therefore, just a fine layer of soil is all you need.[/FONT]

[FONT=Calibri, sans-serif]As you plant each seed, add a seedling tag for each location with the same information you wrote on the germination container. Having unique numbers for each seed will make it easier for you to track the seeds in your journal as they grow. For example, let's say seed number 32 needed coaxing for it to germinate, having that information in your notebook will, over time, be helpful.[/FONT]

[FONT=Calibri, sans-serif]Once the seed has been planted in the starter tray, all it needs is light, oxygen, and moisture. Don't add nutrients as the potting mix has everything the seedling needs already.[/FONT]

[FONT=Calibri, sans-serif]Light: keep the starting tray away from harsh/bright light until later in its life. [/FONT]
[FONT=Calibri, sans-serif]Oxygen: having a transparent cover over the starting tray helps regulate the environment in the tray and at the same time provides enough oxygen for the plants early growth. [/FONT]
[FONT=Calibri, sans-serif]Moisture: just as with the germination phase, keeping the soil moist is all it needs. You don't want to soak the seedlings in the starting tray as it can cause mold growth or drown the seedling.[/FONT]

[FONT=Calibri Light, sans-serif]Let's talk about light[/FONT]

[FONT=Calibri, sans-serif]Seedlings need full-spectrum light, either from the sun or from an artificial light source. With sunlight, protect the seedlings from harsh or intense light while it matures. With artificial light, it's far easier to regulate the intensity. [/FONT]

[FONT=Calibri, sans-serif]An advantage of natural light is that you'll see flashes of the mature plants stem color in the petiole (where the leaf connects with the stem). This information can be helpful in the future as you're evaluating the plants. [/FONT]

[FONT=Calibri, sans-serif]Tip: [/FONT]
[FONT=Calibri, sans-serif]While there are various approaches to growing seedling, we've found indirect natural light for the first phase of growth works best. We then transition from natural light to full-spectrum fluorescent light as soon as the seedlings have grown two groups of leaves with one internode between them.[/FONT]

[FONT=Calibri, sans-serif]If you follow our recommendation of switching to full-spectrum fluorescent lights, place the light 6 inches (150mm) above the plant. If the plant grows tall very quickly, lower the light an inch or so as the plant is attempting to gather more energy from the light. After moving the light closer, check the moisture level and increase hydration if warranted.[/FONT]


[FONT=Calibri Light, sans-serif]Transplanting your seedlings into small containers[/FONT]


[FONT=Calibri Light, sans-serif]Here is a list of supplies that you'll need: [/FONT]

• [FONT=Calibri, sans-serif]Small clear plastic cups or small plastic or ceramic pots[/FONT]
• [FONT=Calibri, sans-serif]Organic Seed Starting Potting Mix[/FONT]
• [FONT=Calibri, sans-serif]Moisture meter[/FONT]

[FONT=Calibri, sans-serif]Tip: [/FONT]
[FONT=Calibri, sans-serif]We use clear plastic cups as it's far easier to see root growth, in clear cups, than in traditional plastic or ceramic pots.[/FONT]

[FONT=Calibri, sans-serif]Important: [/FONT]
[FONT=Calibri, sans-serif]Every container, regardless of the material it's made from requires drainage. Use a drill, or another method, to add drainage if there are no holes for the excess water to escape.[/FONT]

[FONT=Calibri, sans-serif]Just as you did with seed starting tray, we recommend preparing your seedling container in advance of when you need them. This way you can activate the microbes in the mix beforehand by watering the potting mix. [/FONT]

[FONT=Calibri, sans-serif]If you're growing outside in natural light, you can continue the same process of keeping the seedlings protected from harsh light. You also need to monitor the moisture levels in the soil. We use a moisture meter to ensure that the plants have enough but not too much water.[/FONT]

[FONT=Calibri, sans-serif]If you're growing indoors under artificial light, continue to use the same light source keeping the light never closer than 12 inches (30cm), from the plant. Use a moisture meter to ensure the plants within the optimal moisture content reading.[/FONT]

[FONT=Calibri, sans-serif]As the plants mature, their root system will develop, allowing the plant to intake additional water. Therefore, as the plants grow, you'll gradually increase the amount of water to each plant. However, add the water needed by each plant versus watering all of the plants the same.[/FONT]

[FONT=Calibri, sans-serif]By monitoring the development of each seedling, you'll see the roots becoming mature enough to withstand their final transplant. We've found the clear plastic cups make this assessment of the root structure far easier and more accurate than in other small pots. [/FONT]

[FONT=Calibri, sans-serif]As a general rule, once the seedlings have grown four or more true leaves (separated by three internodes), you can plant the seedling in the ground or grow pot.[/FONT][FONT=Calibri, sans-serif]
[/FONT]
 
Last edited:

bleepboop

Active member
A couple of tilt shift attempts through a lil magnifying lense of thcvhunter's High Voltage F3's while making f4's (3 females, 2 males).

These are from the pure power plant x acgc99 and not the Mendocino Durban (used in devil's tit etc) x acgc99 which appears to be the 'new' high voltage listed on sproutways.

#3
picture.php


#2
picture.php


And one photo from the same seeds a couple years back.

picture.php
 

bleepboop

Active member
These are from the pure power plant x acgc99 and not the Mendocino Durban (used in devil's tit etc) x acgc99 which appears to be the 'new' high voltage listed on sproutways.

Looked again on sproutways description and there is mention of hash plant aswell as Mendo durb so I might be reaching a bit by having assumed current high voltage stock was remade differently to the original.
 

RenaissanceBrah

Active member
Best landraces that offer a clean, positive high?

Best landraces that offer a clean, positive high?

Any current landraces Snowhigh offers that would offer a clear, clean, positive funcional high?

I've been asking him via IG but don't want to spam him, so wanted to ask on here if anyone has any recommendations from his current November menu
 

farm3r

Active member
@RenaissanceBrah,

Do you have SnowHigh's email address? Don't worry about asking him directly via email because he will response (may take a couple of days).

From my research, anything congo related is clean, clear, social and energetic. SnowHigh has a bunch of cultivars with Congo in it.

Ask him for the latest seed list.
 

RenaissanceBrah

Active member
@RenaissanceBrah,

Do you have SnowHigh's email address? Don't worry about asking him directly via email because he will response (may take a couple of days).

From my research, anything congo related is clean, clear, social and energetic. SnowHigh has a bunch of cultivars with Congo in it.

Ask him for the latest seed list.

Thanks Farm3r, yes I've reached out to him, he seems to respond quicker on IG.

I hadn't considered any Congo's as I heard it was racy / caused paranoia. Is that true?
 

therevverend

Well-known member
Veteran
I hadn't considered any Congo's as I heard it was racy / caused paranoia. Is that true?
I've found Congolese generally to be less racy/paranoid then some other African varieties. There's a lot of variation in Congolese, I've had clear, calm psychedelic effects, coffee-like effects, and cold sweat effects depending on the cultivar. The best advice is to ask Snow, I never cease to be amazed by how he keeps track of so many rare lines.

PS - anyone know how often Snow usually comes out with new gear?
You should check his Instagram page. I just requested his menu, it seems like he's winding down from health issues. It seems to be a last chance for a lot of his stuff. I notice his prices have dropped and he's willing to do more deals for multiple packs etc. His menu is impressive as usual, especially his Mexican landrace varieties.
 

vinrusso

Active member
I wish someone would put about 10 of Mota De Dio's (Snowhigh) strains through Phylos just to show how many will be linked to Vibes Collection, Ace, Mano Negra, USC etc etc.
 

Nexus7

Well-known member
Well if you're happy to finance the project I can provide samples of both USC - CG '72 Gold and Snowhigh - Golden king (50% CG '72).

Snow says his CG '72 line is different to that of the one coming from Crippled Crow and so far I'd be inclined to believe him.

But yeah I think the dalat is from DeeWee and Congo black is the same as others (?LMN) and probably and few more from the vibes collective.

He seems to have some unique stuff though too.
 

justabluez

Member
Veteran
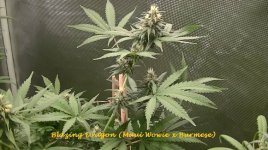
Blazing Dragon (76 Maui Wowie x Burmese).

I finally got a female Blazing Dragon!!! .....I'm determined to get through ALL my Snowhigh Beans before they go BAD !!!!!!......

The Blazing Dragon Female has that Fasciation......fascination......???? mutant look....Seems to be quite healty broad leave looking plant. Does not look like the thin leaf sativa......Not like the Colombians/Mexicans........more on the broad leaf thai side.....no smell yet....

This strain was the male for the TanBD (Tangerine Sky x Blazing Dragon Male)....
Now I think I may try to do (Blazing Dragon Female x (TanBDxAgpd male))...

Next I'll probably try:
- Golden Thai - try to get female
- Golden Dragon - try to get female

I think I like the Mexican/Colombian/Thai combinations.
 

Attachments

  • photo2029351.jpg
    photo2029351.jpg
    68.8 KB · Views: 68

justabluez

Member
Veteran
bd_5921_1.jpg

Snowhigh Blazing Dragon (Maui wowie x burmese).

The Original Blazing Dragon Mom had Faciation, but the clone looks normal.
I really didnt even bother putting the mom in the jar. I hit it with the male Blazing Dragon to make some F2s.
The smoke from the un-cured, and barely dry mom was pretty good. Uplifting day brightener.
I can taste some lemon 7up burn in the vape, but hard to tell with barely dry 1 week old weed...
I made sure I put some pollen in the faciation bud to see what happens.....just curious...
But I think Blazing Dragon has made my cut......Cant wait to try it without seeds to see how it develops....

But I may hit the Blazing Dragon with one of my males (ZacThai or DTHF3).
I dont really like the smell of the Durban Thai x Senegalese x Blazing Dragon.
Smells just like gasoline.....or fuel......
My preference is non-fuel smelling strains......The smoke may be good.....but that gas smell......not for me.....


.
I still have a few snowhigh beans to get through....maybe next I will try Golden Thai or Golden Dragon again.
 

RenaissanceBrah

Active member
Are SnowHigh's Punta Roja's much different to grow from his other Mexican landraces?

Germinating my first landraces, got Punta Roja, Panama Red and Zacatecas x Michoacan (all from Snowhigh) that I've popped 2 weeks ago. One of the Punta Rojas is popping out very slowly, and another one is stretching like crazy... do they need more or less light than the typical Mexican landrace, or any other special attention?
 

justabluez

Member
Veteran
Finally getting the Panama Golds going. They both look quite HAZY. #1 is tall lanky skinny leaf. #2 is a little more bulky. I'll try to document the Panama Gold through flowering.... Still have a few more snowhigh seeds to try, but I seem to be stuck on the Pablos Gold crosses. Panama Gold I believe is either a Pablos Gold F2, or Pablos Gold Mom to Panama Red Dad. Not sure.....

My plan is to mix my Tany F2 with the Panama Gold, Blazing Dragon, TanThaiBD, ZacThai, and Purple Satellite Green Pheno. It seems
that my genetic soup is becoming mostly (Colombian/Mexican/Thai).

Panama Gold #1 (first is the original PG#1 in flower, the other is a clone of PG#1
pg1_100421_1.jpg
image 4852
 

justabluez

Member
Veteran
Panama Gold #1 Smoke Report:

The PG#1 was not grown very well by me. I consider it a "test grow". It was way too small and pulled way too soon.

Having said that: I barely was able to roll one joint with what I harvested. The bud was .purple-ish braidy bud...

Sooo.... I rolled up a joint of the barely dried bud...It was still a bit moist...

Fired that baby up....and I'm tasting fruity/grape/port wine.........nice flavor. Never tasted anything like it....fruity...in the smoke...
The smell..... I cant say that I smelled it.....or maybe it just put me in OUTER-SPACE...
bout 10-20 minutes ago...or so.....
I just feel happy and giddy....and a little floaty....like a balloon......up.....up...and awaaaayyyyy.....in my byu-ta-fu.....in my beu-ta.fullllll balooooooooooonnnn..

hehehehehehehehe
 
Top