What's new
  • Happy Birthday ICMag! Been 20 years since Gypsy Nirvana created the forum! We are celebrating with a 4/20 Giveaway and by launching a new Patreon tier called "420club". You can read more here.
  • Important notice: ICMag's T.O.U. has been updated. Please review it here. For your convenience, it is also available in the main forum menu, under 'Quick Links"!

My DIY LED grow light

vukman

Active member
Veteran
sorry to hear about your friend, sendin well wishes his/her way. Not too bad on costs there. What kind of leds are they? Brand? Wattage?

Thank you A S...thank you very much.. old running mate and..well..for want of a better term...brother. Known him for around 30 years.

The LED's are Chinese no name...I think...there is a chance they might be Epiled but I bought them from a wholesaler who was the one who put the 'star heat sinks' on them. They are all 3W.

I'm an idiot though..:wallbash: :wallbash: :wallbash:

I took those pictures, then I put it all away. After a few hours, I took it out again to work on hard wiring it all together and joining the top and bottom plates permanently.

So, Mr. smart-ass here goes ahead and just wires it all without testing each connection... BOOM!!!!!!, there goes one of the small drivers.

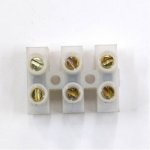
I check what happened figuring there's a short somewhere during my handling the thing.. I unhook it from the terminal block, take a flash light and go over the wires solder joint by solder joint.. I pull everything away from the plate just to be sure and get the reserve one out and hook it up....POW!!! again..

I was hooking up the AC in to the DC out!!!!!!!!!! DOH!!!!!! 2 drivers and now I have to wait a few days for new ones to come...fuck me.. Oh well.....what can ya do... The white lights and blues are working so after I calm down a bit, I'll test the wattage draw on that...

Sorry about that gang...my bad all the way...

Good Luck with all your stuff you've all got going on and please learn from my mistakes...;)
 

Arthritis_sucks

The Dude
Veteran
That blows....pun intended. Live an learn. That ish was bright, ya inspired me. Im on a mission now to build my own, thanks.
 

vukman

Active member
Veteran
It took me about 10 years to learn not to do that and sometimes I forget.

hehe...live and learn...glad to see that it's a condition which goes with the turf and not just me...."whew"...;)

Now seeing the light and it working and all.........seeing that I have to buy new drivers, I am going to get stronger ones for the reds or the 2.4V chips.. even though their numbers are double the number of the blue (something which might be a problem but I can always turn the blue off) the reds are not bright enough.. No where near bright enough to be honest so I am thinking of getting a driver which pushes 700mA..

Any comments or suggestions??
Right now, the 'small' driver is capable of :

The small one can be supply 12pcs 3.4V led,or 20pcs 2.4v led----------min
The small one can be supply 18pcs 3.4V led,or 30pcs 2.4v led----------max

I have 25-630's and 30-660's and the driver is 630mA...advice would be very appreciated before I buy the replacements..

Thank you as always
 

vukman

Active member
Veteran
That blows....pun intended. Live an learn. That ish was bright, ya inspired me. Im on a mission now to build my own, thanks.
hehe,,,yup...blows big donkey dicks!!

Glad to see that you're going to take up the DIY reins...I'm sure you know that any help you may need...there are plenty of us here more than willing to help each other....:)

Good Luck
 

vukman

Active member
Veteran
Hi Gang:

Okay, as promised, I have gone and done some wattage and amperage testing on what is working..:wallbash:<<<<<DOH..I'm such a moron..LOL

So, I have two 'sets' of lights which are operational at the moment which are the whites and blues..The results are as follows:

<added info>...below is the updated wattage and amperage table.....

WHITE-----------------------------71W and 0.59A
BLUE-------------------------------56W and 0.46A
RED(630)---------------------------55W and 0.45A
RED(660)---------------------------DOH..forgot...will get results shortly...
BLUE & WHITE---------------------126W and 1.06A
BLUE & RED(630)-------------------110W and 0.90A
WHITE & RED(630)-----------------127W and 1.03A
BLUE, WHITE & RED(630)-----------183W and 1.51A
BLUE, WHITE & REDS (630 & 660)---228W and 1.91A

Those are averaged out because it jumps up and down -/+ 1-2W and 0.02A
The draw when everything is off was reading 2W and 0.0A.
The voltage was 121V

When I get the replacement drivers..:wallbash:.....I'll post the rest of the results..

Thank you all again..:bow:
 
Last edited:

vukman

Active member
Veteran
So ~ $499 in parts and $1000 in unpaid labor :eek:

Yeah,,imagine that..just what advanced or HGL would charge!!!!!! ahahhaha....LMAO...sorry, I couldn't resist..:D

Nah..I would never charge that much in labour first of all and if I was doing this on a larger scale....the costs would come down substantially..
 

vukman

Active member
Veteran
Oh yeah..sorry.. This is what the top will finally look like when it's all said and done and I get the other fan in there as well..

picture.php


picture.php


As you can see, I tried to balance out the weight evenly....
 

vukman

Active member
Veteran
OKay. the latest update is that by mid next week, I should have replacement drivers for the reds and instead of having them at around 630mA, I ordered 700mA drivers to give them that extra little bit of 'ummmpfffff'....should bump up the lumen/lux of the reds a bit to equal out the substantial difference between them and the whites and blues which run at 3.4V and have an average lumen of around 100lm where the reds are only at 2.4V and around 70-80lm.

More to come and as always,,,thank you all for the comments, criticism and well wishes..:bow:

<added info>..I managed to get the 630 reds going so scroll up to see the wattage and amperage results for everything that is working up until this point..
 
Last edited:

hempfield

Organic LED Grower
Veteran
Can you tell us something about the temperatures ? How warm goes the Al. sheet with all LEDs switched on ? It feels cold, warm or hot when you touch it ?
 

vukman

Active member
Veteran
Can you tell us something about the temperatures ? How warm goes the Al. sheet with all LEDs switched on ? It feels cold, warm or hot when you touch it ?

Hello my friend. I am waiting for the new drivers to come some time this week because I only have 3 of the 4 banks of lights/switches working.

I have also ordered a laser thermometer so I'll be able to get accurate readings on the temperatures. Up until now, I have had the light on for approximately 15 minutes and I felt the back of the plate and fins where it was just slightly warm. Mind you, that was without the fan running either.

I should have all the results in by the end of the week. Sorry it is taking so long but I have a friend in the hospital and that has taken priority over this project...

Thank you as always for following along.......:)
 

analogue

Member
Way to go Vukman.

I would appreciate learning about how your wires are connected to each other in the middle where there is a long white plastic rectangle that looks like a Lego block. What is that, and how does it work?

I'm unfamiliar with ways that wires and stuff can connect outside of the old fashioned twist Nuts .

Thanks!

:tiphat:

p.s. I also don't even know how to set up and use a switch/toggle button. Those 4 switches are neat.
 

vukman

Active member
Veteran
Way to go Vukman.

I would appreciate learning about how your wires are connected to each other in the middle where there is a long white plastic rectangle that looks like a Lego block. What is that, and how does it work?

I'm unfamiliar with ways that wires and stuff can connect outside of the old fashioned twist Nuts .

Thanks!

:tiphat:

p.s. I also don't even know how to set up and use a switch/toggle button. Those 4 switches are neat.


Hi Analogue: I think that the 'big plastic rectangle thing' is called a terminal block if I'm not mistaken.
How it works is if you can picture a metal tube...then there are two screws on either end of that metal tube. You put one wire in one side and tighten the screw. You put the other wire in the other side and tighten the screw. You have now made a solid mechanical connection between the two wires without the need for twisting them or using 'wire nuts'.

If you open any electrical panel, you will see similar items inside the electrical panels but they are usually for the grounds and neutrals as well. Is the case of the one I used, the plastic provides an insulator from the other wires as well as the unit itself.

I hope that makes sense....you can look up 'terminal block' on a search engine (Google) and you should get all the answers you need there.

As far as the switches/toggles go...it is basically two screws underneath the plate where you hook up the wires.

What I did was when I soldered the white LEDs (just an example.. they are all the same), I had one wire going to the positive side of the LED and the other to the negative.

I took the negative wire and ran it directly into the terminal block. The positive wire, I attached one side to one screw on the switch. Then I took another wire and attached it to the other screw on the switch and the loose end I attached into the terminal block next to the negative.

On the other side of the terminal block is the positive and negative which are from the driver. The AC side of the driver is hooked up to a main wire which plugs into the wall socket.

The switch controls the current going to the LEDs thereby turning then on and off.....

I hope that has explained it well enough.. If not, please let me know and I'll try to take some pictures and then edit them in a Photoshop type program.

Let me know....

Good Luck
 

analogue

Member
Informative and educational and thorough. I am sure to use this knowledge going forward, and I'll be able to ruminate on the possibilities in the meantime.

+1:thank you:
 

hempfield

Organic LED Grower
Veteran
Way to go Vukman.

I would appreciate learning about how your wires are connected to each other in the middle where there is a long white plastic rectangle that looks like a Lego block. What is that, and how does it work?

I'm unfamiliar with ways that wires and stuff can connect outside of the old fashioned twist Nuts .

Thanks!

:tiphat:

p.s. I also don't even know how to set up and use a switch/toggle button. Those 4 switches are neat.


The plastic 'lego' block is just a simple connector, used by electricians to join 2 or more wires together. It does not require any soldering, it's easy to use and can run many amps.


There are many types of terminal blocks available on the market, suitable for all king of purposes, for current starting at 1-2Amps and going to hundred of Amps.

And of course, most of them are made in China :biggrin:
 

Attachments

  • regleta_electrica-700x700.jpg
    regleta_electrica-700x700.jpg
    17.7 KB · Views: 29
  • 81IX0056-500x500.JPG
    81IX0056-500x500.JPG
    12.9 KB · Views: 16
  • U-H-F-Type-Terminal-Blocks-Connector-Strips-.jpg
    U-H-F-Type-Terminal-Blocks-Connector-Strips-.jpg
    29.8 KB · Views: 28

vukman

Active member
Veteran
Hi Gang:

Just an update here....The drivers are actually suppose to arrive today. I got the tracking information and the package is here at the airport....just will it pass customs quick enough to make it onto the truck for delivery is the question.

Here is a picture of the size of the light compared to the growing container. You can get an idea of the coverage which will take place...

picture.php


I can't wait to test out the wattage, amperage and then finally, the growing capability of this bad boy...MUHahahahahah.......oopppppppps...Mad Scientist moment again..:D
 

Latest posts

Latest posts

Top