What's new

How-to Hempy (Easy set-up guide for coco hempy bucket)

caregiver77

New member
Here's a beginners guide to Hempy buckets I threw together for some friends. It is by no means definitive or exhaustive.

Anyone who has grown in Hempy buckets will tell you it's a super easy way to grow hydroponically. It combines the simplicity of top-fed soil with the productivity and precision of hydroponic growing. They are also super easy to construct!

Details on how to construct an original-style Hempy can be found here: https://www.icmag.com/ic/showthread.php?t=98419

In this tutorial we will be making a Hempy-style bucket using Perlite and Coco-Coir. Lets get to it!
Materials:
Bucket (walmart $1.50)
Perlite
Coco Coir (I use Bonticare 5kg bricks, about $17 around here)
Drill w/ bit 1/2" or 5/8" work well
Poly tube 3/8" or 1/2" ID depending on what size hole you drill

First hydrate/charge your coco with 1/2 strength nutrient solution. I use 6mL GH Flora Micro, 9mL GH Flora Bloom and 3mL CalMag+ per gallon of water for my full strength nutrient solution, so I dilute this 1:1 with tap water and pH to 5.8. Let your coco soak in the pre-charging solution.
Note: Many people rinse their coco thoroughly before charging, probably a good idea if you are unfamiliar with the brand of coco you are using! Some brands contain very high levels of salt that can be quite detrimental to your plants.

Now lets get the bucket ready.

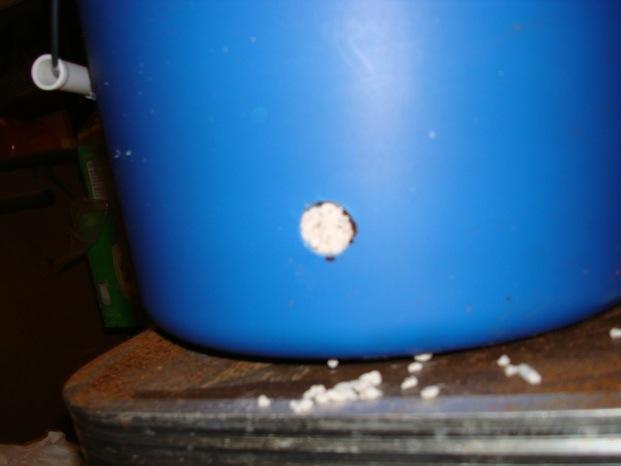
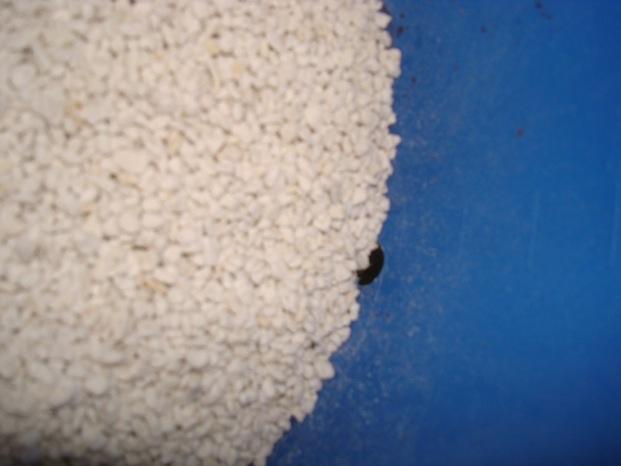
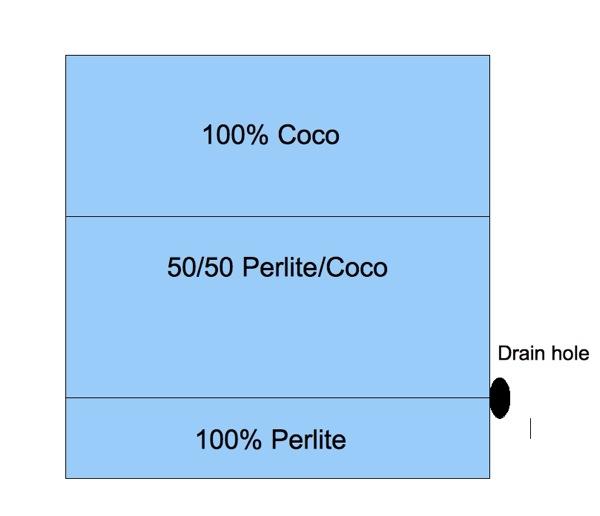
Drill a hole 1½" from the bottom of the bucket
eapgoaacm.jpg

Fill the bucket up to and over the bottom of the hole with 100% perlite.
fapgfaacm.jpg

fapgjaacm.jpg

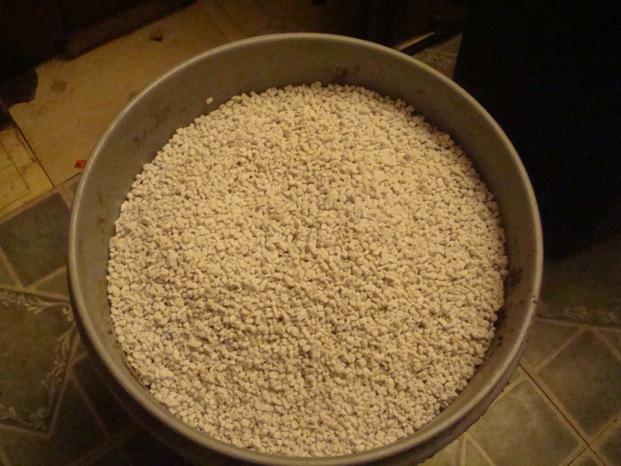
Fill a big bucket or mixing container halfway with hydrated/charged coco
kapgbaacm.jpg

Add an equal amount of perlite and mix up well. This is obviously easier in a shallow container. Storage bins work well.
fapgmaacm.jpg
fapgoaacm.jpg

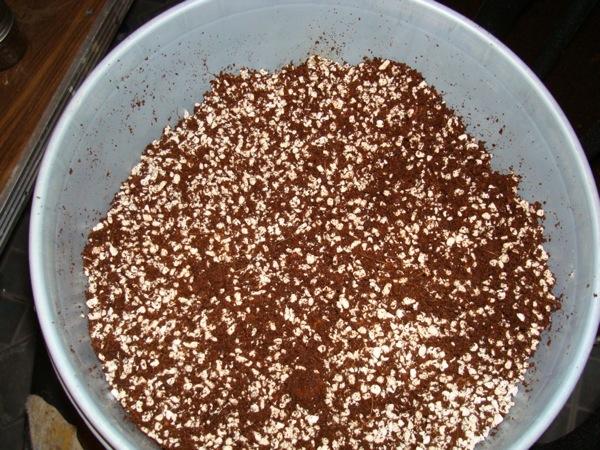
Add the 50/50 mix of perlite/coco so the middle 1/3 to 1/2 of the container contains the 50/50 mix.
hapggaacm.jpg

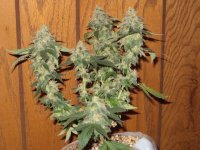
Now it's time to grab your transplants. I have well rooted feminized Bubblicious (Nirvana) here. You can go right in with a rooted plug if you like.
gapgcaacm.jpg

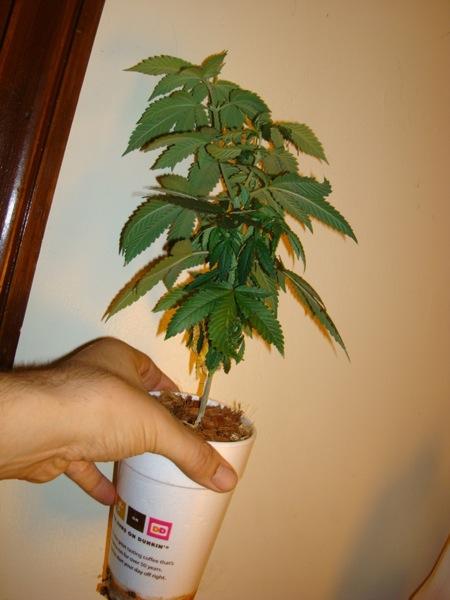
If you have a big transplant like I have, make a dent to fit the root ball. If you just have a rooted plug you can set it right on top or 1-2" above the 50/50 layer.
gapgfaacm.jpg

gapgkaacm.jpg


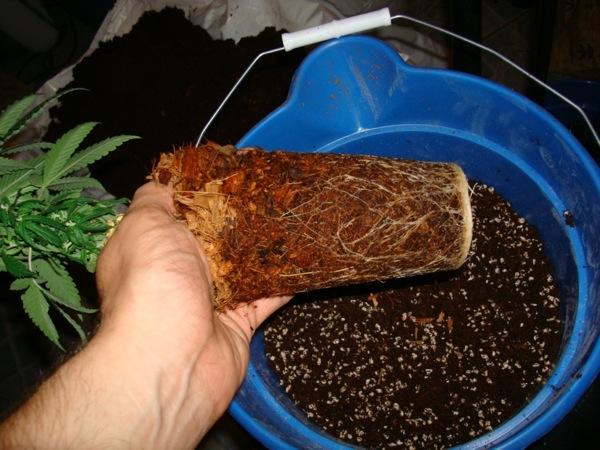
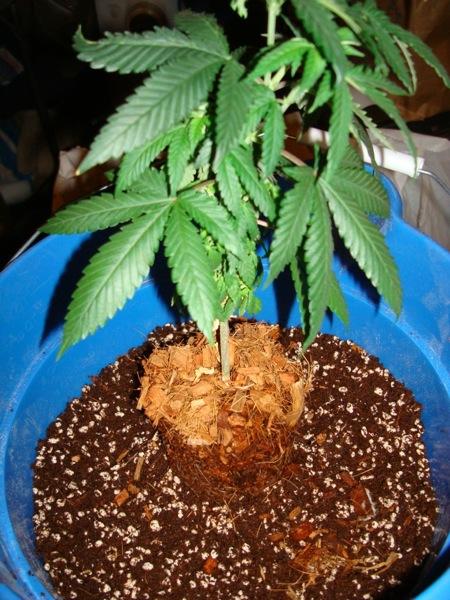
Next fill around your rootball or rooted plug with 100% coco. The extra moisture retention of the 100% coco will help foster lateral root growth and get our girls kickin quick!
gapgoaacm.jpg

hapgdaacm.jpg


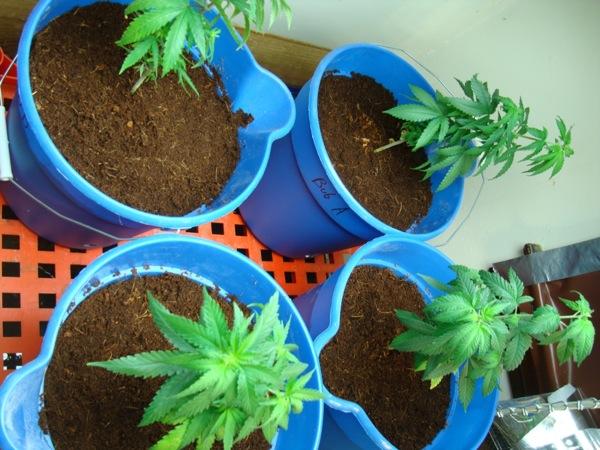
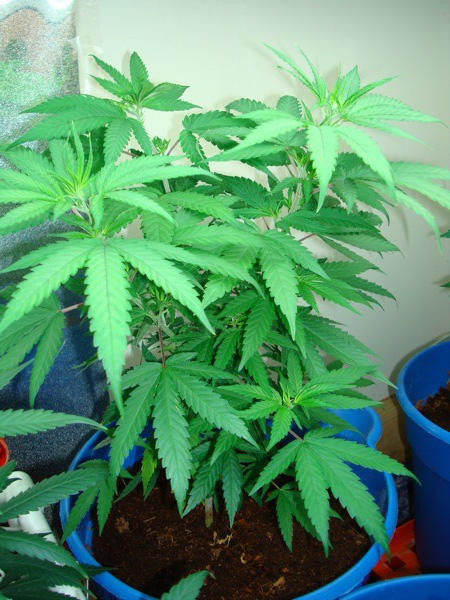
1-2 weeks later, roots have filled bucket, hit bottom and can drink from reservoir. I veg under T5's. Growth from here will be explosive.

mapgkaacm.jpg


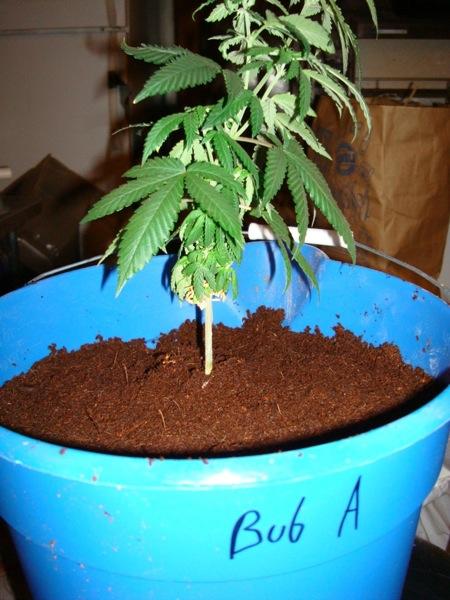
Don't forget to push your hose into the hole you drilled. Position the hose to drain into collection bucket.
 

caregiver77

New member
[FONT=Trebuchet MS, sans-serif]Passive Hydroponics with Internal Reservoir (Hempy Bucket)[/FONT]
[FONT=Trebuchet MS, sans-serif]Strain:[/FONT]
[FONT=Trebuchet MS, sans-serif]Medium: Bonticare Coco-Coir / Perlite[/FONT]
[FONT=Trebuchet MS, sans-serif]Nutrients: GH Flora Series Micro and Bloom, Calmag+[/FONT]


[FONT=Trebuchet MS, sans-serif]General Guidelines[/FONT]
[FONT=Trebuchet MS, sans-serif]Nutrient Regime[/FONT]
[FONT=Trebuchet MS, sans-serif]Base Formula (per gal. H2O) : 6mL GH Micro, 9mL GH Bloom, 3mL CalMag+ [/FONT]

  • [FONT=Trebuchet MS, sans-serif]Seedlings/Clones (until 4 sets of leaves): feed Base Formula at ½ strength[/FONT]
  • [FONT=Trebuchet MS, sans-serif]Vegetative Growth: feed Base Formula at full strength[/FONT]
  • [FONT=Trebuchet MS, sans-serif]Flowering weeks 1-6: feed Base Formula at full strength[/FONT]
  • [FONT=Trebuchet MS, sans-serif]Flowering weeks 7-8: feed ONLY 9mL GH Bloom per gallon H2O[/FONT]
  • [FONT=Trebuchet MS, sans-serif]Flowering week 9 (flush): feed tap water pH'd to 5.8[/FONT]
[FONT=Trebuchet MS, sans-serif]Regime provided is only a guideline and should be adjusted to your plants needs.[/FONT]


[FONT=Trebuchet MS, sans-serif]Feeding Instructions[/FONT]
[FONT=Trebuchet MS, sans-serif] To start, clones will have to be watered very lightly every day. Irrigate carefully just around the base of the small plant. This needs to be done until the roots reach the bottom of the bucket. Roots should begin taking solution from the bottom of the bucket within 4-5 days. This will become apparent as the bucket begins to get lighter.[/FONT]

[FONT=Trebuchet MS, sans-serif] At this point you can start regular feeding. Carefully measure nutrients and mix well with tap water. Shake your bottles very well before opening. [/FONT][FONT=Trebuchet MS, sans-serif]Always mix GH Micro into water first. Always pH balance nutrient solution to 5.8 before feeding.[/FONT]

[FONT=Trebuchet MS, sans-serif] With a watering can or milk jug slowly pour your nutrient solution into the bucket just until it begins to trickle out your drain tube. Then, pour about 30% more nutrient solution in, allowing excess to drain out through tube. Repeat irrigation when medium top is dry and the bucket is lighter; 1-4 days depending on stage of growth and room temperature. It is not ideal to let the internal reservoir dry out completely. Drooping leaves can indicate either over- or under-watering, so adjust your irrigating accordingly.[/FONT]

[FONT=Trebuchet MS, sans-serif] Every two weeks flush with straight tap water before regular feeding. Slowly poor about 1 gallon of tap water through the bucket, allow it to drain. After the flush, feed as you regularly would according to the nutrient regime.[/FONT]
 
G

Graham Purwatt

i've found that it takes less watering with something in the bottom up to the hole then straight coco to the top,i have to water once every 4th day.no need for the perlite.i use sunleaves rocks or hydroton up to the hole then a mix of piece and classic coir.yields are up and the girls love it.h3ads coco recipe all the way through.good tutorial though
 

caregiver77

New member
Thanks Graham, I'll give that a try. I have some piece coir and hydroton. I've tried straight piece in the bottom with very poor results, having to transplant.

I've tried several different combination of medium in hempys. For me this set-up produces the most even and well distributed root ball so far.
 
A

argoagro

Awesome tutorial! Do you save your 'hot cups' from your ice coffee as well? I've got a stack of 'em going ;)
 

stonedar

Macro-aggressor
Veteran
there is no need to try to replicate the wet/dry cycle that plants prefer in soil in either a coco hempy or a perlite based hempy.
it works you can do it, you can let your plants dry between waterings. it's just not as high performance as watering everyday. if you want to water less while the roots are getting to the res, fine. but after plants are growing fast/roots have made it to the res.
you will see an increase in growth if you water everyday with full strength nutes.

caregiver77 what kinda stoner logic did you use to get to layering coco - coco/perlite mix like that? does it seem to help? I run straight coco, with perlite in the res chamber. coco like the classic coir from sunleaves, not the peice coir. I am sure a mix of the two textures of coir would be better than what I use. I cannot see the advantage to your layering method. People have tried it (layering) in soil grows for years and in their minds it always was an improvement but you won't find anyone who grows food or flowers in a commercial setting doing that. A proper draining mix is all they need, it's all we need.

perlite or hydroton in the bottom
3:1 perlite:vermiculite or 1:1 coco/perlite or straight coco in the top for me no layers
 

caregiver77

New member
It's a combination of stoner logic and stoner observations. :tongue:

I'm not trying to replicate wet/dry cycles at all. The coco wicks solution up from the reservoir, creating a root zone more even than what I've experienced with perlite/vermiculite combinations. I use 50/50 in the middle because I want better drainage than 100% coco provides. I like the 100% coco at the top because I've found it to improve lateral root growth and the speed of transplant recovery (always growing vigorously the next day for me). Perhaps my logic is flawed, perhaps my observations are biased. Wouldn't be the first grower to succumb to this.

The hempy bucket's reservoir allows you to go longer between irrigating. I didn't mean to imply to let the reservoir run out completely. I will fix that on the sheet. Thanks for pointing that out! If there is anything else that anyone feels should be clarified/corrected please let me know, I always appreciate input :tiphat:

I wouldn't recommend this method (or any hempy bucket) for commercial food or flower production. It's geared towards medical patients looking to grow a few high quality plants on the cheap.
 

caregiver77

New member
Awesome tutorial! Do you save your 'hot cups' from your ice coffee as well? I've got a stack of 'em going ;)

Haha hell yeah. I take em out of the trash at work too! My lady drinks at least one a day so I've got a pretty good cache of mini 0.2 gallon pots! haha!

Dunkin Donuts supports the medical marijuana community in RI. HA!
 

caregiver77

New member
Thanks ZZ

I've not personally tried an air stone in the rez but have read about others who have. I believe the general consensus is an airstone provides no additional benefit.

It might be worth a try just as a lark at some point in the future.
 
G

Graham Purwatt

the mix i like best is 1 big block of the sunleaves piece coir to 2 small bricks of the classic.with the rocks in the bottom when you finish with it you can pull it out knock off the few remaining rocks clinging to the underside of the rootball and throw it under the mower and no perlite all over the yard.i got so sick of cleaning perlite i love doing it this way,pretty easy.plus the rocks "add silica" supposedly,i've seen no real benefits from the rock other than they are cheap and give you something under the coco to keep it from being soggy all the time.but i've been doing it this way for a while and its been better to me than perlite
 

I.M. Boggled

Certified Bloomin' Idiot
Veteran
Hempy buckets simply work simply

Hempy buckets simply work simply

ZZTop, Could you share with us what exactly did you gleen from that 9 page thread that you linked above that would be interesting and relevant to this discussion of these coco hempy buckets?????

Aeration of the hempy reservoir? No thank you, been there, done that, it causes the buckets to dry out too rapidly and defeats the design concept of KISS (keep it simple stoopid). :)
I could see that perhaps in a less than optimal environment ( too cold? and humid?), where ones coco never seems to dry out, then perhaps some timer regulated air pump action would be of benefit, although I'd just deal with my environmental shortcomings at that point.
Did some more reading as well and found that same answer in most threads including the original. I still think it a very beneficial to the roots so I looked on...

Check this thread out...

https://www.icmag.com/ic/showthread.php?t=12653

400W HPS Scrog - 1Plant - 450gr Harvest

Using air stones...

Crazy Read as well...


You know what "they" say, "different strokes for different folks", me, I have found that a Hempy bucket will perform amazingly well with a perlite bottom filled to just pass the reservoir hole with the remainder being 100 percent coco peat (ones gotta believe... pure coco does work, and well).
For nutrient solution, 1 teaspoon (7 grams) per (tap-water) gallon of General Hydroponics Maxibloom dry one part works great with these Hempy bucket setups. Some Indicas like a wee bit more.
I pay about $11 us dollars a kilo for the maxibloom, so one gets alot of bang for their nutrient buck.
When this Ph adjusted solution is run to waste it makes for a relatively fool proof method, despite the fact God keeps creating bigger and better fools. ;>) :)
I recommend this growing technique to anyone that can appreciate true no-brainer simplicity.
"It's a beautiful thing" as my girl Martha likes to say. :)

In most hands GH nutrient products perform very good to excellent, no b.s. miraculous claims in their marketing scheme, they don't have to lie (much) to sell product.
It's geared towards medical patients looking to grow a few high quality plants on the cheap.
caregiver77, this a very well done tutorial, thank you for sharing it with us all.

IMB :)
 
Last edited:

caregiver77

New member
Thanks IMB, I'm going to pick up some MaxiBloom and see how it works. I've always been hesitant to use powdered nutrients, but I think it's time to get over my prejudice. Ha!

Do you supplement the MaxiBloom with cal-mag in coco mediums?

100% coco runs i've done with different ratios of sunleaves piece and bonticare bricked coco perform well, but my mixes with perlite constantly outperform. My set of data is incomplete and not large enough to draw scientific conclusions, but I've heard of others with similar experience.

https://www.icmag.com/ic/showthread.php?t=108257
 
You know what "they" say, "different strokes for different folks", me, I have found that a Hempy bucket will perform amazingly well with a perlite bottom filled to just pass the reservoir hole with the remainder being 100 percent coco peat (ones gotta believe... pure coco does work, and well).
For nutrient solution, 1 teaspoon (7 grams) per (tap-water) gallon of General Hydroponics Maxibloom dry one part works great with these Hempy bucket setups. Some Indicas like a wee bit more.
I pay about $11 us dollars a kilo for the maxibloom, so one gets alot of bang for their nutrient buck.
When this Ph adjusted solution is run to waste it makes for a relatively fool proof method, despite the fact God keeps creating bigger and better fools. ;>) :)
I recommend this growing technique to anyone that can appreciate true no-brainer simplicity.
"It's a beautiful thing" as my girl Martha likes to say. :)

In most hands GH nutrient products perform very good to excellent, no b.s. miraculous claims in their marketing scheme, they don't have to lie (much) to sell product.

caregiver77, this a very well done tutorial, thank you for sharing it with us all.

IMB :)

I'm with you completely on the 1 teaspoon (7 grams) per (tap-water) gallon of General Hydroponics Maxibloom with Hempy Buckets. I used to run this with Expanded Clay Pellets only in 2.5 gallon Hempy's, and it worked great. Now I use the same solution in simple 5gal DWC Bubblers with a whole lot of airpump. The DWC are working great too. I'm running AK48 at 8 weeks veg , 8 weeks flower under 1200watts, and growing some of the best weed ever. Hempy's and Bubblers are both real easy if you can control your room environment.
 

ZZTops

Active member
Veteran
ZZTop, Could you share with us what exactly did you gleen from that 9 page thread that you linked above that would be interesting and relevant to this discussion of these coco hempy buckets?????


Well... IMB, first off I gleened it's 17 pages long..."-)

One plant, one pound in a Hempy style tub is impressive...

Used rockwool at first then coco on the later grows for it's properties...

If adding an air stone helps ( especially with organics Nutes ) I'm all for it since that's how I roll..."-)

It's all Kool as there's a lot of wisdom in the Kiss Theory...

But I always heard it was Keep It Simple Stoner..."-)
 
C

Carl Carlson


It would be better choice if you used a uniform mix throughout, even in a Hempy style bucket. The idea of using a separate layer on the bottom of either a standard container with drain holes on the bottom or a bucket with a single hole on the side is flawed.

To be clear, the Bucket is not flawed, just this choice of medium.

The bucket in it's simplicity is awesome.

Just put a damn hole in it! lol

But back to the flaw. It's all about the perched water table.

Even though this was written with standard containers in mind, the tech still applies. Just think about the layering again:

Container Soils and Water Movement in Containers
There is, in every pot, what is called a "perched water table" (PWT). This is water that occupies a layer of soil that is always saturated & will not drain at the bottom of the pot. It can evaporate or be used by the plant, but physical forces will not allow it to drain. It is there because the capillary pull of the soil at some point will equal the GFP; therefore, the water does not drain, it is "perched". If we fill five cylinders of varying heights and diameters with the same soil mix and provide each cylinder with a drainage hole, the PWT will be exactly the same height in each container. This is the area of the pot where roots seldom penetrate & where root problems begin due to a lack of aeration. From this we can draw the conclusion that: Tall growing containers are a superior choice over squat containers when using the same soil mix. The reason: The level of the PWT will be the same in each container, with the taller container providing more usable, air holding soil above the PWT. Physiology dictates that plants must be able to take in air at the roots in order to complete transpiration and photosynthesis.

A given volume of large soil particles have less overall surface area in comparison to the same volume of small particles and therefore less overall adhesive attraction to water. So, in soils with large particles, GFP more readily overcomes capillary attraction. They drain better. We all know this, but the reason, often unclear, is that the PWT is lower in coarse soils than in fine soils. The key to good drainage is size and uniformity of soil particles. Large particles mixed with small particles will not improve drainage because the smaller particles fit between the large, increasing surface area which increases the capillary attraction and thus the water holding potential. Water and air cannot occupy the same space at the same time. Contrary to what some hold to be true, sand does not improve drainage. Pumice (aka lava rock), or one of the hi-fired clay products like Turface are good additives which help promote drainage and porosity because of their irregular shape.

Now to the main point: When we use a coarse drainage layer under our soil, it does not improve drainage. It does conserve on the volume of soil required to fill a pot and it makes the pot lighter. When we employ this exercise in an attempt to improve drainage, what we are actually doing is moving the level of the PWT higher in the pot. This reduces available soil for roots to colonize, reduces total usable pot space, and limits potential for beneficial gas exchange. Containers with uniform soil particle size from top of container to bottom will yield better drainage and have a lower PWT than containers with drainage layers. The coarser the drainage layer, the more detrimental to drainage it is because water is more (for lack of a better scientific word) reluctant to make the downward transition because the capillary pull of the soil above the drainage layer is stronger than the GFP. The reason for this is there is far more surface area in the soil for water to be attracted to than there is in the drainage layer.
 

zor

Active member
It would be better choice if you used a uniform mix throughout, even in a Hempy style bucket. The idea of using a separate layer on the bottom of either a standard container with drain holes on the bottom or a bucket with a single hole on the side is flawed.

Are you speaking from experience here? The article you cited doesn't really apply to hempy buckets with an internal resevoir imo.

Also, the instructions from hempy himself and other succesful grows has been a layer of perlite on the bottom.. I had some great success with this that surpassed 'regular' coco grows.
 

Latest posts

Latest posts

Top