
gingerninja
Member
Last month I stumbled across IC looking for a Cannabutter recipe for my first attempt at making edibles (experiment went horribly, my 2nd batch with a billion times the bud in it is in the fridge right now). The friendly mood and atmosphere of just that '7 Easy Steps' post pulled me further into these forums so, as I'm prone to do with all my spare time, I began to browse...
...I saw people talking about becoming self-sustaining smokers with just some mylar, an old PC case, and a pile of light bulbs and I became very intrigued so I began to do some research...
...and now, after almost a week of more cruising these forums than sleep I'm ready to subject myself to your constructive criticisms.
*DISCLAIMER* I am no artist. I also haven't done any CAD tinkering since the 10th grade so consider your eyeballs warned.
I submit to you my SketchUp of an NGB inspired stealth cab.
The whole thing is intended to fit into my roommate's old dresser, which is actually taller on the inside than the opening in the face (hence the lack of a top to my box), and supply the 3 of us that live here with at least enough bud to lighten our habit's impact on our wallets, if not supply us the 2-3oz a month we consume. I'm going to strip the faces off the existing drawers and glue them to a door stained to match.
From Top -> Bottom, Left -> Right you'll find: Utilities/Supply Room, Flowering Room, Drying Chamber, Clone/Vegging Room.
Utilities/Supply Room: This room has a 10w Commercial Air Pump which has 4 outlets, 3 of these outlets will run the SWCs/Bubble Cloner and the 4th I intend to run around the cabinet supplying air flow across the tops of all the plants in the cab (same way having a small fan blowing on them would. It'll be 1/4" aquarium tubing...or 3/16...not entirely sure if the ID of your tubing needs to be smaller than your outlets? Q: will this be enough air flow to encourage strong growth? All ventilation is handled by 120mm PC fans so this line is literally just to blow across the tops and encourage air flow through the cab). There's also going to be an old PC PSU up here with its motherboard connector clipped so it can run all the fans in the case. A master power bar with 2 x Digital Timers (one for 18/6 and one for 12/12) sits up here, and is an internal source of power for all the electronics and lighting arrays in the cab. It alone leaves the cabinet and plugs into the wall. Lastly, the actual clearance of this shelf is to the top of the cork board at the very back not the plywood walls, which I'm hoping is enough space to store my nute bottles and a hydrogemeter in. Q: Could someone please measure the vertical height of a quart and possibly a gallon container of nutes and tell me how tall it is?
Flowering Room: I'm going to run 2 x 2 Plant SWCs a la ScrOG method and put them on each of the sliding shelves you see (that's what the 11x10 chunk of wood on the rail-like thingy is...again, I'm no artist/CAD expert). I'll have them each under their own CFL lighting array that will each be 2 reds (5100/5500) and 1 blue (2500/2700(?)) on 12/12. A 120mm PC fan pulls the air out of the top of this chamber (ensuring it pulls all the warmest air). The holes cut into the back of this chamber are all placed to minimize light that could leak through holes cut into the Vegging and Drying chambers.
Drying Chamber: The Drying chamber has a rack (2 x 11" 1x1s with twine stapled between them at even intervals) that slides out, allowing easier access when clipping your bud up/taking it down. At the bottom of it some holes are drilled to allow cool air from under the dresser to flow up into the chamber. I've placed this chamber at the bottom because, as I understand it, bud is best cured in 65-75F, which is closer to the temp a Vegging room should be than the air above the flowering room would be. (Q: Is this right? if not I can rearrange the components so that the drying chamber is up top with the utilities) Lastly, at the very back of the chamber a rectangular vent is cut to allow the air that comes into the Drying chamber to be pulled out of it through the carbon scrubber at the top of the cab.
Clone/Vegging Chamber: This room holds a Bubble Cloner under a simple 1 red/1 blue CFL lighting array that runs on 18/6. The cloner will serve double as an SWC for Vegging the clones in until they are big and strong enough to go up into the Flowering Chamber. Now I hope to get my Hydro Bonsai Mother (which I will be growing as per zenoonez's advice in this thread versus my crude drawing in the same thread) into this chamber too but I suspect she won't fit into the space I've provided (could someone confirm/debunk that?). A 120mm fan pulls the warm air at the top of this room out into the 'ventilation column' at the back of the cab. The holes in the back of this chamber are placed such that minimum/no light can leak into the Drying of Flowering chambers (At least it looks to me like that'll be the case, anyone disagree?)
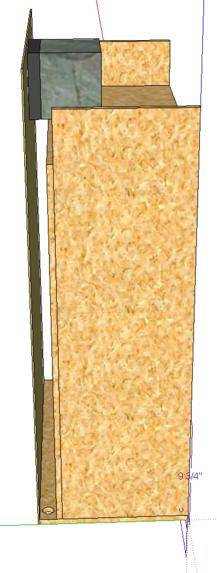
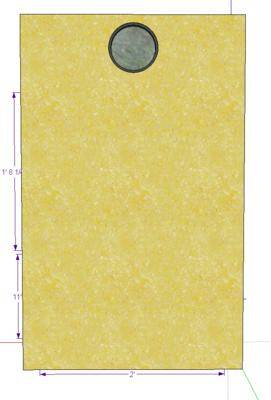
Side View
Back View
This is the corkboard back of the existing dresser, the carbon scrubber (mimicking Suga's design) is attached to this, leaving only one exit point for the air in the cab with the door closed. A 120mm computer fan pulling air through the scrubber should create negative pressure in the case so that air is pulled from the bottom of the drying chamber out the top of the dresser. (Q: Is this enough? I know PC fans have a problem pulling through scrubbers, would I be safer building another one and running both? Presumably at this point I still have room for 4+ more fans on the power supply so this is easily doable.)
 So, I just went to take a shot from the back with 'x-ray' turned on so that you could see how I intend to run my air and power lines...turns out I haven't saved in the past day and my computer just restarted . Looks like it's over to the redrawing board for me for awhile.
In the meantime you guys look this over and let me know if my dimensions and design are all sound. Questions, Comments, Critiques...Go!
P.S Sorry about the length of this post, as I continue/finish I'll tweak it so it reads more like a tutorial instead of a litany of fully-baked ideas and questions.
...I saw people talking about becoming self-sustaining smokers with just some mylar, an old PC case, and a pile of light bulbs and I became very intrigued so I began to do some research...
...and now, after almost a week of more cruising these forums than sleep I'm ready to subject myself to your constructive criticisms.
*DISCLAIMER* I am no artist. I also haven't done any CAD tinkering since the 10th grade so consider your eyeballs warned.
I submit to you my SketchUp of an NGB inspired stealth cab.
The whole thing is intended to fit into my roommate's old dresser, which is actually taller on the inside than the opening in the face (hence the lack of a top to my box), and supply the 3 of us that live here with at least enough bud to lighten our habit's impact on our wallets, if not supply us the 2-3oz a month we consume. I'm going to strip the faces off the existing drawers and glue them to a door stained to match.
From Top -> Bottom, Left -> Right you'll find: Utilities/Supply Room, Flowering Room, Drying Chamber, Clone/Vegging Room.
Utilities/Supply Room: This room has a 10w Commercial Air Pump which has 4 outlets, 3 of these outlets will run the SWCs/Bubble Cloner and the 4th I intend to run around the cabinet supplying air flow across the tops of all the plants in the cab (same way having a small fan blowing on them would. It'll be 1/4" aquarium tubing...or 3/16...not entirely sure if the ID of your tubing needs to be smaller than your outlets? Q: will this be enough air flow to encourage strong growth? All ventilation is handled by 120mm PC fans so this line is literally just to blow across the tops and encourage air flow through the cab). There's also going to be an old PC PSU up here with its motherboard connector clipped so it can run all the fans in the case. A master power bar with 2 x Digital Timers (one for 18/6 and one for 12/12) sits up here, and is an internal source of power for all the electronics and lighting arrays in the cab. It alone leaves the cabinet and plugs into the wall. Lastly, the actual clearance of this shelf is to the top of the cork board at the very back not the plywood walls, which I'm hoping is enough space to store my nute bottles and a hydrogemeter in. Q: Could someone please measure the vertical height of a quart and possibly a gallon container of nutes and tell me how tall it is?
Flowering Room: I'm going to run 2 x 2 Plant SWCs a la ScrOG method and put them on each of the sliding shelves you see (that's what the 11x10 chunk of wood on the rail-like thingy is...again, I'm no artist/CAD expert). I'll have them each under their own CFL lighting array that will each be 2 reds (5100/5500) and 1 blue (2500/2700(?)) on 12/12. A 120mm PC fan pulls the air out of the top of this chamber (ensuring it pulls all the warmest air). The holes cut into the back of this chamber are all placed to minimize light that could leak through holes cut into the Vegging and Drying chambers.
Drying Chamber: The Drying chamber has a rack (2 x 11" 1x1s with twine stapled between them at even intervals) that slides out, allowing easier access when clipping your bud up/taking it down. At the bottom of it some holes are drilled to allow cool air from under the dresser to flow up into the chamber. I've placed this chamber at the bottom because, as I understand it, bud is best cured in 65-75F, which is closer to the temp a Vegging room should be than the air above the flowering room would be. (Q: Is this right? if not I can rearrange the components so that the drying chamber is up top with the utilities) Lastly, at the very back of the chamber a rectangular vent is cut to allow the air that comes into the Drying chamber to be pulled out of it through the carbon scrubber at the top of the cab.
Clone/Vegging Chamber: This room holds a Bubble Cloner under a simple 1 red/1 blue CFL lighting array that runs on 18/6. The cloner will serve double as an SWC for Vegging the clones in until they are big and strong enough to go up into the Flowering Chamber. Now I hope to get my Hydro Bonsai Mother (which I will be growing as per zenoonez's advice in this thread versus my crude drawing in the same thread) into this chamber too but I suspect she won't fit into the space I've provided (could someone confirm/debunk that?). A 120mm fan pulls the warm air at the top of this room out into the 'ventilation column' at the back of the cab. The holes in the back of this chamber are placed such that minimum/no light can leak into the Drying of Flowering chambers (At least it looks to me like that'll be the case, anyone disagree?)
Side View
This is a side view. I've left a gap between the back of the cab and the back of the existing dresser. I plan to use this gap to run wires/tubing but mainly it is there to assist with airflow. All of the chambers vent directly into this "wet wall" and, as you can see, the carbon scrubber should work effectively at emptying the air in this column thus pulling fresh air in the bottom. The little hole at the bottom is to run the cord for the master power bar out and into a wall outlet.
*I just noticed there's no dimensions on the y axis in this view so just FYI the cab is 13" from the front to the very back and that gap I've left for airflow is 2", leaving a depth of 11" for all of my chambers.*
*I just noticed there's no dimensions on the y axis in this view so just FYI the cab is 13" from the front to the very back and that gap I've left for airflow is 2", leaving a depth of 11" for all of my chambers.*
Back View
This is the corkboard back of the existing dresser, the carbon scrubber (mimicking Suga's design) is attached to this, leaving only one exit point for the air in the cab with the door closed. A 120mm computer fan pulling air through the scrubber should create negative pressure in the case so that air is pulled from the bottom of the drying chamber out the top of the dresser. (Q: Is this enough? I know PC fans have a problem pulling through scrubbers, would I be safer building another one and running both? Presumably at this point I still have room for 4+ more fans on the power supply so this is easily doable.)
So, I just went to take a shot from the back with 'x-ray' turned on so that you could see how I intend to run my air and power lines...turns out I haven't saved in the past day and my computer just restarted . Looks like it's over to the redrawing board for me for awhile.In the meantime you guys look this over and let me know if my dimensions and design are all sound. Questions, Comments, Critiques...Go!
P.S Sorry about the length of this post, as I continue/finish I'll tweak it so it reads more like a tutorial instead of a litany of fully-baked ideas and questions.
*'Works' Cited*
This design was inspired by the following threads. Thank you to the OPs and contributors in each of them.
ALL ABOUT BONSAI MOMS/MUMS - HOWTO: Bonsai Mother
Anti's MicroStealth Cab Design - inspired my airflow design
Cheap DIY Drying Trunk - made me realize I'd have to cure my harvest
In-Depth SCROG Method - HOWTO: ScrOG
Marijuana Stealth Cabinet (NGB) - Because who wasn't inspired by this?
micro carbon scrubber - model for my carbon scrubber
Step by step bubble cloner setup - model for my cloner/vegging swc


