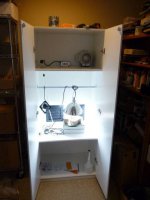
What's new

150w HPS Club and Resource Guide......

C

Cozy Amnesia

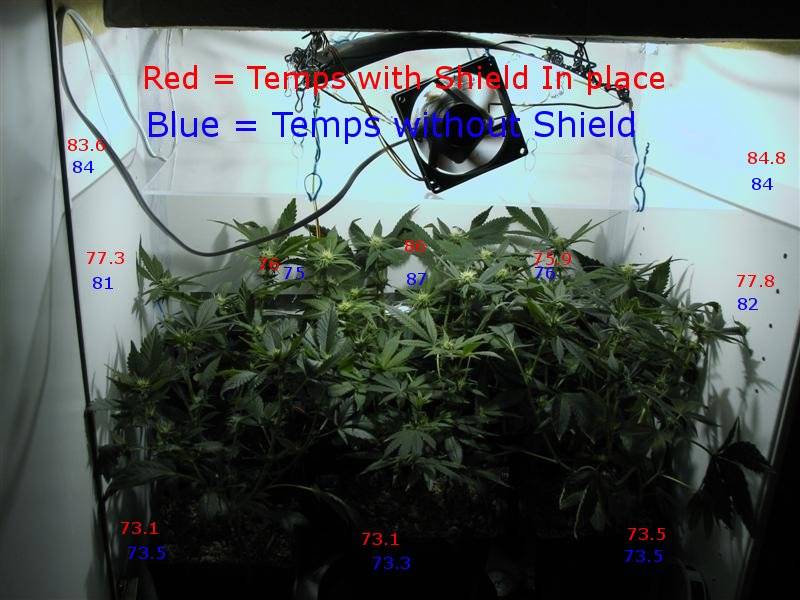
Thanks Cozy, she has about 4 weeks to go???

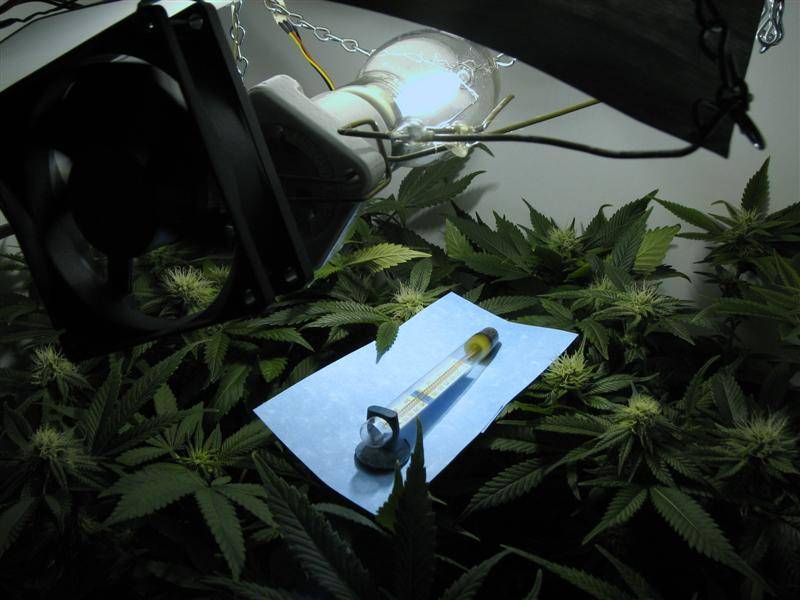
That's a dope ghetto hood you fashioned there - hat's off. Is that how close you usually have the lights?

Well that pic was taken soon after installing the reflector and this is the first time I'm using the 150w without a cooltube, so I'm experimenting until I find out how close I can get it.
 

Barnt

Member
Heat Shield Corrections

Heat Shield Corrections

Until recently, my previous investigations had lead me to believe that heat shields worked and would help prevent heat build up. This can true in some situations and in fact was so in one of my former setups. The shield had provided a proper path for airflow and allowed the heat to be exhausted rather than re-circulated in my computer case. This previous thought of needing a heat shield partially influenced me to continue this trend.

Recently, I found the other evidence I thought I had that was pro heat shield is now flawed. Ignoring all the numbers first, you can clearly see in the picture below that the light is deflected by the shield at the edges of the cabinet. The light that is being reflected and not being sent below the shield is now being reflected above the shield. That is why the edges of the cab above the shield is brighter while below is lighter; as in shield is reducing effectiveness of the light by bouncing it upwards in the wrong direction.

Now to the numbers. As retarded as it sounds, I previously only had used my temperature gun to check the temperature of the two side walls only. I figured that the temperature difference seen above and below the shadow of the shield would maintain under the entire shield. Last night though I ended up taking more temperature points as you can see in the picture below. What can be concluded from this is fairly simple. Directly under the light bulb (where I previously never checked temperature--utter failure I know) where the light would pass through the shortest distance in the shield, the shield did very little, if nothing. On the sides though, the angle between the light and the shield would make the light pass through a greater distance in the shield. This caused the light to be bounced upward of the shield while reducing the light under the shield. This skewed my results of only testing the sides of my cab. With more light being reflected upward, and less downward, of course the top will be hotter than below (making me think the shield was working). Now without the shield, you can see the temperatures are much more linear and consistent to what you would think.

IMG_5711_Medium_1.JPG


This led me to my second experiment of the night. I decided to directly use an analog temperature gauge to see the differences directly below the light. While the fish tank temp gauge reads a few degrees high normally, I think the black lead base absorbs more heat and thus reports the temp for that color. Green does not absorb as much heat and thus my previous temps of ~86F from above seem accurate. I also used the temperature gun to read the thermometer by placing it in the hole of the sensor for another measurement. Results below.

IMG_5739_Medium_.JPG


I did the tests twice to make sure they were accurate. Average for the temperature with the shield was 97.5F on the fish thermometer and 84.4F with the temp gun. Without the shield the temperature with the shield was 97F on the fish thermometer and 85.5F with the temp gun. So if anything, the shield might help a little, but I would account the differences as just caused by uncertainties.


CONCLUSION:
So as I said before, in some situations a heat shield might be good to direct air flow and remove heat more efficiently. In my situation, I have good airflow with fans all pointing upward aiding in airflow direction. I have lots of intake along with a good fan. There is no need for a heat shield for me. It has been removed as of last night and will never go back in place. I feel bad about being so adamant in spreading the word on heat shields, hopefully this will help some people make a better choice :wallbash:


A few notes: Temperatures were very dependent on where I shot with the gun. I used an average of the temps that looked good. Also ambient for the first picture was 70.8 and my room was cooling and by the end of the tests it had dropped to 68 by the second. My heat shield was plastic, but I would imagine glass will act similarly.
 
C

Cozy Amnesia

Good analysis Barnt! That proves a lot of growers around here who say that you can cool a bulb by blowing a fan on it as much (or almost as much) as you can cool it with a air-cooled reflector or cool-tube.

When I had my cooltube in place, I still needed to have a fan blowing over the cooltube because it would get hot in the middle if otherwise (hurricane lamp, don't use them they suck). Now I just have a reflector with a fan blowing on the open-air bulb. I can't say temps aren't worse, they are, but that's from all the CFL I added I'm sure. I can place my hand under the HPS to feel how hot it is and it's just the same as when it was in a cooltube. That tells me that I can get the bulb the same distance to the plants with or without a cooltube.
 
Nice work Barnt, I have 1 of those aquarium thermometers and tried it myself - about 40 c it was showing resting on the canopy. I'm glad you saw sense, as 150's don't throw out enough lumen's to light bleach. I v'e seen bulbs in cool tubes 1 inch away with no probs; therefore radiant heat/lumen's is of no concern, as long as one adjusts ambient temperature around the bulb which can be achieved with just a pc fan (in my case). Moreover, plastics and glass love to absorb the blue end of the spectrum, while allowing infra-red to pass - as those who have experienced the phenomenon known as "Truckers arm" will testify. As you know HPS is already lacking in blue light, so we could do with every last ray! Some Greenhouse's are now built with fused quartz, or Synthetic fused silica glass, which is a transparent glass with an ultra-high purity and improved optical transmission in the deep ultraviolet.
The guy at my local hydro store tells me a little heat stress (around 28/30) is good for it, and promotes more resin ;)

Cozy you're growing in coco right? You've got to try this Headmaster - or as it's know in Aussie: Black magic bud. getting some fast bud growth here!
 

IndianHay

Member
My box is f hot with 150w mh. What else can i do except to throw all away? My box is 44x49x90cm with two 120mm holes in the bottom and one 1x120mm hole with 28-40cfm fan. The temps are really high. You think it will help if i mount two fans on each side of the reflector to suck air from hot lamp to higher position in the box? The main heat is under the light, higher position in the box is much cooler. I dont know if the law that hot air lifting higher is not in my box?
 

Pipedream

Proudly Growing My Own Since 1969
Veteran
:rasta:

Just because "hot air rises", it does guarantee that the top of your box or cabinet will be the hottest point. Many factors affect the various ambient temperatures within a given space. While the temps at the uppermost regions of some cabinets may reach well into the 90's, I assure you if you could take an accurate reading just a 1/8 of an inch away from your 150w HPS bulb it would likely be well over 250 deg-f. Don't believe me? Try putting a drop of water on it and watch it instantly vaporize.

In spite of the various temperature points inside an enclosure, the very-top still remains the single best point to evacuate air from. This is true for several reasons...it assures there are no trapped air pockets; it does remove the warmest average air; it helps to eliminate a continuous cycle of reheating the same air which can be additive; and assuming your intakes are at the bottom, it assures a complete turn over providing cooler denser air rich with O2.

Placing fans in a SEALED enclosure can help to even out the ambient temperatures. However, there is no way that they will lower them. The only way to lower the temperature is to either generate less BTU's (heat) or remove them from the enclosure. This is why so many experienced cabinet and greenhouse growers continously stress the importance of increasing the size and volume of your air input and exhaust.

And keep in mind, given a constant heat source, the smaller the space is, the greater the heat build-up will be.

:rasta:
 

rebo

Member
Quick Intro.

Quick Intro.

Just wanted to say hey to everyone..
I'd like to join the 150W HPS club.. I've been lurking on this board for a while now, reading and learning.. I think I got one of the last 150w econo lights available a couple of months back.. I've mostly finished my cabinet, it's not 100% light proof yet but I couldn't wait to grow so I got some lowryder2 and lowryder2 x ak47 x blueberry, and am growing that now. The cabinet is from Home Depot. The dimensions are 2'x3'x6' and is divided into 3 compartments. Once I get off my duff and lightproof it I will have a veg/clone, a flower chamber, and a utility chamber from bottom to top respectively. I remote ballasted the econo-light and have it running in a bake-a-round cool tube. I am using fox farm nutes, and I have 3 lovely females and just pulled 3 males. I used the pollen from one of the males and brushed it onto the flowers of my lowryder2. It looks like I'll get some seeds now. I have some pictures that I will post as soon as I'm allowed. Anyways.. greetz to everyone in the 150w HPS club!
 

IndianHay

Member
Pipedream: ty for the answer! I¨ve add two fans on the top of hood, so they will push hot air from bulb directly in the upper section of the box and then will the exhaust fan suck that hot air quicker :D if that still not be enough i will drill another hole at the upper section and add another 120mm fan. :D thx another time!
 
C

Cozy Amnesia

IndianHay, don't forget to make sure your intake is big enough. It should at least be as big as the exhaust or bigger to be on the safe side.
 

rebo

Member
A couple of pics of my grow and cab

A couple of pics of my grow and cab

I know how everyone likes pics.. so here's a couple of pics of my Lowryder2 grow and cabinet. The LR2 plant is about 14 inches tall and is starting to get frosty and has a nice skunky sweet smell to it.

I hope to figure out how to put these pictures right in the message body instead of attachments.. if anyone knows how and wouldn't mind sharing the info with me I'd sure appreciate the help.
 

Attachments

  • P1010396 - LR2 Flower In Cab.jpg
    P1010396 - LR2 Flower In Cab.jpg
    32.6 KB · Views: 8
  • P1010353 -LR2 Flower.jpg
    P1010353 -LR2 Flower.jpg
    38.3 KB · Views: 15
  • P1010326 - LR2 Babies.jpg
    P1010326 - LR2 Babies.jpg
    33.7 KB · Views: 12
Nice rebo, You might want to get a reflector and lose the cool tube though - if temps aren't a problem.

I think you have to get a certain amount of posts before your pics come up on the message rather than attachments, I don't like it either. I thought you became a member after 75 posts? Does anyone know when you can put a custom avatar?

*walks away to spray plant with sparkling spring water*
 

rebo

Member
Thanks Divine Cosmos. Yeah a reflector is definitely in the works for my cab. It's all still a work in progress.. I just couldn't wait to finish the cab before
I started growing lol ..
 

henri abreu

New member
Hello to all..

As you guys can notice, i'm new around as a writer but i've been reading a lot.
I just have a couple of questions..
It will be a grow room of 56W x 43D x 70H (cm) with a 150HPS.. everything already here. My doubts stands for the home made carbon filter (wich size or carbon weight) and for the exaust fan (what kind and how many CFM). I was thinking of a 10cm exaust Linear Axial kind of fan with an aprox. 95CFM but I'm pitch black regarding the carbon filter.
If there is another option for my exaust system, it'll be gladly accepted and please help me about the filter.
Thanks a lot in advance.. take care you all!
 
You've got a small space so you're going to need some hefty extraction. I'll recommend you get one like mine: 100mm In-Line Centrifugal Fan, 1 Phase.
187 M3/hr @ Free Flow or 110 cfm.

IPx4 Rated

56 watts, 2500 rpm, 0.24 amps, 45 dB(A) @ 3mtr

I have wired a fan speed adjuster on mine and I turn it down to about 25%
growing in 75 75 100 (cm) tent. I have no probs with temps running it that low.

Then just get yourself a 100m carbon filter.

Have you got enough room for a filter?
 

henri abreu

New member
Hi Divine cosmos, thanks for the quick answer..
well, I was aware about a hefty extraction for that space.
I dont know if I can get one 100mm centrifugal fan around here.. just ordering online.. I can get a 100 or 120mm tube-axial (you might be thinking that I live in the mountains.. well.. haha I can say so :/). Anyway, I was into this 150hps cabinet for a very low cost until I can move to a bigger one.
I'll try to find something near that centrifugal 100mm in-line fan.

You said:
Px4 Rated

56 watts, 2500 rpm, 0.24 amps, 45 dB(A) @ 3mtr

I'm sorry but I didnt understand it, could you explain it?

I want a speed controler but those that I worked with, when moving a little bit the whell, the fan will stop working.. I dont know how to get one that I can adjust the speed without big problems.

Regarding the carbon filter... the space I have inside the cabinet is that.. Outside on the back I have the same width and height but different depth - 150mm, that is the space that I want to put the ballast, the extractor (insulated somehow, at least some dB's decreased), and some other stuff, usual to hide stuff.
Oh, and I got around 500gr of super-activated carbon bought in a pet store.. the guy told me that it was super-activated and bla bla ble... So as I got the carbon and dont want to spend that much, I was into some home made filter.

Thanks again for your time!
Kind regards

EDIT: I wanted to say tube-axial fan
 

DiscoBiscuit

weed fiend
Veteran
Hello to all..

I was thinking of a 10cm exaust Linear Axial kind of fan with an aprox. 95CFM but I'm pitch black regarding the carbon filter.

The designs thread has many options for DIY scrubbers. I happen to like the scrubber made from mesh pencil holders. These work well for micro grows but aren't particularly "sized."

http://www.icmag.com/ic/showthread.php?t=48949&highlight=mesh+pencil+holder


If you plan to size your scrubber, here's some info that will help you calculate barrel length in accordance with your intake diameter.

http://www.icmag.com/ic/showthread.php?t=31679&highlight=dummies

What ever you do, get a fan with an intake flange. It will make it easy to attach the scrubber air tight.

I want a speed controler but those that I worked with, when moving a little bit the whell, the fan will stop working.. I dont know how to get one that I can adjust the speed without big problems.
You're not using a light dimmer are you? Not the same thing. A speed controller can be had for as little as $15.00 from harborfreight.com. I think it is for pole motors and is advertised as a "router" speed controller. Check the type of fan motor you're getting for compatibility. A variac controller is about $45.00 and wont cause the fan motor to hum. I've got the cheap controller but you can't hear the hum with the cab door closed.
 

rebo

Member
I want a speed controler but those that I worked with, when moving a little bit the whell, the fan will stop working.. I dont know how to get one that I can adjust the speed without big problems.


Being a noob here myself I was hesitant to reply, but I do have some info that you may find helpful so I thought I'd share..
I'm using a ceiling fan speed controller with my solar & palau duct fan. The ceiling fan controller is digital (important for me) and it has a low, med, and high setting and it looks like a wall switch. It works beautifully and induces little to no motor hum. I tried a Harbor Freight router controller, but it induced a lot of motor hum in my fan..I hear that the router speed controllers work beautifully with lots of other fans though, so no disrespect meant.. For my purposes the ceiling fan speed control switch works beautifully, and Home Depot had them for like $15 bucks. I'm attaching this picture of my cabinet. On the top shelf you can sort of see the ceiling fan switch laying on it's side near the round fan.
 

Attachments

  • P1010188 - cabinet opened.jpg
    P1010188 - cabinet opened.jpg
    21 KB · Views: 12
I'm using a ceiling fan speed controller with my solar & palau duct fan. The ceiling fan controller is digital (important for me) and it has a low, med, and high setting and it looks like a wall switch. It works beautifully and induces little to no motor hum.

Nice little cabinet!

Couple of q's:

1) Do you have a link or name for the particular speed controller you are using?
2) Why did you feel it necessary to control the speed of the fan? Is it too loud as is? If it's the TD-100, it's the exact fan that is waiting to be plugged into my cab-in-progress.
3) Why is your utility room so large?

Bork
 

rebo

Member
Nice little cabinet!

Couple of q's:

1) Do you have a link or name for the particular speed controller you are using?
2) Why did you feel it necessary to control the speed of the fan? Is it too loud as is? If it's the TD-100, it's the exact fan that is waiting to be plugged into my cab-in-progress.
3) Why is your utility room so large?

Bork

Hey Bork thanks man..

1. The ceiling fan controller I'm using is this one: http://www.homedepot.com/webapp/wcs...Id=10053&productId=100391275&N=10000003+90054
it was actually $19 and change.. not $15 as I stated earlier.. my bad..

2. I bought the TD-125 fan (which in hindsight was a mistake because of the 5 inch flange) I bought it though because of the cfm... I wanted to be as stealthy as possible.. my thinking was that with the higher cfm I could tune the speed down and still have acceptible airflow while making the fan even quieter. it's not totally silent but it is pretty quiet considering the airflow I have but unfortunately the whoosh of the air can still be heard.

3. The utility room is a fixed size, due to the way the cabinet all screws together. I could've modified the panels and made it smaller but for my needs it works ok for now. once I start mothering and cloning in the lower part of the cabinet I will most likely use the utility room for storage etc..

I just got a canfilter 2200 and plan on installing it this weekend.. I am going to have the filter on the outside of the cabinet and hopefully make it serve a dual purpose, as a filter and as a muffler to try to stifle that last bit of air whoosh sound, and to clean up some of that delicious skunky musky smell.. It's getting noticeable throughout other areas of the house, and I can't have that..

-Rebo
 

Latest posts

Latest posts

Top