
You are using an out of date browser. It may not display this or other websites correctly.
You should upgrade or use an alternative browser.
You should upgrade or use an alternative browser.
G
Guest
Update 8-26
Update 8-26
I started my grow thread.
I'll be starting on prepping the area the flowering unit is going to be built in this weekend, so more pics & notes will be forthcoming. My least favorite part is going the be the first - cleaning & disinfecting the area. YUCK!!!
The cats are going to be very unhappy - the bathtub I'm about to take over is one of their favorite hangouts. Too bad!
G
Guest
Starting on Flowering Garden
Starting on Flowering Garden
I'm getting started on building the flowering unit.
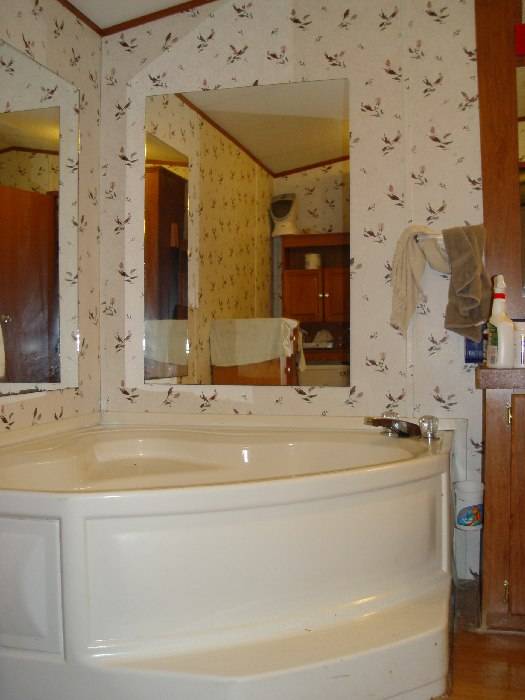
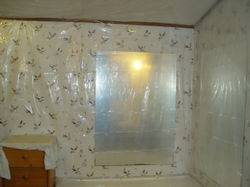
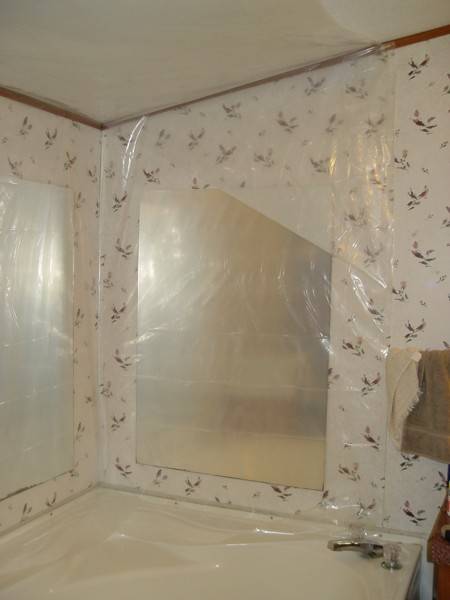
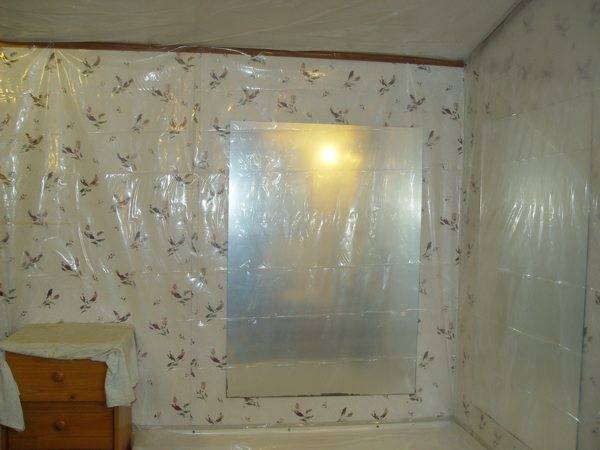
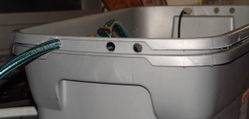
First, here are pics of the bathtub I'm building the garden on. This is a shot of the corner
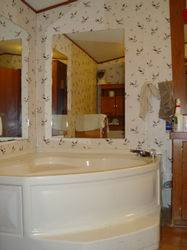
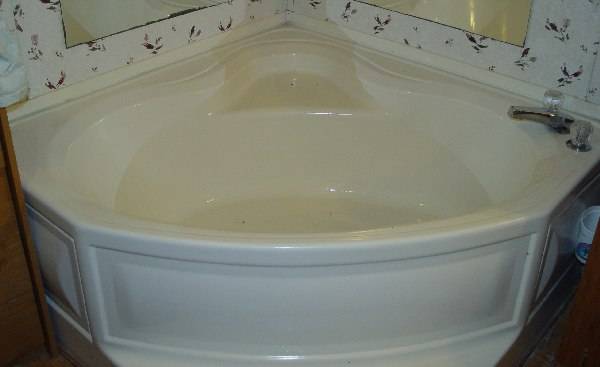
And here is a shot of the tub itself.

A rough diagram of the tub

The tub is basically 53" square with the front corner rounded off. The "sides" are about 23". I'm planning to make a garden on top of the tub that is the full 53" wide, 26" deep, and about 54-56" tall.

This will give me just over 8 sq ft of grow space. I don't want the garden to completely cover the tub because I'm going to have the reservoir inside the tub and I'll need to access it for maintenance. Also, if I made the garden too deep, I wouldn't be able to reach in to the back of the space to train the plants.
Initially, I'll be using a bank of 4' fluoros for grow lights. My 400 watt HPS light iis not air cooled and I just don't have enough available height to run it without cooling. Luckily, the case has glass already in place, so all I should need to do (all?) is cut a hole for the intake, another for the exhaust, and figure out how to hook up the ducting. The real trick is going to be cutting holes in the case without bending it out of shape so much that it won't fit back together.
The ceiling is slanted above the tub; it's 63" at the back and 67.5" at the front of the planned garden unit. I need to leave room for the air scrubber & fan on top, which limits the grow height even more.
I need to put up plastic for the moisture barrier in the entire corner area and put insulation in against the walls & ceiling to help prevent hot spots from showing on the outside (security). I don't want to do these until I have the PVC cut and ready to assemble - this is one of the cats' favorite hangouts and if I put those up before I have the garden ready the insulation will get used as a scratching post.
Like the mother unit, I'll be using PVC pipe for the framework of the garden and cover it with Reflectix insulation. I'll use a heavy duty shower curtain liner from walmart on the outside to keep the mylar on the Reflectix from being obnoxious.
More later!
Starting on Flowering Garden
I'm getting started on building the flowering unit.
First, here are pics of the bathtub I'm building the garden on. This is a shot of the corner
And here is a shot of the tub itself.
A rough diagram of the tub

The tub is basically 53" square with the front corner rounded off. The "sides" are about 23". I'm planning to make a garden on top of the tub that is the full 53" wide, 26" deep, and about 54-56" tall.

This will give me just over 8 sq ft of grow space. I don't want the garden to completely cover the tub because I'm going to have the reservoir inside the tub and I'll need to access it for maintenance. Also, if I made the garden too deep, I wouldn't be able to reach in to the back of the space to train the plants.
Initially, I'll be using a bank of 4' fluoros for grow lights. My 400 watt HPS light iis not air cooled and I just don't have enough available height to run it without cooling. Luckily, the case has glass already in place, so all I should need to do (all?) is cut a hole for the intake, another for the exhaust, and figure out how to hook up the ducting. The real trick is going to be cutting holes in the case without bending it out of shape so much that it won't fit back together.
The ceiling is slanted above the tub; it's 63" at the back and 67.5" at the front of the planned garden unit. I need to leave room for the air scrubber & fan on top, which limits the grow height even more.
I need to put up plastic for the moisture barrier in the entire corner area and put insulation in against the walls & ceiling to help prevent hot spots from showing on the outside (security). I don't want to do these until I have the PVC cut and ready to assemble - this is one of the cats' favorite hangouts and if I put those up before I have the garden ready the insulation will get used as a scratching post.
Like the mother unit, I'll be using PVC pipe for the framework of the garden and cover it with Reflectix insulation. I'll use a heavy duty shower curtain liner from walmart on the outside to keep the mylar on the Reflectix from being obnoxious.
More later!
Secret Room
Member
Ambre I wish you lived in the SE instead of SW. It sure would be nice to have some help. I'm just getting back from Lowes with 1.25" 10' long pvc hanging out of my compact car, had to make two trips. I'm using the SnapTure connectors to put together my light stand because I can't drill any holes in the walls or ceiling. I need to start a thread like yours with a progress report & pictures.
Fantastic!!!!!
G
Guest
Isaack & Farmer John - thanks for the compliments. Planning is fun. I also hate to have to re-do things, so I try to do them right the first time. The more pre-planning I do, the more I'll catch potential problems and can prevent them instead of having to fix them.
Secret Room - I'm not real deep in the SW; not too awfully far from Dallas, actually.
If you can't find the 3-way and 4-way connectors you need to assemble your PVC, try this website: A to Z Supply That's where I got mine. No need to glue the connectors on - they stay just great. As a matter of fact, taking the frame apart can be a problem!
1" to 1.5" PVC is strong enough to make a frame for hanging almost any light and you can use it as a support for your reflecting material (kind of like tent poles...). I used 1" PVC for the mothers garden & I'm using 1.5" for the flowering garden. The longer the pieces of PVC, the more flexible it will be. Unlike wood, it doesn't absorb moisture or give insects a place to hide. It's easy to clean and disinfect and you can paint it if needed.
1/2" PVC is great for small areas (mother plants, cloning, etc). I have a small garden in the kitchen using 1/2" PVC that has catnip & herbs in a small ebb & flow system. That way, if someone comes in the house and smells plants, I have an obvious source in plain sight (the odor from the garden can spread when I'm working on the garden - the ventilation system can't properly scrub the air when the door is open).
When you are measuring your PVC, remember to take the depth of the connectors into consideration. Depending on the diameter of the PVC, the connectors add about 1" to 1.5" to the length. The PVC fits inside the connector about 1" on the end. Measure the overall length of the connector and subtract from that the length that the PVC will go inside to get the "real" length the connector adds to the measurements.
For example, if you need your framework 60" tall and you will be using two 3-way elbows (one at the top & one at the bottom), the elbows will account for about 2" of the height, so you would only cut your PVC 58" long.
Good luck and let me know when you start your build thread! Feel free to ask questions if you need help.
G
Guest
More Flowering Garden
More Flowering Garden
I started the work on the flowering garden Sunday.
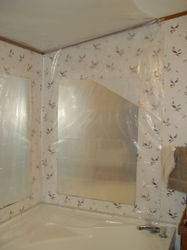
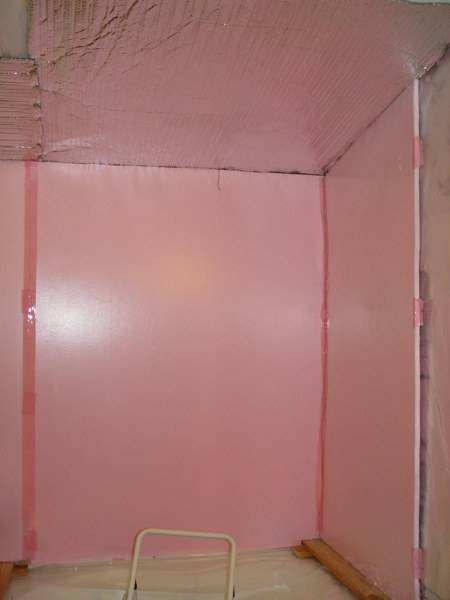
First, the area was cleaned and disinfected. Then I removed some unnecessary trim from around the tub to recover about 1/4" of room on the rim.
I put up a layer of 6 mil plastic drop cloth as a moisture barrier. The drop cloth is held up using a light-duty staple gun. After finishing putting it up, pieces of waterproof plastic tape were put over the top of each staple to make sure it wouldn't rust. I removed the screw mounts from the mirrors, but the dummies who put them in also glued them to the wall! What a way to ruin good wallboard.
Since the reservoir is a bit taller than the tub, I used some scrap pieces of 1"x4" to make a spacer to raise the garden frame above the top of the reservoir.
After placing the spacers in position, I measured and cut the styrofoam insulation for the walls.
NOTE: I put the ceiling insulation up last - it would have been easier to put that up first.
Here is the insulation on the back wall

Here is the insulation placed on the side wall

Here is the ceiling insulation

You can see the wood spacers in place at the bottom of the insulation on the rim of the tub. This will raise the base of the garden 1.5".
I also measured & cut all the PVC pipe for the framework of the garden today. I didn't figure anyone really wanted to look at a picture of a pile of pieces of 1.5" PVC pipe, so I didn't bother taking one.
That's it for today. I took some time to watch part of tonight's Nascar Cup race between bouts of working on the garden (hey, it's a holiday weekend - I can waste a couple of hours, can't I? )
)
More updates Monday night!
More Flowering Garden
I started the work on the flowering garden Sunday.
First, the area was cleaned and disinfected. Then I removed some unnecessary trim from around the tub to recover about 1/4" of room on the rim.
I put up a layer of 6 mil plastic drop cloth as a moisture barrier. The drop cloth is held up using a light-duty staple gun. After finishing putting it up, pieces of waterproof plastic tape were put over the top of each staple to make sure it wouldn't rust. I removed the screw mounts from the mirrors, but the dummies who put them in also glued them to the wall! What a way to ruin good wallboard.
Since the reservoir is a bit taller than the tub, I used some scrap pieces of 1"x4" to make a spacer to raise the garden frame above the top of the reservoir.
After placing the spacers in position, I measured and cut the styrofoam insulation for the walls.
NOTE: I put the ceiling insulation up last - it would have been easier to put that up first.
Here is the insulation on the back wall

Here is the insulation placed on the side wall

Here is the ceiling insulation
You can see the wood spacers in place at the bottom of the insulation on the rim of the tub. This will raise the base of the garden 1.5".
I also measured & cut all the PVC pipe for the framework of the garden today. I didn't figure anyone really wanted to look at a picture of a pile of pieces of 1.5" PVC pipe, so I didn't bother taking one.
That's it for today. I took some time to watch part of tonight's Nascar Cup race between bouts of working on the garden (hey, it's a holiday weekend - I can waste a couple of hours, can't I?
)More updates Monday night!

G
Guest
Flower Garden Continued
Flower Garden Continued
As promised, more work done.
Immortal - Hey, gotta get my Nascar fix! Only one more race until the Chase for the Cup; it's getting close!
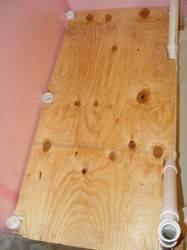
Today I put together the base section of the garden so I could mark the notches I needed to cut for the shelf that will support the plants. After cutting the notches, I brought the shelf inside to make sure they were the right size before I painted it.
Both the shelf for the bottom & for the top of the unit have been painted and are on my front porch drying. They were painted with 3 coats of white Kilz 2, a latex sealer/base coat that is effective against mildew and mold. Nice sealer and good reflectivity.
Here is the front view of the base with shelf.
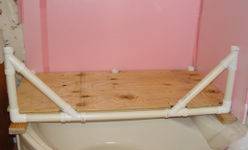
The angle pieces in the corner of the front are to strengthen the frame. I will be placing a vertical support in the center of the back of the garden, but I didn't want to put a vertical support in the front because it would restrict my getting inside to work. Angle pieces will be going in the top corners, as well.
Here is a top/side view of the base with the shelf
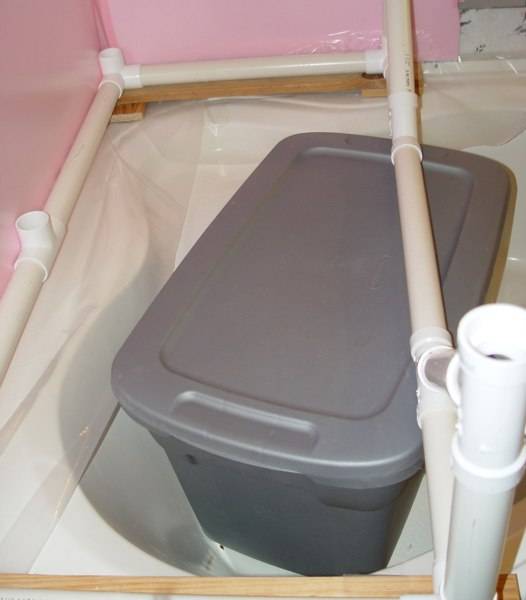
I also placed the reservoir into the tub under the base to make sure it fit right (I'd rather find out now than after I finish everything!) I also made sure that there was enough room for me to stand in the tub and be able to access the garden easily.
Here's a front view. You can see the spacer boards at each side that raise the frame up high enough to fit over the reservoir.
The cat is Angel and he's one of the ones who is going to be really unhappy when he can't play in the tub any more! He's about a year old; I rescued him when he was about 5 weeks old. I named him Angel because the black section down his back looked like a pair of wings folded closed over his body.

Here's a side view

Here is the reservoir with the exposed section of the lid marked.

I'm trying to decide if I want to cut the lid along that line and put some type of hinge on it so I can easily open & access the inside of the reservoir. The other option I'm considering is cutting a fairly good-size hole in the lid and using a plug of some type to cover it.
The outlet from the pump inside the reservoir will be on the side of the reservoir to the right. There will be a "Y" connector with on/off switches coming off the pump; one side will feed the garden and the other side will be used to drain the reservoir when it's time to change it out. I have a second pump that will be used to fill the reservoir from the tubs the RO water is stored in. The RO unit is just too slow to try to use it to fill the reservoir, so I'll be running water & storing it in smaller tubs to be available when needed.
Flower Garden Continued
As promised, more work done.
Immortal - Hey, gotta get my Nascar fix! Only one more race until the Chase for the Cup; it's getting close!
Today I put together the base section of the garden so I could mark the notches I needed to cut for the shelf that will support the plants. After cutting the notches, I brought the shelf inside to make sure they were the right size before I painted it.
Both the shelf for the bottom & for the top of the unit have been painted and are on my front porch drying. They were painted with 3 coats of white Kilz 2, a latex sealer/base coat that is effective against mildew and mold. Nice sealer and good reflectivity.
Here is the front view of the base with shelf.

The angle pieces in the corner of the front are to strengthen the frame. I will be placing a vertical support in the center of the back of the garden, but I didn't want to put a vertical support in the front because it would restrict my getting inside to work. Angle pieces will be going in the top corners, as well.
Here is a top/side view of the base with the shelf

I also placed the reservoir into the tub under the base to make sure it fit right (I'd rather find out now than after I finish everything!) I also made sure that there was enough room for me to stand in the tub and be able to access the garden easily.
Here's a front view. You can see the spacer boards at each side that raise the frame up high enough to fit over the reservoir.
The cat is Angel and he's one of the ones who is going to be really unhappy when he can't play in the tub any more! He's about a year old; I rescued him when he was about 5 weeks old. I named him Angel because the black section down his back looked like a pair of wings folded closed over his body.

Here's a side view
Here is the reservoir with the exposed section of the lid marked.

I'm trying to decide if I want to cut the lid along that line and put some type of hinge on it so I can easily open & access the inside of the reservoir. The other option I'm considering is cutting a fairly good-size hole in the lid and using a plug of some type to cover it.
The outlet from the pump inside the reservoir will be on the side of the reservoir to the right. There will be a "Y" connector with on/off switches coming off the pump; one side will feed the garden and the other side will be used to drain the reservoir when it's time to change it out. I have a second pump that will be used to fill the reservoir from the tubs the RO water is stored in. The RO unit is just too slow to try to use it to fill the reservoir, so I'll be running water & storing it in smaller tubs to be available when needed.
Maybe Angel wants his own catnip garden!!
G
Guest
C_C_E: Funny you should say that. I actually have a small ebb/flow garden in the kitchen full of catnip. That way, if someone comes in & smells plants, there is an obvious source in plain sight. Plus, I spend about $15 a month on catnip, so this will save me some money.
G
Guest
Flowering Unit Continued
Flowering Unit Continued
Here is the next installment of my building projects.
The first project today was to get the reservoir completed. Since this is going into the tub underneath the garden, I have to have it finished and in place before building the framework for the garden.
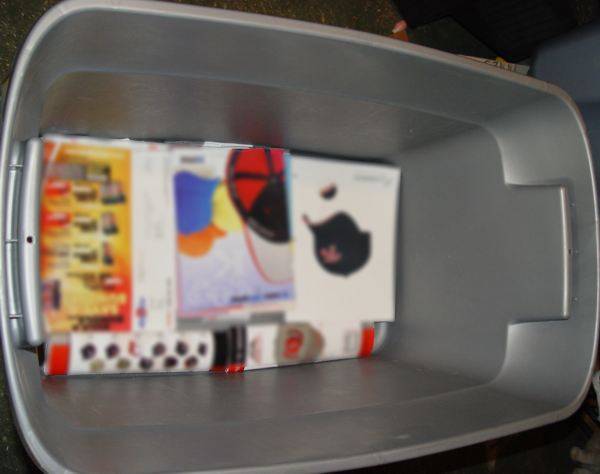
The reservoir is two large storage tubs, one inside the other for strength. This will hold over 25 gallons of water and using only a single tub will result in lots of bowing. To prevent the inner tub from cracking at the base, the gap between the two tubs at the base was filled with old magazines and catalogs.

The pump I purchased is designed to be used submersed or in-line. The water intake is a couple of inches above the floor of the reservoir and the safety instructions that came with the pump said not to use it in less than 6" of water when used as a submersible. Since I plan to use this pump to empty the reservoir when it is time for changes as well as feeding the plants in the ebb/flow unit I will be building, I want the pump to be able to empty the reservoir a lot lower than 6" of water. So I chose to set it up for in-line use even though it is going to be submersed in the reservoir. (I ran a test with the pump in a tub of water for an hour with an aquarium thermometer to see if the pump would heat up the water when it ran - it does not heat the water, so no problem to use it as a submersible.)
I took off the filter unit, screwed the hose adapter into the intake, screwed another hose adapter into the outlet, and attached a hose to the intake that would fit into the corner that will be the lowest point in the reservoir once it is in place in the tub.
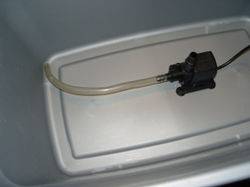
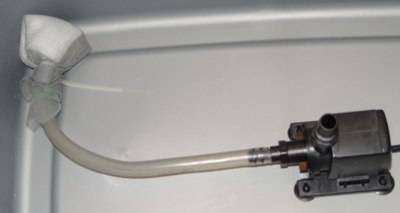
To prevent any particulate matter that may make its way into the reservoir from entering the pump, I built a custom filter to go over the end of the intake hose. The filter is made from a rectangle of fiberglass window screening material and four layers of thin polyester quilt batting. The window screening is folded over the batting to prevent the batting from coming apart and getting pulled into the pump.
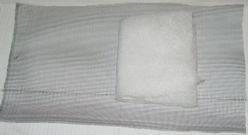

Then I folded the filter over the end of the hose so no water could enter without passing through the filter and fastened it securely in place with a cable tie.
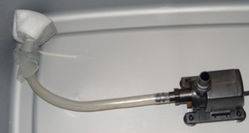
The hose attached to the output on the pump is a length of garden hose. It is secured with a stainless steel hose clamp and then a sleeve is slipped over the top to prevent the hose from kinking.

A 2-outlet "Y" hose manifold is screwed to the end of the length of hose. All screw-type connectors have teflon tape applied to the threads. The manifold has individual on/off levers on both sides so that one can be shut off while the other is used.
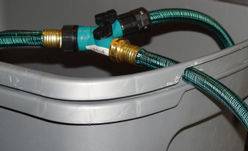
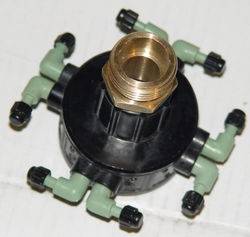
A length of hose was attached to one side to be used in draining the reservoir; an 8-outlet manifold for 1/4" tubing to feed the ebb/flow garden was attached to the other side.
Holes were made above the handle on both ends of the tub. These allow access for the drain hose, the electric cord for the pump, tubing from the air pump, and the 1/4" tubing that will feed water to the garden.
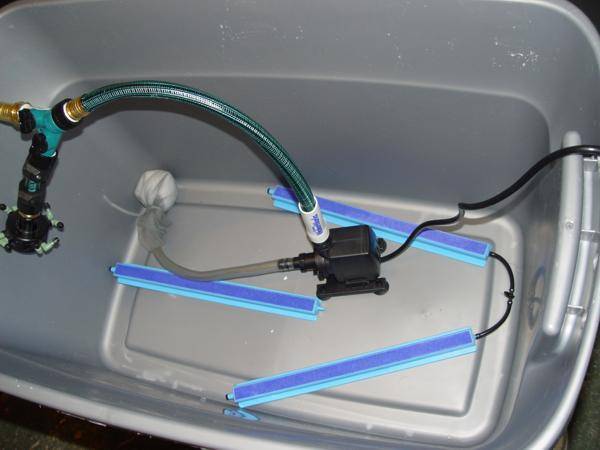
Here is the inside of the completed reservoir.
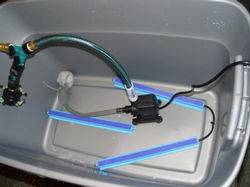
Next I used my Dremel (I love my Dremel - it's the most versatile tool I've ever had) to cut the access hole in the lid of the reservoir. This is large enough to fit my hand in easily to access the Y manifold and the 8-outlet manifold.

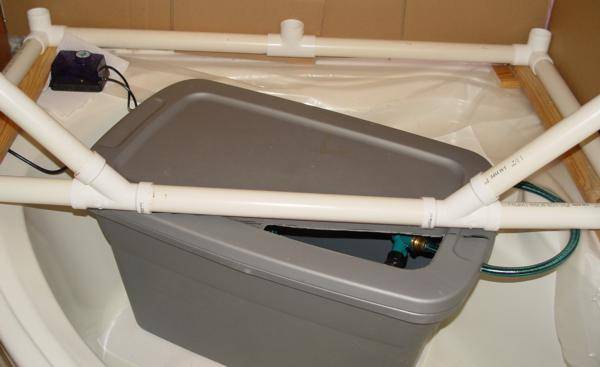
Here is the reservoir in its final "resting place" in the tub. A layer of rubber shelf lining was put under it to help keep it in position so it isn't likely to move around. You can see the air pump for aerating the solution sitting on the edge of the tub. This way it will be above water level so I don't need to use anti-siphon valves, which cut the passage of the air quite a bit. The pump is sitting tucked into a double layer of the rubber shelf liner to prevent vibration noise.
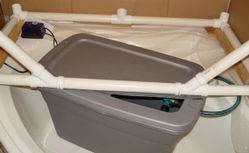
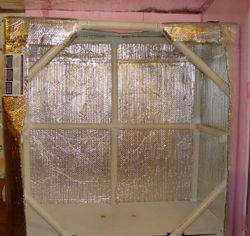
I cut a length of Reflectix insulation to size to fit around the sides and back of the garden framework and slid it into place. To keep it from moving around as I assembled the frame, I 'tacked' it in place with a few pieces of tape to the base. Then I started building the framework.

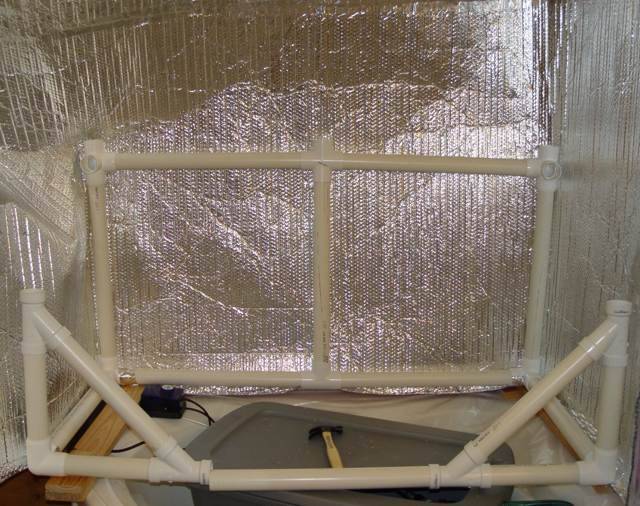
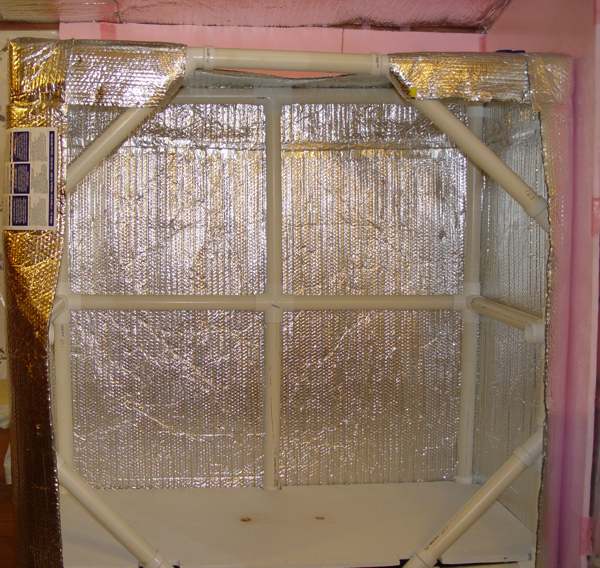
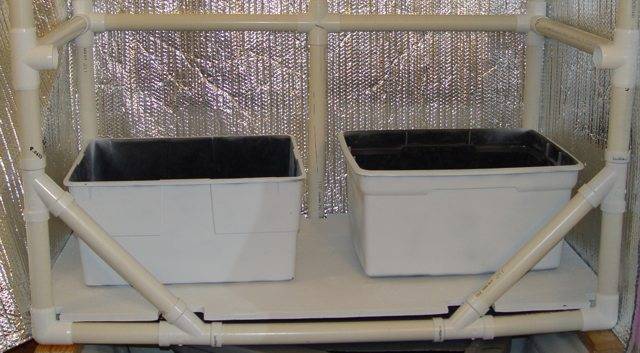
Here is the completed frame
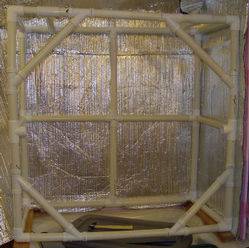
Here is the frame with the shelf in place and the Reflectix pulled into position and attached. The "dots" in the center of the shelf are the overflow drain holes for the ebb & flow units.
Here is the base of the unit with the tubs that will eventually become the ebb & flow containers. Since these containers were clear, I painted them black to opaque them and then white to reflect heat and light.

And that brings us up to date on the build.
I have to make the "door" to cover the front of the garden, cover the exposed sections of garden with black vinyl shower curtain material to help light-proof the unit, build the air scrubber & ventilation system, build the ebb & flow units and plumb them, and hang the lights. The unit should be ready just about the same time as the plants are ready to go into flower!
Getting there.............

Flowering Unit Continued
Here is the next installment of my building projects.
The first project today was to get the reservoir completed. Since this is going into the tub underneath the garden, I have to have it finished and in place before building the framework for the garden.
The reservoir is two large storage tubs, one inside the other for strength. This will hold over 25 gallons of water and using only a single tub will result in lots of bowing. To prevent the inner tub from cracking at the base, the gap between the two tubs at the base was filled with old magazines and catalogs.
The pump I purchased is designed to be used submersed or in-line. The water intake is a couple of inches above the floor of the reservoir and the safety instructions that came with the pump said not to use it in less than 6" of water when used as a submersible. Since I plan to use this pump to empty the reservoir when it is time for changes as well as feeding the plants in the ebb/flow unit I will be building, I want the pump to be able to empty the reservoir a lot lower than 6" of water. So I chose to set it up for in-line use even though it is going to be submersed in the reservoir. (I ran a test with the pump in a tub of water for an hour with an aquarium thermometer to see if the pump would heat up the water when it ran - it does not heat the water, so no problem to use it as a submersible.)
I took off the filter unit, screwed the hose adapter into the intake, screwed another hose adapter into the outlet, and attached a hose to the intake that would fit into the corner that will be the lowest point in the reservoir once it is in place in the tub.

To prevent any particulate matter that may make its way into the reservoir from entering the pump, I built a custom filter to go over the end of the intake hose. The filter is made from a rectangle of fiberglass window screening material and four layers of thin polyester quilt batting. The window screening is folded over the batting to prevent the batting from coming apart and getting pulled into the pump.


Then I folded the filter over the end of the hose so no water could enter without passing through the filter and fastened it securely in place with a cable tie.
The hose attached to the output on the pump is a length of garden hose. It is secured with a stainless steel hose clamp and then a sleeve is slipped over the top to prevent the hose from kinking.
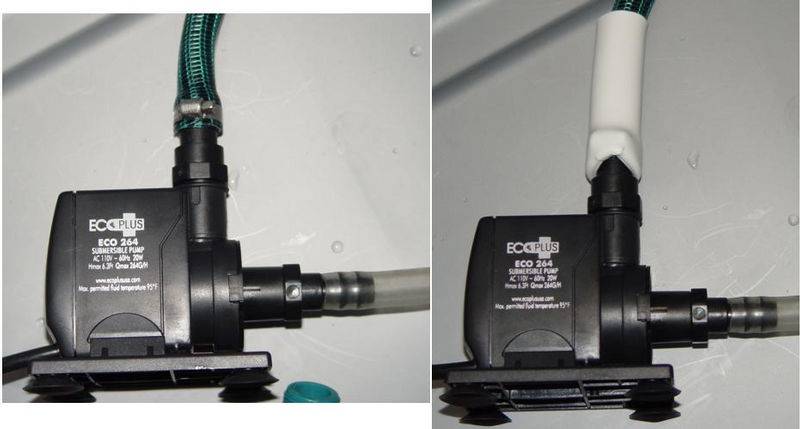
A 2-outlet "Y" hose manifold is screwed to the end of the length of hose. All screw-type connectors have teflon tape applied to the threads. The manifold has individual on/off levers on both sides so that one can be shut off while the other is used.

A length of hose was attached to one side to be used in draining the reservoir; an 8-outlet manifold for 1/4" tubing to feed the ebb/flow garden was attached to the other side.

Holes were made above the handle on both ends of the tub. These allow access for the drain hose, the electric cord for the pump, tubing from the air pump, and the 1/4" tubing that will feed water to the garden.

Here is the inside of the completed reservoir.
Next I used my Dremel (I love my Dremel - it's the most versatile tool I've ever had) to cut the access hole in the lid of the reservoir. This is large enough to fit my hand in easily to access the Y manifold and the 8-outlet manifold.

Here is the reservoir in its final "resting place" in the tub. A layer of rubber shelf lining was put under it to help keep it in position so it isn't likely to move around. You can see the air pump for aerating the solution sitting on the edge of the tub. This way it will be above water level so I don't need to use anti-siphon valves, which cut the passage of the air quite a bit. The pump is sitting tucked into a double layer of the rubber shelf liner to prevent vibration noise.
I cut a length of Reflectix insulation to size to fit around the sides and back of the garden framework and slid it into place. To keep it from moving around as I assembled the frame, I 'tacked' it in place with a few pieces of tape to the base. Then I started building the framework.
Here is the completed frame

Here is the frame with the shelf in place and the Reflectix pulled into position and attached. The "dots" in the center of the shelf are the overflow drain holes for the ebb & flow units.
Here is the base of the unit with the tubs that will eventually become the ebb & flow containers. Since these containers were clear, I painted them black to opaque them and then white to reflect heat and light.
And that brings us up to date on the build.
I have to make the "door" to cover the front of the garden, cover the exposed sections of garden with black vinyl shower curtain material to help light-proof the unit, build the air scrubber & ventilation system, build the ebb & flow units and plumb them, and hang the lights. The unit should be ready just about the same time as the plants are ready to go into flower!
Getting there.............
G
Guest
Big Toke - Thank you for the compliment. Planning is one of my favorite parts of a project, so details come naturally. I suspect sometimes I overdo it, but it's fun.
very nice detailed informative thread you have goin girl excellent im doin a lil dwc thing my self
G
Guest
nice!!!!, looks like you have it together.
G
Guest
Immortal - I'm glad you find it useful. Anything else you want to know on the reservoir? I put a lot of pics on that one because I haven't found a good tutorial on them in one place, just bits & pieces scattered around. Let me know if you have any questions and I can edit the thread to include them.
Chucky - A "little" DWC thing? With the number of ladies you have going? I'm not certain the word "little" applies to anything you do! The number of grow threads you are posting is just mind-boggling. Like I said in an earlier post, I'm jealous!
My DWC tubblers are going well. I had to build a second one and move half the plants into it because they were getting too crowded and fighting for light. I'm really impressed with the way the plants are growing in there and may eventually give up my current addiction to ebb&flow for the flowering garden. I like the ease of having a central reservoir for the large garden, so I'd probably end up building a recirculating bucket system instead of messing around with having to work on each individual bucket for nutes, refills, etc.
Estayapi - thank you! This is my first garden in several years, but my first garden ever was back in the 70's. Things have come a LONG way since then!
Oh well, back to cleaning litter boxes & bagging the trash (tomorrow is trash day and the truck comes around before I get out of bed, so I have to do it tonight.)

