What's new

Ambre's New Grow Setup

sysprog

Member
Ambre,
Very nice clean setup and excellently organized. Again you show that with attention to detail in planning, pays off in construction and use!

I have some of those same containers! I like the square ones, I used to use the folgers plastic ones which are round.

I am running recirculating hydro now, the only thing I never liked about it, besides the large volume of water, was that most designs leave the buckets full when you do a res change. Some fixed that problem by adding a drain at the bottom and a valve. I use the siphon effect: my feed is 1/2 pvc, inside the bucket I put a 90 elbow and a extension 1/2 pvc to the bottom of th bucket. I left about 1" at the bottom which is enough to cover the airstone in the event of a power outage in which the nutes would siphon back into the res. Again all of this is casa dePOT (minus pump, airpump & airstones) 1/2 pvc, fipt x slip adapters, 1/2 poly feed lines (allows buckets to be moved vs hard plumbed 1/2 pvc), 1 1/4 sump drain hose w/ 1 1/4 slip x slip connectors for buckets (originally 3/4 but roots clog those even with 2x buckets turns daily), 2" (or 3 - 4") pvc back to res. I got the pump from harborfreight.com (they also a cheap 1/4" drip irrigation kit ~$6) and air from china-mart (or k-mart...). It's nice compared to e&f in ease of construction. Also, it's pretty much setup to go bio if you're inclined (nice not to do res changes!)

Thanks for the efforts you put forth in sharing!!
 
G

Guest

Sysprog -

I've been thinking about the recirculating buckets myself and came to the same conclusion on the lines. I don't like making holes in my containers below water line (that's just an invitation to a leak, in my mind), so I was going to run lines down from the top of the container for the feed and put the overflow/drain lines at the top. That way, the containers would drain back into the res for changes. I've read that some people have had problems with roots growing into the drain lines, so I was going to cover the drain lines with some mesh or a double layer of window screen to keep that from happening.

Keeping the end of the feed line a bit above the bottom of the container is a good idea. The small amount left shouldn't make a big difference in res changes and it's good insurance.

I love designing & building new systems - it's fun!
 

Harry Gypsna

Dirty hippy Bastard
Veteran
Hi Ambre, I just founbd this thread of yours, Its great, I loveall the detail, you can really tell that some serious thought went into it. .....I think i just found a new person to run ideas past and get an opinion....that is if you dont mind of course.....
Brilliant thread.......
 
G

Guest

Harry-

Thanks for the compliments! Designing & thinking things out is something I enjoy doing.

No problem with giving advice. I'm full of it. :YaRight: Ummm, somehow I don't think that came out quite right.... :laughing:
 

Harry Gypsna

Dirty hippy Bastard
Veteran
LOL (just laughed out loud at 6;40 am ......dont know if i woke every1 up yet, hehehe.....) cheers ambre.....
 

Jah-Jah

Member
Hey Ambre!

Great thread, nice setup and great pics what can I say, great work.
Ive been following both your grow and growroom threads both splendid! :wave:
 
G

Guest

Success!!!!

Success!!!!

I got the flowering garden finished & 8 of the clones transplanted into it. I'll keep them on 18/6 for a couple of days to allow them to adjust to the new environment and switch to 12/12 Wed or Thurs. :woohoo:

I'll post a proper update when I have time - I've gotten behind on work trying to get this finished. :spank:
 
G

Guest

Finished! Ventilation Section

Finished! Ventilation Section

I'm going to break this update into sections since it covers a lot.

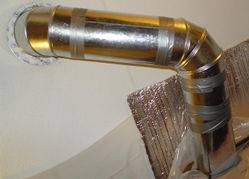
I picked up the various parts I needed to get the blower hooked up to the vent hole in the ceiling -

2 pieces of 7" sheet metal ducting, 24" long
2 adjustable 90-degree connectors
Easy connector for ceiling hole
Duct tape

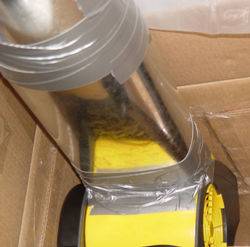
The first piece of ducting was used to connect to the blower. The outlet on the blower is 7" wide x 3" tall; a total of 20" around. 7" ducting is about 22" around, just right for fitting to the opening with overlap.

First I bent two slight crimps in the ducting to fit either end of the bottom of the blower outlet. I fit it on the blower to make sure I had the spacing right and marked where I needed crimps for the upper corners. After putting the bends into the ducting, I took a 21" length of R-shape rubber insulation and glued it around the fan outlet (this will fill in any small gaps that may be left from my inaccurate fitting of the ducting). Then I wrapped the ducting tightly around the fan outlet and wrapped it with several winds of duct tape, making sure to hold it to the fan securely.


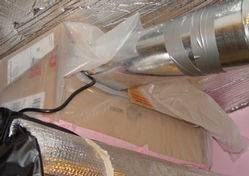
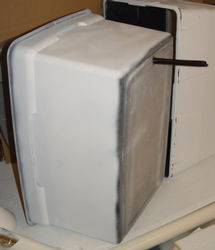
Then I placed the fan into the filter unit I built previously and measured the location/size of the ducting where it will exit the unit. I transferred these measurements to the flaps that will close on the filter unit and cut out the sections needed to fit around the duct.


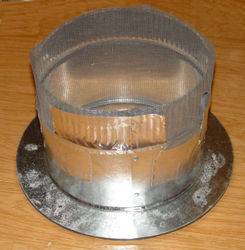
I then prepared the easy fitting for the ceiling. This meant drilling holes for screwing it up and putting a piece of window screen over the top to keep bugs from coming in.


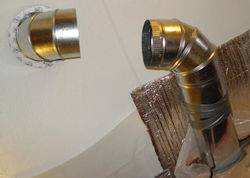
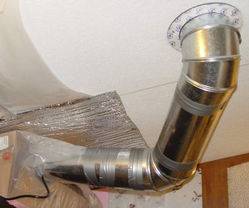
I slid this up into the ceiling & screwed it in place, then attached one of the adjustible 90-degree adapters to it. I attached the other 90-degree adapter to the end of the piece of ducting attached to the blower.


Then I measured what length I needed to cut the second piece of ducting to in order to fit the gap, taking into consideration that the pieces slipped inside of each other. I cut it to length, slipped it into place, and secured all joins with more duct tape! (Duct Tape is like The Force - it has a light side, a dark side, and it binds the universe together....)


I filled the carbon filter with about 2" of pelletized activated carbon, making sure it covered the entirety of the air intake hole.

I ran the cord from the blower out of the box, folded the flaps closed, and secured it air-tight with lots of tape. Since the box is covered with a sheet of 6-mil plastic, the plastic was taped to the ducting where it exits the unit.


That completes the ventilation section of the build on my flowering garden.
 
G

Guest

Fluorescent Light Fixture

Fluorescent Light Fixture

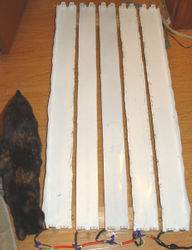
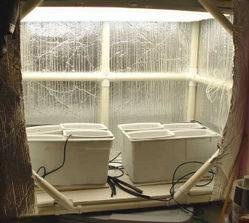
I am temporarily going to be using 4' shop lights as a fixture in the garden. The garden is about 26" deep x 52" wide, so I could easily fit 5 shop lights. Rather than having them hung separately and having to mess with each one when I need to change the height, I decided to connect them together.

I cut the reflector wings off the sides of the three inner lights and cut the inner reflectors off of the two edge lights, leaving the reflectors at either side of the unit. Removing the reflectors allows me to place the lights closer together. I then screwed the lights to two pieces of wood, one at each end of the lights.


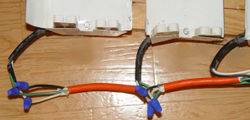
These lights don't have power cords already on them, so I used sections of an old grounded heavy-duty extension cord to wire them together. Each connection is made using caps manufactured for this purpose. The plug end of the extension cord is used to plug the system into the timer.


I then covered all connectors with two layers of electrical tape for protection against moisture and any potential problem that may be caused by the wires touching any of the mylar in the garden.


I didn't get a good picture of this part due to too much reflection, but I covered the five fixtures with a sheet of mylar to reflect the light back down into the garden. I reinforced sections of the mylar between the fixtures with foil tape & cut slits to allow heat to be pulled up through the fixture instead of forcing all the air to come around the sides.

I then put two heavy eye-bolts at each end of the two boards for hanging the fixture. I tied rope to the eye-bolts and ran it up over the PVC pipe at the top of the garden frame. I will eventually put rope cleats in, but for now I'm tying the rope to the frame.


This finishes the light section....
 
G

Guest

Ebb & Flow Unit

Ebb & Flow Unit

Last, but certainly not least, the garden.

I am using ebb & flow (this time), but not using a table setup. I have my own way of doing things....

As in the small garden I described previously, each plant has its own container and each container has its own feed line from the pump. Drain holes are drilled about 1" down from the top of the container & the feed lines are assembled the same as described in the small garden.


Since this garden is not built directly on its reservoir, the containers are placed inside of a large sterilite bin. I cut a hole slightly less than 1/2" diameter in the center of the bottom at one end of the container and installed a 1/2" diameter hose. The hose is secured with glue, not silicone - glue adheres to the plastic much better than silicone does. The hose goes through a hole in the floor of the garden unit and then through a hole in the lid of the reservoir so the overflow water feeds directly back into the reservoir.


To encourage the overflow to go back to the reservoir and not sit stagnant in the container, I built a support for the container that has approximately 1/4" lift at one end. The picture below shows two of the supports stacked and held with clamps while the glue dries. The notches cut in the opposite end are for the drain hoses to pass through on their way down to the reservoir. A piece of rubber shelf liner was placed between the support & the container to prevent the container from slipping out of position.


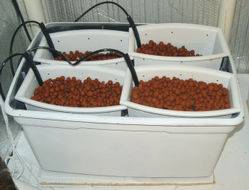
The feed line unit is held in one corner of the planter and the planter is filled about 3/4 of the way with hydroton. The reason for filling them only 3/4 of the way is to allow room to insert the plants - I flood the planter completely with nutrient solution, then insert the roots of the plant by holding it between my hands, pushing my hands down into the rocks, and then removing my hands. I use one hand to support the plant while I fill the container the rest of the way with hydroton. The picture below shows the unit on the slant board with feed lines & hydroton in place, ready for plants.


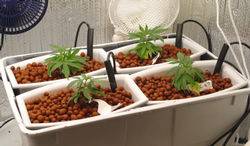
Here is the planter after plants were put in and some fans added for air circulation. I covered the planters with foil after the picture was taken to discourage algae from growing and to help hold moisture at the root level (the fans are blowing directly across the top of the planters and could dry out the hydroton too quickly).


Voila - finished! One working garden with 8 clones happily getting ready to start making flowers....

:dance: :woohoo: :dance: :woohoo: :dance: :woohoo: :dance:
 

Sleepy

Active member
Veteran
i love watching someone who is real handy.

nice work, Ms.

very inspiring.

thank you.
 
G

Guest

Thanks for the kind words guys!

I hate to say it, but I've been bored this weekend and have started another project. The mothers have overgrown their space and I need to cut them back. I hate to waste the cuttings especially since I haven't determined sex on all of them yet, so I'm planning a Rubbermaid container for cloning cuttings that will allow me to continue to use the small veg area I currently have for other things (like the clones that are already in it).

I'll have to make a trip to Radio Shack for a couple small fans and to Walmart for some light sockets, but I have everything else already on hand.

I suppose eventually I'll have to dispose of most of the clones, but I don't want to do so until I know I don't need them.
 

NiteTiger

Tiger, Tiger, burning bright...
Veteran
*tag*

Gotta read this whole thing later :)

Lookin good Ambre. I've got some questions, but they're gonna have to wait.
 

mariman

Member
I love to see ingenuity at work! Have a couple of questions:

Do you start your seedling in perlite, and when roots are long enought, transfer them into the bubbler?

And...where did you get those collars for the bubbler.

Thanks, my gears are a turnin, lol. I want to go hydro this grow. Last one was a pain with all the transplants using soil. ebb/flow most likely. I have got 50 williams wonder seeds calling very loudly to me. :D
 
Last edited:

Latest posts

Latest posts

Top