You go Ambre!!! Very well engineered, designed and constructed. Excellent details on each stage of your project. Would you be so kind as to give a ballpark figure on you monetary investment?
I know I spend way too much on this hobby lol
I haven't actually kept track, but at this point I'd say close to $2000 for everything. This includes the RO filter, spare parts (extra pump, etc) stuff I picked up that didn't work out (such as bins that were a bit too large to fit - but I can use them to hold RO water until it's needed), and stuff to set up an ebb & flow "decoy" catnip garden in the kitchen. I have enough activated carbon to make filters for at least 18 months, enough nutes to last about the same length of time, etc. Once I have this set up, I won't have to spend any more for a while.
Having the medicine I need to help with my migraine headaches - priceless!
At 5-600/oz that is money well spent! I built a C22 style cabinet out of plywood and 2x3 that ended up costing about the same as a C22, but it is rock solid and customized.
Some items you have to purchase regardless of cabinet. Lights, carbon, fans, nutes, medium...oh and genes! I know I've definitely sunk over 2k so far (not including genes!).
What I think others will find useful, is how much your customized cabinet cost. PVC, glue, reflectix, res, e&f items (tray, pump...) and time involved. I know some folks would rather buy premade no matter what, but others may make the decision based on cost benefit. And you setup is so pro you could market it! Blows most of the ebay systems away!
Ambre's Growhomes: Penthouses for your ladies!
Then there are the junkies like us who would build even if it cost 2x as much! It's done my way, damnit! lol
Cheers to ya!
I figure if I build it myself, then I'll know how to fix it. Also, if it doesn't work out, I don't have anyone to blame but me. Besides, building myself is fun! I enjoy the process of designing, debugging, and building - and I enjoy the satisfaction of seeing it completed and working.
I thought about building a wood cabinet, but we are going to be moving the house when we find the land we're looking for (this is a mobile home). The PVC frame will be a lot easier to disassemble and hide when the moving crew comes, as well as reassemble after the move.
Eventually we'll either build a real house on our land or buy a large double-wide to live in; when that happens, this will become my shop (I own my own business). The garden will most likely stay in this house as will the majority of my rescue cats (I have about 30 cats right now).
The garden will probably get larger after we aren't living in this house; I'd like to play around with some breeding just for fun. I am thinking about starting to accumulate seeds for some of the standard stable strains to use for breeding projects. The figure I gave didn't include seeds, either.
Well, I'd better get back to work. I stayed home to keep an occasional eye on the Nascar cup race, but I'm mostly working on the garden.
That must be the magic number around $2000.00 to do it right. I searched and shopped for the cheapest prices; to build the grow areas correctly you just have to spend the money. One thing I considered when I'm putting mine together is whether I can use what I have to expand lighting(add a light) buckets or include CO2. Everything I have right now is kind of overkill for the size of closet. Thats what I like about your grow Ambre is your engineering capabilities of putting it all together and your knowledge of growing. When you gave me the suggestion of ruffing up the plastic on my tank I did it half assed and it cost me another couple days. I had to drain and really ruff up the plastic, reseal it and now it's holding water. Thanks for your help.
AMBRE how do you put your "grow link" on your posts like you and Big Toke and everyone else around here does.
Open the Hydro group so you can see the title of your thread.
Don't open your thread; just right-click on the title. A box will pop up that has several options. Highlight "copy link location" or whatever sounds close to that (I use Netscape, not IE) and click on it. This copies the location of the grow thread to your computer's clipboard (temporary storage memory)
Then go into the user area menu dropdown at the top of the screen and select the option to edit your signature block
Put your name on the first line (since it's a "signature" block). If you want, hit the enter key and add a tagline (this is where I have "The Cat Lady" on mine)
Hit the enter key twice to get down to a blank line
Click on the little icon above the text box that is a blue circle with a couple 'links' of chain at the bottom - this is the tool that lets you add a 'link'
A box pops up on screen and first it asks you for the text to be displayed - type "My Grow Thread" or whatever you want to call it, and click OK
Then it asks for the URL of your link. This is what I had you copy to the clipboard. Don't type anything, just hold down the "control" key and type the letter "v" while you still have the control key pushed down. This inserts the link from the clipboard to the box.
Click on the "save signature" box and you're done.
Today I finished covering the top of the flowering unit and built the carbon scrubber.
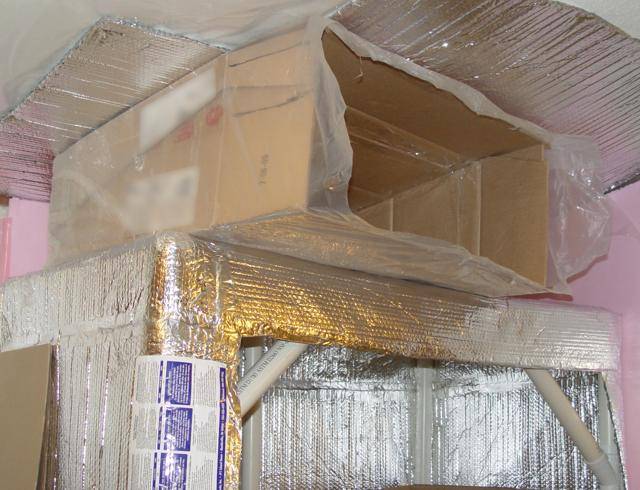
The top of the unit was not completely closed over with the Reflectix I used to cover the frame when I worked on it last; there was a gap in the center that needed filled. I also needed to seal all seams in the Reflectix to prevent air leaks in unwanted areas. I cut a piece of Reflectix that was large enough to cover the top and come down over the top front several inches. This "valance" at the top gives me a solid enclosed area that will trap much of the heat even if I have the door open (pictured in the first photo below).
I didn't want to use one of the commercial-style cylindrical scrubbers since I am limited on the size, so I designed one that works flat. This is very similar to the design used on the mothers/veg garden, but without the prefab furnace filters and with a lot more carbon to absorb the odors of flowering.
After finishing sealing off all the seams, I prepared the box that will contain the scrubber unit. Since the ceiling above the garden is angled, I had to custom-cut a box to fit the available space. For the container, I chose to use a cardboard box again. This is working very well for the small garden and it is much easier to adjust the shape than wood would be.
After getting the box cut to size, I taped all seams securely (both inside and outside). I then slid the box on top of the garden to make sure it fit correctly before I covered it with heavy 6-mil plastic for extra-sure air tightness.
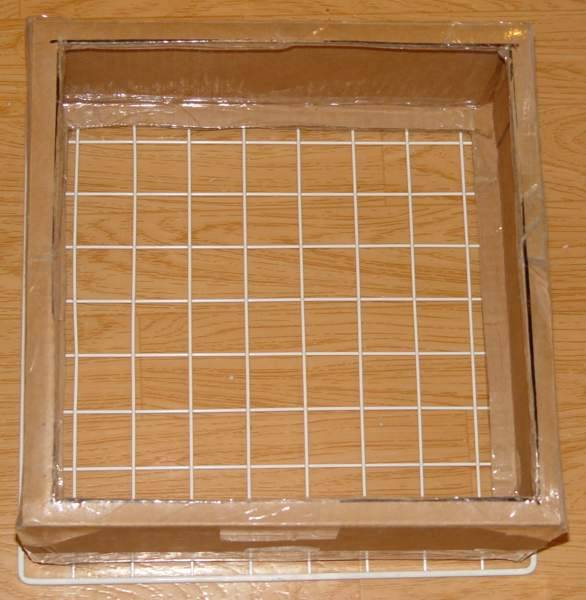
I then built the actual scrubber unit. A metal grid goes on the bottom of the container box covering the hole that connects the box to the flowering garden. This grid will support the weight of the carbon filter.
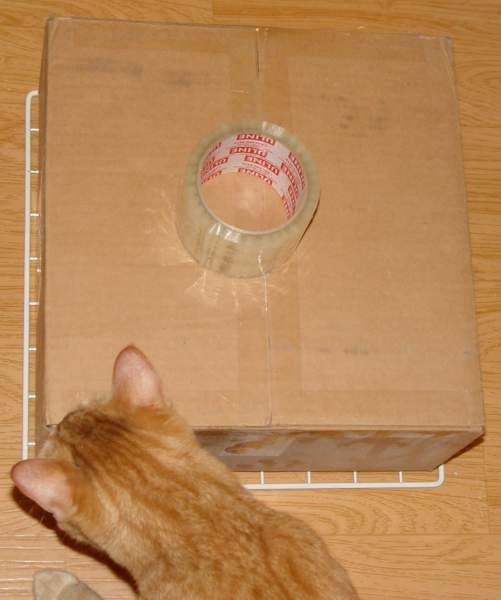
I found a smaller box that fit inside the dimensions of the grid to use as the frame for the carbon filter. One of the cats just couldn't resist getting into the action....
I taped the top & bottom of the box closed securely, then cut the top & bottom of the box out leaving approximately 1/2" of cardboard in place. All edges & corners were then reinforced with tape.
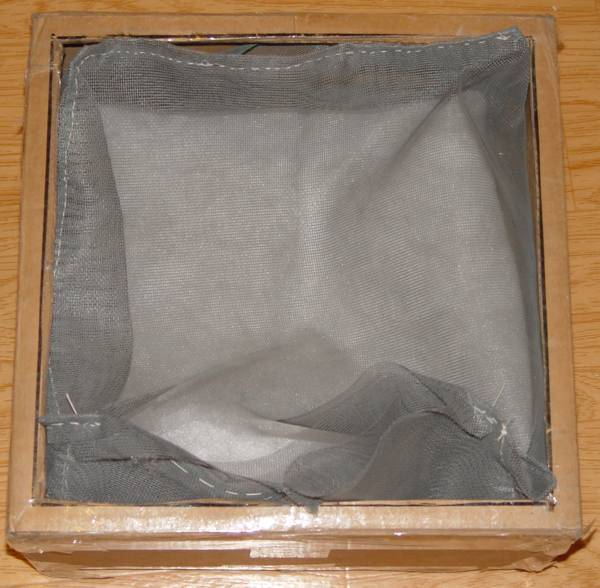
Next, I made the container for the carbon. This is made of a length of fiberglass window screening that is folded to fit the interior of the box. I sewed the corners securely to keep it in shape, forming the bottom & sides. I then sewed two sides of the top of the container closed, leaving one side open. A double-layer of thin polyester quilt batting was placed in the bottom of this screen container to act as a filter for dust & particulate matter (the carbon lasts longer if it doesn't have to deal with solid particles as well as the odors). (Same cat managed to get in this picture - just the other end!)
Here is the filter bag placed inside the frame. You can see the open section ready for me to put the carbon inside at the bottom edge. I won't actually put the carbon in until the garden is finished, but it will hold about 2" of pelletized activated carbon. The bucket of carbon I bought should be good for 2 refills as well as the initial fill.
A hole is cut in the reflectix on the top of the garden the same size & position as the hole in the container box. The reflectix is pulled up inside the box and taped securely in place. To insure that this area is sealed air-tight, weather stripping was glued in place on the bottom of the container box around the hole. This way, when the blower is pulling air from the garden, the reflectix will be pulled up tight to the box & air won't be able to come in to the scrubber from anywhere except from the interior of the garden.
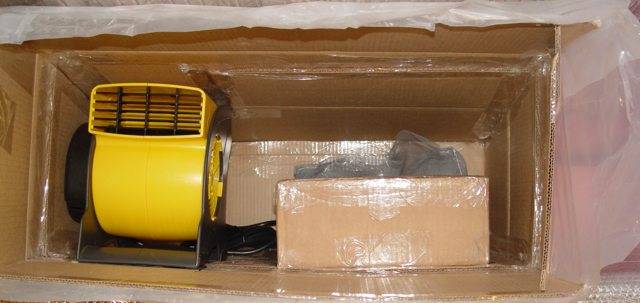
The carbon filter is taped down securely on the right side of the container over the hole that connects it to the garden and the blower is on the left. The blower is a Stanley blower fan that has 3 speeds:
CFM's, and amp draw
High - 2181 cfm; 0.85 amp
Medium - 1746 cfm; 0.62 amp
Low - 1282 cfm; 0.50 amp
I've seen others who are using these in their gardens and they work very well. The blower is only $40 compared to a couple of hundred for a comparable in-line type blower.
The air intake for the blower is on the side closest to the carbon filter. The rectangular grid you see facing you is the outlet. I am going to pick up a length of 7" or 8" diameter metal duct - one end will be bent to fit around the rectangular opening, pop-riveted to fit, and caulked for air tightness; the other end will be left round to connect to the exhaust.
The flaps on the container box will be folded in. There is enough extra plastic hanging over the edges that I will be able to overlap it and tape it completely closed. I have to cut an exit hole in the box once I have the ducting fastened to the blower.
I also cut the pieces I will be using for the door on the unit, but I didn't get it put on as yet. I want to rig up some ties at the top so that I can roll the door up and tie it out of the way when I'm working with the plants.
And that's it for another task completed! Gotta get this done by the end of the month; I expect the plants to be ready about then.
I got the Lasko brand of the smaller one (the Stanley is actually manufactured by Lasko, so they are the same fan). The little one is good for circulating air inside the garden, but the big one is great for exhausting the garden because it has a very powerful blower. I wanted to get a couple more of the small Lasko's when walley-world sold them out at the end of the season, but they all sold out. So I have 4 of the Honeywell vortex fans (those are great), an extra big Stanley blower, three of the Lakewoods, a couple clamp fans, and four of the desk fans on stands. That should last me until next year when they get them in stock again! I love it when they put something I need on clearance....
yeah lasko thats it. Im using it for my exhaust until I feel like splurging on a vortex inline fan. I tried a dayton blower but it was too big and the company shipped it damadged so i sent it back.
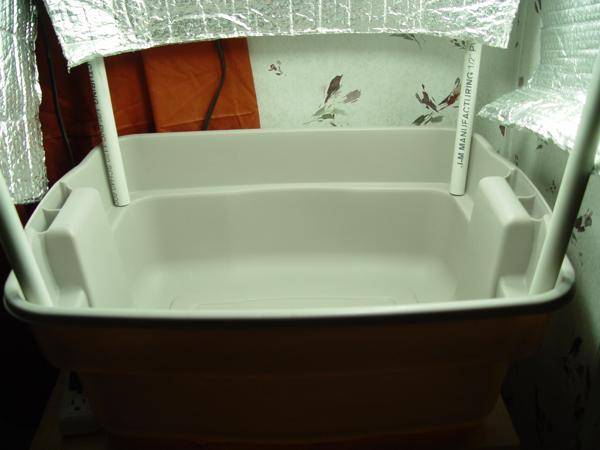
I had a request to post pics & directions for my small ebb & flow garden. This would be perfect for vegging or mother plants, though I use it as a "decoy" garden in my kitchen filled with (what else?) catnip.
You need a tub that has a lip inside suitable for supporting a rack or shelf to hold the plants. The one I used is about 8 years old and I don't believe it is made any longer, but just about any container that has a "ledge" around the edge near the top will do. You just have to be creative in finding or making the rack to fit your container.
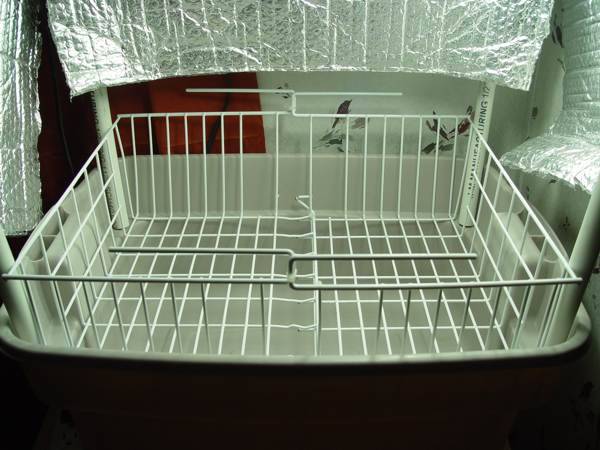
The rack in mine is two wire under-shelf baskets that have had the front angled section at the bottom flattened out/cut down. The racks are held together in several places with small cable ties and are very solid.
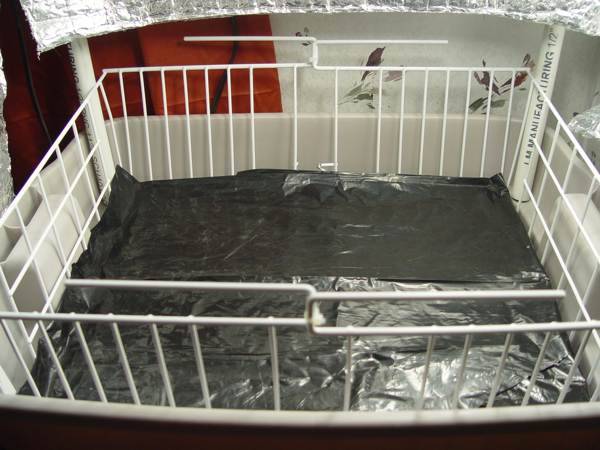
Since the nutrient solution will be in the tub directly under the planters on the shelf, I put a piece of black plastic in the bottom of the shelf to block light and prevent algae problems. I made slits in the plastic every few inches to allow water to flow through when the pump is running.
The pump & plumbing in this is pretty well identical to the plumbing in the reservoir for my large garden, so I'm not going to repeat the directions here. This holds 5 gallons of nutrient solution. There is an airstone in there too, though it isn't shown in the picture. Here is a picture of the pump in place:
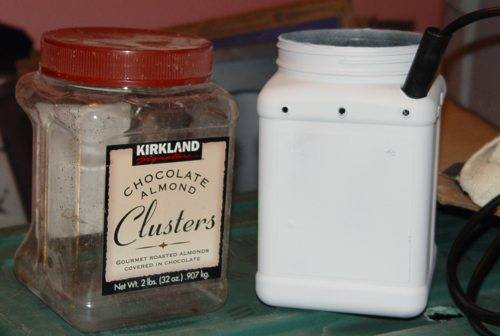
The planters can be almost anything you like. I used square plastic containers that originally had candy in them this time; last time, I used the bottom sections from 1-gallon milk jugs. I painted them black to light-proof them then white to reflect light and heat.
You can see in the above picture that I made three holes in each side of the container toward the top. These are to allow the nutrient solution to flow out of the container without going all the way to the top & floating medium out with it. The large black tube going in the upper side holds the feed line for the ebb/flow unit (the tube is a piece of 1/2" poly pipe intended for irrigation systems). The feed lines are black 1/4" irrigation tubing. The picture below shows the inside of the pot before the medium is put in. The large black tube holding the feed line is not really necessary, but I find they protect the hose.
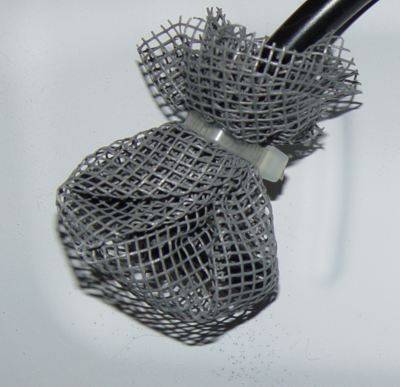
A tee is inserted in the bottom of the hose and a small circle of fiberglass window screening is put over it to prevent particles of medium from getting in and plugging up the feed.
I use perlite in these planters, though any medium suitable for hydroponics can be used.
Here are the planters in place in the rack with the feed tubes going down into the reservoir.
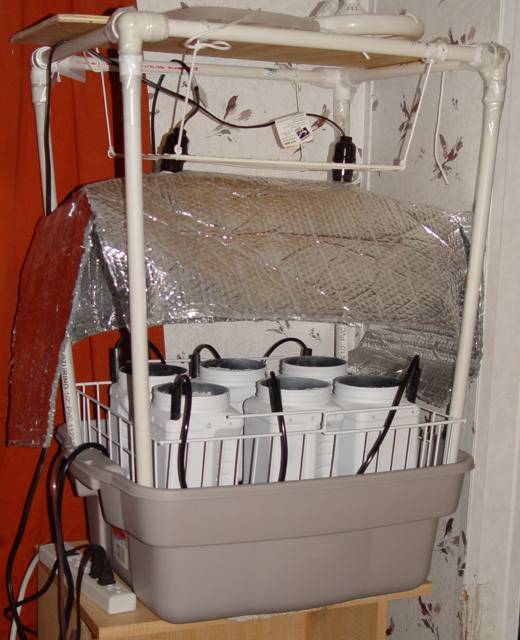
Here is a picture of the complete unit. The frame above the unit holding the lights and reflector is made of 1/2" PVC. There is a piece of plywood on top that holds the air pump and any supplies that are handy to put there (I have a circular fluoro light there in this picture - it was placed in the garden a few minutes after the picture was taken). You can see the power strip on the left; a timer for the pump and a timer for the lights were added to the power strip.
The rack supporting the lights is one of the 14" square grids that I pictured in the section on building the air scrubber. Four ropes are tied to the corners of the rack & go up to the top of the frame so the lights can be lowered & raised as needed. The sockets holding the lights are from some inexpensive clamp lamps purchased at Home dePot. I took the clamps & reflectors off since the Reflectix I put on does the job of redirecting the light quite nicely. I use CFLs in the garden.
Here is a picture of the catnip seedlings settled into their new homes. After taking this pic, I covered the exposed medium with aluminum foil to prevent algae from growing. Once the plants are larger, they will block enough light that the foil won't be needed.
Ambre you never cease to "amaze" me with the innovative way you use everyday products in your builds. It just goes to show that we can make do with what we have if we just look around. Building your own unit can be cheaper than buying the ones in the hydro stores and work just as well or better.
Everything for a good home-built hydro garden except nutrients & test meters can be obtained from WallyWorld, Home dePot, and Lowes. Pumps can be bought in the garden section (pond pumps), containers for small gardens can be storage containers or wastebaskets for larger ones, rubbermaid & sterilite containers for reservoirs & overflow catchers, tubing & fittings from irrigation systems, fittings & air pumps/tubing from the aquarium dept, etc.
It just takes a bit of ingenuity!
I see you got your signature block figured out - even with colors!
I have been losing sleep trying to figure out a good way to keep mother plants in hydro
AND THEN you come along and show us something absolutely BRILLIANT
Im just confused about one thing....Do the containers stay constantly full of water, or how do they drain?
Everything you said in your last post is absolutely true, if you are creative enough you can build a very effective hydro system for pennies on the dollar what it would cost to buy one already pre-made
The containers start draining as soon as the pump shuts off by siphon effect. That's how all ebb & flow systems work. Overflow when the pump is running goes back down into the reservoir and the water inside the containers siphons back into the res after the pump shuts off. Simple & clean.
At the moment, I have my mother plants in bubblers since that garden isn't conveniently located where I can keep a reservoir. They are growing amazingly quick in the bubblers - take a look at my grow thread for pics. I haven't posted directions on how to build the bubblers because there are lots of directions for them on most of the cannabis forum-type websites, but I can post them if anyone is interested.
I've never purchased a pre-made hydro garden. I've been building my own for about 10 years now. That way, they are designed to fit the space I am working in instead of having to create space to fit something someone else designed. I also know how to fix or tweak every aspect of the garden since I built it to begin with.
My next system might be a set of recirculating bubblers. Individual bubblers are nice for the mothers, but for the flowering garden, I like the convenience of having a main reservoir to work with instead of messing with individual containers. I've already started mentally designing the system and I haven't even finished building the current ebb & flow garden....


") lol
lol .... you explain the process very well, cant wait to see the results, keep 'em coming


