What's new

The CannaBunker Begins

dgr

Member
CannaBunkerMan,
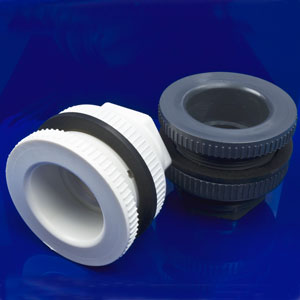
Thanks for taking the time to show us your system. You mentioned usplastic's bulkhead fittings. But you didn't mention which ones. They have a bunch of different ones. So, which ones did you use? Do you think the ones you chose would work on a round 5 gallon bucket?
 

CannaBunkerMan

Enormous Member
Veteran
CannaBunkerMan,
Thanks for taking the time to show us your system. You mentioned usplastic's bulkhead fittings. But you didn't mention which ones. They have a bunch of different ones. So, which ones did you use? Do you think the ones you chose would work on a round 5 gallon bucket?

16441p.jpg


http://www.usplastic.com/catalog/item.aspx?itemid=22725&catid=477&clickid=searchresults

I used the heavy duty ones. They're a little expensive, but they are worth it. Unbreakable, and reusable if you give yourself some extra PVC pipe when you glue it into the slip fitting part. I used item # 16450, the 1" fittings, and then used adapters to fit the 1" fittings with standard garden hose.

Originally, I used the Uniseals on the 5 gallon bucket, but they DID NOT WORK on 5 gallon buckets.

Uniseal-12-inch.jpg


I was able to reuse the uniseals on the bottom of the sewer pipe for the drain tube. There they worked great. Uniseals need a thick wall to work properly. The bucket walls are too thin.

To answer your question, yes, the heavy duty USPlastic fittings will work an a 5 gallon bucket. You can crank them as hard as you can with monkey wrenches, and the bucket wall will bend to conform to the flat fitting.

I kept all of the fittings from my old hydro system, and I re-use them where I can. They work great on the drain bottom of my reservoirs.

The uniseals are much cheaper, but their customer service SUCKS. I feel like they mis-advertised their fittings to work with buckets. USPlastics customer service is fantastic.
 

CannaBunkerMan

Enormous Member
Veteran
Soooo, I can't call in a main shutoff to replace the main breaker without a licensed Electrician's number. Bullshit. It would take me 5 minutes to replace the main breaker. Now I need a "cool" electrician that won't wonder if the 100A breaker with the huge gague wire has something to do with the reason he's replacing the main breaker.

Recap; half of my electrical panel would shut off, while running all 6 lights, (and running a toaster + microwave) but only occasionally. A reset of the main breaker was the only way to bring that half back on. I bought a replacement main, and now the electric company won't turn the power off for me. Fuckers.

Yay!
 

Shafto

Member
Or you could 'accidentally' spill some oil on the road in front of a nearby power pole.

Maybe stack on a few pair of dish washing gloves, put on the gum boots, and slap that sucker in there hot!

-Just kidding, but I'm sure you knew that.

Nice work on the bunker, and glad you have he cojones to post it. I'm sure you're gonna absolutely fine on the safety front too, because you haven't gotten greedy. Your bunker is a fair size and karma is on your side my friend.
 

dgr

Member
CannaBunkerMan,
You received some good advice earlier on checking the individual legs for balance. I don't recall seeing a follow up. You should be able to find a cheap clamp on meter with peak hold.

I have no problem plugging in the vacuum cleaner every time I use it. It's using the same voltage that is going through my main breaker. Take what you will from that. Live moves are done all the time. When we upgraded out service entrance, the tie in on the overhead service entrance at my last house was done live. A coworker who had worked for a power company offered to bring over his 600V gloves and do it but since we needed a permit for the new meter, the contractor did it.


If I recall correctly, you don't have the proper sized wire on that 100A feed to your subpanel. An attentive sparky would spot that and could cause you grief.

Sparky gloves are available but spendy. Using but not relying on the gloves is probably a really good idea. Black soled boots are colored with carbon = conductor. Although I'm not an electrician, my boots have translucent soles and are meant for sparkys. Shrink wrap on a screwdriver shaft saves a slip of the finger. A piece of Styrofoam on top of a piece of plywood is a good insulator. My welder has an OCV of 100V and I hold it in my hand along with METAL when I'm using it. But I try not to stand in a pool of saltwater while it's on.

Again, take what you will from that. To use one of Krunch's phrases, the sandy vaginas on here would take offense if someone were to suggest that you do the switch live. So let's just say that I'm not advising you to do anything other than pay someone else to do this for you. Then again, I wouldn't follow my own advice.
 

CannaBunkerMan

Enormous Member
Veteran
Thanks dgr, I still have a couple of weeks to come up with something, I've been considering swapping it out live, and I wasn't sure of how to insulate yourself properly if I chose that route. If a hip electrician surfaces, (I've put feelers out), that would be ideal. If not, I'll have to take the more risky avenue.

As for the balancing, I ended up moving the bunker's breaker (100A) in the main panel to the other half of the same main panel. I still had the same problem. As for the sparky's scrutiny, I think that anytime the balance is at question, any large tap off of the main panel will be questioned.

My main concern with swapping out the main breaker is errantly bending the leads to cause DISASTER! What's the best thing to cover the dangerous bits of the main leads with while working everything into place?
 

CannaBunkerMan

Enormous Member
Veteran
Ok, where to start with this one... I had originally planned to skip the aeration of the water in the sewer piping that feeds the plants. I thought of it as more of a NFT system, where there wasn't much standing water. There are airstones in the main reservoirs, and the plants get watered every 4 hours, and the runoff drains back into the reservoirs.

I started worrying about things like power-outages, or the accidental un-plugged pump, and I decided to increase the standing water inside of the sewer pipes by moving the drain fitting up. This left me with more leway to spot a problem before it became an issue. Now, I'm worrying that the dissolved oxygen might be used up before fresh water from the airated reservoirs replenishes the DO. Then I remembered how much roots like to grow around the airstones, and I wondered if I was making a mistake.

Do you think that I should add an airline to each plant site, or am I over thinking it here? The root growth is healthy, and they don't seem to mind not having an airstone. All things equal, I would like to keep the setup as simple as possible.
 

dgr

Member
As for the balancing, I ended up moving the bunker's breaker (100A) in the main panel to the other half of the same main panel. I still had the same problem.
CannaBunkerMan,
If you have an unbalanced leg, that wouldn't actually do anything. The unbalancing comes from the 110V legs.

I'm ignoring 80% here for ease of reading.

The 240V 100 Amp breaker you have can pull 100 Amps on EACH leg. I don't recall the size of your main breaker. Let's say it is 125 amps. It can have 125 Amps on EACH leg. If either leg exceeds the amperage rating of the breaker it should trip the entire breaker. That's why there is (should be) a tie bar between the legs.

Edit to add. $15 to $20 for a clamp meter at harbor freight. It will also let you know if you are over committing your wire size ran to your subpanel.

That's why the load needs to be looked at on each leg. Let's assume the subpanel is balanced and pulling 65 amps on each leg with everything running. If we pull 60 additional amps on EITHER leg, it will trip the main breaker.

So if the 110V circuits in the system on leg A pull 60 amps and the 110V circuits on leg B pull 30 amps when this occurs, you have an imbalance. Leg A will trip the main breaker. If you microwave pulls 15 amps and it is on leg A, moving it to leg B will have both legs pulling 45 amps and your system should not trip the breakers.

That's why we put a clamp meter on the main legs. It'll show if one of the legs is pulling too much amperage and it will tell us if the other leg has the capacity to supply that amperage. The meter will also tell us which 110V circuits are on which leg and what amperage they are pulling. Read leg A. Turn off a breaker that has a load on it. If the amperage drops, it's on leg A. If not, it's on the other leg.

Then again, you're circuit breaker might be old and tripping at less than rated amperage. ;)
 

CannaBunkerMan

Enormous Member
Veteran
Okay, it's starting to make more sense. 240v circuits are always balanced, since they span both legs. There's no easy way to tell which leg of the main sub-panel a 110 circuit from my garden will be on. What I'm still a litte fuzzy on is why moving the garden's 100A breaker from one side to the other wouldn't in effect move the 110V loads from my garden to the other leg of the main breaker.

I'll be picking up a clamp style meter tonight. If I get my hands into it, my mind will follow.
 

dgr

Member
CBM,

I threw a loop in there. I assumed that your sub panel IS balanced. That is also a concern. However, 1) You stated previously that you'll never hit the 85 amp rating on your wiring and 2) If you're pulling 100 amps on either leg of the subpanel, it should trip your 100 amp feed to the sub panel, not the higher amp rated main breaker at your main panel.

Moving your sub panel feed would move the loads to the other leg. But if your sub panel is balanced, it wouldn't matter. However, back at the main panel, the 110V legs feeding other areas of the house are still on the same legs.

Here's what I would do. Meter both legs at the garden panel and make sure that you are balanced AND under the rating of your wiring.

Meter the legs on the main panel and create the event that causes power loss. If it's one leg spiking above the main breaker rating, identify what 110V circuit on that leg you could move to the other leg. You'll need to measure the load on those individual breakers to determine that. If the legs are balanced and the breaker is tripping, then it's time to replace the main breaker.

For edification, this is my understanding. Your main breaker is half tripping when a series of events occurs. The A/C in the garden is on and the toaster and microwave are operated. So, if it is an unbalanced situation, moving the microwave should reduce the load on that one leg.

Here's a meter free way to muddle through this. Remove the tie bar on the main breaker. Cause the trip. Find a 110V circuit in the main panel that a load that is part of the problem. Move it to the other leg. Test. REPLACE the tie bar.

BTW, they make soft starters for compressors. I don't know much about them but they are meant to reduce start up amps.

BTW2 and unrelated, if you aren't shy about spending the cash for a breaker, why don't you replace the 100A feed breaker in your main panel that is feeding you sub panel with one sized for your wiring? Breakers protect downstream. I see no issues with having an 80 amp breaker feeding your sub panel even though the sub panel has a 100 amp breaker in it. But again, I'm no electrician.
 

usda101

Active member
CBunkman you are a beast . Spent the last few hours reading complete thread without moving , A lot of my customers are agry with you due to my absence . :artist:
 

Tony Aroma

Let's Go - Two Smokes!
Veteran
I just discovered this thread, and over the past 3 days have read the entire thing. Like a good novel, I just couldn't stop reading.

I don't know what I could add that hasn't been said about your accomplishment. Outstanding job! You've actually done what many of us only wish we could do.

The only question and comment I have is about that swinging door entrance. It took me a while to figure out how it was supposed to work. The video finally made it click for me. But one thing I don't understand is the steps that go over the doorway from the outside entrance. Do you have to remove those every time you enter the bunker? If you leave them out, wouldn't it compromise the stealth of the entrance? And if they're a hassle to put in and take out, would there be a tendency to get careless and just leave them out all the time?

When I first saw what you were trying to do with that door, I thought it was going to be one of those swing-down attic doors with the stairs/ladder built in. This kind of thing:

woodwerner_2.jpg


Have you ever thought of something like this? That way it could swing down, not up. And the stairs would be part of the door and not have to be removed. Or maybe they'd be upside down. And then you could get rid of that step ladder. I don't know. Just a thought.
 

CannaBunkerMan

Enormous Member
Veteran
The only question and comment I have is about that swinging door entrance. It took me a while to figure out how it was supposed to work. The video finally made it click for me. But one thing I don't understand is the steps that go over the doorway from the outside entrance. Do you have to remove those every time you enter the bunker? If you leave them out, wouldn't it compromise the stealth of the entrance? And if they're a hassle to put in and take out, would there be a tendency to get careless and just leave them out all the time?

When I first saw what you were trying to do with that door, I thought it was going to be one of those swing-down attic doors with the stairs/ladder built in. This kind of thing:

woodwerner_2.jpg


Have you ever thought of something like this? That way it could swing down, not up. And the stairs would be part of the door and not have to be removed. Or maybe they'd be upside down. And then you could get rid of that step ladder. I don't know. Just a thought.

You're right, Mr. Aroma, I do usually leave them out, and it does compromise the security. That's one of those problems that I put on the back burner while I finished the room, and dialed everything in. Your idea was the way I had originally wanted to design the entry steps. There's a lip below the stairs where the wall begins that is in the way of a bottom pivot point door.

The other problem is that the steps in the bulkhead are attached to the sides via brackets. I couldn't come up with a way to attach the steps to the bottom panel that swings out. If I were to weld brackets on the back, instead of the sides, I'd also need to come up with a way to support the weight of someone using the bulkhead as designed. It would need to lock into place, and that was another level of engineering that I decided to solve at some future date.

There's a lot of things that I just put off, so that I wouldn't drown in the billion things that needed to get done. I still need to hide the vent shaft that leads to the crawl space in my house. That's where all of the utilities are routed into the room. Ventilation, electricity, natural gas, etc. If anyone were to take a look in the crawl space, they'd know something was up.

I'll eventually address all of these things. Right now I'm focusing on getting the setup dialed in. It seems that my list of things to do is never-ending.

My latest problem is that running dual 32 gallon reservoirs, they aren't mixing well. I need to add a mixing pump that pumps water from one into the other, without overflowing. The float valve water topping setup makes this a little more interesting. Why don't I use the 64 gallon res that I used in the last setup? It's almost a foot taller than the 32 gallon brute trash cans. I'd need to raise the sewer pipe planters, and I don't want to give up the vertical space. Ideally, I'd have a short 64 gallon res, but I need to wait until the cash flow returns.

I also need to refit the drainage from the sewer piping planters to keep hydroton out. One of the drains was clogged this morning when I checked on everything. Whenever I get a clog, and things overflow, it essentially dilutes the reservoir. When the water level drops, the missing nute mix is replaces with fresh water. I can tell if there's a leak by monitoring a large drop in the nutrient level.

I'm wondering if I should just scrap the second res, and add nutrients twice as often. The second reservoir acts like a capacitor, but it's not as necessary as if I didn't have an auto topper.

My other problem is that I am COMPLETELY out of cash at the moment. Okay, actually I have $130 to my name at the moment, so I'm not COMPLETELY out, but it's close. I couldn't find a clamp style multimeter for under $50, so I need to wait on that one. Luckily the electrical problem only surfaces every week or two. Can't I use a regular multimeter to calculate the current draw from the main line?
 

CannaBunkerMan

Enormous Member
Veteran
BTW, does any one have any suggestions about the problem from post 369? The roots look fine, fresh and white, but how do you tell if they're getting enough dissolved O2?
 

dgr

Member
CBM,
I did post a way to try and trace an imbalance without a meter. Look at post 372. You can't use a regular meter as amps have to be read in series. You'd need to disconnect the feed, hook your 10A meter between it and the breaker and them smoke the meter when you try to pull 50 amps through it. However, a regular meter would tell you which leg of the half-tripped main breaker is tripped by checking for voltage on each leg. That'd save you the trouble of removing the tie bar to test.

If you look at your kitchen circuits, do you have more than one? If so, can you move the toaster and/or microwave to the other circuit? If not, can you move that breaker to the other leg in the panel? That'd probably be the simplest test.

best of luck
 

tenthirty

Member
BTW, does any one have any suggestions about the problem from post 369? The roots look fine, fresh and white, but how do you tell if they're getting enough dissolved O2?

You've turned this into a flooded tube. Google heath robinson flooded tube.

I think that you should be circulating the nutrient solution continuously.

Please, some one correct me if I'm wrong,
the way I tell if I have or am getting root disease the first thing that comes to my attention is rapid ph changes.

The next is slime in my pump filter.

After that, brown and or slimy roots and possibly a bad smell. The smell can come on sooner if you have a good nose and are astute.
 

CannaBunkerMan

Enormous Member
Veteran
I've been having problems with one of my lights, a 1000 watt hps, that is the furthest from the ballast. It's about 35-40 feet, and I think the ignitor in the ballast is too far from the bulb. It's a lumitek digital and I can't take it apart to replace the ignitor, since it's all epoxyed closed.

Can I add ANOTHER ignitor inline, before the bulb to get this guy to light? Would I need to bypass the one that's encased in friggin' carbonite, or will an additional inline ignitor do the trick?

It seems like whenever I tackle one problem, another one takes its place. I can't wait for the day that all I need to worry about it watching my plants grow. My latest issue is with the drip lines. Roots like to grow into the drip lines and clog them. The drip lines also aren't doing a good gob of saturating the hydroton in the netpots. Also, once a line is clogged, I don't have any way to clear out the errant roots. I think I might have been a little ambitious with running the lines into the interior of the tubes, and connecting them midway into the sides of the netpots. This is too close to the rootzone. I think I need to feed the plants from the top, but then they'll be in the way of easy access to the netpots. Does anyone know of any good ideas when it comes to creating a drip line manifold to feed many plants at once?
 
Top