What's new

Smart Pots

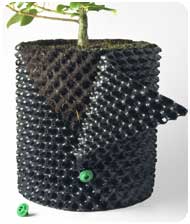
Simba- I agree, since the dry-wet cycle is shorter, your roots get more oxygen and you can feed your plants more often. I like the smart pots in my experiences so far and am switching over to them unless I can find some air pots to do a side by side with locally.
 

simba

Sleeping Dragon
from http://www.superoots.com/airpot_work.htm
"Superoots Air-Pots have unusual cuspated walls made up of closed inward pointing cones and open ended outward pointing cones. There are no flat surfaces on the inside of the container to deflect roots and start the spiralling process.

The inward pointing cones direct the roots further outward to the open ended cones where, because the air density in the soil is too great, the roots dehydrate and are effectively pruned. "

i cant debate how your grow is setup,
however when i tested them i found when you watered the finer media would fall out the side and bottom..
also since they even say only the outer dimples are open..
they are only air pruning the plants roots that make it to the hole Some dont Some guy i saw on a Garden forum said he saw less root circling when he went to AP from Solid wall, even though it was rare he saw it.> SP will never have this. also SP is a Full Aeration Container hense the fabric vs the plastic..
also with those inward cones once those are all making contact with the media even the outward ones..
no mater how loose..
Not starting any thing but it is media to plastic contact on a rather large scale especially when comparing to a standard solid wall container. (more surface area on AP vs standard plastic container hence all them dimples.. (that's allot)
Im not sure if the SP or AP is better for trees but IMPHO the AP is more suited to trees vs shorter plants With smaller feeler roots that would love to hit a fabric wall and be pruned right away vs having to hit plastic then follow it out..
 

Clackamas Coot

Active member
Veteran
Watering

Watering

With the SmartPots line of products the deal about watering probably needs a little input.

When watering plants in these pots, it's very important that you make sure that you initially apply the water in and around the trunk of the plant. If you concentrate on the outside edges you'll get a false reading when the plant's soil has been properly hydrated.

I water in and around the trunk of the plant until I see water coming out of the bottom. THEN I begin to apply water to the outside edges of the plant until water is coming out of the sides of the SmartPot from the soil line down to the bottom of the plant's container.

This thorough watering will reduce the amount of times you need to water.

I can't stress this enough - total and complete hydration of the soil is crucial to maximize the benefit of using these types of pots.

HTH

CC
 

its420

Member
I can't stress this enough - total and complete hydration of the soil is crucial to maximize the benefit of using these types of pots.


I bottom water with my smarts, they rock!!!
 

Strainbrain

Chairman of the Joint Chiefs
Veteran
I've used the Smart Pots to good effect as well. I liked them because they were nice and squat relative to their volume, and I am most limited by height. I got an extra 2" of headroom for the plant in a dual-1-gal soil comparison grow.

First time around, I hadn't worked out a good technique for watering in the cloth and had no better results than the side-by-side with the cheapy $2 plastic nursery pot. No worse, either, for what that's worth.

Second time around, I figured out the watering thing and I saw why these things sell. Easily 25-30% more plant than the plastic.

In the end, I stuck to plastic because of the moisture factor. I'm in a wooden cab in a carpeted closet and can't really deal with it. They leech a little bit out of the bottom in addition to what runoff actually runs out the sides. I would elevate them ~1" on a wire shelf if I used them again on the wood.


-s
 

K.J

Kief Junkie's inhaling the knowledge!
Veteran
i cant debate how your grow is setup,
however when i tested them i found when you watered the finer media would fall out the side and bottom..

You must have had a very, very loose soil because other than the first time watering, I've never had a problem with media falling out of the side holes or the bottom.

they are only air pruning the plants roots that make it to the hole Some dont Some guy i saw on a Garden forum said he saw less root circling when he went to AP from Solid wall, even though it was rare he saw it.>

That's very strange. I can't imagine how roots would circle and Airpot; in fact it seems rather next to impossible to me.
 

simba

Sleeping Dragon
kj,
ya i use coco, higromite, soil, etc..

ya i can and cant see it..
i was just reading around the forums on AP and found he said this and hes a tree dood.. and he said it..
http://forums2.gardenweb.com/forums/load/contain/msg081202463545.html
"My experience with them is that they do their job... sort of. There are still a few roots that find their way around the perimeter of the container, also, the coarse medium can turn some roots back into the container, etc. Overall, the roots are more fibrous and far fewer circling roots than when I used solid walled containers.."
 

simba

Sleeping Dragon
ya, they are made out of plastic fabric so it wont hold water pesay however water does stick to it so kinda,, shake a few times and air dry 10 minutes later DRY>>>
 
I got some number 3's on the way, and I have been thinking. If I root some clones in an aero cloner.....can I just stick them right into the #3 SP......or should I still root bound it in a beer cup? Just wondering because if went straight into a smart pot from an aero cloner it would get a true 100% root prune you know? Everything will go straight down. So would it be best to go straight from the aero to that or would going in 16oz beer cups be best?

Also I wanted to throw a couple plants outside, and I was wondering about the bigger sized SP. Now I heard in regular plastic, putting plants in a 30 gallon container will give you trees by august, and most say they get like 2 lbs per tree that big, so I was wondering with the Smart Pot what would be the best size for going outside. I was gonna start the feminized beans outside in april when theres the time change....so I can get the max use outta them, but Im not quite sure what the best size to go with on the SP would be, for a good long outdoor grow where I will hopefully get over a LB off each! Any input is appreciated! Thanks!
 

K.J

Kief Junkie's inhaling the knowledge!
Veteran
The increased air flow actually IMO dries the rootzone out too fast, we typically use 30% perlite and combined with the airflow through the sides and bottom they dry out too fast.

I feel that if you are watering every day in soil there is something wrong (plus it`s less time smoking more time working), either the pot is too small or temps are too high, I had to water more often and keeping water in the pot while watering was a pain (in my model SP and AP should be fine).

Interesting observation. Our Airpots don't seem to be drying out the inner part of the soil any quicker (even the bits that stick out the holes don't seem bone dry to me). We water once every 5 days or so, and we're using the 5 gallon pots.

A close personal friends and guru of mine once told me that the best possible way to look at what may or may not work with a plant is to observe the way things occur in nature. The question was related to bottom watering by filling the pan beneath the plant but not top watering, he said rain falls and runs through the soil helping wash buildups out and freshening the rootzone. I have applied this logic to many grow situations and more often than not it holds true.
These pots don`t allow for a zone of moisture around the base of the rootzone, I think that dryer conditions at topsoil level and moisture below helps MJ thrive.

Very sage advice indeed. This is our method of watering too. We wait until it's pretty dry up top and the weight of the container has dropped significantly before we water again.

I personally feel like the plants are happier with the root pruning. We'll see how they compare to the Smartpots as I've got some of the 3 gallon versions on their way right now (we plant to put the Blue Mystics in them, so it won't be a scientific comparison since our Airpots have The Pure in them).
 
Z

Zeinth

airpots

airpots

in south orange county 1 hydro shop has the airpots..5 dollars for 5 liter and 10 dollars for 10 liters.

3 weeks and i am sold on these airpots...coco an perlite and use organic teas.

had deepwater 5 gals...very good but water culture is tricky...rockwool is good but lung damage from dry cubes in risky as well as 1 shot use.

after using coco an perlite rinse with water an use again.and again.

saw smart pots...didnt go for it.
 

simba

Sleeping Dragon
Heya Zeinth, Thanks for the post..
1.3 gal for 5 (SP #2 $3.95 )
2.64 gal for 10 (SP #3 $4.95 )

i would like to say

AP is not a full Air Pruning / aeration container it is a air pruning container

(AP wont dry out as fast as SP actually AP is closer to full plastic container in this aspect)

<that is another great beni of SP. wet/dry cycle actually gives some of the faster growth found in hydro vs standard plastic containers As the air gets all the way threw IE drying out air comes in>

any one really good at math and can figure out how much surface area is on the AP.. id like to know vs a Rose pot.
did they have SP that you could do one next to your AP and report let us know ur side by side thoughts ..
 
Man i would totally do a side by side and even take pics if I had a AP but I just dont think it can stand up to the SP. I did a lotta research on both, and I could practically make a AP with a regular pot. I mean come on....the little bumps on the side of the AP cant be what make it so great...their so called "reservoirs" sounds like a marketing skeem to me. I am using the SP and made the decision before hand. If you think about it....wont the inside of the AP still get warm? I know it will...in the spots not next to the holes or even next to them....the suns still gonna beat down on them and I would bet still cause some kinda funky smell or whatever that stuff that stinks is inside of regular pots. I think the SP is the best kinda pot you can put your plants in. I did see a side by side of the SP against a regular pot and the difference was AMAZING when it came to just the structure of the plant, and how much healthier and more vigorous the SP looked. The only thing is I need to figure out a good method for "LST" in the SP.
 

Hammerhead

Disabled Farmer
ICMag Donor
Veteran
I did a side by side with the SP(5g) and regular Square pot(5). I'm doing a side by side with a AP(8G) and Regular Square pot (5).

The First one I did I did see a healthy plant in the SP but I did not see any major changes in Yield or Potency. The Plant looked nicer as it was growing in the sp that all I noticed.


I'm in the 2nd test with AP. I'm seeing the same here. Plants are a bit taller. There is some issue with watering the AP. When you water these you will lose 1/3 of the water you put in it will leak out all of the holes so a 2nd water maybe needed. They are all SLH and are all the same Phenotype. The plants in Regular pots are doing fine just 4-6 " shorter. I will have to see as they flower. So far I'm not sold on Either AP/SP.
 

PoopyTeaBags

State Liscensed Care Giver/Patient, Assistant Trai
Veteran
i would like to say

AP is not a full Air Pruning / aeration container it is a air pruning container

(AP wont dry out as fast as SP actually AP is closer to full plastic container in this aspect)

<that is another great beni of SP. wet/dry cycle actually gives some of the faster growth found in hydro vs standard plastic containers As the air gets all the way threw IE drying out air comes in>


Dude i got smart pots and air pots... let me tell you that airpots dry out way faster then SP... i dont know where u got that info but i have to water my airpots 2-3 times more then i do my smart pots...

as for my side by side comparison.....

i like both for different reasons... airpots can be messy.... they almost dry out too fast... i water my airpots sometimes 2 times a day and in water which is crazy compared to the reg pot.... it makes roots stretch out and grow alot faster and healthier reminds me of almost like growign in coco... as for the smart pots i do like them but they DONOT dry out as fast.. however they have NO Mess.. i do like them alot better then reg pots however....

with airpots you wil have water leaking out the holes and the bottom along with the water comes dirt...


as which is better.... i htink the verdict aint quite out yet on which im going to switch too one day i lean one way the other day the next....

sorry i ddint mean to sound like an ass if i did... but from side by side airpots dry out twice as fast.... As for watering 1 water for me is probably watering the airpots 2-4 times to actually let the water sink in thouroughly through the airpot...
 
N

nekoloving

very VERY interesting discussion y'all got going here ;)

few things hopefully not mentioned yet:

1. the patent:

1 4510712 Air-root-pruning container
A vertical air-root-pruning container involving a series of vertical air gaps displaced around the sidewall of a container. The air gaps are alternately displaced outwardly or inwardly to air-prune... 1000
2 4497132 Air-root-pruning container
A vertical air-root-pruning container involving a series of vertical offsets or air gaps displaced around the sidewall of a container. The offsets or air gaps are alternately displaced outwardly or... 984


4 5241784 Plant root container and method of air root pruning
An air root pruning cylindrical container with a corrugated sidewall to lead growth of the root tips along the inner surface of the sidewall to a plurality of apertures in the sidewall. The... 840
heh - remember patents are quite useful things for finding how they work in general ... ok next up:

there's a product called a cool-ring which is REALLY interesting.

http://www.floridacoolring.com/index.php?section=26

they have several vids of it and how it works, but its even more interesting on how i found it ;)


Julia Walker
ESRM 412 – Native Plant Production
Spring 2005 – Prof. Kern Ewing

Guidebook for Native Plant Propagation:

Development and construction of an air-pruning propagation bench, and its proper use


Why use such a system?
An air-pruning propagation system is a low-cost, efficient method of propagating cuttings, seedlings or container plants for restoration projects. Air pruning happens naturally when roots are exposed to air in the absence of high humidity. The roots are effectively “burned” off, causing the plant to constantly produce new and healthy branching roots. If roots are not exposed to air, they continue to grow around the container in a constricted pattern. The roots may spiral, twist, kink or become strangled. When the plant is later installed it will likely fail to establish a normal root structure, and instead will have reduced uptake of water and nutrients. Eventually abnormal growth should be obvious and could cause the plant to fail. Damaged root systems also cause leaves to turn yellow or brown, shrivel or drop. Healthy, highly branched root structures allow a plant to more efficiently uptake water and nutrients while increasing growth and overall plant health. A strong root system will make a plant better able to establish itself when installed in a restoration project.

image001.jpg
Strangled
image002.jpg
Twist
image003.jpg
Crank handle
image004.jpg
Pot-bound
image005.jpg
Spiral
image006.jpg
Well developed
http://depts.washington.edu/propplnt/Chapters/air-pruning.htm#_edn1Comparison of poor root structures to a well developed root structure

image008.jpg

[FONT=&quot][ii][/FONT]Pot-bound roots


image010.jpg


image012.jpg

[FONT=&quot][iii][/FONT]Example of air-pruning using commercially available plug trays

Advantages of air-pruning:
·promotes branched root systems
·encourages new roots to sprout
·prevents roots from spiraling
·prevents plants from becoming pot-bound
·plants may remain in pots, plugs or plant bands longer

image013.jpg

[FONT=&quot][iv][/FONT]Branched root structures resulting from air-pruning methods

image015.jpg

[FONT=&quot][v][/FONT]Healthy air pruned roots at open base of cell

How do you most effectively utilize an air-pruning bench?
Depending on the climate and plant material the benches may be set up outside, in a hoop house or greenhouse. In an enclosed structure more careful monitoring of humidity and air flow is necessary.
Watering should be done from above either manually, with a drip irrigation system or a mist system. When propagating cuttings or seedlings a mist irrigation system may be the best option. The misting system can be constructed using irrigation supplies from your local hardware store or kits are available from many online retailers.
image016.jpg
image017.jpg

[FONT=&quot][vi][/FONT]Plant bands: note the side holes for promoting lateral root pruning
Seeds or cuttings should be propagated in plugs or plant bands. Plant bands are open-bottomed paper sleeves and are highly recommended (see www.hummert.com). Roots easily air-prune below and the paper will decompose when planted. Plugs may be less effective, needing lots of openings for air to hit the roots, including side slits. Any side air contact in either the plant bands or plugs will help to prune the lateral roots. It also can be difficult to remove plant material from plug trays.
image018.jpg

[FONT=&quot][vii][/FONT]Air-pruning plug tray with open bottom and mesh base
When using plant bands it is vital to remember to carefully monitor moisture levels as the paper sleeves can wick water away from the plant.
It is important to use a soil mixture that has a high water holding capacity to accommodate the extensive root structure development and tendency of plant bands to dry out. Drainage should not be an issue as the bench is suspended off the ground.
Air-pruning is also highly effective for propagating trees. It increases the “shelf-life” of the plant material, prevents root circling, and increases the success of plant installations because the transplants establish quickly. Using such systems eliminates the need to re-pot as the tree grows, as small plants can be potted directly into large containers. This type of pot causes the plant to develop a dense root ball of tiny white roots filled with carbohydrates, ready to branch out when planted. The root ball may also be more resistant to extreme temperatures. This can greatly increase the survival rate of plant material installed in a restoration project.

image019.jpg

[FONT=&quot][viii][/FONT]Air-pruning pots are used to eliminate root circling in tree production
image020.jpg

This shows eucalyptus root development using an air-pruning pot

How do you know the roots are air-pruning properly?
No roots should be visible outside or beneath the container. If you can see small white tips of roots try:
·increasing the air flow with fans
·raising up the bench
·decreasing the humidity (increase ventilation)

The propagation bench:
Many different designs would be effective. The basic needs are an open metal surface raised up off the ground, such as a mesh, that allows air to flow freely. It should be at least 16-24” high to allow air to circulate beneath. Standard height for a typical (non-air-pruning) propagation bench is 36”. This height accommodates someone in a wheelchair to get up close to the plants. The frame can be constructed out of treated lumber, metal, concrete or plastic. While concrete makes a very sturdy table that can support great amounts of weight, it is a much more permanent type of construction than the other options.
image022.jpg

[FONT=&quot][ix][/FONT]Metal benches such as this are highly effective, and are readily available online

[FONT=&quot][x][/FONT]Materials List:

  • Coated wire--14 gauge, 1-inch grid
  • Treated lumber frame, 2-inch by 4-inch
  • Cinder block legs

Construction:
To build a relatively inexpensive and sturdy bench you’ll need to construct a wooden frame and create a surface of wire mesh. The precise dimensions of each table should vary according to your particular needs. In this example the base of the bench is made of two 16” cinder blocks and a 16” piece of the 1-inch by 4-inch treated lumber.
·Lay the bottom cinder block horizontally on the floor.
·Set the second cinder block vertically centered on the bottom block
·Lay the 16” piece of lumber flat across the upper block
·rest the frame on these legs, placed 4’ on center along the edges of the bench
The frame should be 4 feet deep, and may be as long as needed for the space. 2-inch by 4-inch treated lumber should be used to construct a simple frame to which the mesh metal surface is attached.
The height of the bench can be raised by adding additional horizontal cinder blocks. This design will yield a bench the recommended height of at least 16-24”.
image024.jpg

[FONT=&quot][xi][/FONT]This shows a similar bench. Here the legs have been placed at the corners.

Resources:
1)http://www.renaldo.org/renaldosales/ag/airprune.html
2)http://www.wvu.edu/~agexten/hortcult/greenhou/grencons.htm
3)http://www.greeningaustralia.org.au/GA/NAT/TipsAndTools/Library/Growingseedlings.htm
4)http://courses.washington.edu/ehuf4...d_Disadvantages_of_Planting_Material_Form.doc
5)http://www.haxnicks.co.uk/
6)http://www.rootmaker.com/faqs.php
7)www.cherrylake.com/Resources/RoomToGrow.pdf
8)http://www.superoots.com


[FONT=&quot][/FONT] Image source : http://www.nda.agric.za/docs/macadamia/macadamia.htm

[FONT=&quot][ii][/FONT] Image source : http://www.rhs.org.uk/advice/profiles0404/plant_establishment.asp

[FONT=&quot][iii][/FONT] Image source : http://www.renaldo.org/renaldosales/ag/airprune.html

[FONT=&quot][iv][/FONT] Image source : http://www.renaldo.org/renaldosales/ag/airprune.html

[FONT=&quot][v][/FONT] Image source : http://www.sierrahort.com/conifer.htm

[FONT=&quot][vi][/FONT] Image source : http://www.hummert.com/catalog.asp?P=2748

[FONT=&quot][vii][/FONT] Image source : http://www.renaldo.org/renaldosales/ag/airprune.html

[FONT=&quot][viii][/FONT] http://www.superoots.com

[FONT=&quot][ix][/FONT] Image source : http://www.alumni.ca/~rich4k0/images/greenhouse_bench.jpg

[FONT=&quot][x][/FONT] The instructions for building this bench were found on the West Virginia University Extension Service website : http://www.wvu.edu/~agexten/hortcult/greenhou/grencons.htm

[FONT=&quot][xi][/FONT] Image source : http://www.ashland-city.k12.oh.us/ahs/classes/hort/2003/feb26/move2.jpg
http://depts.washington.edu/propplnt/Chapters/air-pruning.htm


image017.jpg


notice that TOG? [trees of green] hehe i just HAD to point that out yaknow hehe - anyway look over what they are using, its really REALLY simple and totally DIY friendly - i'm just looking at this and a cab and thinking.... ok so water to waste..... yeah needs to be over a tray for runoff or something.... shoooooooooooot - this might go really good with one of those autovalve setups - think hydrofarm?


-[edit]-
HT-111_2.jpg
one possible answer? set pot in pot with perlite at bottom or whatnot...
 
Last edited:
air pot, smart pot, cool ring.........they all have the same function

by design smart pot is better, no assembly, they are sturdy for it being a fabric, light weight, easier to have a large quantity shipped, and the least expensive.
 
Top