What's new
  • Happy Birthday ICMag! Been 20 years since Gypsy Nirvana created the forum! We are celebrating with a 4/20 Giveaway and by launching a new Patreon tier called "420club". You can read more here.
  • Important notice: ICMag's T.O.U. has been updated. Please review it here. For your convenience, it is also available in the main forum menu, under 'Quick Links"!

NoobwannaB's Fabric Pot SIP method (works with hard pots too)

Hey Noob

Posted this next door but I figured it would work here too.
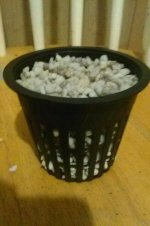
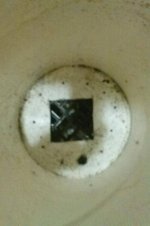
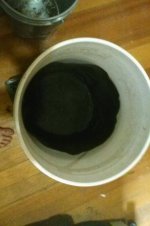
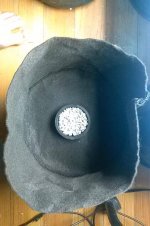
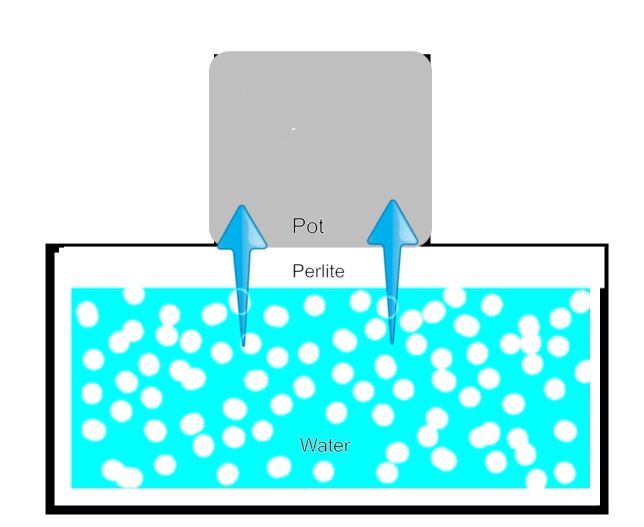
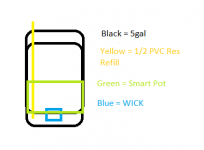
This is how I set-up my current SIP, should try cutting out the sides of the bucket for air-flow, but that's another day. The Smart is acting as a filter to keep the res cleaner when I apply tea's and such, also helps to re-use a bucket if you now have a smaller WICK to work with.
 

Attachments

  • CAM00300.jpg
    CAM00300.jpg
    40.6 KB · Views: 18
  • CAM00301.jpg
    CAM00301.jpg
    30.4 KB · Views: 21
  • CAM00302.jpg
    CAM00302.jpg
    37.8 KB · Views: 20
  • CAM00303.jpg
    CAM00303.jpg
    52.3 KB · Views: 19

noobwannaB

Member
Hey Haggard!! I'm such a bonehead when it comes to stuff like this...I see all the parts, just not sure how it all fits together??? I thought maybe the perlite instead of the soil wick, and the smartie instead of the inside bucket...but you've got a hole in the bucket no??
 
Hey Noob

Yea I am still using 2x plastic 5gal buckets, but I have already used these buckets for SIPs, but the old wick didn't make it.

So the Smartie is holding the new wick in place, and filtering all the BS that normally sinks into the res.

Here's a group shot so you can get a better idea, all the refill spouts are behind the plants.

:woohoo:
 

Attachments

  • CAM00314.jpg
    CAM00314.jpg
    83.8 KB · Views: 20

noobwannaB

Member
Hey Noob

Yea I am still using 2x plastic 5gal buckets, but I have already used these buckets for SIPs, but the old wick didn't make it.

So the Smartie is holding the new wick in place, and filtering all the BS that normally sinks into the res.

Here's a group shot so you can get a better idea, all the refill spouts are behind the plants.

:woohoo:
Ok, I get it. You did something like this last run no?? Because before I came up with this I was seriously considering your smartie in a bucket deal....still tripped up by the 5 gal buckets though, just don't have the room in my space. Looks like a winner though!

Came up with this diagram today for the 'other' place...for anyone having trouble visualizing. Just throwing it in here.

4d95e3559983da6020552dd00b1226f5_zps2c8fce83.jpg
 

2 Legal Co

Active member
Veteran
Haggard

You've got me confused, please explain how it works.

What do you mean by 'new wick' and 'old wick'?

Maybe it's just too early in the morning. lol Help me out here.

edit; I've got the concept,,, just not following the components.
 
Now if my assumptions are spot on this would also be usable for "uncooked" organic soil with e.g peat moss in it. Kind of like cooking the soil during the run, and upon re-using the soil the next run it would be cooked, no?

What I'm saying is that the bad water retention of the uncooked pat moss wouldn't make a difference since it will wick anyway.
 
Last edited:
Nope. Already had someone try that and for some reason, could be the lack of a plant or the lack of O2 but cycling takes longer and meh.

You could how ever fill a pot like this with FINISHED soil, and cover crop it outside before you plant indoors.

2Legal

I used that bucket for another SIP @ one point, the wick was a small plastic planter that's the square hole you see. The Smart Pot allowed me to re-use that bucket by cutting a hole in the Smartie to fit the NEW wick.

Hope that clears it up!


Noob

Ironhead is messing around with that idea right now, my first SIP/SIPPA with all the holes drilled didn't impress me much. The thing is adding that layer of fabric is decreasing your volume of soil!

Go to Lowes not HD, in the painter section next to all the brushes you will find small 2.5gal plastic buckets $3/each, 8in Diameter should work perfectly for you, and perfectly to make a Smart SIP.

I am kind of pissed I have to use 5gal for this first run, plan on coming out of the tents and start getting slightly more seriously using only 15+ Smarties.
 
Since Noob is showing off her sick paint skills I figured I would to help you guys see the SIPPA layout.
 

Attachments

  • SIP Paint.png
    SIP Paint.png
    2.8 KB · Views: 23

noobwannaB

Member
Nope. Already had someone try that and for some reason, could be the lack of a plant or the lack of O2 but cycling takes longer and meh.

You could how ever fill a pot like this with FINISHED soil, and cover crop it outside before you plant indoors.

2Legal

I used that bucket for another SIP @ one point, the wick was a small plastic planter that's the square hole you see. The Smart Pot allowed me to re-use that bucket by cutting a hole in the Smartie to fit the NEW wick.

Hope that clears it up!


Noob

Ironhead is messing around with that idea right now, my first SIP/SIPPA with all the holes drilled didn't impress me much. The thing is adding that layer of fabric is decreasing your volume of soil!

Go to Lowes not HD, in the painter section next to all the brushes you will find small 2.5gal plastic buckets $3/each, 8in Diameter should work perfectly for you, and perfectly to make a Smart SIP.

I am kind of pissed I have to use 5gal for this first run, plan on coming out of the tents and start getting slightly more seriously using only 15+ Smarties.

Meh...I'm pretty happy with the system I'm running.

I can use any size pot I want. I looove the smarties, and I've washed/reused my 3 gals several times and they're always like new when they're clean. Perlite online is pretty cheap, and it's reusable too, so the only way I need to spend more money is if I decide to step up the size of my pots. My plan was to run 3 plants this grow so I only bought 3 - 7 gal smarties and ended up with 5 seedlings lol!! Got plenty of 3 gals though so I can run the rest in those and just clone them (plan to do that anyway) and run them bigger next time. No way I can go bigger than 7 gal...unless somehow my state goes legal that is ;)

I'd still love to use that kiddie pool and fill it with perlite....
Sent from my iPad using Tapatalk HD
 
Okay, now I'm going to explain why my apartment looks like a construction site.

All begins with reading this thread, which convinced me that this might be something useful to me. The fact that I have to be gone from my grow site for a couple of days finally made me decide to try it out.

So I took the little green tray that came with the humidity dome, filled it with LECA (what I had home) and sprinkled some soil on top. I didn't have anything else to cover it with so I thought this might be a good idea.

I also took a netcup and put it in one of the corners. It made a really clean appearance! :)

The test subjects were sixteen small bagseedlings in tiny plastic pots. They were bone dry and they need constant watering, fine subjects indeed!


Well it turns out it works fantastic! So fantastic so that I immediately decided to focus all my attention into getting the stuff I needed within the hour as the stores were about to close!

In my growroom I built a pool, the size of the entire room (well, walk-in-closet actually). Poured in a couple of bags of LECA and put a fibermat thing on top. I think normal people use it to shade their potatoes or something like that. Anyhow, it was treated with some oily gunk so it repelled water. It turns out that if you run it in the washer machine for like 15 minutes it seems to wick (well I have to wait until tomorrow to actually know).

The result? Well, I'm happy but it was quite a lot of work!


You can't tell from the picture but the table is actually raised quite a bit to make it easier to work (read play and cuddle) with the plants.

I hope this makes life easier now, haha!
 

noobwannaB

Member
.....I think normal people use it to shade their potatoes or something like that. ......../QUOTE]

LOLOL!!!! I just love that statement....normal people ;)
You win the prize for sure on rapid response and ready action! zigge you're my new hero!!

Not so sure about the soil, or your covering, but the system should work well for you. I usually suggest not putting ANYTHING in between the wick (lava, perlite, whatever) and the pot, especially with a hard pot. You really need to soil to make good contact with the wick. The dirt...I'm gonna pass on that one, but your shade material might work. Here's a picture of my plants from a week or so ago when they were still in a seed tray
9343638A-FE52-4250-AE43-D8E34BA10698-248-0000004324048CF3_zps43021a17.jpg


See how the material is kinda skirted around the pots?? I have had people find success by laying it down if you cut a hole in the fabric for the pot, but I tried that and didn't like it at all. I just cut my material into strips a little longer than my trays and tuck it around the pots while laying it lengthwise.

You can use lots of material...an old sheet, even plastic I suppose as long as you work it around the pots and not underneath them. For some reason I don't like the idea of the plastic though...but that's just me. Or...
you could use nothing!! I think I said (may be confusing the sites) that even though you may get slight discoloration or algae it doesn't really harm anything. It's not pretty...and for me the white, clean look of all the perlite is just so beautiful (yes, I'm weird), so I don't like to see it look dingy, but it doesn't get slimy or anything, doesn't breed mold, and won't hurt your plants. Up to you though!!

AWESOME start!! Thanks for sharing, and kudos again for being a sport and giving it a shot. Tweak it until you get what you like and works for you and ENJOY :D

Sent from my iPad using Tapatalk HD
 

hbj1891

Member
.....I think normal people use it to shade their potatoes or something like that. ......../QUOTE]

LOLOL!!!! I just love that statement....normal people ;)
You win the prize for sure on rapid response and ready action! zigge you're my new hero!!

Not so sure about the soil, or your covering, but the system should work well for you. I usually suggest not putting ANYTHING in between the wick (lava, perlite, whatever) and the pot, especially with a hard pot. You really need to soil to make good contact with the wick. The dirt...I'm gonna pass on that one, but your shade material might work. Here's a picture of my plants from a week or so ago when they were still in a seed tray
View Image

See how the material is kinda skirted around the pots?? I have had people find success by laying it down if you cut a hole in the fabric for the pot, but I tried that and didn't like it at all. I just cut my material into strips a little longer than my trays and tuck it around the pots while laying it lengthwise.

You can use lots of material...an old sheet, even plastic I suppose as long as you work it around the pots and not underneath them. For some reason I don't like the idea of the plastic though...but that's just me. Or...
you could use nothing!! I think I said (may be confusing the sites) that even though you may get slight discoloration or algae it doesn't really harm anything. It's not pretty...and for me the white, clean look of all the perlite is just so beautiful (yes, I'm weird), so I don't like to see it look dingy, but it doesn't get slimy or anything, doesn't breed mold, and won't hurt your plants. Up to you though!!

AWESOME start!! Thanks for sharing, and kudos again for being a sport and giving it a shot. Tweak it until you get what you like and works for you and ENJOY :D

Sent from my iPad using Tapatalk HD

subbed. i love you:blowbubbles:
 
.....I think normal people use it to shade their potatoes or something like that. ........

LOLOL!!!! I just love that statement....normal people ;)
You win the prize for sure on rapid response and ready action! zigge you're my new hero!!

Not so sure about the soil, or your covering, but the system should work well for you. I usually suggest not putting ANYTHING in between the wick (lava, perlite, whatever) and the pot, especially with a hard pot. You really need to soil to make good contact with the wick. The dirt...I'm gonna pass on that one, but your shade material might work. Here's a picture of my plants from a week or so ago when they were still in a seed tray
View Image

See how the material is kinda skirted around the pots?? I have had people find success by laying it down if you cut a hole in the fabric for the pot, but I tried that and didn't like it at all. I just cut my material into strips a little longer than my trays and tuck it around the pots while laying it lengthwise.

You can use lots of material...an old sheet, even plastic I suppose as long as you work it around the pots and not underneath them. For some reason I don't like the idea of the plastic though...but that's just me. Or...
you could use nothing!! I think I said (may be confusing the sites) that even though you may get slight discoloration or algae it doesn't really harm anything. It's not pretty...and for me the white, clean look of all the perlite is just so beautiful (yes, I'm weird), so I don't like to see it look dingy, but it doesn't get slimy or anything, doesn't breed mold, and won't hurt your plants. Up to you though!!

AWESOME start!! Thanks for sharing, and kudos again for being a sport and giving it a shot. Tweak it until you get what you like and works for you and ENJOY :D

Sent from my iPad using Tapatalk HD

Haha, thanks for the encouragement!

To continue my story...

This morning when I woke up I went to check on the lasses. I noted that the small plastic cups (the sixteen in the middle) were wicking as they would of been bone dry again if they weren't absorbing moisture. Which was pleasing.

The larger hard-pots however were not functioning very well. What I did was that I removed the mentioned potato shading material and put the pots directly on the Hydroton. (I still don't know if the words Hydroton and LECA are interchangeable?).

When I get home from work I can in more detail describe if it works with the combo hydroton - hard pots. I suspect it will not work if the roots aren't poking out the bottom, which they aren't as of yet.

The next step is to manufacture some square pots that will be of the dimensions that makes me fit exactly 32 pots on the table. This will render any shading material useless since the pots themselves will cover the whole area sooner or later. The plan is to have eight rows of four plants, one row for every week of flower. The area below the table will be used for vegging and cloning of four plants each.

Now I have been thinking about ways to let me elevate the pots for canopy management. Since the rows will be of different heights I was thinking I could manufacture cubes of this material that are filled with some wicking material, then I would simply place the cubes in between the pots and the hydroton bedding.

I am not sure about this but wouldn't pure EWC in the cubes (from now on called elevators) be a good idea? That would provide nutrients and bennies to the wicking water on it's way to the plant, no?

One more problem that I ran into was that I bought way to little LECA (approx. 35 liters). I need to go buy at least that amount again.

Oh, and for those wondering - the room dimensions are 167cm x 78cm, or 5.5ft. x 2.6ft. The usable height under the table is 70cm or 2.3ft. You think this height would let me veg for one week using T5 tubes?

You really are a star NooB, I like you! :D

Peace, Z

edit:

I'm throwing in some eye-candy aswell :D
picture.php
 

noobwannaB

Member
Not a star, just a gal that discovered something that works (got lucky, many of my hair brained ideas don't) and decided to share it with the masses ;)

It doesn't make a bit of difference if there are roots coming out the bottom...look at the diagram again. The wick works like this...
the wick material (perlite, lava, whatever you're using) pulls the water
if using soft pots the fabric pulls the water from the wick material
then the soil pulls the water from the fabric pot and feeds the roots.
If you're using hard pots, essentially you're bypassing the wick function of the fabric pot so you NEED good contact between the soil and wick material so that the SOIL can pull the water from the wick (sorry about the caps, on the app and no way to accentuate a word any other way).
That's why in my tutorial I say that if using hard pots you need to press them down into the tray a bit and not move them around so that there's good contact between soil and the wick material.

Again, ideally the set up works best with fabric pots, but it WILL work with hard pots, I tested it long before I posted it up for anyone else. The test was with a 10 gal pot in a dish pan with perlite. Now admittedly the weight of the pot kept it in contact with the perlite but with a smaller pot pressing it down into it and maybe even twisting it a bit so it comes up slightly on the side would have the same effect. I started my seedlings this way on this grow and they were in styrofoam cups ;) You do NOT want anything between the wick and the pot though. NOTHING...not with a hard pot. :(

As far as EWC or anything like that it's your grow...you can literally do what you want, but I like to keep my reservoir as clean as possible. Water only, so I add all my 'foodstuffs' outside the system, let it drain if need be then return to the tray so that it stays clean.

It's early for me and I've just started my second cup of coffee, but I hope this makes sense and helps you figure it out :)


Sent from my iPad using Tapatalk HD
 

83entrepreneur

New member
Hey noobwannaB, I like your thread, you have some useful information. I recently went to some homemade sip pots made from 5 gal buckets. I like you perlite set up. Do you think this set up would aslo work soiless? Fill pots with perlite instead of dirt. Of coarse I would have to add nutes. Whats your input please.
P.S. I am new hear just joined when I saw your thread.
 
Top