What's new
  • Happy Birthday ICMag! Been 20 years since Gypsy Nirvana created the forum! We are celebrating with a 4/20 Giveaway and by launching a new Patreon tier called "420club". You can read more here.
  • Important notice: ICMag's T.O.U. has been updated. Please review it here. For your convenience, it is also available in the main forum menu, under 'Quick Links"!

My many designs and experiments.

Killkingkong

Active member
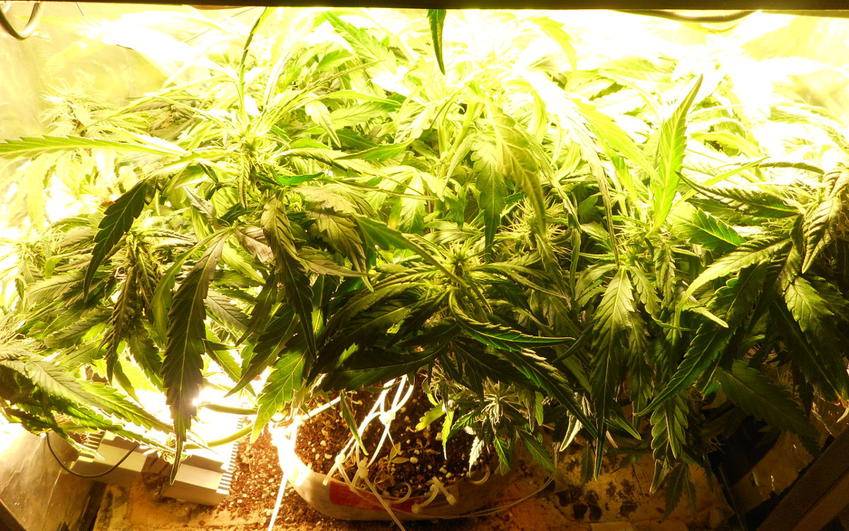
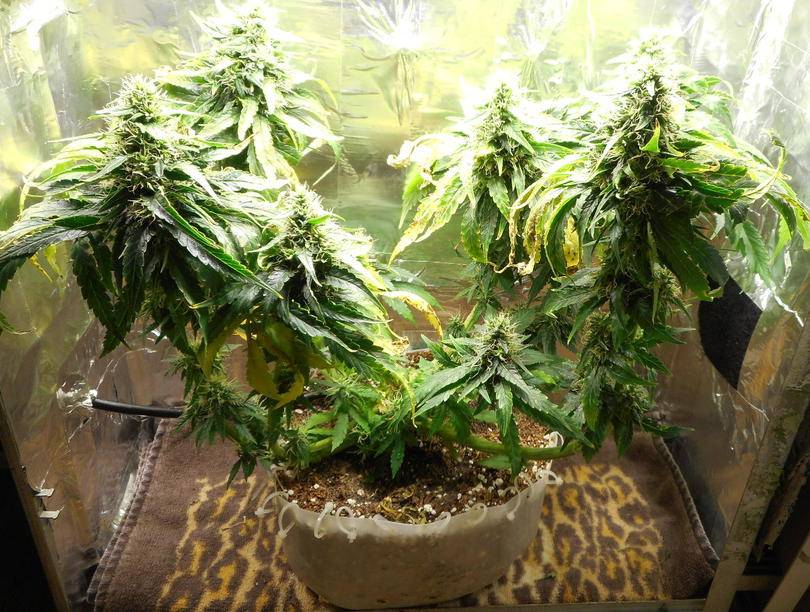
Ok, so I made major changes this past week and finally got all the ideas that have been floating around out of my head. Instead of buying a new PC case I decided to put my new light in my big PC. I took the 3 LEDs out of my big PC and am going to put them into my small PC. I started the process of putting the 3 lights into my small PC, but I'm have trouble getting the magnets on the heatsinks. I'll have that done by next week. This new light in my big PC is awesome, extremely bright. I took the single high quality light out of my small PC and decided to put that in my medium pc as a below canopy light. I've had that idea for a long time so I finally went through with it. My thinking is that there's so many branches on the plant in the medium pc the light doesn't penetrate under the canopy much. Hopefully this turns what would have been popcorn nuggets into quality buds.

picture.php


picture.php


picture.php
 

Killkingkong

Active member
As you could tell from the prior pictures one of my plants was getting smaller and smaller. I was taking a lot of samples from this plant and eventually the leaves all started to die, so i decided to just harvest this plant early so I have a little stash which gives me less incentive to touch my other plant which is doing well. I got the 3 lights up in my small PC now, but it's still empty. Next week I'll start 2 new seeds that came from quality bag seed. After this next plant is harvested I should have plenty in my stash not to bother the next wave of plants. I also moved the remaining plant into the Big PC and also transferred the underside LED light in there. There's 50w from up top and 20w down below. hopefully I get a good yield.


Hey, Killkingkong, nice thread of your's!
Mostly lurking around but your thread is one of those which inspire me.
You manage to train your plants to a nice structure. I like how you share the tips of the design process on your boxes too.
Your last light seems to be a pretty good one. Have you had any measurements on it?
 

Killkingkong

Active member
Hey, Killkingkong, nice thread of your's!
Mostly lurking around but your thread is one of those which inspire me.
You manage to train your plants to a nice structure. I like how you share the tips of the design process on your boxes too.
Your last light seems to be a pretty good one. Have you had any measurements on it?

I don't have any solid measurement, but I have a lux measure app on my phone. I wouldn't take it for exact value, but I guess the numbers are useful for comparing my boxes. While the highest lux came from the smallest box and the lowest with the biggest box I still think my big box is much better because of an almost uniform light spread. plus the way I measure all of there boxes was to flip a empty grow pot upside down and put my phone in the center. So while the height of the phone is the same for each measurement the lights are at different heights depending on the box. There was about 8 inches of space inbetween the light and phone for the small box 10ish for the medium box and 13ish for the large box, but that's all just eye balling.

Small PC - 35366lux
Medium PC - 24449lux
Large PC - 19983lux

New lights in the small box:


New hopeful seedlings in the small box:


Branches Drying in medium box:
 

Killkingkong

Active member
I did some more "accurate" testing. This time I put my phone at a distance of 6 inches from each light. In my medium pc I have 2 brands of lights in my medium pc (3 cheapos in the center (run at 10w each) and 2 high quality lights on the sides(also run at 10w each)), so for this case I measured in the center and on the side. In my big PC I turned off the underside light so I could just test the top lux. Also all boxes used 50w for all testing.

Center Medium: 39637lux
Side Medium: 43683lux
Small: 51074lux
Large: 40288lux
 

Killkingkong

Active member
I finally hooked up my automated watering system last night...it flooded my cab again. I just don't have much luck with automated watering, but I'll keep working on it. The plant that's wrapping up is looking real smokeable right now (That other plant that I sampled is almost done lol) so I want to get the automated watering up so I don't have to check on it everyday (out of sight, out of mind) but of course I don't want it to die either. Training is completely done on this plant, in fact I cut all the zip ties after I moved it from the medium pc to the big pc and there's plenty of space between the light and the plant. but even if the branches grew into the light the light is completely cool to the touch at 50w. I'm still waiting for my other seeds to sprout. They were kinda small so I'm not confident in them. if these don't sprout I think I'll finally buy quality seeds again from seed boutique.

Day 56
 
Last edited:

Killkingkong

Active member
Nothing too exciting to report, it's just a waiting game now. I got my automatic watering working, i hope. So i have a water pump in my res which has tubes leading to my active PC right now. It comes on twice a day for a steady drip of nutes for 30 minutes which waters just before there's runoff (like the name implies the "drain to waste" method seems wasteful to me). So I'm out of bud from that other plant and now that my automated watering is working I'm gonna try to check on the plant at little as possible to avoid temptation. I also flipped the plant around so the otherside could get some of the bottom lighting. I also raised the bottom LED by stacking it on top of another heatsink so it penetrates deeper into the canopy.

Someone said they like how I explain my designs, so I figured I'd fill you guys in on how I power my fans. Basically I always use 12v adapters with preferably 2amps or more. I then take a "12v led dimmer" that cost me about .68 cents on ebay from china. I originally bought the led dimmer thinking I could use it with my LEDs, then i realized they're not made for high power leds. When I realized all these dimmers did was adjust voltage, I thought it might work for my fans, which is did perfectly. So i switched all my fan power supplies to this. I tried bigger boxed dimmers and for some reason those make a loud whining noise that's impossible to ignore. I bought some of those adjustable power supplies before and those work, but they also make a whining noise (but not as bad as the boxed dimmers). For my fans/power supplies I also decided to use standard computer fan connections, so everything is detachable and easily replaced. All the plugs on all my cases are compatible with each other, so if anything fails (a fan power supply died on me 2 weeks ago) I can easily swap them out.

Day 63:


Fan connectors/dimmers:
 

Killkingkong

Active member
Getting a little bored with this current grow. I'm disaapointed in the genetics of this plant, but then again it's bagseed. Looks like this is gonna need 100+ days. I see a 4 pack of Nirvana seeds on Seed Boutique for like $75, so that's my next purchase.

Day 71:


Day 78:
 

DoubleTripleOG

Chemdog & Kush Lover Extraordinaire
ICMag Donor

I really like the way that looks. You have inspired me to make my next DIY project a multiple cob led fixture. I especially like that you source the cheapest parts possible. Showing that the "cheap" parts work good is even more encouraging. Start with cheap stuff, and work my way up to "high end" parts once I find a design that suits my needs, and performs as I expect. Thanks for your dedication. :tiphat:
 

Killkingkong

Active member
4 seeds 75$? damn

Sorry, 4 packs of 5 feminized seeds, so 20 total seeds and 4 different strains. I already made colliodal silver a while ago so I should be able to make my own fem seeds down the line if I want.

I really like the way that looks. You have inspired me to make my next DIY project a multiple cob led fixture. I especially like that you source the cheapest parts possible. Showing that the "cheap" parts work good is even more encouraging. Start with cheap stuff, and work my way up to "high end" parts once I find a design that suits my needs, and performs as I expect. Thanks for your dedication. :tiphat:

I actually started out using expensive parts and then move to cheap because I wanted to use more and more LEDs but at $55+/LED that wasn't possible for me. For my next run with better genetics I have 2 ideas in the works. I'll either put my 3 quality LEDs up top in my medium PC and do a quality vs quantity experiment or I'll build a 2nd 10 cheap LED light and use all my quality LED as underside lighting since there's less space to put light underneath....meaning I have quality light on bottom and quantity light on top...we'll see, i just really need to buy quality seeds before I spend anymore money on parts.
 

1sqft

New member
I actually just joined to take my hat off to you. I have a couple of questions, as well...
First- where exactly are your drivers? I don't see them anywhere in your pictures and was wondering how/where you mounted them.
Second- you appear to be under driving powerful LEDs. I'm guessing the advantage would be less heat...?

Cheers,
 

Killkingkong

Active member
Today is day 84. I'll let this one go a week or 2 more then I'll chop. Still very disappointed in these bagseed genetics. On the brighter side a donor is sending me some quality seed crosses, so i'll be using his seeds and the next run will be sponsored by him. Since I don't have to spend money on seeds anymore I'll be using that money to build a 2nd 10 cheap 100w (rated) LED fixture and buy a 4th quality LED (The same as the one I used in the bucket a few pages back). By buying the 4th quality LED I'll have 2 sets of quality LEDs that I can use for underside lighting my next grow. I've come to the conclusion with LEDs it's better to have a high quantity of light on top and high quality LEDs down below. Since the pots take up space use better quality light down below since you won't be able to add as many as on top.

Day 84:


I actually just joined to take my hat off to you. I have a couple of questions, as well...
First- where exactly are your drivers? I don't see them anywhere in your pictures and was wondering how/where you mounted them.
Second- you appear to be under driving powerful LEDs. I'm guessing the advantage would be less heat...?

Cheers,

I have all my drivers outside the boxes. They use to be on the ground but the wires were constantly getting tangled, so a few weeks ago I either taped/screwed/zip tied all my drivers onto my wall. Now the drivers don't take up floor space and with that hook holding the cords in place nothing gets tangled anymore. I use PC power supplies to plug/unplug my light. At the end of each driver I connected a power supply cable to do this. I use to just twist wires together and poke holes through walls to get the wire out the box, soldering wires together and using connectors is much cleaner.

Drivers:


For the quality LEDs I drive them harder than the cheap LEDs. At 1 point I was running my best LED in a 5 gallon bucket and at 50w. The buds from this were great, rock hard. unfortunately 50w was just too much heat for such a small space and at the plant get close to the LED I had heavy bleaching and burning. The buds on the sides of the bucket were beautiful though. For the cheap LEDs I underdrive them so much (5w per LED at the moment) because they're no where near as efficient as the high quality chips. Let me put it this way, my best chip is rated for about 65w and that produces 8800LM. That's 135LM/W. If you were to drop the wattage on that chip to 50w it might go up to 150LM/W because the chip has to displace less heat so it raises the lumens per watt. The cheap chips on the other hand are rated at 100w and about 9000 lumens which is 90LM/W which is far worse than the quality LEDs. but once again if you don't run it at the rated 100w (I'm running them at 5w each) you raise the efficency a ton. However you can't just run 1 5w light and expect results. I checked recently and see that the price of my best LED dropped from $60 when I bought it a year ago down to $30 on mouser. For $30 I can buy 10 cheap LEDs and use the strength in numbers idea and get a better spread of light.

Bucket when it ran 50w. You can see the hotspot in the center where the leaves where bleaching and burning:
 
Last edited:

Killkingkong

Active member
This plant I'm currently growing refuses to finish. As I said I'm very disappointed in the genetics of this plant. It's my fault though, I took it out of a bag of dirt weed, not even quality bag seed. I cut off one of the smaller branches and took a up close pic so you can see there's almost no crystallization on the buds and the hairs are all very clear. I like the size of the buds, but that's about it. I'll keep this going until I have to refill my res (looks like about 1/2 a gallon left) but I don't even want to smoke this plant anymore. I spent 3 months growing dirt weed and it looks like it has another month left.

On the bright side, the seeds that the donor sent me arrived yesterday. I have them germing in my small PC right now. I've very excited to grow his seeds. He sent me 6 kinds. They all have been crossed with a Strawberry Dogshit male that he had. Now I should really be able to see what these LEDs can do besides grow dirt weed.

Day 91:


Picked smaller bud to show the lack of crystallization:


Seed crosses gift from the donor:


1 of each seed waiting to be germed:
 
Last edited:

Safe Gardener

Active member
Hey man, great experiments. I got some really helpful hints in another thread from Dion for what I can do with a Mean Well Driver that I already have but decided to do a cheap ebay build first just to get my feet wet so to speak before buying some better COB's, ext.

I found in one of your posts (not sure if it is in this thread or another) an ebay parts break down and basically copied it. I'm only a couple days away from assembly and have a question for ya. I am building two with the 300x140x20 heat sink that you posted and 4 cheap 100W COB's each. The COB's will be powered by ebay 30W drivers 1 driver to 2 COB's. the first light will be 4 warm white 100W COB's so that one is pretty straight forward. The second will have 2 warm and 2 daylight (already had these 4 on hand from a late night purchase last year some time). Imagine two rows of 4 COB's, now take every other out of the top and the opposite two from the bottom. That is the design I am going with unless you have a better recommendation. Now imagine it took all that to lead up to the question.

With light #2 having 2 daylight and 2 warm COB's what is the most effective order? Currently I am thinking the 2 daylights on the interior and the 2 warm as the exterior but can easily by swayed. Any suggestions? Thanks.

-Safe Gardener
 

Killkingkong

Active member
Hey man, great experiments. I got some really helpful hints in another thread from Dion for what I can do with a Mean Well Driver that I already have but decided to do a cheap ebay build first just to get my feet wet so to speak before buying some better COB's, ext.

I found in one of your posts (not sure if it is in this thread or another) an ebay parts break down and basically copied it. I'm only a couple days away from assembly and have a question for ya. I am building two with the 300x140x20 heat sink that you posted and 4 cheap 100W COB's each. The COB's will be powered by ebay 30W drivers 1 driver to 2 COB's. the first light will be 4 warm white 100W COB's so that one is pretty straight forward. The second will have 2 warm and 2 daylight (already had these 4 on hand from a late night purchase last year some time). Imagine two rows of 4 COB's, now take every other out of the top and the opposite two from the bottom. That is the design I am going with unless you have a better recommendation. Now imagine it took all that to lead up to the question.

With light #2 having 2 daylight and 2 warm COB's what is the most effective order? Currently I am thinking the 2 daylights on the interior and the 2 warm as the exterior but can easily by swayed. Any suggestions? Thanks.

-Safe Gardener
Personally daylight lights never interested me. I haven't experimented with them so I won't say anything bad about them (this is a show and prove thread). However if you mixed in daylight to improve your veg performance why not just veg an extra week with warm whites, and get the most out of flowering. If you bought the daylight whites to have a better mix in general spectrum that seems fine, I'd go warm/white/warm/white.

I don't know the size of your grow space, but nonetheless I think you should put all 8 cobs onto 1 heatsink and save the 2nd heatsink for high quality cob experiments in the future. That way you maybe can put 4 high quality cobs on the 2nd heatsink and do some side by side experiments as to which is more effective, 8 cheap cobs or 4 quality ones. I also don't know if you bought the drivers already, but if you still haven't I think you should do 4 cobs per heatsink get 2 50w drivers instead of 4 30w. I kind regret buying so many different brands of cobs and different sized drivers early on. This made it hard to mix and match an now I have a shit load of drivers in my closet.

Imagine two rows of 4 COB's, now take every other out of the top and the opposite two from the bottom.
-Safe Gardener
I'm not exactly sure what you mean by the bold part
 
Top