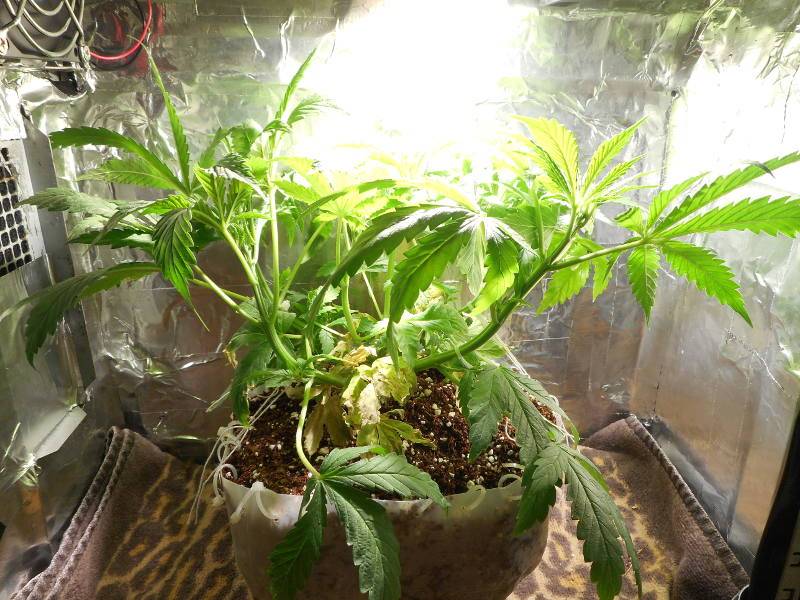
Ok, I have to ask: how the hell was this done? I don't think I've seen a plant so short and bushy. This looks practically like a marijuana bonsai.

-
Happy Birthday ICMag! Been 20 years since Gypsy Nirvana created the forum! We are celebrating with a 4/20 Giveaway and by launching a new Patreon tier called "420club". You can read more here.
-
Important notice: ICMag's T.O.U. has been updated. Please review it here. For your convenience, it is also available in the main forum menu, under 'Quick Links"!
You are using an out of date browser. It may not display this or other websites correctly.
You should upgrade or use an alternative browser.
You should upgrade or use an alternative browser.
My many designs and experiments.
- Thread starter Killkingkong
- Start date
Killkingkong
Active member
Ok, I have to ask: how the hell was this done? I don't think I've seen a plant so short and bushy. This looks practically like a marijuana bonsai.
Top once, during the 3rd or 4th node during the 1st week. try to overwhelm the plant with as much light as possible without causing heat issues to limit stretch. 4-6 new shoots should start to develop. Let them grow until they're strong enough to be trained. You can see zip ties around the top of that container. Put more zip ties on the top of these 4-6 branches. Then use string to ties the branches down as far as you can. Keep repeating this process as new branches form and retie those old branches as they continue to grow.
Killkingkong
Active member
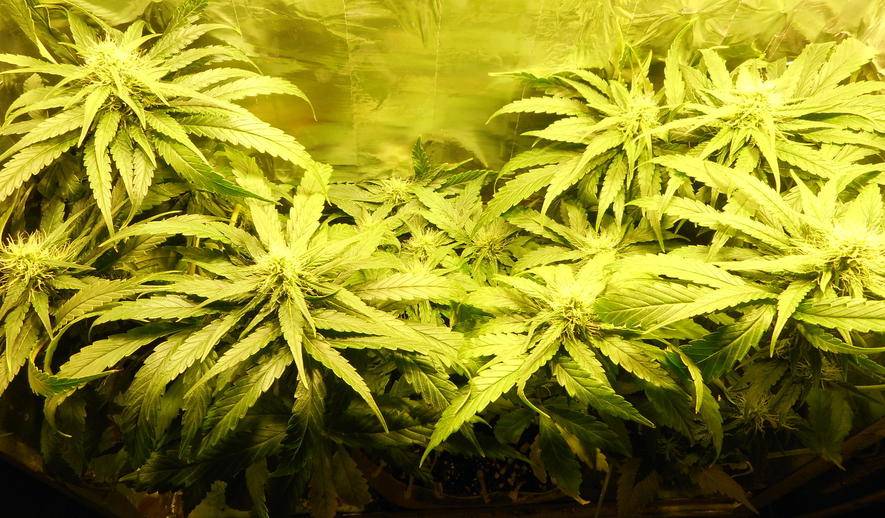
Everything is now in flowering. Those 3 runt seedlings look fine now and have been moved to the medium PC, in bigger pots. They should show sex in about 2 weeks. the other plants are 1 week into flowering and should show sex in about another week. Once I get rid of the males there should be plenty of more space to go. Even though the Small PC has the best quality light just have 1 light in there means that box has the worst light coverage, which isn't good for creating a even canopy. So I finally pulled the trigger on a LED design that's been in my head for a while. I bought 10 100w rated cheap LEDs from China for like $27 on ebay. They're cheaper than the Lohas 100w LEDs for $10 each on amazon. I'm a firm believer in under driving your LEDs and running more of them which allows them to run cool and your plant can grow right next to it without burning. Those parts should be here in a few weeks or a month. The single LED in that case will be fine in the meantime.
LEDs for $27:
http://www.ebay.com/itm/15195876369...49&var=451136534801&ssPageName=STRK:MEBIDX:IT
Heatsink for $21:
http://www.ebay.com/itm/131566824558?_trksid=p2057872.m2749.l2649&ssPageName=STRK:MEBIDX:IT
Medium PC Day 1 Flowering:

Small PC Day 7 Flowering:
Big PC Day 7 Flowering:

LEDs for $27:
http://www.ebay.com/itm/15195876369...49&var=451136534801&ssPageName=STRK:MEBIDX:IT
Heatsink for $21:
http://www.ebay.com/itm/131566824558?_trksid=p2057872.m2749.l2649&ssPageName=STRK:MEBIDX:IT
Medium PC Day 1 Flowering:
Small PC Day 7 Flowering:
Big PC Day 7 Flowering:
StrangeVisitor
Member
Top once, during the 3rd or 4th node during the 1st week. try to overwhelm the plant with as much light as possible without causing heat issues to limit stretch. 4-6 new shoots should start to develop. Let them grow until they're strong enough to be trained. You can see zip ties around the top of that container. Put more zip ties on the top of these 4-6 branches. Then use string to ties the branches down as far as you can. Keep repeating this process as new branches form and retie those old branches as they continue to grow.
Perfect instruction.

Is that inside view of the grow box?New wiring harness to stop wire tangling:
[URL=https://www.icmag.com/ic/picture.php?albumid=65579&pictureid=1561164&thumb=1]View Image[/url]
raspberry pi - good idea, it should fit well.
Great job! Whating for new updates.
HuffnPufferfish
Member
blue spectrum, and keep lights close, easyOk, I have to ask: how the hell was this done? I don't think I've seen a plant so short and bushy. This looks practically like a marijuana bonsai.

Killkingkong
Active member
Is that inside view of the grow box?
raspberry pi - good idea, it should fit well.
Great job! Whating for new updates.
Nah, that's the inside of my closet that has the 3 different PCs. The PCs are the grow boxes. And only the webcam will be inside the box. I'll either cut a whole to run the webcam usb out of the box and then tape the hole back up, or create a usb hub for the box, so the wire is detachable. I like to keep the boxes pretty empty now. If you look through past pages you'll see They're much more tidy now. The better I get with tech the more I can simplify things.
blue spectrum, and keep lights close, easy
I've never really went out of my way to add any blue spectrum to my boxes. I currently have 3 different brand LEDs (2 high quality and a cheapo brand for $10 each). While the cheap LEDs appear to be a much darker yellow, they all seem to grow plants in a similar fashion, if trained similarly. I think training the plant early to send light deep into the canopy plays a far bigger role than spectrum, if you're using decent light.
Here are those 4-6 shoots after being trained yesterday. Opening up the center yeaterday alone will create 10-15 new branches.
Killkingkong
Active member
Things are chugging along. I think I swapped the plants around to different cases since last update. 2/3 of the older plants have shown to be female and the other male, which was tossed. Still waiting for definite sex for the younger 3. If 2 or more of those younger plants are female I'll be running 4 boxes once the newest parts I ordered come in for a 4th box so I can get as much bud as possible during this run, then look to sell 2 of the cases right after harvest. Parts for the new case are coming from China and should be here either any day/week/month.
Small PC:

Medium PC:

Large PC:

The 1 confirmed male:

Small PC:
Medium PC:
Large PC:
The 1 confirmed male:
HuffnPufferfish
Member
leds HAVE a big blue spectrum ")
Killkingkong
Active member
unfortunately 3/3 of the younger plants turned out to be males. I might start up a few more seeds, but probably after the rest of the parts I need for my next build come in. The heatsink came yesterday, but I still need the LEDs, thermal paste & self tapping screws.
Day 21:


Day 21:
Killkingkong
Active member
Heatsink:


Killkingkong
Active member
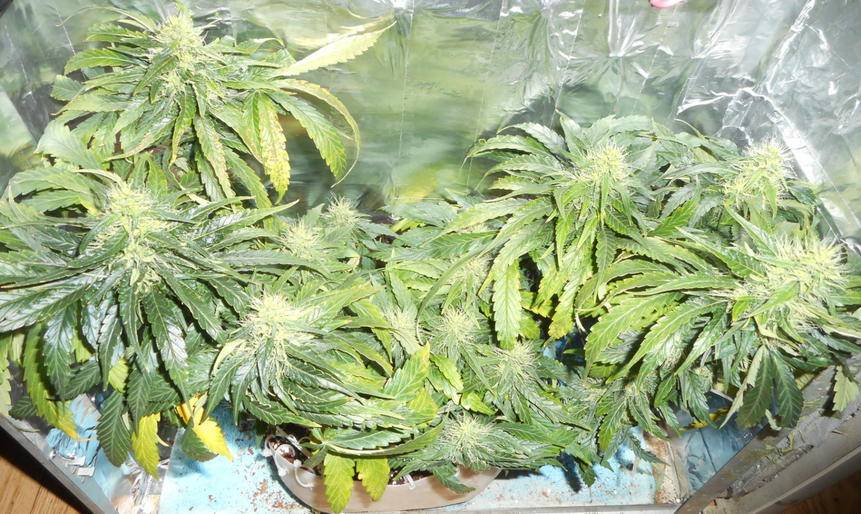
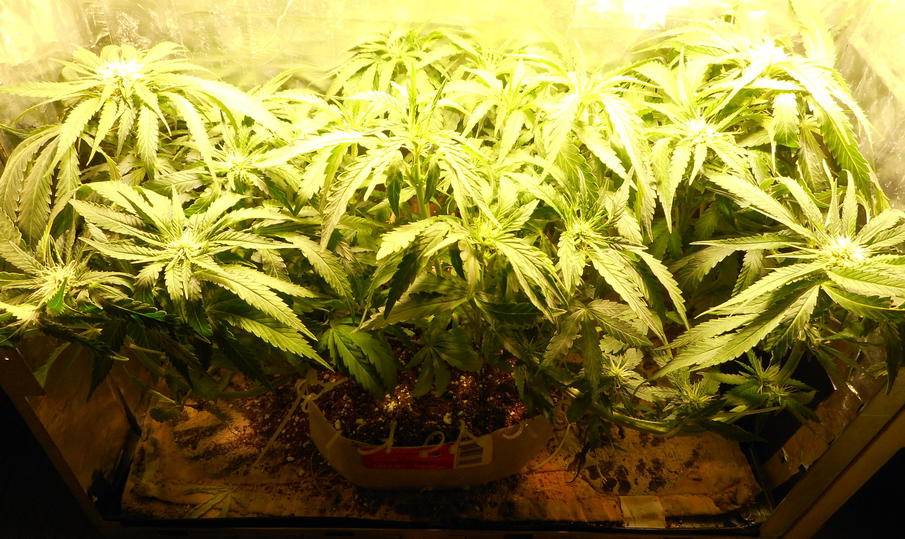
Things are getting fat now. This is day 28 for these 2 plants, so about 1/3 of the way there. They're bag seed and are probably sativa so it's going to take longer than 60 days. The plant in the first picture didn't quite train the way I wanted. The branches in the center never caught up to the branches on the sides height wise. I continuously tuck the fan leaves of the bigger branches to give the short branches light. Stretch is ending about now, so I doubt those branches will catch up height wise, but they get more than enough light to develop a few grams each branch. Basically they're short, but shouldn't turn out to be popcorn buds.
The LEDs came for my next light build, but I still need the thermal paste and self tapping screws. I have a case that's the same as my small PC that I was going to use for this new build, but I think this light will be by far my most effective (I have 5 LEDs in my medium PC. 2 high quality, 3 cheapos.). So I'm probably gonna spend the $25 for a new case so I can get the most bud as possible from this new light.
Layout for the new light
Last edited:
Killkingkong
Active member
It's going to look like a server farm with 100s of PCs soon.
Luckily I'm a computer guy and people would find it weird if I didn't have a fleet of desktops in my room. I am actively trying to sell the small PC though. I put it up on craigslist and this app someone told me about called OfferUp. If I can't sell it I'll gift it to a pothead. When I get a design in my head it nags me until I can get it out of my head, so yeah I end up stockpiling.
Killkingkong
Active member
The thermal paste and self tapping screws came today. So this new light I'm building is mostly made up of cheap parts from china to keep cost low. Others may say that the cheap chinese 100w LEDs are worthless, but I doubt they took the time to test them out. My last grow (undocumented, sorry!) was with 3 100w(rated) cheap chinese LEDs run in parallel from a 50w driver (when you run LEDs at less power than they are rated they become more efficient....meaning the less watts you use for a LED diode the more lumen(lux really)/watt you get) While I agree higher quality LEDs are more efficient and effective I don't have the money to spend $50/LED (Which I've done a few times before, go back to past pages) when I want a 10 emitter light. Instead I spent $26.50 on 10 cheap LEDs so I can underdrive them. There is strength in numbers with LEDs create as even of a light canopy as possible so there are no hot spots in your case.
10 100w (rated) LEDs - $26.50
Heatsink - $21.49
Thermal Paste - $1.11
20 Self Tapping M3 Screws - $2.39
Total: $51.49
I already have plenty of LED power supplies so I didn't buy one for this light, but I think this new light can be run between 50-100w without much problem (with decent cooling/fans). I'll be running this light at about 50w since it's in a PC. I looked up some power supplies on ebay. It's $9.98 for a 50w and $16.68 for a 70w driver on ebay
50w Total: $61.47
70w Total: $68.17
The only thing left to buy is a new PC case. I've decided I don't want to put this newest light in a small PC because this light 'should' outgrow that without a problem. another Mid ATX case should be a perfect fit. Hopefully I put all this together before the next update on tuesday.
HuffnPufferfish
Member
in the oc scene, a steel case is cooler
Killkingkong
Active member
Man If you can get your hands on an aluminum Lian Li case you might even be able to passively cool those
Nah, too expensive. I'm gonna buy a cheap $28 case from the computer store. Plus aluminum isn't magnetic so I wouldn't be able to hang the light with just magnets. On top of that my last run I ran 3 LEDs and cooled them passively in an steel case and didn't have any issues with heat. So I'm pretty sure I could get away running this new light without fans, but I want to so I can try and push the limits before heat becomes an issue. I'm gonna have to use one of those 600w boost adapters that I bought(check the last page) because all of my constant voltage led drivers are 36v. I think I'm gonna run the emitters for this new light 2 series 5 parallel, so I'll need 70ish volts. So in using the boost adapter I'll be able to fine tune the intensity of the light based on heat.
Last edited:
Killkingkong
Active member
Ok, so I finally put together my new light. I think this light/heatsink combo is perfect for a PC. After putting it together I tested it out with a 20w driver and it worked fine. I ended up wiring all 10 in parallel instead of 2 series 5 parallel so I could use either my old LED drivers or those new 600w boost adapters that I bought. I still haven't bought a new case (I'm broke right now) so there's no home for this light right now, but I have all the other hardware to make a new grow box (fans, aluminum tape, carbon pellets, carbon sheets & chopped up computer powersupply).
Quick Tutorial
Place LEDs down and mark where the holes goes:
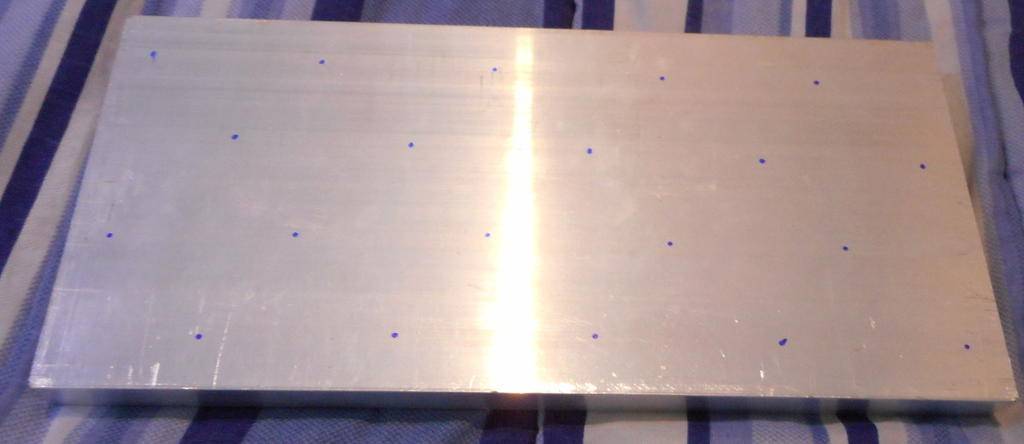
Find the appropriate drill for your self tapping screws (I practiced on a throw away piece of aluminum to find the right size...start small work up in drill size):
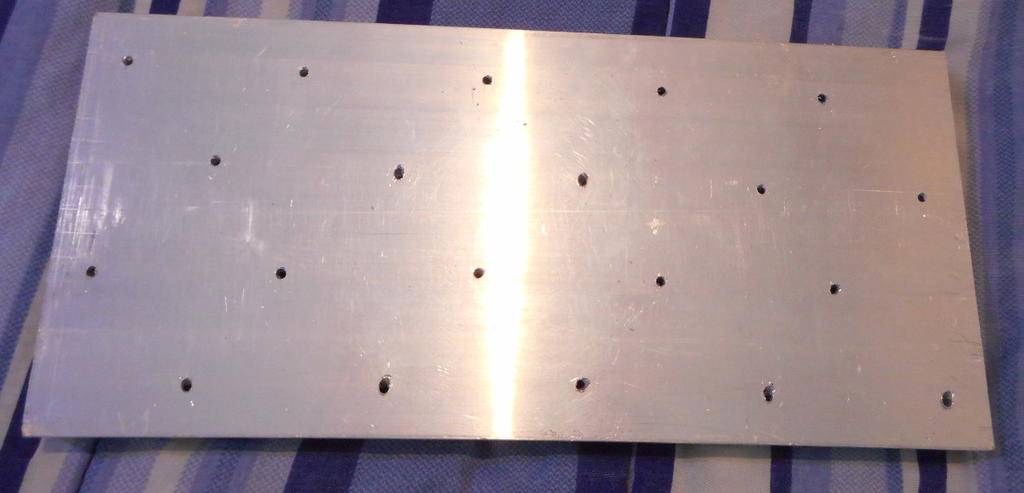
Put a glob of thermal paste on the back of each LED and screw each LED down tightly with your self tapping screws. Then wire up everything based on your design.
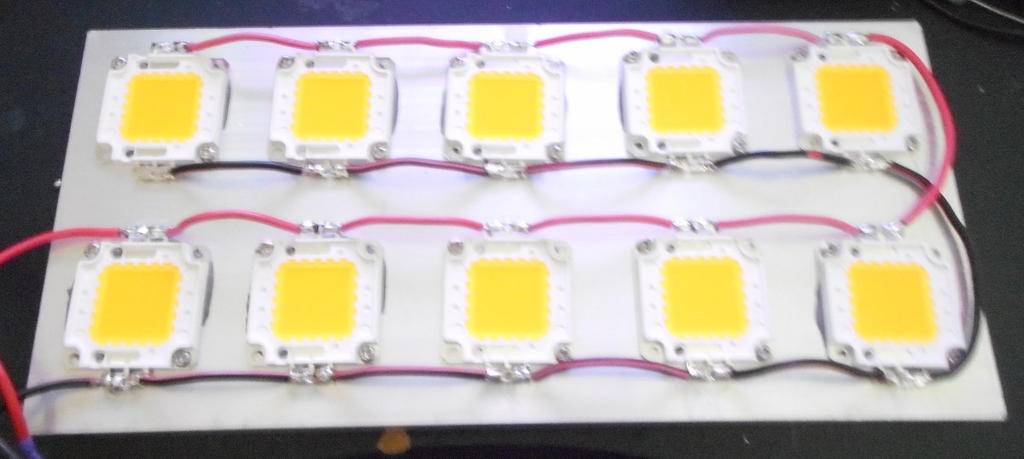
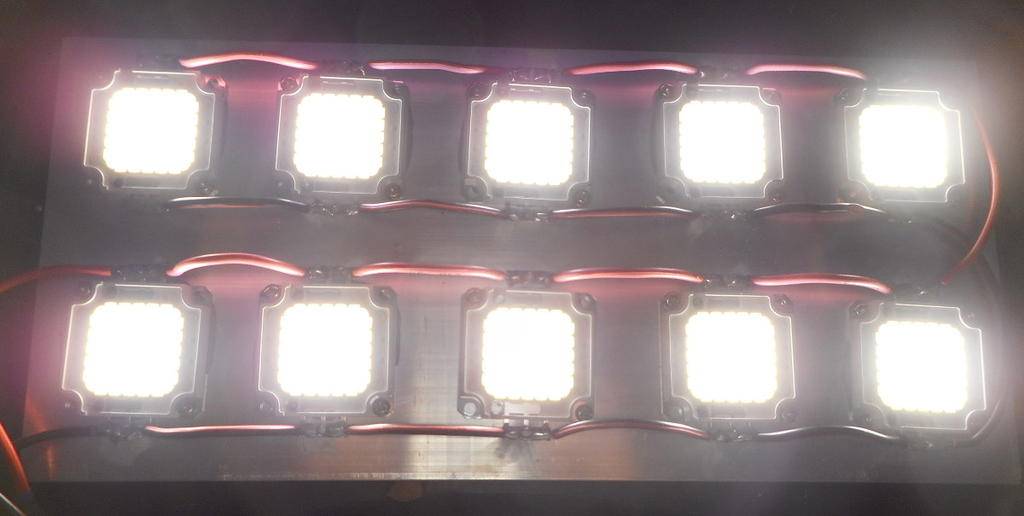
Test out your wiring to make sure it works as expected. I saw a lot of people complain their cheap LED cobs from china had a bunch of damaged LEDs in each cob. Each of these 10 cobs are made up of 100 individual 1w (rated) LEDs. On testing all 1000 LEDs lit up, no dead cells and I chose the cheapest possible one from china.
Quick Tutorial
Place LEDs down and mark where the holes goes:
Find the appropriate drill for your self tapping screws (I practiced on a throw away piece of aluminum to find the right size...start small work up in drill size):
Put a glob of thermal paste on the back of each LED and screw each LED down tightly with your self tapping screws. Then wire up everything based on your design.
Test out your wiring to make sure it works as expected. I saw a lot of people complain their cheap LED cobs from china had a bunch of damaged LEDs in each cob. Each of these 10 cobs are made up of 100 individual 1w (rated) LEDs. On testing all 1000 LEDs lit up, no dead cells and I chose the cheapest possible one from china.
Killkingkong
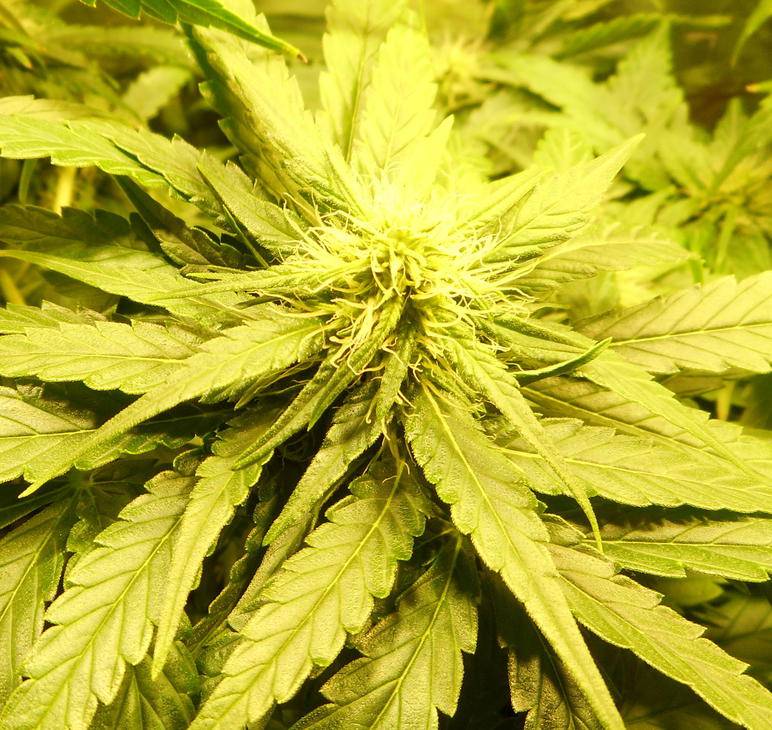
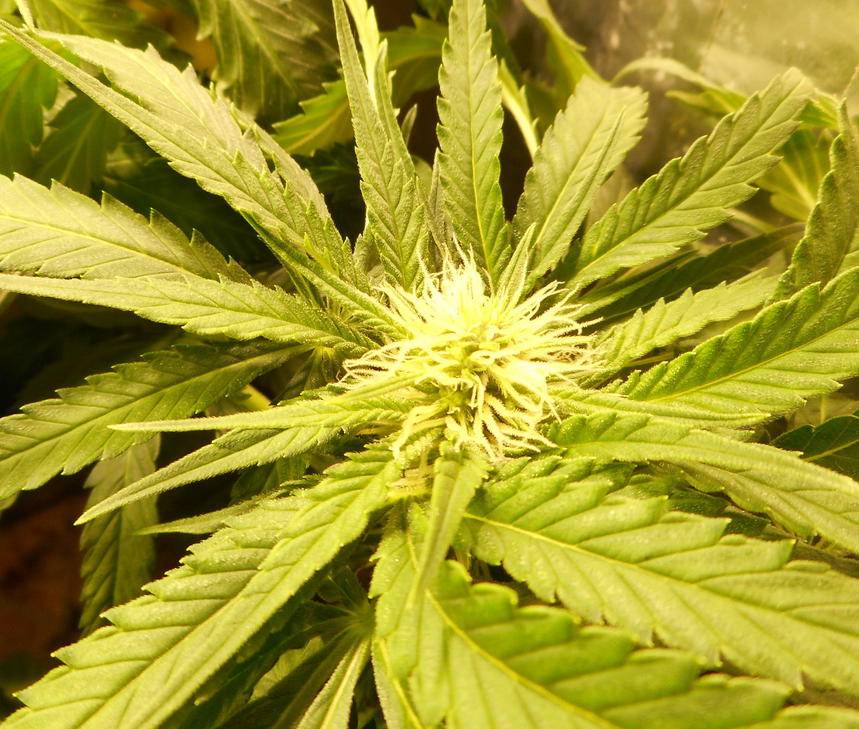
Active member
Today is day 35 for the 2 female plants. The plant that grew unevenly is budding up nicely from top to bottom. While the center buds on this plant won't get too tall the branches on the outside are relatively tall in comparison and are budding from top to bottom. The other plant that's far more evenly spaced out is budding at different stages depending on the branch. The branches in the center which are younger are just now starting to show pistils. I think all of the branches on this plant is slowing down the flower process. luckily I have 2 plants going so I'll just leave this one to longer to finish.