What's new
  • Happy Birthday ICMag! Been 20 years since Gypsy Nirvana created the forum! We are celebrating with a 4/20 Giveaway and by launching a new Patreon tier called "420club". You can read more here.
  • Important notice: ICMag's T.O.U. has been updated. Please review it here. For your convenience, it is also available in the main forum menu, under 'Quick Links"!

BUTANE EXTRACTION AND RECOVERY SYSTEM

Rickys bong

Member
Veteran
DIDM, I think you are thinking of two different things.

"nitro" used in making ice cream is nitrous oxide. Not useful for this process at all.

Or you are thinking of liquid nitrogen, which is -196 deg C.

A tad too cold to be useful either.

I don't think lower temperatures make any difference in a closed system, not that I've found anyway. And anything below probably -10C is going to cause negative returns.

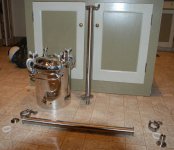
Freezing the material in a open tube extraction is different, but that's another subject...

RB
 

Gray Wolf

A Posse ad Esse. From Possibility to realization.
Mentor
ICMag Donor
Veteran
the latest yield from our system is now 25.2%! this is mixed flowers from a 45th parallel outdoor garden.

Cool! Do I infer that was 25.2% Absolute, which would be a couple of points more raw oleoresin?
 

Gray Wolf

A Posse ad Esse. From Possibility to realization.
Mentor
ICMag Donor
Veteran
OK, I have started ordering parts for the next generation and will do a step by step build on this one.

I decided to bite the bullet and just purchase the lower pressure pot, as my from scratch design bids came in higher than just picking up a stainless ASTME certified pot off the shelf.

While I can personally build a pot cheaper, I can't pay a machine shop to build it cheaper, which was my goal, so as to make it available to more folks without my own active participation.

Alas, I retired in 2005, so my practical knowledge of current pricing is outdated, leaving me appaled at current shop rates for CNC equipment.

This system will also be fully automatic, and though I initially started with the intent of simply using a PLC, the costs for hard and software seem too, too expensive, so we will design and build our own automatic controls using cheaper components. I'll supply a schematic of the system, after we shake it out.

The good news is that within our retired group of slack jawed drooling superanuated geeks, we have the talent that designed and built the latest and greatest over priced control systems, before retirement and components are still relatively cheap. Hee, hee, hee, snicker, snark, snort...............
 

Gray Wolf

A Posse ad Esse. From Possibility to realization.
Mentor
ICMag Donor
Veteran
Progress is being made. The new 2 1/2 gallon Binks stainless ASTME 120 psi pressure paint pot arrived and it is gorgeous.

I've come up with a modification of the center plug, that fills the hole for the optional agitator, and the paint port lid, that is simple and cheap, so I sent those parts out to a machine shop to be bored and 304SS Schedule 40 nipples and a down tube installed.

It not only maintains the integrity of the ASTME certified vessel itself, but is easy and cheap for any DIY's that wish to follow. The rest of a manually operated unit, simply screws together.

This one is automated, so I also sucked our resident electronics genius Bob into the project, and we ordered the countdown timers.

I found some slick parts for columns at www.glaciertanks.com, which you can see in the picure with tri-clamp connections.

More info on our progress at our Skunk Pharm Research.com website:

PS, The care provider leasing our test sled reports she is now processing about 480 grams per hour, and has broken the 25% return level on BHO Absolute, with an raw oleoresin extraction cost, without labor and periodic maintenance, of aproximately $0.015 per gram.

PPS: The machine doesn't run 24/7, but runs periodic batches at the rate above.
 

Attachments

  • Terpenator pressure pot and columns.jpg
    Terpenator pressure pot and columns.jpg
    47.9 KB · Views: 30
Last edited:

Mr.Sputnik

New member
A few questions:

Does the finish on the pressure pot make a huge difference if BHO is collected in a glass container inside the pressure pot? I contacted a Binks dealer and they wanted $1,100 for the stainless pressure pot so I'm looking for a cheaper alternative.

What did you do about an analog micron gauge for measuring vacuum pressure or what would you recommend as far as analog is concerned considering you went with a digital unit?

When you replaced the 1/4" refrigerant lines for 3/8" did you also replace the 1/4" fittings with 3/8" fittings?

Did you ever put a filter/dryer on the inlet of your refrigerant pump (appilon G5)? If so where is this part available?

How do your mesh screens with paper filters attach to the glacier tank tubes?

Thanks Gray Wolf! Great thread you started here! Props to Foaf and RB as well!
 

Gray Wolf

A Posse ad Esse. From Possibility to realization.
Mentor
ICMag Donor
Veteran
A few questions:

Does the finish on the pressure pot make a huge difference if BHO is collected in a glass container inside the pressure pot? I contacted a Binks dealer and they wanted $1,100 for the stainless pressure pot so I'm looking for a cheaper alternative.

What did you do about an analog micron gauge for measuring vacuum pressure or what would you recommend as far as analog is concerned considering you went with a digital unit?

When you replaced the 1/4" refrigerant lines for 3/8" did you also replace the 1/4" fittings with 3/8" fittings?

Did you ever put a filter/dryer on the inlet of your refrigerant pump (appilon G5)? If so where is this part available?

How do your mesh screens with paper filters attach to the glacier tank tubes?

Thanks Gray Wolf! Great thread you started here! Props to Foaf and RB as well!

That is a ghastly price for the Binks unit, and that should give you a clue how hard I looked for a suitable alternative, even to the point of designing my own.

As an OEM, I get a slightly better price in lots of 5 or 10, but not one at a time.

Unfortunately, although a 2 liter Pyrex beaker fits perfectly inside, doing so insulated the glass beaker from the heated walls and as soon as I pulled a vacuum, the boiling butane cooled down the beaker and the boiling ground to a halt.

We didn't come up with a good way to heat the beaker inside, without putting something inside the chamber requiring cleaning and the inside of the pot does get messy.

You might consider using a steel pot, and having it stripped and nickel plated or take a look at the work FOAF did on lining the pressure pots with PTFE Teflon bags. If they were in good contact with the outside surfaces of the pot, it should work.

I picked up a combination pressure and vacuum analog gauge at the local refrigeration supply shop. They had a nice selection and it isn't necessary to read in microns, mm/hg works well enough for this process.

If I wanted to read in microns, I would use a Hastings gauge with a DV-6 tube. I used them extensively in industry and I've seen them used on E=Bay, at reasonable prices.

I replaced the 1/4" plumbing right up to the recovery pump, but used an adapter at that point and didn't change out the pump fittings.

I put a filter dryer in front of the G-5, that I took off of the first Micro Vac II pump that I picked up. I mostly put it there to protect the pump from pulling any droplets of oil laden butane through it and seizing the pump. That hasn't been an issue, so that part seems to work.

It does look like we are collecting moisture as we continue to reuse the butane, so I presently plan to rebuild a Robair refrigerant recycle pump and filtration/dryer system, that I picked up on Craigs list. It will pump butane in a loop, from the storage tank, through the dryer filter, through a moisture sensor, and then back to the tank.

Instead of the Robair dryer/filter, we currently are planning to make columns that are identical to extraction columns, except they will be filled with molecular sieve, which can be regenerated by baking.

A column can either be run on the extractor itself, or attached to a manifold and pumping system.

You are going to love the solution to the filter screen question. Check out the Buna Tri Clamp screen gasket in 40 mesh at Jet Gasket and Seal Company. Try www.BreweryGaskets.com.

We wad up about three coffee filters and stuff them in the end of the tube before loading and cap it with three afterwards. They do the filtering and the screens hold them in place.
 

Attachments

  • Combo seal and screen 2.jpg
    Combo seal and screen 2.jpg
    42.4 KB · Views: 26
  • Combo seal and screen.jpg
    Combo seal and screen.jpg
    41.1 KB · Views: 29

Trichgnomes

Member
GW-

Thanks for this info!

You are going to love the solution to the filter screen question. Check out the Buna Tri Clamp screen gasket in 40 mesh at Jet Gasket and Seal Company. Try www.BreweryGaskets.com.

I have a ton of stainless steel mesh (100 micron) that I have been been cutting into circles to fit the extractor opening, but they are a bit thin, so I always use two plus coffee filters.

I tried steel wool, but found it was a pain to clean, and I always got steel wool bits in my extract. Your solution seems to be the best!


Edit: so do you use it as your actual gasket, while simultaneously using it as your filter?

Because I have a proprietary extractor, it is obviously configured different than yours. Do you think I could just put the whole thing at the bottom of my column and use it as a filter disc?
 

Gray Wolf

A Posse ad Esse. From Possibility to realization.
Mentor
ICMag Donor
Veteran
GW-

Thanks for this info!


I have a ton of stainless steel mesh (100 micron) that I have been been cutting into circles to fit the extractor opening, but they are a bit thin, so I always use two plus coffee filters.

I tried steel wool, but found it was a pain to clean, and I always got steel wool bits in my extract. Your solution seems to be the best!


Edit: so do you use it as your actual gasket, while simultaneously using it as your filter?

Because I have a proprietary extractor, it is obviously configured different than yours. Do you think I could just put the whole thing at the bottom of my column and use it as a filter disc?

It is a standard 1 1/2 Tri-Clamp fitting, so it might fit. They also have them in different diameters.

If you wadded two coffee filters and stuffed them on top of your material, and then put a screen seal gasket on top, sized to fit the ID of your tube, the coffee filter pistons will hold the screen against the smaller diameter holes in the two column end caps.

I do that with the test sled, but just cut out a piece of 130 micron stainless mesh. The paper filters do all the work, and the screen just holds them in place and protects against chunks.
 

Gray Wolf

A Posse ad Esse. From Possibility to realization.
Mentor
ICMag Donor
Veteran
Updates on progress:


Well, progress is going slower than planned, with illness rearing its ugly head amongst usn's cadre of graying, hoary moss covered retired machinists.

Here is the only two pieces in the basic system, that require machining or welding, and you can see how easy they are to make. They still need to be cleaned and polished, but the attached pictures show what they look like immediately after fabrication.

The center plug in the pressure pot lid was bored for an easy slip fit on a 3/4" 1.050" OD Schedule 40 316SS pipe, with 10.5" sticking out the bottom of the plug and 3.5" sticking out the top. This is where the valves and column attach.

The paint port lid was also modified by cutting off the wrench boss and boring for the same 3/4" pipe. This will be for the control valves and pressure switches.

We decided on pneumatic operators on full port stainless ball valves. All are air to open or close, except the butane supply valve, which is a normally closed, spring return valve for safety.

The three and four way Asco solenoid valves for the air, will allow us to separate the electrical functions from the extraction area, for explosion proof protection.

More info on our progress at our Skunk Pharm Research site: Keep in mind that manual valves can be used at significantly less cost.
 

Attachments

  • Turpenator MK II Valves 3.jpg
    Turpenator MK II Valves 3.jpg
    46.8 KB · Views: 27
  • Turpenator MK II Valves 2.jpg
    Turpenator MK II Valves 2.jpg
    48.8 KB · Views: 29
  • Terpenator MK II valve list-1-1.jpg
    Terpenator MK II valve list-1-1.jpg
    31.4 KB · Views: 28
  • Terpenator machined parts in place-1-1.jpg
    Terpenator machined parts in place-1-1.jpg
    54.4 KB · Views: 28
  • Terpenator machined parts-1-1.jpg
    Terpenator machined parts-1-1.jpg
    34.5 KB · Views: 26
  • Turpenator MK II Valves 4.jpg
    Turpenator MK II Valves 4.jpg
    37.4 KB · Views: 28
Last edited:

Gray Wolf

A Posse ad Esse. From Possibility to realization.
Mentor
ICMag Donor
Veteran
Progress! The pneumatic operated valves arrived, so I picked up the rest of the piping parts and assembled her.

Behold the Mk II Terpenator ready for deliver, sans controls and ancillaries.

Next I will build the air solenoid valve manifold, which I am mounting remotely outside the ventilated extraction cabinet, that it is scheduled to go into.

The electronics are scheduled for smoke test this weekend, and then I have to package them and build the air solenoid valve manifold. The bread board logic worked for computer simulation, so now we see if they work hard wired and can carry the loads.

For any of ya'll building your own, you can find more information, and my growing parts list at our Skunk Pharm Research.com website:

Remember, that this can more easily be made in a manual unit, and will work as good as this automated unit, just requires more tending.

I also stumbled across what may be a slick and cheap way to build a small passive recovery system, and will report back more on that subject, when the parts I special ordered (8/10 wk from China) arrive and I put a prototype together. Hee, hee, hee, snicker, snark, snort...............ahwooooooooooooooooooooooooooooooooo!!!!!!!!!!!1
 

Attachments

  • Terpenator MK II assembled.jpg
    Terpenator MK II assembled.jpg
    17.2 KB · Views: 23
  • Terpenator Mk II assembled-2-1.jpg
    Terpenator Mk II assembled-2-1.jpg
    41.5 KB · Views: 29
Last edited:
Top