
sanjuan
Member
Yes. It is not in the exact middle of the loop for the sake of convenience.so at the bottom right is the drain/flush 'T' fitting ?
Yes. It is not in the exact middle of the loop for the sake of convenience.so at the bottom right is the drain/flush 'T' fitting ?
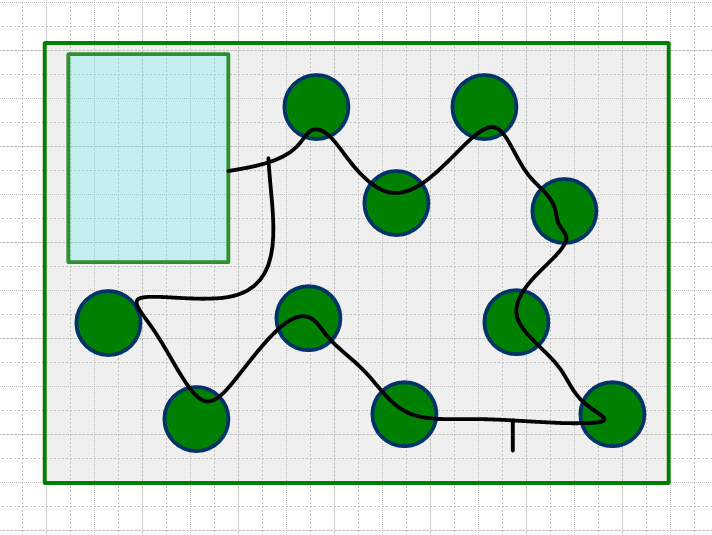
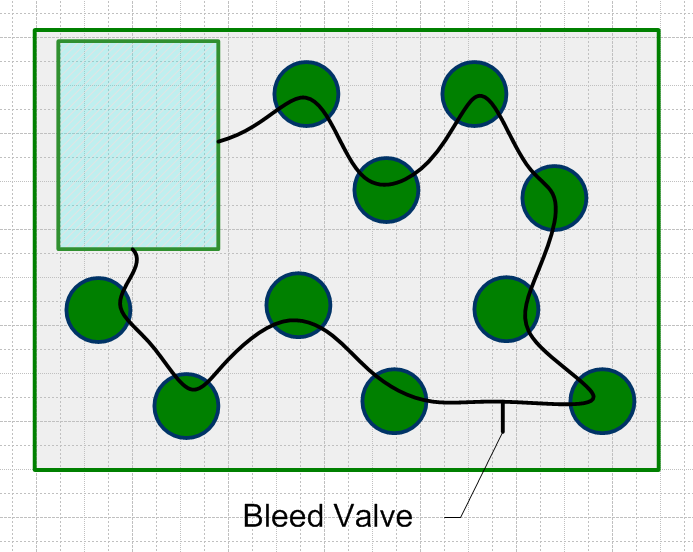
This is my plan for ten 8" smart pots in a 4.5' x 6.5' Hydrohut. Each pot has one Blumat with its 8-8-3mm tee. The 8-8-8mm (1/4") drain tee will have a shutoff valve pointing toward the back door for easy bleeding into a jug.
(Not shown are the Botanicare trays I'll have under the pots in case of runoff.)
whoa I am confused. I have been running a loop,. with a T at the begging. No end t , because all my nutes will just come pouring out, and waste it.

I see that a few people are using coco in smart pots with Blumats, But is there any one here using coco in Air Pots with Blumats? Any thoughts on this combination?
I'm currently using the Air Pots in soil with Blumats and it is working out great, But for my next grow I'm thinking of using COCO instead of soil and my only concern is with the Air Pots and coco that the roots might get too much air.
Anyone try this combination yet? or have any thoughts about it?
This is my plan for ten 8" smart pots in a 4.5' x 6.5' Hydrohut. Each pot has one Blumat with its 8-8-3mm tee. The 8-8-8mm (1/4") drain tee will have a shutoff valve pointing toward the back door for easy bleeding into a jug.
(Not shown are the Botanicare trays I'll have under the pots in case of runoff.)
A bleed valve was suggested earlier in this thread to get rid of any bubbles in the line. Weekly maintenance of draining about a gallon, as I recall. I've got an official Blumat 8mm shutoff valve to go on that second (lower right side) tee. Any decent 1/4" shutoff fitting should work (the ID of the 8mm line is about 6mm).whoa I am confused. I have been running a loop,. with a T at the begging. No end t , because all my nutes will just come pouring out, and waste it.
Hi sunnydog,Excellent!
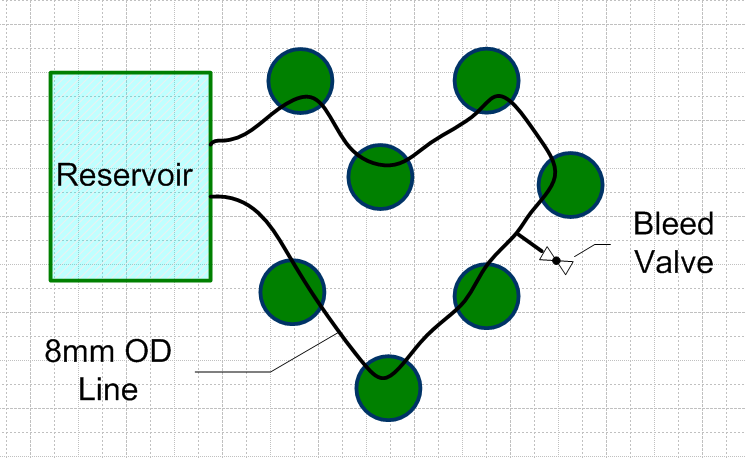
Only possible improvement would be to have two "outs" on the res.(lose the "T" )
Then there would be two independent channels.
If anyone is using multiple "patio kits" You already own the thru-hulls.
Hi sunnydog,
I have been thinking of doing that since I bought an extra thru-hull fitting and that blue rectangle represents a Botanicare 20 gallon reservoir with two nice bulkheads ready to plumb.

Had a scan through this thread - these things look like excellent bits of kit. I read on their web-site that they recommend not using fertilizers in the reservoir that feeds the ceramic waterers. However, from what I can glean, people on here have very few problems, if the drippers are cleaned on a scehduled basis, with using Gen Hydro's Grow, Bloom and Flora. (I have always thought these were excellent nutes and tried to convert friends to these from brands which tend to be more popular in the Uk).
Anyway, to ask some open questions;
1.Is it the consensus of those experienced with blumat use that GH's series cause the fewest problems?
2. How often should the lines and bulbs be cleaned to ensure there are no blockages?
3. Any recommendations as to what's best to use for cleaning?
Apologies (if these questions have been answered in various places already) and thanks thanks in advance of them being answered again!
slowandeasy,
are you using straight canna coco? nothing added?
Thanks for all the great information in this thread. This thread inspired me to set up a Tropf Blumat system in my flowering tent. I have even dedicated my first icmag post to the subject because it is a great product and this is a great thread.
I had been hand watering in coco every freaking day. The plants looked great but it was a lot of work. I knew from hand watering and my own anal record keeping that every plant was different in how much water it sucked up each day so a basic drip system might give me some convenience when I have to leave my plants for a few days but it couldn't be relied on to regularly feed my plants. The Tropf Blumat solves that problem and is a perfect complement to a medium like coco that you can constantly feed. Now I just have to refill the reservoir every few days and I can have some free time back.
I didn't do everything right the first time around so I thought I would share some of what I have learned in the process. I am sure some of this is obvious to the pros but to newbies like myself it may be helpful.
Thank you Sunnydog and everyone else for sharing your experiences. I hope my ramblings can likewise help someone else along the way.
- Rubbermaid reservoir is iffy - my first try was with a Rubbermaid tub. It would have probably worked but I never was able to get rid of that Rubbermaid smell and it did not hold the temperature down well at all and I was having stability problems in my reservoir when I was using the Rubbermaid. They probably require additional light proofing as well.
- Igloo cooler works well as a reservoir - it keeps the temperature stable, is light proof, and the new cooler smell can be washed away.
- An Igloo cooler is very thick in spots so if like me you smoke out before taking on any DIY projects, be sure to note that the hull adapter that comes with the patio kit does not allow for a very thick hull. So before you drill into that brand new ice chest, make sure that the spot you have chosen to drill is thin enough to accomodate the hull adapter. I learned this the hard way and now I have a $15 ice chest that won't hold any liquids. It makes a great bench though.
- The closest US drill bit to the 12 mm hole that is required for the hull adapter is 7/16 inch. This is a little small but the hole can be expanded slightly with a rat tail file so that the hull adapter can get through.
- The rubber washer for the hull adapter goes on the water side. Don't ask why I know this.
- A submersible water pump puts out a lot of heat and is not a good idea for this type of reservoir. With the right nutes an air stone is all that is needed if you are running nutes.
- GH Floranova nutes are not a good idea for a low-maintenance reservoir. I should have realized this when I saw how sludgy the nutes were but at the time I was intent on simplicity and a one part nute program is as simple as it gets. The pH was going up a full point overnight and there was lots of floaties in the lines. At first I was blaming it on the cheap Rubbermaid reservoir but I finally came to the conclusion that the Floranova was the main cause of the instability. I think some have said the GH Flora series nutes are fine but the organic Floranova line does not work.
- House & Garden Cocos A&B are the shit by comparison. I am using the two-part plus the Drip Clean and the pH is incredibly stable. I have let it go for up to a week and it maintained 5.8 the whole time. It mixes very clean and my plants love the stuff.
- Like everyone else says, get lots of the 3 mm hose. It is so much easier to work with than trying to get the 8 mm supply line to bend to your will. I ran the supply line and feed line T's in a loop around the outside edge of my tent. I then cut off 30 inch lengths of the 3 mm hose to run to the Blumat sensor. This is way easier and tidier than trying to make what comes with with patio set work.
- It's easy to find the patio set online but individual parts are hit and miss. I ended up ordering direct from Blumat and while it is cheaper for the parts, overseas shipping to the US is brutal. Make sure you get everything you need - the base shipping is the expensive part and they can squeeze a lot of those little parts in a small box. Unless you are making a gigantic order, the size of the order isn't going to have much effect on shipping costs. Shipping took a little over 2 weeks to the US. It started out as DHL on the Europe side but it ended up coming to me via USPS.
- The only way to get the 8 mm supply line off the barb connectors is to cut it off with a razor blade or utility knife. This is probably a good thing but I like to find things out the hard way. You cannot pull them off, period. I spent more time than I care to admit trying. The 3 mm drip hose will come off the barb connectors with a little bit of a tug but I wouldn't reccommend this without a shut-off valve and a way to bleed the line first.
- The 8 mm supply line CAN be pulled off the connector on the Blumat provided shut-off valves. This is by design - when the connector caps are tightened to the valve it secures the connection so that the tubing can't be pulled off. This allows me to remove the reservoir for cleaning but I do worry about the wear and tear from pulling it off this way but so far it hasn't been a problem.
- I probably should have followed Sunnydog's advice and bought the T's from Kent Systems and made my own manifold and reservoir connection using more readily accessible parts but like I said I like to learn things the hard way.
Peace

Hey Sanjuan,if you could do the diagram with both outs on the same side( Just for schematic simplicity),I think it should be the "official" diagram for the thread.Hi sunnydog,
I have been thinking of doing that since I bought an extra thru-hull fitting and that blue rectangle represents a Botanicare 20 gallon reservoir with two nice bulkheads ready to plumb. I plan to install 1/4" barbed quick-connects so it will be easy to haul out the empty reservoir for scrubbing in the bathtub to prevent algae.

Example of a feed line loop:

")
