Wow I want your electric Bill I've been paying almost 900 a month, for 2400 Watts of light and a 12000 btu AC. Stupid California. They wonder why people steal power. after 3 months of non stop AC it quit working and killed my yeilds and quality I went 3 days with no AC. Now I got no money to get going again. I Will find a way but it's going to be tough to get through the next 3 monthsthere better things to use that will get you R-40 in a 3/1/2" wall space.
i used a combination of 2" eps foam panels- R-7.5
and inm mid stream found polyisocyaurnate foam panels at the roofing supply house, they come in thickness up to 4"
the 2 inch panels i used were rated R-12 or R-13.
Prodex was the icing on the cake,
this stuff is only 13/64ths of an inch thick and is R-16.
use it with air space and you'll get top results
its also a radiant barrier and also gives you a 19dba drop in contact noise reduction.
i uses a combo of all three. I would have skipped the eps foam because the iso was superior but i already install some of the eps.
the neat thing with the iso is R value increases as it gets thicker!
my 1st elec bill came in and I'm amazed...
6000w of light in veg 18hrs a day
6 mag ballasts in the room w/running temps 145-164F
gas Co2 gen
a bunch of fans pumps etc etc
it was under $90 for my mini split
total bill, under $500
i was expecting up to $700-$750
anyways something to mull over
and my

You are using an out of date browser. It may not display this or other websites correctly.
You should upgrade or use an alternative browser.
You should upgrade or use an alternative browser.
Bad Habit's 10x13 CGE Room Build
- Thread starter Bad Habits
- Start date
damn packer... really sorry to hear that.
i had my 1st bloom run chopped 1st week of april,
looking at the 10bows i started thinking about your exact same scenario, fuggin summer ,
mid bloom and the ac craps out on me.
I have a lot to lose
can't have an hvac nosing around and my next paycheck's rotting in the sweltering heat
i bought a back up mini split and it was online in by july
best $1800 insurance policy you can get.
and yeah, cali....Xpensive everything over there.
tell those idiots running cali to build a few coal fired power plants
Spent the day framing the room with nails as per Gnome's method and suggestion. Thanks dude! Did 3 nails on the ceiling (both ends and 1 in the middle), and 2 on each wall (ends only).
Doing the whole room took me 7 hours... LOL! Not sure if I'm just retarded or slow
I did go potentially overboard by doing the entire room, as I'm not entirely sure as to where I'll place every piece of equipment so I wanted to make sure I know where all the studs were as to allow for flexible design going forward after installing the insulation.
Some Pics:
Circled one's are the edges of the joist, ones right outside of those is where the drill bit went straight through. Then just chose a space in the middle of the 2 edge holes to put the middle trim nail.
View Image
Speaking of holes - any suggestions as to what I should use to patch up these pin-sized holes? Kwik-seal caulk? something else? There's quite a few around the room now hahaha.
.
good lord bro,,one hole one threaded hook. you find a drywall screw and drill a pilot hole a couple milimeters from that
http://www.amazon.com/dp/B000IKK0OI...e=df0&creative=395109&creativeASIN=B000IKK0OI
Dan Cooper
Member
Great looking room and wow I am glad we moved from CA cause if my power bill was that high for only 2400 watts it would be hard to do any work at all, I guess there would always be the outdoor season
Bad Habits
Member
Well, after using the room for 7 months I've decided to do a deep clean and do some upgrades as well.
The first and most important thing I decided to do was automate my run off. Previously I had plastic totes sitting under the trays where the runoff would go, and I had to manually empty them in the toilet every. fucking. day. This got so god damn annoying. carrying a 10 gallon tote with runoff water splashing around across the house is NOT fun.
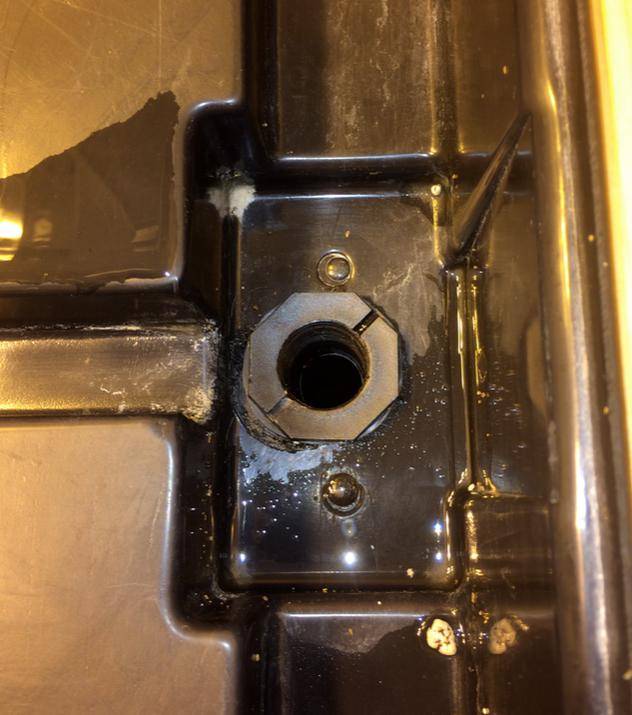
First thing is this peice made by either Hydro Flow or Botanicare that I got at the grow shop. It has a gasket that screws on, and the barb allows for 1" poly flex tubing to slip on:
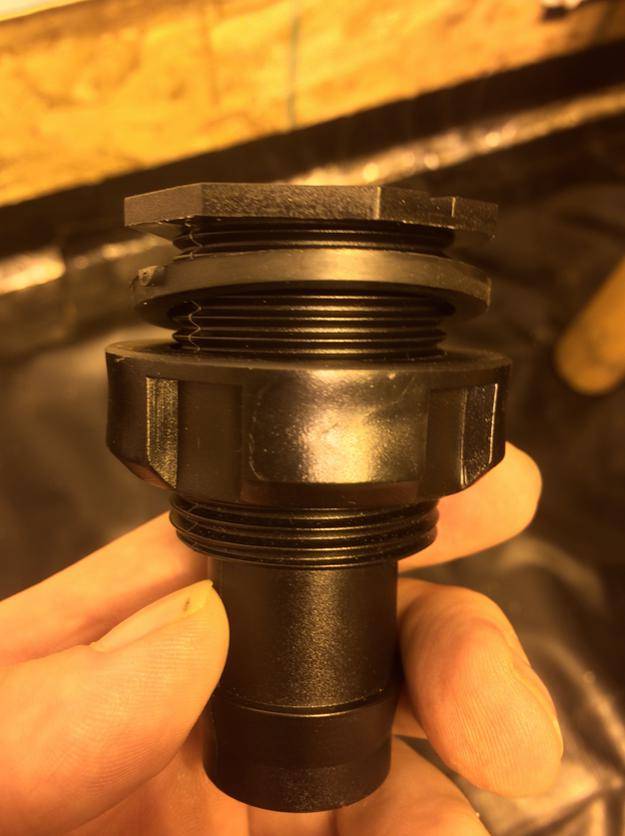
Installed in the tray (right after I put some screen over the hole with water proof tape so no perlite would go in and clog the sump pump):
Bottom View with the poly flex tubing secured with a hose clamp:

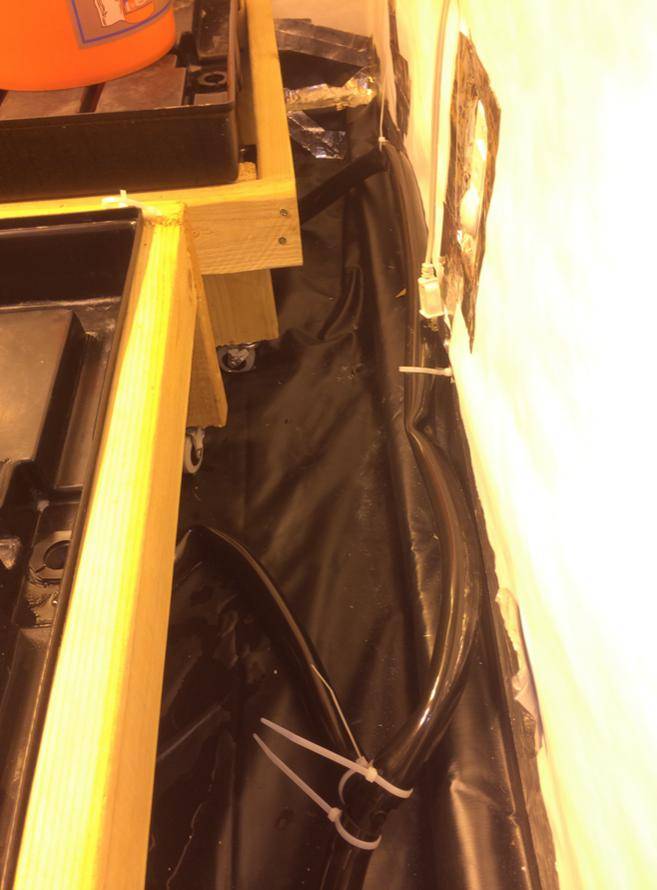
I still want to be able to move my tables around for room/plant maintenance, so I left some extra slack in the tubing. I did some water tests and so far it all drains fine despite having kinks and curves in it:
Now the crucial peice of equipment, the pedestal sup pump:
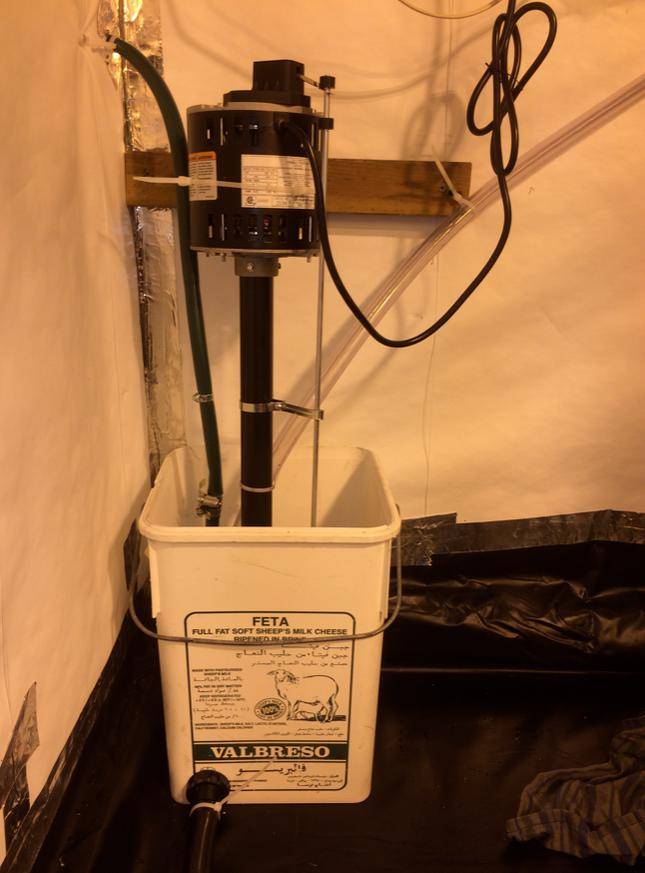
Picked it up at HD for like $70 bucks or so, and found this square bucket it fits into perfectly. I piped the tubing in with the same thing I used on the trays. The pump is on a float valve, and usually discharges through a 1.25" PVC pipe. Well, I already had the garden hose discharge there from when I had PVC on the wall for the dehuey and AC to passively drain through, and didn't want take it out and redo it with the 1.25" PVCs. So I just used 2 reducers so the garden hose would fit into the pump. I did some research and some people say that the reducers will make the pump have to work harder and damage it over time, but so far it's worked with no issues. Fuck it.
The first and most important thing I decided to do was automate my run off. Previously I had plastic totes sitting under the trays where the runoff would go, and I had to manually empty them in the toilet every. fucking. day. This got so god damn annoying. carrying a 10 gallon tote with runoff water splashing around across the house is NOT fun.
First thing is this peice made by either Hydro Flow or Botanicare that I got at the grow shop. It has a gasket that screws on, and the barb allows for 1" poly flex tubing to slip on:
Installed in the tray (right after I put some screen over the hole with water proof tape so no perlite would go in and clog the sump pump):
Bottom View with the poly flex tubing secured with a hose clamp:
I still want to be able to move my tables around for room/plant maintenance, so I left some extra slack in the tubing. I did some water tests and so far it all drains fine despite having kinks and curves in it:
Now the crucial peice of equipment, the pedestal sup pump:
Picked it up at HD for like $70 bucks or so, and found this square bucket it fits into perfectly. I piped the tubing in with the same thing I used on the trays. The pump is on a float valve, and usually discharges through a 1.25" PVC pipe. Well, I already had the garden hose discharge there from when I had PVC on the wall for the dehuey and AC to passively drain through, and didn't want take it out and redo it with the 1.25" PVCs. So I just used 2 reducers so the garden hose would fit into the pump. I did some research and some people say that the reducers will make the pump have to work harder and damage it over time, but so far it's worked with no issues. Fuck it.
Bad Habits
Member
Previously I just had one 60pint dehuey in the room, always set at 50%. The room was always like 50-55% with the lights on, and I never thought of looking at the RH at night with the lights off. When I was harvesting recently during lights off I looked and it was around 65%.
I've never had any kind of mold or bud rot thus far, but have only flowered out 3 different strains so far. I figure who knows if I'll run strains in the future which are more predisposed to bud rot, so better safe than sorry - it was time to up my dehumidifying capacity.
Before I had the ideal air dehuey sitting next to the carbon filter, and it passively drained into a condensate pump which then pumped it into the PVC mounted on the wall, and out through the garden hose discharge point. Well I got rid of the PVC pipe because the garden hose was now connected to the pedestal sump pump, and the AC condensate line was piped to that.
After seeing how many people use their dehuey water I decided I'll add an extra rez in the room and collect it and use it, ultimately saving money on water in the long run.
I took the ideal air dehuey and mounted it up on the wall at the opposite side of the room, so that the drainage line could passively drain downhill into the new rez. To mount it I first screwed 2x4s into the studs with lag bolts, then used the mounting brackets that came with the dehuey and attached those to the 2x4s with lag bolts as well (the mounting brackets themselves wouldn't have lined up the studs, hence the need for the 2x4s):
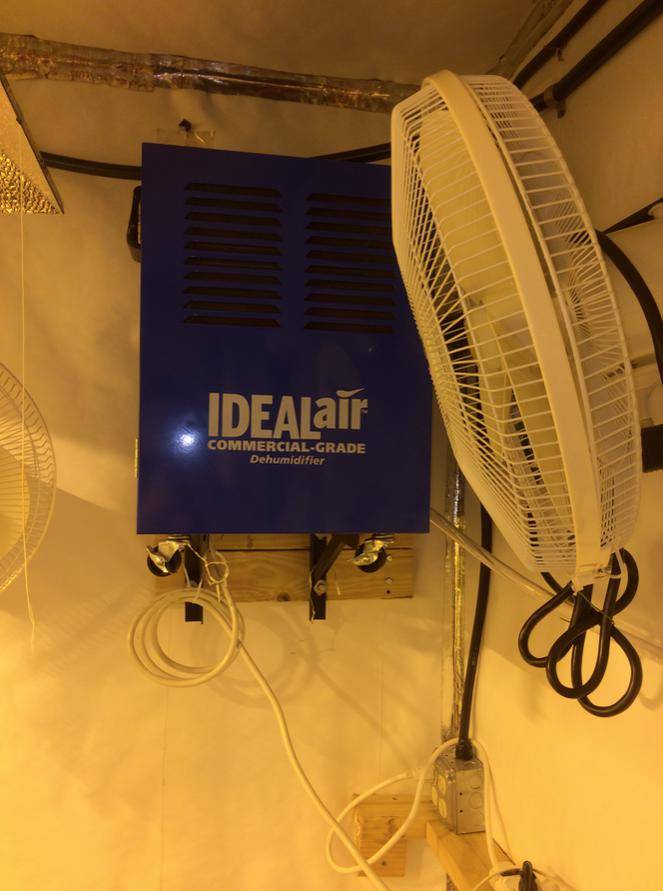
I bought an additional 50 pint Friedrich unit, which actually has a condensate pump built into it. So I placed that where the ideal air previously was, and tacked up the discharge line up out of the way on the wall to drain into the new rez. I think 110pints combined of dehuey power should be plenty to keep my RH at 50ish % now
I've never had any kind of mold or bud rot thus far, but have only flowered out 3 different strains so far. I figure who knows if I'll run strains in the future which are more predisposed to bud rot, so better safe than sorry - it was time to up my dehumidifying capacity.
Before I had the ideal air dehuey sitting next to the carbon filter, and it passively drained into a condensate pump which then pumped it into the PVC mounted on the wall, and out through the garden hose discharge point. Well I got rid of the PVC pipe because the garden hose was now connected to the pedestal sump pump, and the AC condensate line was piped to that.
After seeing how many people use their dehuey water I decided I'll add an extra rez in the room and collect it and use it, ultimately saving money on water in the long run.
I took the ideal air dehuey and mounted it up on the wall at the opposite side of the room, so that the drainage line could passively drain downhill into the new rez. To mount it I first screwed 2x4s into the studs with lag bolts, then used the mounting brackets that came with the dehuey and attached those to the 2x4s with lag bolts as well (the mounting brackets themselves wouldn't have lined up the studs, hence the need for the 2x4s):
I bought an additional 50 pint Friedrich unit, which actually has a condensate pump built into it. So I placed that where the ideal air previously was, and tacked up the discharge line up out of the way on the wall to drain into the new rez. I think 110pints combined of dehuey power should be plenty to keep my RH at 50ish % now
Bad Habits
Member
The next thing I decided to do to make my life easier was move my water source inside the grow room itself.
Before, I had my bigboy filter in my bathroom, hooked up to the washer/dry hose inlet (I don't own a washer or dryer). This meant that for the outlet hose I had to have it running out of my bathroom, across my kitchen, across my living room, and into the flower room every time I needed to fill up my rezs (so usually once every couple days). Due to laziness this usually resulted in me just leaving the hose out into the living room rather than rolling it up and putting it back in the bathroom, which was a rather uncomely sight
I decided to mount it in the flower room in the back close to the ceiling, once again using lag bolts to connect a 2x4 to the studs, and lag bolts to connect the filter to the 2x4:
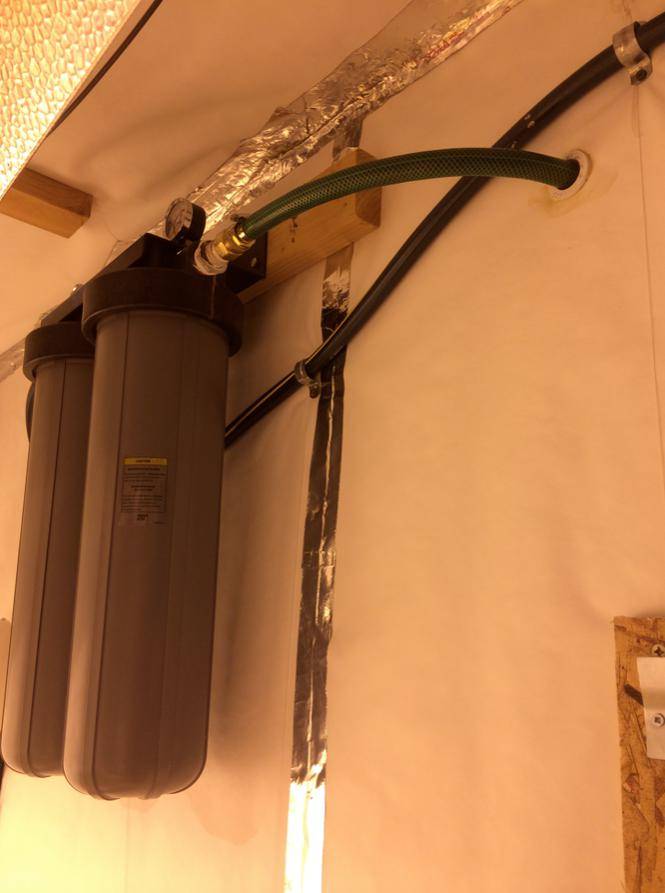
To pipe the hose in, I first used an extra long drill bit to drill through the layers of insulation, drywall, and shingles out through the house. This is because a typical holesaw drill attachment isn't nearly long enough to get through all that shit. So pilot hole -> hole saw as far as possible -> then go outside and use the holesaw again from the opposite direction until it meets the first hole made from the inside. I put a PVC slip bushing in the hole and caulked it in, hose through that, then caulk around the hose on the outside.
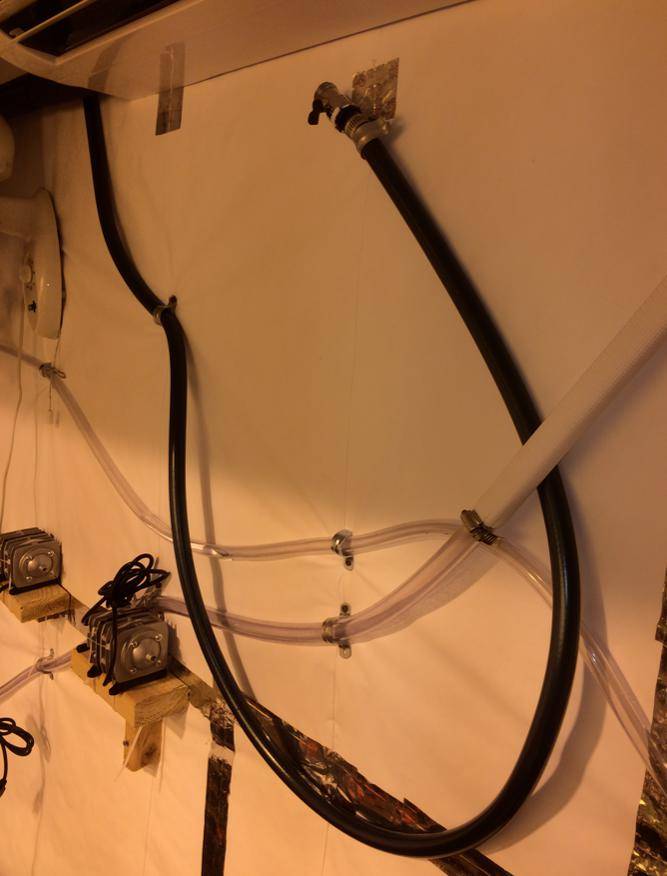
For the outlet hose I just used 1" pipe straps and secured them to every other stud to keep the hose up and out of the way. I cut the hose so there would be just enough length to get to every rez, and then used another pipe strap and only screwed in one of the holes so I could fit the hose in and out to keep it up out of the way:
The hose outside is just connected to a regular outside water faucet with an anti-siphon valve built in. Now, having the hose outside could potentially give me some problems in the winter. There's maybe a month or 2 out of the year where the temperature drops below freezing (usually only at night), which could cause the water in the hose line to freeze and maybe burst the hose. I think what I'm going to have to do during that time is be diligent in checking the weather forecast, and if the temp is supposed to go below freezing I'll have to empty the line out. This is the trade-off for getting rid of the eyesore hose in the house. Hopefully it won't be an issue.
One more thing I've decided to add in the room, which can be seen in the last picture, is some eco plus air pumps. Before I just had 1 pump in the rez recirculating the water/nutrient solution, and one utility pump which would pump the water to the tables from the rezs (so 2 pumps in each rez). I run the flora nova series (it's like a part organic part salt nute solution), which I guess ideally needs to be aerated properly. I've decided to add in the air pumps for this purpose, hopefully they make a difference.
Before, I had my bigboy filter in my bathroom, hooked up to the washer/dry hose inlet (I don't own a washer or dryer
). This meant that for the outlet hose I had to have it running out of my bathroom, across my kitchen, across my living room, and into the flower room every time I needed to fill up my rezs (so usually once every couple days). Due to laziness this usually resulted in me just leaving the hose out into the living room rather than rolling it up and putting it back in the bathroom, which was a rather uncomely sight I decided to mount it in the flower room in the back close to the ceiling, once again using lag bolts to connect a 2x4 to the studs, and lag bolts to connect the filter to the 2x4:
To pipe the hose in, I first used an extra long drill bit to drill through the layers of insulation, drywall, and shingles out through the house. This is because a typical holesaw drill attachment isn't nearly long enough to get through all that shit. So pilot hole -> hole saw as far as possible -> then go outside and use the holesaw again from the opposite direction until it meets the first hole made from the inside. I put a PVC slip bushing in the hole and caulked it in, hose through that, then caulk around the hose on the outside.
For the outlet hose I just used 1" pipe straps and secured them to every other stud to keep the hose up and out of the way. I cut the hose so there would be just enough length to get to every rez, and then used another pipe strap and only screwed in one of the holes so I could fit the hose in and out to keep it up out of the way:
The hose outside is just connected to a regular outside water faucet with an anti-siphon valve built in. Now, having the hose outside could potentially give me some problems in the winter. There's maybe a month or 2 out of the year where the temperature drops below freezing (usually only at night), which could cause the water in the hose line to freeze and maybe burst the hose. I think what I'm going to have to do during that time is be diligent in checking the weather forecast, and if the temp is supposed to go below freezing I'll have to empty the line out. This is the trade-off for getting rid of the eyesore hose in the house. Hopefully it won't be an issue.
One more thing I've decided to add in the room, which can be seen in the last picture, is some eco plus air pumps. Before I just had 1 pump in the rez recirculating the water/nutrient solution, and one utility pump which would pump the water to the tables from the rezs (so 2 pumps in each rez). I run the flora nova series (it's like a part organic part salt nute solution), which I guess ideally needs to be aerated properly. I've decided to add in the air pumps for this purpose, hopefully they make a difference.
Last edited:
Bad Habits
Member
Previously, I just had my irrigation tubing sitting in tray like this:
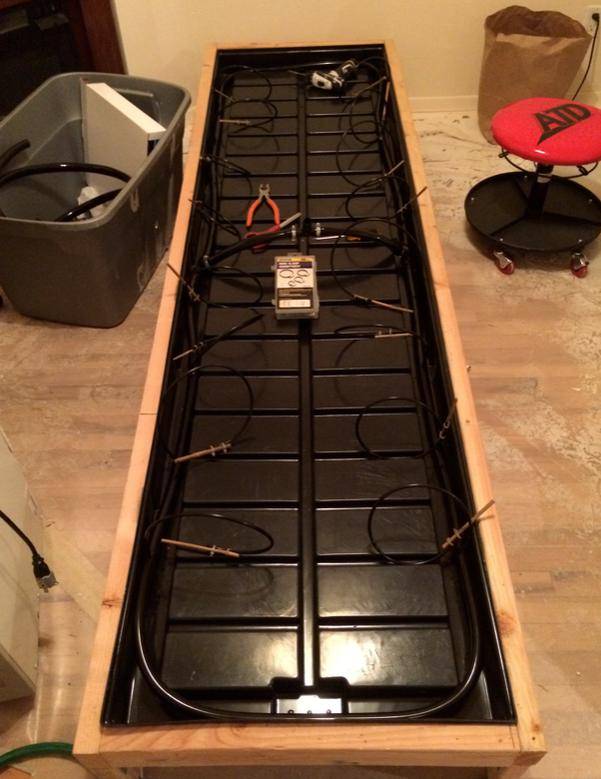
Well, that meant that the tubing would always get dirty and nasty as fuck from runnoff water by the end of run, translating into one more thing to have to clean between runs. While doing the deep clean of my room I decided to replace all my irrigation/drip lines, and this time I decided to mount the irrigation lines on the table frame itself, so no run off would come in contact with it:
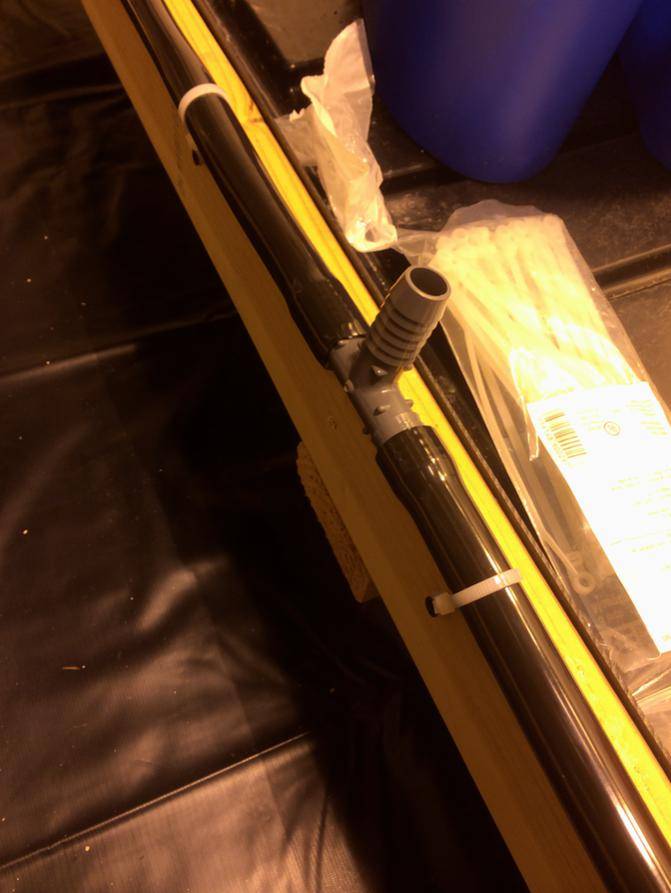
I secured the poly-flex tubing to the table with those zip ties that have a hole for screws in them.
Next thing I decided to redesign was the entry point. Before I had it pretty much straight across the tray, which meant any pots couldn't be sitting right there. So I usually ended up either running 4 or 6 plants per tray, and the entry point would dissect them in the middle. This was annoying if I wanted to run an odd number of plants and truly maximize the space. So I decided to deal with this I would have the entry up high so it would completely clear the pots. Here's the new one with five 10 gallon pots on the table:
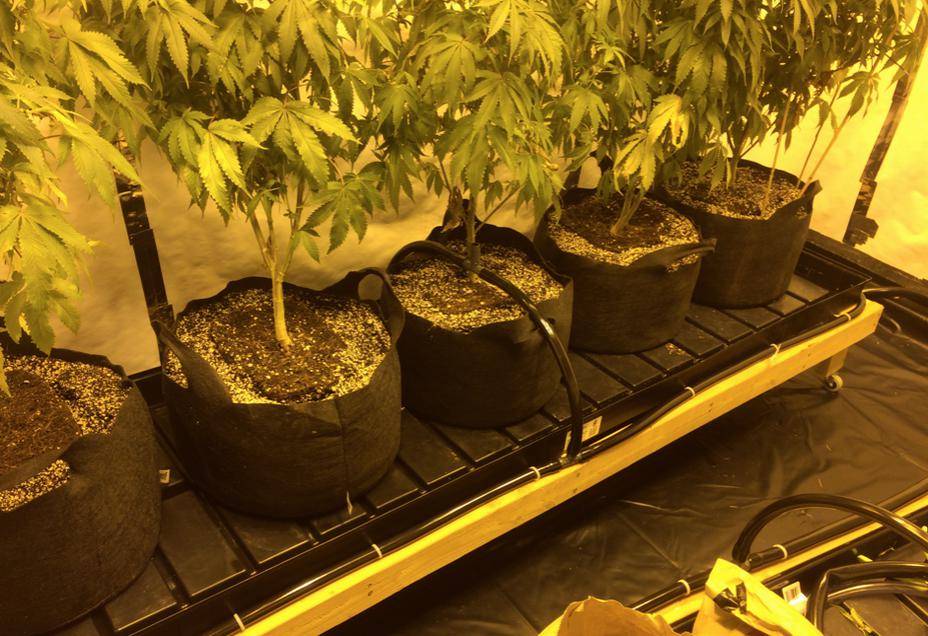
(note I put the entry point directly in the middle of everything in order to achieve equal pressurization in the lines, also I haven't put in the actually drip-lines themselves yet in this picture).
One more thing I'll change is the length of the tubing coming from the rezs to the tables. Before I would just measure from the table to the rez and cut the tubing, meaning each table had a different length of tubing running from the rez to the table. Well, all 3 rezs' pumps are running on the same recycle timer for watering, and thus each table ended up getting a different amount of water because of the different lengths of tubing (the table furthest away got the least, and the the table closest to the rezs got the most). This might not matter that much if you were doing one or 2 waters per day achieving run-off on each one, but I'm usually watering at least 6x/day so this adds up.
Well, that meant that the tubing would always get dirty and nasty as fuck from runnoff water by the end of run, translating into one more thing to have to clean between runs. While doing the deep clean of my room I decided to replace all my irrigation/drip lines, and this time I decided to mount the irrigation lines on the table frame itself, so no run off would come in contact with it:
I secured the poly-flex tubing to the table with those zip ties that have a hole for screws in them.
Next thing I decided to redesign was the entry point. Before I had it pretty much straight across the tray, which meant any pots couldn't be sitting right there. So I usually ended up either running 4 or 6 plants per tray, and the entry point would dissect them in the middle. This was annoying if I wanted to run an odd number of plants and truly maximize the space. So I decided to deal with this I would have the entry up high so it would completely clear the pots. Here's the new one with five 10 gallon pots on the table:
(note I put the entry point directly in the middle of everything in order to achieve equal pressurization in the lines, also I haven't put in the actually drip-lines themselves yet in this picture).
One more thing I'll change is the length of the tubing coming from the rezs to the tables. Before I would just measure from the table to the rez and cut the tubing, meaning each table had a different length of tubing running from the rez to the table. Well, all 3 rezs' pumps are running on the same recycle timer for watering, and thus each table ended up getting a different amount of water because of the different lengths of tubing (the table furthest away got the least, and the the table closest to the rezs got the most). This might not matter that much if you were doing one or 2 waters per day achieving run-off on each one, but I'm usually watering at least 6x/day so this adds up.

DAVES NOT HERE
Member
nice build bad habits. hope your room is rockin and rollin
I'm bumping this old thread because I have it on my bookmarks on my browser and it's always right on that bar at the top of the browser window, so I open up ICMag through this thread all the time. I've read through it a dozen times. Gotta love that post by Fred.
BH, I hope this room is still rocking. I' can't imagine it being idle. You did a good job, tons of work, lots of details. Shitload of tape. Just wanted to give you big ups for the thread, and say howdy.
Later, PT
BH, I hope this room is still rocking. I' can't imagine it being idle. You did a good job, tons of work, lots of details. Shitload of tape. Just wanted to give you big ups for the thread, and say howdy.
Later, PT

