What's new
  • Happy Birthday ICMag! Been 20 years since Gypsy Nirvana created the forum! We are celebrating with a 4/20 Giveaway and by launching a new Patreon tier called "420club". You can read more here.
  • Important notice: ICMag's T.O.U. has been updated. Please review it here. For your convenience, it is also available in the main forum menu, under 'Quick Links"!

Bad Habit's 10x13 CGE Room Build

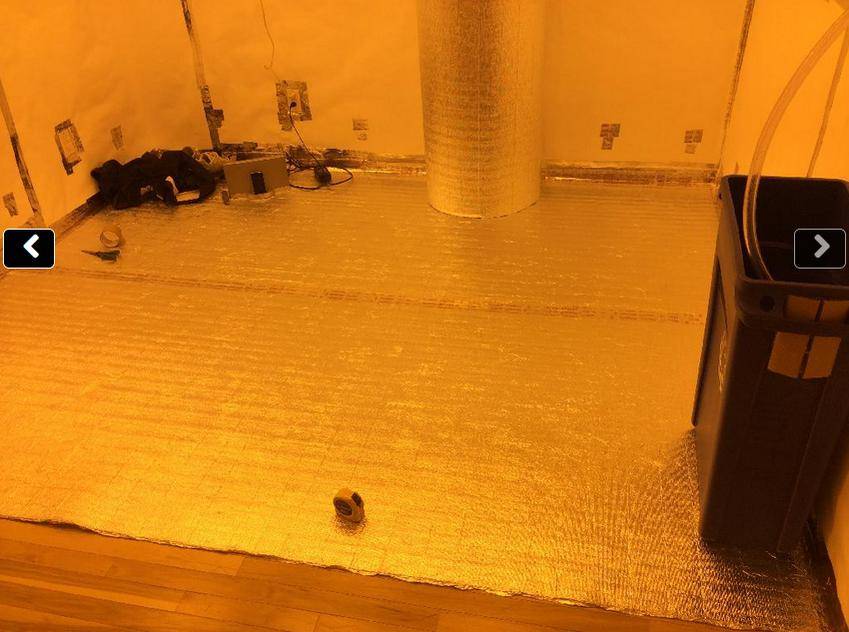
Layin down the prodex on the floor for more insulation

picture.php


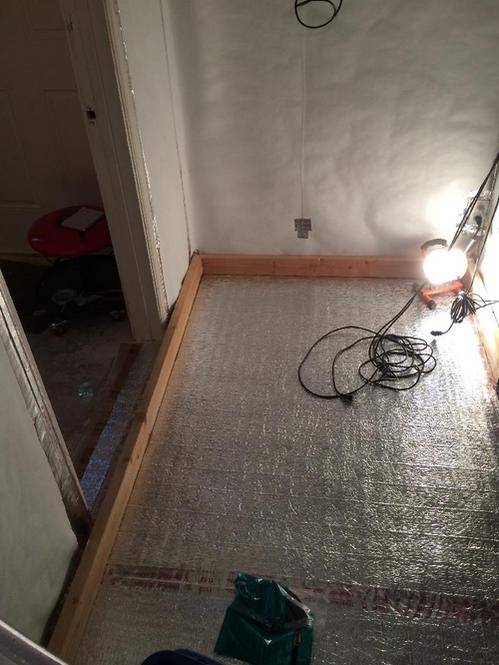
Framing the floor with 2x4s for the pond liner, to create a wall so no water would leak out of the room in the event of flooding

picture.php


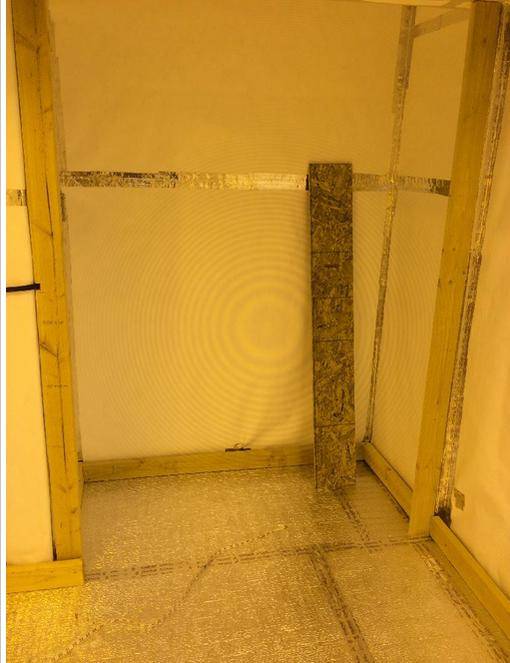
Framing the closet out. I'm planning on creating a door out of orca film with tarp zippers, but the closet opening is 60" and the orca film is 54" across. Solution? Use 2x4s on the sides to close the gap (this is all in theory, keeping my fingers crossed it works lol)

picture.php


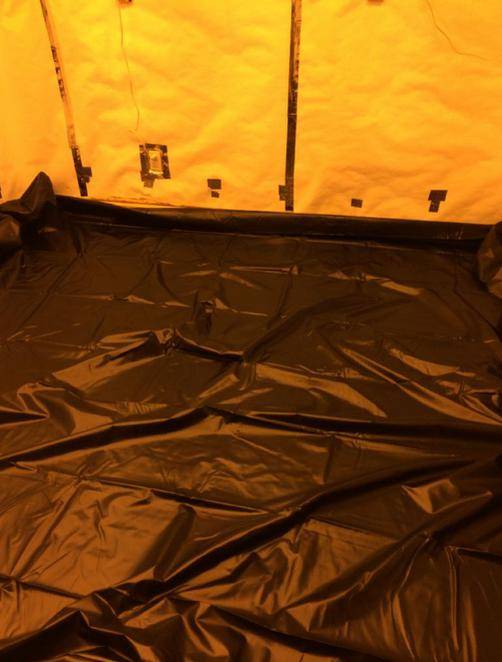
Time for pond liner!

picture.php


Laying out the pond liner. Now this was a real fuckin pain in the ass. The pond liner size I had to get was 13'x20', and my room is about 10'x13' but there is the wall where the closet is that makes it an awkward shape. I think the best thing to do would have been to lay out the pond liner completely flat and cut it to shape before installing it. However, on my property there is a ton of dirt and didn't wanna get the entire thing dirty and somehow attempt to clean it. Ideal place would have been a blacktop at a school or something, but the combination of bad weather and me being a terrible insomniac and always waking up late meant I never did. So I had to basically lay it out in the room as best I could and try and cut it along the edges to get it to fit. The main 10ishx10ish area in the room was pretty easy, the the front of the room by the door where it's broken up was hard as hell to do.

picture.php
 
Used a heavy duty staple gun first to secure the pond liner to the top of the 2x4s. Next used the nashua water-proof repair tape to secure the edge of the pond liner to the walls. Between the orca film on the walls and the pond liner you could take a hose and spray it against the wall and all the water would just pool on the floor no problem.

picture.php


This place (where the closet starts) was the hardest place to secure the pond liner. Because I didn't precut it with lips, I had to ghetto cut at the edges, which resulted in some of the cuts having to go to floor in order to be able to lay out the liner flat. This obviously presents the problem of having holes for water.

picture.php


The solution? Cut a few small strips of the liner and used contact cement to cover up the small cuts where the original liner was. After securing it with the contact cement I used copious amounts of the water proofing tape around the edges just to make sure no moisture would get trapped between the layers or anything. Pretty ghetto solution, but it should work.

picture.php


picture.php
 
So I got the Titan Co2 "rain system" which is really just a 20' plastic line with holes cut in it and a fitting to hook up the Co2 regulator line. The 20' managed to circle around my 3 rows of light almost exactly perfectly. In this pic it's the black line hanging from the 2x4

picture.php


This is where the circle connects by the ballasts, and it hooks in the line which goes down to the regulator. After trying to jam the hoses on the connector for like 10 minutes and only getting them about 90% on, decided to use a little bit of duct tape for a more secure connection:

picture.php


Here's the line dangling down to the left of the panel ready to be hooked into the regulator/tank:

picture.php


Sealing the door up. 2 layers of prodex, then weather stripping all along the edges of the door. Then a layer of weather stripping all around the frame of the door. Then a layer of weather stripping on the inner part of the door that sits flush with the weather stripping on the frame when you close it. It's not 100% sealed, but I plan on cutting out a 1.5" piece of styrofoam with handles to stick in the door as well for a complete seal and to help with noise reduction.

picture.php
 
Now things left to do:

1) cut out duct holes in plywod which will attach to the closet framing at the top and bottom

2) attach said plywood to the closet framing

3) hook up the inline fan in the closet

4) create the orca film/tarp zipper door

5) build my dripper system for the room (still not completely sure how I'm gonna do this, might go with pico's design)

6) build short slanting tables for my 2x8 trays

7) hook up the co2 tank

8) cut out my removable styrofoam removable door


and the list goes on and on...
 
Holy shit! I got some reading to do apparently.

Damn this is sick! Looks familiar

Thanks for dropping in Third Coast!

haha, bet there's plenty that could just be skimmed or even skipped in this thread... dunno how it's already at 6 pages!

I can be extremely OCD and over analytical, so I think a good portion of the thread is just me thinking outloud and asking questions lol. Been workin on the room for abour 2 months now, whereas other people probably could have banged it out in less than a week lmao.

hehe... yup I gets the deja vu feelings too TC..
but it's much more enjoyable on this end of the job :laughing:

woohoo!!.... youse a knockin it out Bad

:woohoo:

Wut up dude! Your room was a huge inspiration and I can't express how much you've helped me on my journey so far. Lookin forward to conversin with you more in the future :tiphat:
 
Dehuey Woes

Dehuey Woes

Well fuck me...

So as I mentioned before right now I'm using the idealair 60 pint/day unit. For 3 days in a row now I've come to the spot, and after 24 hours or less it's full, and the room is at 99% humidity! (currently not living at the grow location and commuting). There is condensation build up on the floor and walls, and I can wipe the sweat on the walls with my finger and it leaves streaks, to give you an idea of how humid is.

For the first 2 days I had just left the runoff water in the plants' tray, so I thought maybe that was why the RH was so high, but yesterday I shop vacced all the water out of the trays...

So after that happening for the 2nd time yesterday, I stuck a second dehumidifier (an old Hampton Bay 40pint/day) in, and just got here now after about 23 hours and they were BOTH full and humidity at 99% again (with no water sitting in the plant trays!). I also didn't even water the plants yesterday!

On my mitsu mr slim I don't have it set on the dehumidify setting, as my HVAC guy (who grows) said that I shouldn't put it on DRY MODE because you can't set the temperature when you have it on that. I have the condensation line sitting in a trashcan, and I have noticed 1/2'-1' of water in it (more when there was only the 1 dehuey in the room, now less with the 2). What I think might be happening is when the dehuey fills up and the room peaks in humidity the ac kicks it's dehuey on? don't really know...

Right now I'm just manually removing the water bucket from the dehuey and dumping it down the sink in the kitchen, but since I'm commuting at the moment and it's filling up before I have a chance to get back, obviously this is no bueno... Buddy said it seemed like the only solution would to be to punch a hole in the wall and hook up a line to drain it outside. I'd like to avoid that if possible because don't really wanna take the chance of the neighbors seeing it, considering I couldn't have it just drain immediately outside of the house because it would seep down into the crawl space under the house and that would be no beuno either, so I would have to have it come out at least a few feet in order to drain into the grass and not pool up right against the house.

By the way, I only got 4 plants in the room right now!!! Considering I plan on having 9-12 flowering and another 10-20 vegging in the closet I gotta come up with a solution to this fast.

Considering between the 2 dehueys that's 100pints/day, and my room is at less than 1/4 full, I dunno what to do. I'd like to get a nice big Santa Fe unit, but don't have the dough for that at all right now...

Any insight or advice would be much appreciated...
 
Sweet build dude!!!

Love the attention to detail and sorting out problems before you have them.

Looking forward to seeing the room full of plants :)
 

ceosam

Member
super clean build mate, much respect.

question: why did you poly the room instead of painting? didn't think you could seal it well enough?
 
Sweet build dude!!!

Love the attention to detail and sorting out problems before you have them.

Looking forward to seeing the room full of plants :)

Thank you sir!

I tried to anticipate as many problems as possible before starting in attempt to try and skip some of the growing pains associated with buildouts and new rooms.

Unfortunately, I'm already starting to run into various problems, starting with when I moved the first four plants in a few days ago.

As I stated in the previous post, my dehueys are fillin up too fast which shuts them down and then makes the RH spike wayyyy up.

I envisioned perfectly trained plants on the table that would fit perfectly in the trays dimensions, so I would have a tiny bit of wiggle room between the trays to do maintenance on the plants. My first four plants are wayyy bigger than than the 2 foot width of the tray, so at least for the first tray that idea is out the window.

I want to have my 3 rezs in the room, but I'm not sure how that's going to work out in terms of the water temps, because I know they have to be in a certain 10ish degree range or else bad things can happen, and I don't have the money to buy a water chiller in the event the water gets too hot.

Not sure how vegging in the closet is gonna work out considering how packed the room is gonna be and it's gonna be a real PITA to get in there to service the veggin plants.

The list goes on and on... :laughing:

super clean build mate, much respect.

question: why did you poly the room instead of painting? didn't think you could seal it well enough?

:tiphat: Thanks man.

by poly, are you referring to the white stuff on the walls? It's orca film, which I don't think is poly if I'm not mistaken. And I did paint the room with 2 coats of white paint with mildicide mixed in to combat mold issues should they arise, but I do have the orca film and 2 layers of prodex insulation to hopefully keep any moisture contained within the room and out of the walls/ceiling/floor.

check your PMs bad
:smoke:

Dude your a life saver! Seriously. Can't express how much I owe you :)
 
One of my projects today: Building a removable door to help keep the room as sealed as possible. One of my buddies gave me the idea:

picture.php


It's R-tech 1.5" foam insulation from HD. Basically styrofoam with some cool reflective shit on one side :laughing: I tried to cut it as precisely as possible, but it was too thick to use a small utility knife on, so I ended up using a jigsaw which wasn't 100% on the line so there are a few small places where it doesn't sit 100% flush: however between all the weather stripping on the door and frame and that I'm fairly confident the rooms should be pretty damn sealed.

So one task was how to put handles on it in order to open and close it. So I got out some handy duct tape:

picture.php


Now here's one problem: if you put the door in from the inside it's fine because you can kinda just pound it in place with your hand. But if you're putting it from the outside it's a different story: because it has to go on the inner frame you have to pull it into place, and because it sits in the frame so snugly I ripped one of the handles the first times trying, even though I used a shit load of duct tape lol. Gonna have to play with it more tomorrow.

Problem #2: What to do with the inner door knob. Because of the shallow depth of the frame and width of the insulation board, the door knob interferes with the frame going into place. So I thought I would just take off the handle on the inside and it would be fine. Nope.

picture.php


As you can see the rod thingy still sticks out a bunch. I briefly glanced at doorknobs at HD last time I was there and didn't see any that would be shallow enough to use for my purpose, and really don't have the money to be buying extra little things here and there. Might just have to pull the door handle off every time for now LOL.

Also started building my first table for my trays, but didn't snap any pics. Tomorrow I'll finish the table and build my PVC scrog frame as well.

One issue I've been having is I'm a major insomniac. Like I usually go to sleep around 5-6am :( So that means I usually don't really get the ball rolling and wake up until like 7-8PM, which only gives me a few hours to really use power tools without worrying about being a nuisance to the neighbors. I have 2 houses which are in pretty close proximity to me, and one of them is a family with kids and they seem to go to bed around 9-10PM (like all the lights go off in the house), so I really try and not do any loud shit after 9-10. Shit sucks, but don't wanna take any chances with pissing off neighbors and havin em come around to yell at me or call the cops with a noise complaint....
 

the gnome

Active member
Veteran
hey Bad, on the door handle,
you can pull out the knob/rod on the entry side then use a flat head screw driver to operate the strike going in or out.
then you can mount the knob handle on the entry side of the door to have something to open and close the door.
I have a pull handle on the outside,
i used a dummy knob on the inside of my door, just screw it to the door, no holes.
picture.php
 
Well I got lazy unfortunately and never finished this thread...

Decided it's the least I can do in an attempt to give back to the ICmag community - personally I know I learned a ton from searching and looking through threads like this.

Alrighty so to pick back up where I left off...

Building tray tables!

When I designed the room I calculated I could fit four 2x8 (or two 4x8) trays in there. However, this would pretty much be wall to wall, with zero maneuverability, and nowhere to store water/have a rez. As such, I decide to sacrifice some bud production ability for the ability to be able to squeeze between the trays to perform maintenance on the plants, and store 3 mr slim rezs in the room so I wouldn't have to lug water in everyday from a different part of the house.

For the tray tables I decide to have them at a slight incline so the water would drain towards one end, and release through a drilled hole into 10 gal rubbermaid container under the table. On a side note, after using this system for 2 crops so far it sucks because I have to manually take out the rubbermaids everyday, carry them to the bathroom and pour them in the toilet. This gets pretty damn old and need to find a way to automate it.

I built the tables so the Rubbermaid's would just barely fit under, so I would sacrifice minimal vertical height. I cut the tray legs 1.5" different on the 2 ends for the incline. In retrospect I should have done maybe 3", as my room isn't 100% level so some runoff does pool up from time to time.

The first tray table I built I kinda of goofed. I screwed the the legs on the interior of the frame so the tray would sit on top of that (this is the tray shown in the last pic). After doing the first one I realized I could save about 2" of vertical space and have it be more structurally sound if I built the frame around the tray itself, and attached the legs to the bottom:

picture.php


picture.php


picture.php


So last I built the scrog net frame with PVC. I didn't glue any of the parts together, and used zip ties and screws to attach them to the bottom of the tray:

picture.php


So far they have worked fine. Once in awhile a section will come loose but it's easy to shove back in place.

Last thing I did was build a drip system for the plants:

picture.php


Plan is to have 4 plants in 10 gal pots on each tray, with each pot getting 4 drip lines.

Originally I was going to build the drip system out of PVC using Pico's thread, but a friend convinced me that tubing was better...

The tubing on the table is poly flex (only sold at grow stores I think). In an attempt to have equal pressurization I put the input in the middle of the tray, which hooks up to another poly flex tube that goes into the rezs at the edge of the room, and slides onto a 1/6 HP flotec utility pump from home depot.

The drip lines themselves are just standard 1/4" drip lines that come in a roll from home depot, connected to the polyflex tubing with barbs. I then attached little pieces of bamboo stakes with zip ties to the end of the drip lines to help secure them in the coco so they don't come loose.
 
Last edited:
Hooking up the 20lb Co2 tank to the regulator:

picture.php


Regulator plugs into a Titan controls Atlas 9 (pictured on last page).

I've been using the room for about 5 months now and I'm only on my 2nd 20lb tank with the PPM set at about 1000 pretty consistently. I thought this was odd but my friend said he thought it was normal since the room is sealed?

Put the can-100 filter in the room, and attached the 12" max fan:

picture.php


For some reason the max fan didn't sit completely flush in the 12" flange, so I stuffed some weather stripping in the crack to help with the vibration.

The max fan sounds like a god damn airplane! Chit is loud as hell, so I attached a fresh duct silencer to it:

picture.php


Also used neoprene clamps on both the top and the bottom of the fan:

picture.php


With the silencer and clamps the noise is greatly reduced. You can definitely hear it in my house (it's a very small house), but not really so much outside the house. If you walk right up to the wall of the grow room outside the house you can hear it, but if you're standing say 5 feet away you can't.

This thing is a fuking BEAST! It's so powerful it ripped the orca film and tape right off the wall after a few weeks LOL:

picture.php


I retaped it, but the orca film still juts out in the middle and sucks into the filter, and is just kinda permanently like that (so like 2 sides of the filter are slightly obscured by it). So far it hasn't caused any issues with the fan though after months and months of use.

I definitely oversized the fan/filter, but so far have had no smell issues with the room so I'm happy with it.
 

Treetroit City

Moderately Super
Veteran
Nice update BH! I deal with the same shit with my runoff except I'm in a barn so I have to dump out side. Pain in the ass but what are you going to do right? I bought a condensate pump but have not got around to hooking it up yet. Guess I'm not sure where I'll pump it to yet. As it is I dump my runoff totes into five gallon buckets and when both buckets are full I take them and dump them outside, usually every three-four days.
 

xxxstr8edgexxx

Active member
Veteran
Nice update BH! I deal with the same shit with my runoff except I'm in a barn so I have to dump out side. Pain in the ass but what are you going to do right? I bought a condensate pump but have not got around to hooking it up yet. Guess I'm not sure where I'll pump it to yet. As it is I dump my runoff totes into five gallon buckets and when both buckets are full I take them and dump them outside, usually every three-four days.

i did this set up where i let everything dump into a bin with a sump on a float switch underneath the floor in a crawl space. when it kicks on it flows through a garden hose over to my sewer line that we plumbed in a male 3/4 hose inlet. the hose just srews onto our sewer line. but you could attach to a buried french drain pipe run.

lots of different ways to do things. i personally like automation, lets my efforts go towards plant health rather than emptying and filling water nutes etc.
 
Top