What's new
  • Happy Birthday ICMag! Been 20 years since Gypsy Nirvana created the forum! We are celebrating with a 4/20 Giveaway and by launching a new Patreon tier called "420club". You can read more here.
  • Important notice: ICMag's T.O.U. has been updated. Please review it here. For your convenience, it is also available in the main forum menu, under 'Quick Links"!

Big Soil Little Room, Recycled soil trial

FatherEarth

Active member
Veteran
So I decided I wanted to fill an entire room with soil and see if it could be done. My first concerns were:

Humidity, soil born pests, water drainage and working space.

The room is 10.5w'x15'lx 8'h
6k watts air cooled
Cooling with outside air, backup A/C if needed
Two dehumidfiers with a total of 120 pints of potential water removal per day
CO2 burner

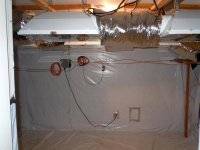
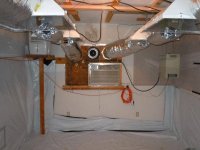
Nothing fancy, here are a few room pics:

attachment.php
attachment.php

attachment.php


The clones were taken before the onset of flowering from an outdoor crop of large healthy plants. I always make more mothers than I need so I can take only the best and largest lower shoots. I avoid lateral side branches and only take the tips. The cuts are always very large, with at least two sets of leaves, anywhere from 8-10 inches long. Rooting plugs are 2"x3". In my experience the larger the cut the healthier the resulting plant. Mothers were heavily fed P. Silicate via root drench and foliar as well as a strict weekly IPM schedule. Adding compost teas and Kelp extract to an already well balanced soil mix.
They are planted into Organic "black gold" this stuff is good for the first two weeks of growth. Foliar Feed for the added boost I am looking for.


BG-Natural-and-Organic-225x300.jpg


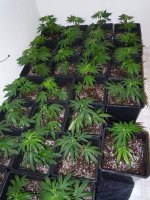
Here are the clones transplanted into 3 gal pots on Day 1 fresh foliar feeding of fulvic acid.

attachment.php
 

Attachments

  • Intro walk in.jpg
    Intro walk in.jpg
    47.9 KB · Views: 19
  • Intro room spread.jpg
    Intro room spread.jpg
    49.3 KB · Views: 18
  • intro pics ballasts.jpg
    intro pics ballasts.jpg
    56.2 KB · Views: 19
  • Clones transplant day one fulvic acid foliar.jpg
    Clones transplant day one fulvic acid foliar.jpg
    93.6 KB · Views: 19

FatherEarth

Active member
Veteran
Here is @ day 7
One root feeding of kelp extract and fulvic acid also one foliar feeding of yucca plant extract.

picture.php


Day 10.5 they are growing vigorously. Im still scrambling to get the pots mixed and filled with a few minor bumps along the way. An extra transplant may be in order, although not ideal, it may be needed to keep the roots running and plant vigor high. Already behind schedule on a perfect run attempt where timing is everything. Better catch up quick or start to lose points in plant vigor and health.

picture.php
picture.php

So the original plan was to pack this room full of soil. (4 )400 gallon smart pots with a total of 8 yards of soil mix. I was going to cover the floor in pallets to keep the pots off the ground, but opted against it because of lack of uniformity and cleanliness of the pallets. The lights are spaced to each cover a 4x4 square with some overlap down the center. A raised floor was built to cover the exact size of the light foot print, this provides drainage in the event of overwatering and also a considerable amount of added air flow.


picture.php
picture.php
 

FatherEarth

Active member
Veteran
The Soil Mix:


So the soil mix consists of Emerald Pro Moss, Perlite medium grade and #4 Chunky, Green waste compost, EWC, amended with
 Organic:


Feather meal

cotton seed meal

blood meal

kelp meal

alfalfa meal

fish bone meal

K mag

azomite
Glacial Rock dust

par4

rock phosphate

calcite lime
crushed oyster shells
*
The best peat moss available is very important, not all peat is created equally.. Have a look at the analysis
*pro-moss emerald tech sheet.pdf *

*
http://fungi.com/pro...luble-1-lb.html
*
Contains concentrated spore mass of the following:
Endomycorrhizal fungi
Glomus intraradices, Glomus mosseae, Glomus aggregatum, Glomus monosporum, Glomus clarum, Glomus deserticola, Gigaspora margarita, Gigaspora brasilianum, Gigaspora etunicatum
Ectomycorrhizal fungi
Rhizopogon villosullus, Rhizopogon luteolus, Rhizopogon amylopogon, Rhizopogon fulvigleba, Pisolithus tinctorius, Scleroderma cepa, Scleroderma citrinum
Trichoderma
Trichoderma harzianum, Trichoderma konigii
Beneficial Bacteria
Bacillus subtillus, Bacillus licheniformis, Bacillus azotoformans, Bacillus megaterium, Bacillus coagulans, Bacillus pumlis, Bacillus thuringiensis, Bacillus stearothermiphilis, Paenibacillus polymyxa, Paenibacillus durum, Paenibacillus florescence, Paenibacillus gordonae, Azotobacter polymyxa, Azotobacter chroococcum, Sacchromyces cervisiae, Streptomyces griseues, Streptomyces lydicus, Pseudomonas aureofaceans, Deinococcus erythromyxa

*

picture.php


Perlite by the tote

picture.php


Green Waste Compost by the yard, been sitting in the yard for nearly a year now, still breaking down, nicely

picture.php


Mixing by hand is a time consuming and laborious task to say the least. I measure my ingredients with an extra smart pot (measuring cup) when measuring compost, ewc and perlite.
I am currently mixing 2 yards at a time which equals one 400 gallon pot, using kiddie pools for mixing bowls.
picture.php


Once all the ingredients are measured out, the two kiddie pools are mixed with a hand tiller.


Still lacking adequate room to mix, I use a 400 gallon pot to do the final mixing. I added rebar to the sides to keep them out of the way of the tiller.
picture.php
 

Attachments

  • pro-moss emerald tech sheet.pdf
    143.2 KB · Views: 67

FatherEarth

Active member
Veteran
Lots of moving dirt around to get it mixed well, after its mixed it loaded into a large trashcan with wheels. These things hold a lot of dirt, no spills and on wheels…

picture.php


Another option to move dirt and even store your mix without it going anaerobic, heavy duty woven contractor bags holds over 100lbs

picture.php


Wheel it indoors and start unloading into the pots.* Using card board to support the sides as its filled carefully so not to spill too much dirt under the raised floor.


picture.php
 

FatherEarth

Active member
Veteran
In one of the 400 gallon pots I recycled these pots left from the mothers of the current clones going into this room. There were root mites in one pot and also spring tails. Positive ID made with microscope examination.


picture.php
picture.php
picture.php


Root mites feasting on gnat larvae

[youtubeif]http://www.youtube.com/watch?feature=player_embedded&v=wMNdnQZGoqo[/youtubeif]

After a few trash can runs the pots were filled.


picture.php
 

FatherEarth

Active member
Veteran
As much as I wanted to have (4) 400 gallon pots they just wouldnt fit. So I went with (5) 65 gallon smart pots under the other row of lights.
*
While the beds wait for some compost tea to finish brewing they are blessed with crystals.


Nothing like free CO2 via the fungi in the soil. If you cant make out the display its sitting at 1750ppms thats just from the amount of soil fungi/ organisms releasing CO2
 

FatherEarth

Active member
Veteran
So before I can transplant anything into the soil mix, I like to get it wet with some compost tea to get the microbes working on breaking down those amendments and unlocking those nutrients. It would be ideal to give them a week or more head start in doing so. Two to three weeks being optimal but not necessary. Its not like a super soil where you have to wait a month for it too cool off, you just need to make sure its been good and wet when you plant to make sure there are no dry pockets and the available nutrients are able to be absorbed. Some brewing action, indoors no less *


It was pretty cold outside and its best to brew closest to where you will be using the tea so I did the easiest thing I could…


FatherEarth

Active member
Veteran
Some of you are probably wondering whats in the tea.. I almost forgot, its microbemans recipe with my own adjustments:
*
http://microbeorgani...ost_Tea_Recipes
*
*
2 liters green waste compost

2liters quality earth worm castings

4 cups molasses

2 cups kelp meal

2 cups alfalfa meal

1/2 cup powdered soft rock phosphate

1/2 cup Glacial rock dust

1/2 cup pure protein dry 15-1-1

60 ml quality fish Hydrolysate( not emulsion) I use Organic Gem
*
*
So how does it smell?
*
for the first 8 hours it smelled a bit fishy, by morning when I came back in it smelled like sweet earthy goodness. The molasses takes over after the microbes get to work eating the funk.. Im certainly going to be doing more indoor brewing


So after watering the awaiting transplants with ACT, and soaking the beds, the plants will be transplanted within 24 hours.


FatherEarth

Active member
Veteran
So after all that brewing you want to make sure your delivery is safe for your microbes to make it to their intended target may it be the rootzone or leaf surface. You may to want to take note of a few things that keep microbes alive on their journey from the brewer to the plant. Your pump if not the right type can be a death trap for a large portion of your hand fed microbial children. There are several types of pumps that will not harm the microbial life. Ill save myself some considerable time and carpal tunnel by sending you to where this idea originated for me:

Gardening Rythms Application Equipment.*
The site is informative although hard to navigate, if you dig youll find lots more good info. Read that then what Im making here and why may make more sense if you dont already grasp what Im talking about.
I use a diaphgram pump. This particular pump is on demand which means it builds line pressure then it stops until you call for it via pressing down the handle on your sprayer. Saves battery and needless cycling of tea through the pump, seen here:
*
Fimco High Flo Gold Series 2.1 G.P.M. starts at around 60$


This battery was the only one they had at napa auto when I went to buy, not ideal but it works. Ideally you want one that is sealed and can withstand getting wet and laying on its side. This one has to remain up right, be refilled and be kept dry, so... I put it in a 5 gal bucket and drilled some hole to vent acid gasses generated by a hot battery. Two pieces of wood cut to wedge it in tight so it doesnt fall over. The clear tube is the acid overflow tube..


FatherEarth

Active member
Veteran
best wand so far and easy to clean


I take scoops of tea with a 5 gal bucket out of the brewer and dump them into the holding tank that my pump connects to. I turn off my brewer about 2 min before I take a scoop so not to get too much debris. then I pour it into the holding take through a window screen I framed to fit the barrel. Also placing the output of the holding tank several inches off the bottom prevents you from pulling any debris into the pump that would stop the pump.


FatherEarth

Active member
Veteran
so Day 17 the room is filling in nicely, so far so good


“Tom Hill
As a rule of thumb I calculate a water volume of around 10% of soil volume per "maintenance" (normal) watering. Occasionally I'll do a light watering (5%) or a more thorough soaking (15%) but 10% is the "normal" watering once we are in maintenance mode.

So that would be 1/2 gallon water for a 5 gallon container. These 6 foot containers are up around 50 cubic feet or something over 300 gallons. This requires about 30 gallons per cycle.”
To calculate how many gpm Im getting I use a stop watch and a 5 gal bucket and time how long it takes to fill. As Im watering each pot I use the stopwatch and keep track of the time so I know how many gallons Ive put in. Also making sure Im spreading the water out evenly over the dirt surface and using paced even strokes until its covered evenly, then repeat until the timer goes off.


Here is one of my watering days.
*
Day 17 watering, 50 gal*
800 ml molasses,
65 ml Protekt,
350 ml kelp extract,
20 ml, Ej catalyst,* (to balance PH yea I still check my ph, LOL)
therm x 70 1/4tsp per gallon
= ph 6.5 exactly
*
*
Foliar fed Calcium 25 a week earlier followed by root feeding the next day
*
molasses 1tbsp per gallon, therm x70 .25tsp per gallon
PureProteinDry 15-1-1** 9 grams per gallon
*
Saw an amazing amount of growth by the next day. Literally 5-6 inches of new growth OVERNIGHT after those applications! I heard it was amazing stuff but never used it before. The Calcium 25 is a must have as is the PPD 15-1-1 amino acids WOW you need to try it.
*
Next time I apply it I will take before and after pics to document cause its impressive. Make sure your lights arent too high or they will stretch a bunch. Keep em low let em pack in.


here are the calcium 25 instructions... We use the vegetables and ornamentals Cal 25
*
*Calcium 25 instructions.pdf


Plants praying to the Creator
*
D.O.G


@day 20

Day 21, flip:
*
1st day of Flowering


*
 

Attachments

  • Calcium 25 instructions.pdf
    357.1 KB · Views: 65
B

BasementGrower

wowowo. lool 17 days and they grew fast as fuck.. do u find u yield better.. doing these large bed type pots.. compared to using like 5 or 10 gallon pots per plant???

i was thinking of trying to do this also.. i figured they would get bigger then individual pots.
 

JohnG

Member
wow, that is a helluva lot of soil for such a small room. Good thread title. Can't wait to see the yield!
 
Top