What's new

OldOne's 2nd cab run - PLL / PPK / Arjan's Haze 3

ImaginaryFriend

Fuck Entropy.
Veteran
OO:
You drill 1/2 your ppk sidewall and IF does the whole thing. Does it matter?
IF:
UPDATE OCTOBER 11, 2010 Here's some interesting tech I somehow overlooked my first few times through the thread... you can see that my buckets do not have this incorporated.

D9's POST 613:
Quote:
Then we come to pulsed irrigation. Not only are the benefits of drip realized, but you also get the “plunger” effect. This sudden burst of water creates a wavelike effect that travels through the medium with a higher mass per application than drip, pushing and pulling more oxygen via displacement as it falls. This is why I did not drill out the upper half of my buckets. Gases cannot escape from the sidewalls of the upper half. As the pulse hits and falls old air is pushed out through the holes in the bottom and fresh air is drawn in through both the top of the medium and the sidewall holes.
If I were to build another bucket, I'd leave the bottom two inches intact in case I accidentally bump my timer an pulse to flood--the one time I did that made an awkward mess. I like the pulse-gas-exchange theory, so I might leave a little more intact on the top.

I built mine when D9 was talking about drilling out the top part of his bucket too to reduce the root ring.

I'll break open my root balls when the time is right, and we'll have a idea of what my buckets looked like on the inside...

To restate: I'd still leave a bit more of the bottom intact to make up for silly over-pulse mistakes. But your lid within a lid will work as a collection. My plywood top did not do that. It just ran off. And made a mess. So, I guess you could drill it all the way out, as long as your lower bucket lid was shaped to become a a collection point.
 
S

SCROG McDuck

“Why am I going to use a 2" hole saw, instead of a 1.5" one?”

because you want some clearance for the 1.5” od tailpiece. 1.5" hole saw for the grow container and tailpiece and a 2" or 2.5" hole saw for the reservoir lid. It needs to be just loose enough to get the tailpiece in and out of the reservoir. Remember you are going to have some kind of screen or cloth held over the end with plastic wire ties or something. You need to be able to clear it when you install or remove the grow container.

I did forget the screen on the tail piece...

“Tire valve, for connection to the controll bucket, is 'above' the
intended rez waterline? I thought rez, 'interacted' with controll bucket.”

yes, the reservoir does interact with the control bucket. no, tire valve for line to control bucket should still be installed low in sidewall. This is if you need to use a control bucket. A control bucket is necessary for those running multiple containers. Second 7/16” hole using a second tire valve as a removable stopper is for checking tds and ph. You could use a cork or rubber stopper here.

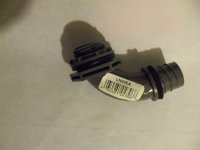
Here is similar 1 piece, pvc fitting for checking rez ppms..
1/2' & 3/4" available..


In OO's case the single reservoir has to function as a control bucket so he really doesn't need the lower tire valve hole. I really didn't think of that earlier. He is going to use one container as a reservoir, control bucket, and pump chamber because of space limitations in his cabinet.


https://www.causewaybaitandtackle.com/Fin_Strike_Latex_Tubing_p_1501.html

this is just one of many sources for “3/16” black latex tubing”. It is not the one I used, I used a different one but can't remember which now. Price is about the same.

thanks.. thats expensive..

It just occurred to me that OO will only need a single 3” piece and one tire valve to get out of the bulk tank. I keep forgetting “one” container. I am used to multiple containers.

Hey, OO, you might want to use something else and wrap it with something black.

Jacks+ in DWC is working out well...
Ph drift is almost non existqnt and controllable if
necessary... clean stuff..
If I were to stay with DWC, I'd continue useing it..

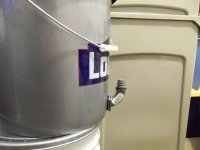
Fittings at Lowes
 

Attachments

  • LSD Day 39 Bloom 600w 001 (800 x 600).jpg
    LSD Day 39 Bloom 600w 001 (800 x 600).jpg
    22.1 KB · Views: 17
  • LSD Day 39 Bloom 600w 003 (800 x 600).jpg
    LSD Day 39 Bloom 600w 003 (800 x 600).jpg
    28.3 KB · Views: 17

delta9nxs

No Jive Productions
Veteran
OO, sidewall of grow container should be drilled out approx. 1" staggered centers with a 1/4 or 5/16" bit. i would start from the bottom right where the curve forming the bottom of the container corner stops and the flat part of the sidewall begins. if you go up the sidewall as far as the molded ledge, which is about half way, you will get sufficient o2 and allow the pulse to "pump" the medium. more o2.

it will also stop root spinning in the lower area of the container, which is where most of it occurs. after all the reading and experimenting on root pruning i'm convinced it's the extra o2 that is the real benefit. root pruning does cause more extensive root branching but not necessarily more root mass.

even though IF is all paranoid (we better send him some indica hash) about water coming out the bottom from over-pulsing if it happens you are putting way too much liquid on top at one time.

small, frequent pulses are the deal here. people have mentioned putting an air pump to this somehow. i think the pulses are pumping air already. how much? who knows?

your real challenge here is finding a pump small enough and a timer with the right capabilities. those timers cactus jack was talking about had a minimum "on" or duration of event of one minute. i'm not sure how many times per day it is capable of. you can always limit the pump to reduce delivery volume. or put a by pass loop on the pump to return what is not used to the reservoir.

to stop material from falling out of the tailpiece i use regular fiberglass window screen. one piece only. held on the bottom with
2 nylon wire ties. i think any fabric will do.

IF used another piece of fabric at the top of the tailpiece in the medium in an additional attempt to stop root growth. he rounded the coco up above the tailpiece before he placed the fabric on it. i would be afraid (who's paranoid now) the medium would pull away or sag creating an air gap at the top of the pipe. if this did occur it would stop all sub-irrigation.
 

ImaginaryFriend

Fuck Entropy.
Veteran
"Just because you're paranoid, don't mean they're not after you."

Yeah... I carelessly bumped my timer and made a mess. Wouldn't be a problem in your Rubbermaids, as the top will catch the run-off...
 

oldone

Member
congrat OldOne you are a real green thumb bro.Very interesting thread,thanks for share!!I'm doing a cfl experiment too.:D
enjoy&relax:wave:
Thanks for looking in blueschato, and also for the rep. "...Slow Wide Turns Brother..."

good luck with you grow,
OO
 

oldone

Member
D9 and IF,

Thanks for the advice guys. I just got back from a shopping mission and managed to snag a 10" dia black plastic garbage pail that I've cut down to 7" tall. Should be about 2.4 gallons worth. The 1.5" sink drain fits beautifully in the bottom, gotta love hole saws.

I'm now contemplating drilling umpteen thousand 1/4" holes in the damn thing.

I have a tiny 60gph fountain pump and a timer with 7 on/off cycles per 24 hours.

I get to build again!

Back later with pics,
OO

I think IF's gonna have some of his own primo stash real soon, D9 you should be swimming in the stuff. LOL
 

delta9nxs

No Jive Productions
Veteran
"Just because you're paranoid, don't mean they're not after you."


"they" are always after "you", IF. they are right on your ass all the time. just one step behind. you have to keep moving. if you stop they will get you.

remember, when we were kids, you had to jump way off the bed to keep "them" from grabbing your feet.

and the closet door had to be closed to keep the "evil monkey" or one of his friends from coming out and "getting" you. apparently the "evil monkey" wasn't too bright and couldn't figure out door knobs.

and now, as adults, we have evil pigs chasing us around for growing a beneficial plant. and they are really out to get you too!
 

ImaginaryFriend

Fuck Entropy.
Veteran
remember, when we were kids, you had to jump way off the bed to keep "them" from grabbing your feet.
Wait... your not jumping these days? How the hell do you keep them off your feet?

I looked into a suspension bridge from the bathroom to your bed. I had the preliminary engineering done for that, but it didn't work with my local zoning and the building inspector is a hard-ass.

So I still jump.
 

MeLikesPCs

Member
Hi oldone/anyone,

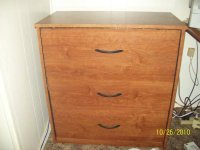
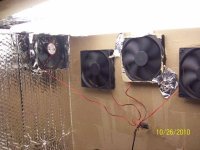
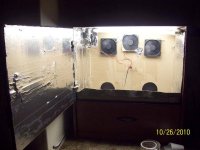
Can you help me? I now have a small wooden dresser 25inches wide, 12.5inches deep and 27inches high. 4 55Watt PLLs on top. 4 120mm fans - sorry can't locate cfm info on them, but they seem good. Heat is way to high. The PLL workhorse ballast in mounted under the dresser. I thought PLLs ran cool. The ballast is cool, but the bulbs are very hot, and make a lot of heat.

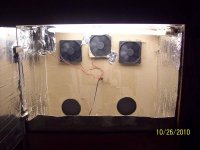
All the fans are mounted on the back wall. Originally I had two blowing out on top, and two fans sucking in on bottom. Over 20 degrees hotter in the dresser than the room!

Now I have three fans blowing out on top, one hanging from top to blow across the bulbs, and two holes on bottom, but still too hot.

How exactly do you ventilate with your PLLs? I suppose I need to get new fans. Perhaps mount one on the floor sucking in? I suspect the hot air that blows out is just getting sucked back in.

I can get any fan from newegg or performance-pcs.com, but not sure what to do. I thought using PLLs would elimiate heat issues, but that is not the case.

I'm starting to feel like I should have just used spiral CFLS. PLLs seem very hot to me. Are 4 55 Watt PLLs just too much for this small space?

Thank you.
 

oldone

Member
Hi oldone/anyone,

Can you help me?
Hi MeLikesPCs, of course we'll help. PLLs run cooler than equivalent spiral cfls, but still produce heat.

New PLLs run hot but cool down somewhat after a week or so.

You undoubtedly have a ventilation problem. Can you post some pics? Feel free to do so here. (or start your own thread) ICMag is a great place to ask.

FYI, I cool 6 x 55 watt PLLs with 2 of these Deltas. I can cool to about 5deg C above ambient. They blow through a flat carbon scrubber.

Dont worry, we'll get you sorted out,
OO
 

MeLikesPCs

Member
The fans you are using put out 44dba. That's to loud for me. You only use two? Right now the room temp is 74 and the dresser is 104! I just don't get it
 

MeLikesPCs

Member
pix

pix

Trying to upload pix.
 

Attachments

  • 014.jpg
    014.jpg
    48.6 KB · Views: 14
  • 015.jpg
    015.jpg
    49.5 KB · Views: 17
  • 016.jpg
    016.jpg
    62.8 KB · Views: 13
  • 017.jpg
    017.jpg
    46.9 KB · Views: 13
  • 018.jpg
    018.jpg
    47.3 KB · Views: 12

MeLikesPCs

Member
Right now I'm trying pushing it out with 3 fans on top. Air is naturally getting sucked in on two holes on bottom, and one fan is just hanging blowing on the lights. I know there should probably be a third hole on bottom, but wanted to wait to get opinions before cutting more holes.

Also, trying to be somewhat stealth, but my first concern is the heat issue.
 

oldone

Member
Trying to upload pix.
I see them fine.

The thing that jumps right out at me is your intakes...the area of your intake(s) must be at least double your exhaust. So cut some more holes and cover them with window screen(to keep the nasties out). Make the new holes as low as possible. I have enormous intakes, which is a bitch in the winter, LOL.

Editing to say just use your jigsaw to cut out the area between those 2 holes I see and you should be fine.

Are we seeing all of your intakes? Also, just for the record, the exhausts should be as high as possible (wrt the lights) because heated air rises of course. Also PLLs are hottest near the base, so if possible your exhaust should be near them.

How important is stealth to you? It looks like a very nice cab...just need some tweaks to your design.

Good job!
OO
 

Ernie420

Member
I wonder if you put 2 fans on the bottom pushing cooler air in and 1 or 2 up top pulling air out if that would cool it down.

You got to remember hot air rises so your just blowing it around the cab if your pushing it in thru the top. . Some hot air may vent out the bottom hole but more would vent from the top.

Just trying to help im a newb but have been lurking for years.
 

MeLikesPCs

Member
I have read intake should be as big as exhaust-but that is probably with an intake fan, but passive intake (no fans) at least double makes sense.

Originally i had two intake fans on bottom and two exhaust on top, but too hot.

I guess I'll just make a big rectangle hole on the bottom and light trap on back extending very near floor - cold air. If still a problem I'll try adding a intake fan to that hole.

Thanks for the advise. I'm going to work on it a bit more and at some point be back with more questions.

Thanks again.
 

oldone

Member
I guess I'll just make a big rectangle hole on the bottom and light trap on back extending very near floor - cold air. If still a problem I'll try adding a intake fan to that hole.
Its exactly what I had to do...


You can see my gigantic intake in the lower left hand corner of this pic and thats my veg side! The flower intake runs right across its compartment, but you cant see it here. FYI, this pic is from my pre-ppk days...

OO

Good luck and keep us up to date,
OO
 

MeLikesPCs

Member
You have built some cool stuff. To do this right sure takes a good deal of time, patience, and money. I'm going to rip the back off the cab and start fresh, placing the holes in better places. Also, I think the thermometer I bought doesn't work well, going to try getting another one to compare.

I just germed and planted some bagseeds today in my PC with 4 23W 6500k spiral CFLs. Hopefully the cab will be ready when the new babies are.
 
Top