What's new
  • Happy Birthday ICMag! Been 20 years since Gypsy Nirvana created the forum! We are celebrating with a 4/20 Giveaway and by launching a new Patreon tier called "420club". You can read more here.
  • Important notice: ICMag's T.O.U. has been updated. Please review it here. For your convenience, it is also available in the main forum menu, under 'Quick Links"!

My Modest Micro Cab - 2sqftx150w HPS

foescan

Member
Last year a friend gifted me some locally outdoor-grown sativa, which was a bit seeded. I sprouted two just to see if they would germinate, and from that point on I became fascinated (more like obsessed) with this plant. They grew fast! I spent months researching every aspect of growing indoors, and ended up with what you see here. There are so many great setups on this site, and I borrowed many ideas.

I purchased a storage cabinet from Walmart measuring 15”x22”x60” externally. Not as small as a lot of setups here, but I think it still qualifies as “micro” considering the small footprint.

picture.php


Anyway I replaced the cardboard back with luan painted with three coats of Bulls Eye 1-2-3 primer/sealer. The cab was assembled with latex caulk at all contact points, and an additional bead inside to ensure air tightness. I used square pine molding, also primered, to create an inner lip around the cab for the weather strip; when installed on the edges of the cab itself the weather strip was readily visible around the doors which I didn’t like. The molding made light proofing a little easier and added some structural rigidity. An additional flat piece of molding attached to the left door and some foam prevents light leaks and allows the doors to seal when closed. The inside is covered with Reflectix foil insulation. It was easy to apply.

picture.php


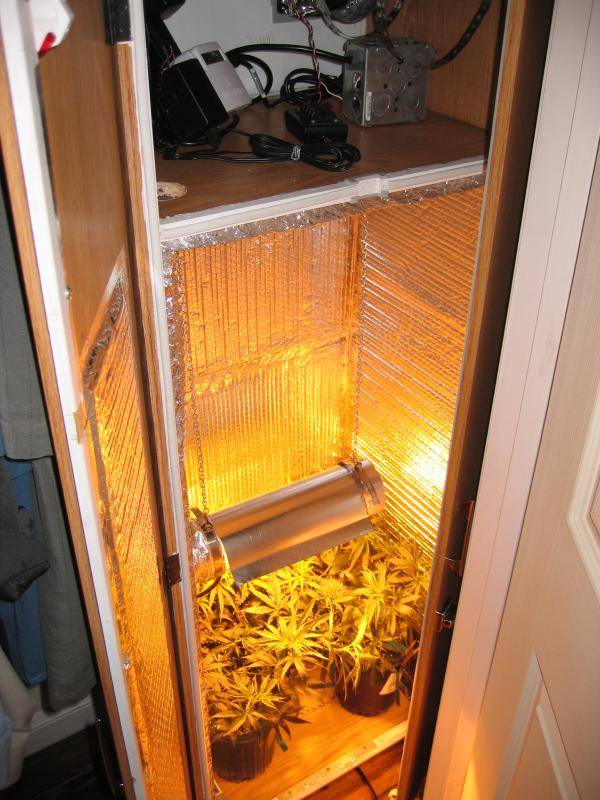
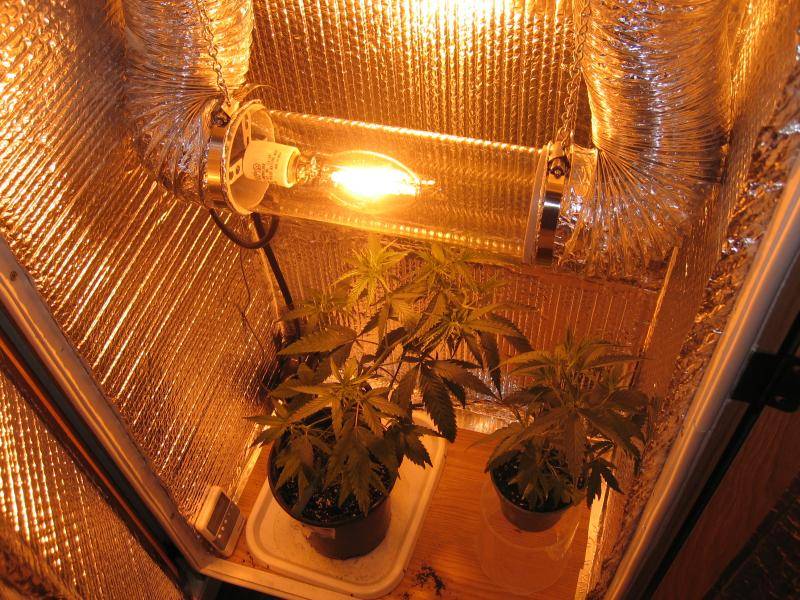
The growing chamber measures 14”x22”, or 2.1 square feet. With the 150w HPS that’s 71 watts per square foot. Total height is 46”, effective growing height (from the top of the pots to the ceiling) is 37”.

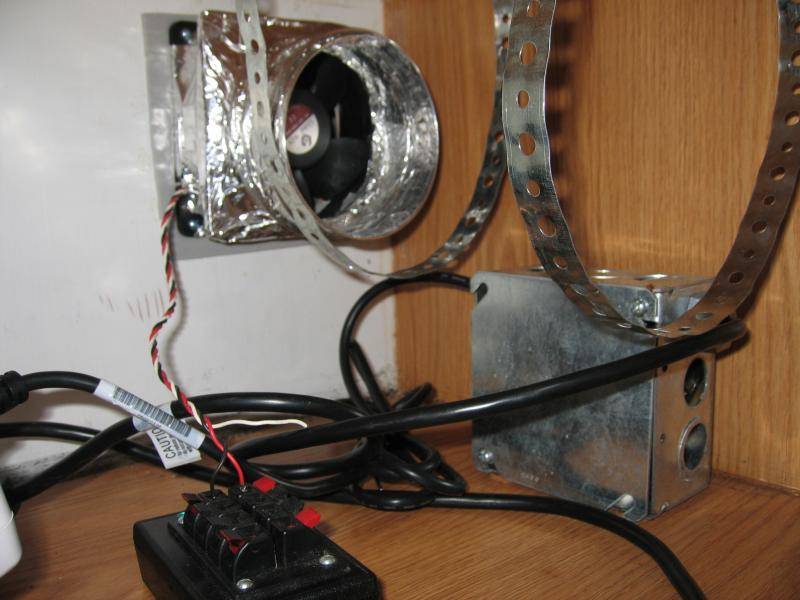
Light is a remote-ballasted 150w HPS security light with a Bake-A-Round for a cooltube. Reflector was made from a section of 4” duct. I’m currently exhausting through the cooltube, but as soon as the plants start to smell it will be on its own closed circuit, and I’ll exhaust through a DIY carbon filter in the utility room. I’ve had leaves right against the glass with no damage, the cooltube really lets you position the light as close as possible. The 120mm 130cfm axial fan in the utility room runs on 5v right now during the light cycle. It’s powerful enough at 12v to pull air through the filter, and it’s supposedly 45 decibels at 12v. Basically as loud as my computer. The cooltube’s 90mm fan runs continuously at 7v.

picture.php


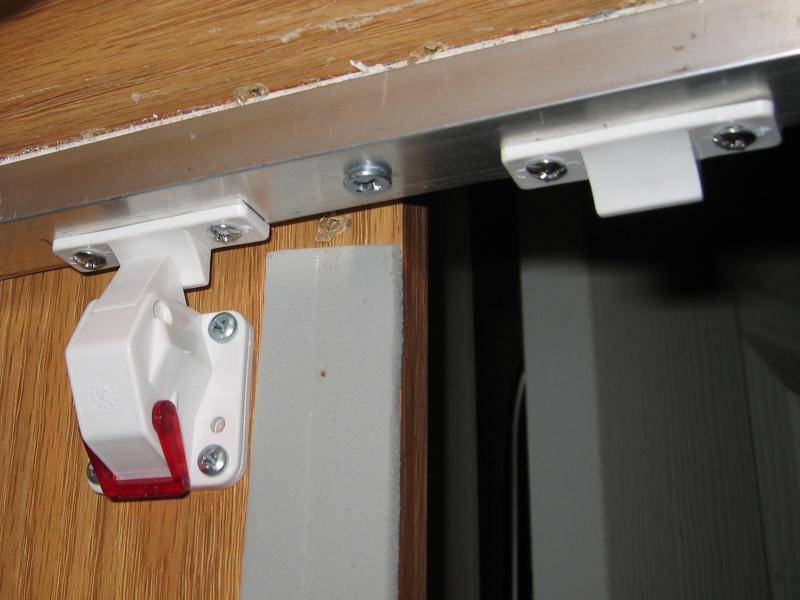
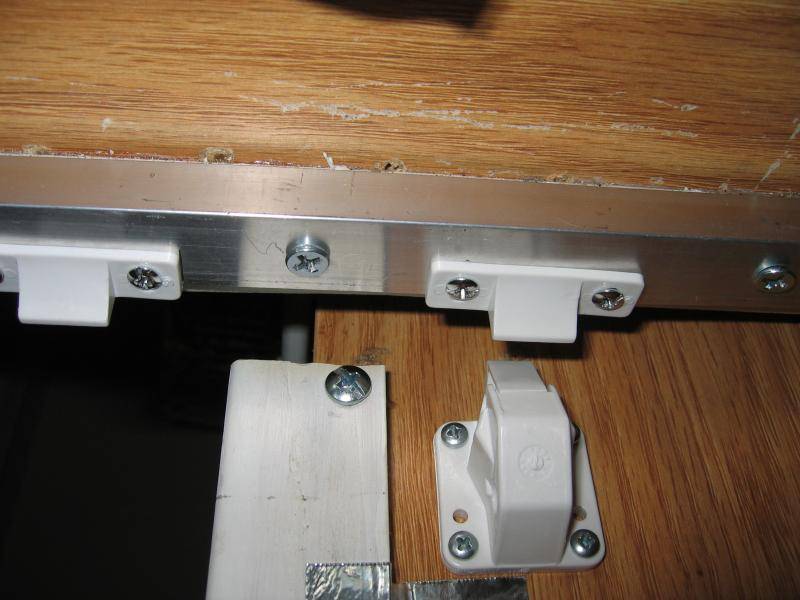
I plan to remove the lock on the outside, since tot locks are installed it’s unnecessary. I cut some L-shaped aluminum stock to reinforce the wood molding where the locks are installed. And used much longer screws. It takes a very firm push to get those doors shut, but I get a good seal against the weather strip.

picture.php


picture.php


picture.php


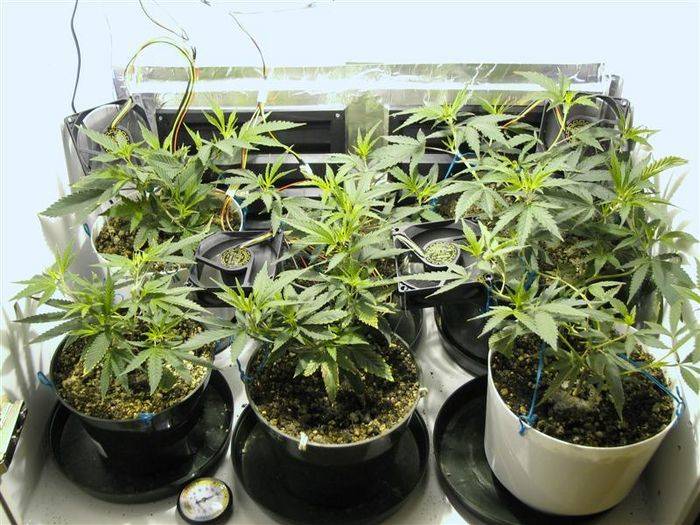
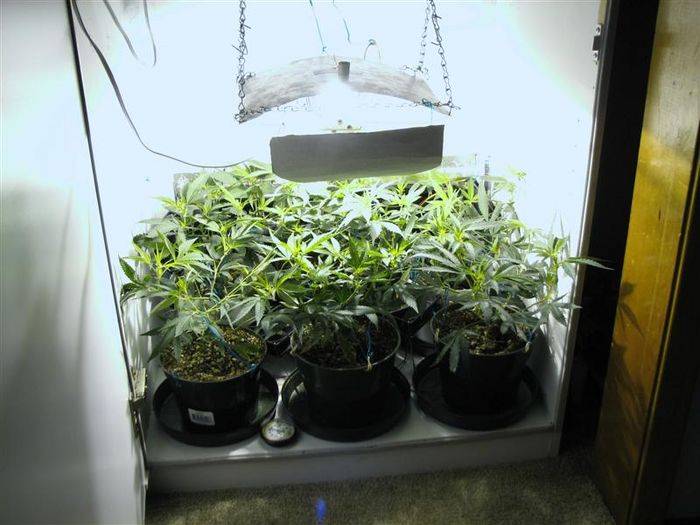
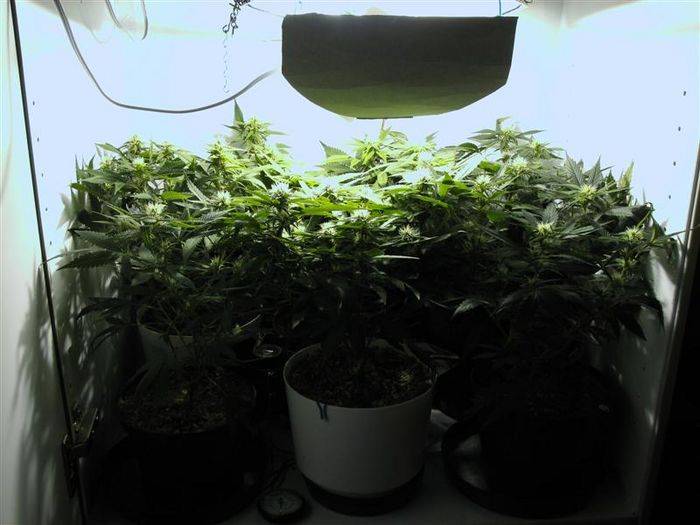
The above text is several months old, written while I was waiting for my account to be approved. I'll get up to date in the next few posts by sharing some pics of my grow.
 

foescan

Member
My plants are actually clones from one of the two I grew from seeds this past Spring. They grew so fast that I had them sitting out in my closet before I finished constructing the cab. I had to take cuttings and ditch them in a hurry after my roof leaked and there were insurance agents and contractors all over the place checking out the damage. But this worked out well since I’ve been able to give these two the care they need.

picture.php


picture.php


picture.php


I'm organic, or pretty close depending on how you view perlite. Soil is a mix of equal parts worm castings, compost, peat and perlite, and amended with blood meal, bone meal, and hydrated lime. During veg I fertilized with fish emulsion, and during flower I will only use blackstrap molasses, since my soil has lots of slow release nutrients.

These guys like to stretch! I began some LST early on.

picture.php


They responded to it quite well.

picture.php


picture.php


I ended up going with smaller pots for flower than I originally planned. The 6 gallon pots were huge, and I was worried about them stretching like their mom did. I don't recall the exact size at the moment, but I believe they are around 2.5 gallons.

picture.php


picture.php


Shot showing the ever-shrinking headroom.

picture.php


More to come.
 

foescan

Member
I switched to 12/12 on November 5th, a week after potting up to the final size. And I made the mistake of untying the plants.

picture.php


They started straightening within hours.

picture.php


And I had to raise the light by a few links daily.

picture.php


Then they really took off. I was starting to worry about running out of space.

picture.php


Spotting the first signs of flowers was great! Wednesday, November 17th: day 1 of flower.

picture.php


That's it for tonight.
 
Last edited:
you're going to want to get down in there and clean up the those plants, where the light isn't really penetrating.

but it looks great so far bud!
 

foescan

Member
In hindsight you're right texas_green, I should have removed most of the growth beneath the main canopy. Very little light makes it down, and those buds will never fully develop. Plus it would have provided better airflow.

But I decided for my first run not to prune except leaves ready for removal. I wanted that low growth since it's usually the first to show deficiencies or other problems, and I really had no idea what to expect. Next time around I will aggressively strip the undergrowth.

I already built a screen for scrog too, a method I'm eager to try. I think I could easily have scrogged with just one plant and probably end up with a similar harvest. And in my state the fewer plants the better. I get nervous even with cuttings around, so I won't be able to experiment with different phenotypes from seed or try my hand at breeding any time soon.

On with the show!

The canopy was staying even, but vertical space was fast disappearing.
picture.php


I had to add a second circulation fan. Should have done it much sooner.
picture.php


I see buds!
picture.php
 

foescan

Member
What a tangled web we weave. . .

What a tangled web we weave. . .

I was nearly out of space, and worried that these girls weren't going to stop stretching any time soon.

picture.php


It was so crowded in there that I didn't know where to begin tying down branches, so I bent them over and under each other.

picture.php


What a mess!

picture.php


A lot of the lower fan leaves started to die off and could be removed.

picture.php


I tried to give as many budsites as possible an unobstructed view of the bulb.

picture.php


This is one of my favorite pics. Just look at those beautiful flowers!

picture.php
 
In hindsight you're right texas_green, I should have removed most of the growth beneath the main canopy. Very little light makes it down, and those buds will never fully develop. Plus it would have provided better airflow.

But I decided for my first run not to prune except leaves ready for removal. I wanted that low growth since it's usually the first to show deficiencies or other problems, and I really had no idea what to expect. Next time around I will aggressively strip the undergrowth.

I already built a screen for scrog too, a method I'm eager to try. I think I could easily have scrogged with just one plant and probably end up with a similar harvest. And in my state the fewer plants the better. I get nervous even with cuttings around, so I won't be able to experiment with different phenotypes from seed or try my hand at breeding any time soon.

well i'll be damned, seems like you have this under control. :nanana:

and you won't be disappointed with the scrog set up im sure.

keep up the good work my man, i'll be following along with ya.
 

K.J

Kief Junkie's inhaling the knowledge!
Veteran
Great cab! Lots of similarities to my own, being built right now. I'll be watching for sure. But man, those thing are bushy!
 

kaotic

We're Appalachian Americans, not hillbillys!
ICMag Donor
Veteran
That's got to be the most crowded cab I've seen in a long time. Looks real nice. Respect+
 

Abja Roots

ABF(Always Be Flowering) - Founder
Veteran
Very Nice Setup. Looking very lush and healthy as well. Congrats and Good Luck.

Enjoy.

Keep an eye out for bugs (mites especially) since it's so dense in there it might be hard for you to spot initial infestations which can really spiral out of control.

Are you using any neem or any other sort of preventative?
 

justanotherbozo

Active member
Veteran
nice job man, kudos to you for your DIY skills and for some very pretty
girls, lol.

anyway, i'll be followin' along bro, and look for FreezerBoy, he does an
awesome SCROG inside a standup freezer, lol, hence the name. for real,
he knows his shit man and SCROGin' in a DWC, or maybe SWC, is his thing!
here's a link to his current growlog, i think you'll enjoy it.
http://www.icmag.com/ic/showthread.php?t=99905
 

Barnt

Member
We've got very similar cabs. Mine is 16" deep by 22" wide and 35" tall (much shorter than yours). My previous grow I had slightly over crowded my cab and it really hurt my harvest. The grow I just finished below in my sig came out perfectly. For the strains I've grown (mostly indica based), I need about 75% of the footprint of the cab covered before flower. With a sativa that stretches a lot (like yours) you probably would want to flower at 50% coverage. The time I over crowded I flowered at about 100% and that made the tops too close together. Even though the tops were close to the light they did not get dense at all. Next time, I would recommend trimming everything 6-8" below that canopy and even remove the small stuff from the canopy.

As it is right now, I would say you will get less bud with it packed in there like that vs it being more sparse. Not to mention the bud you will get will be very wispy and airy. Just food for thought. Here are some pics from my previous good grow (starting up another at the end of this month). I pulled 98g dried from these six girls...


Flower:
42214IMG_4100_Medium_.JPG


Week 1:
42214IMG_4296_week_1_Medium_.JPG


Week 3:
42214IMG_4380_week_3_Medium_.JPG
 
Last edited:

foescan

Member
Thanks for the feedback everyone! I'm not sure there's a single original idea to be found anywhere in my cab's construction: everything was picked up from DIYs and construction threads here. I've read Freezerboy's thread as well. Wait, I did come up with reinforcing the molding and tot locks with aluminum stock! And I put some fancy chrome handles on the doors. :)

Barnt, I think you're right in that I vegged far too long. When these girls took off it was all I could do to keep up each day. And the buds are definitely not dense, I'm still hoping they'll bulk up. But I bet they'll be good, and as I'm a light smoker I doubt I'll run out before I finish a second grow. I've read your thread too. Now that I can finally post instead of lurk I'll be able to comment and thank people whose designs were so helpful.

It’s still a work in progress, and I have a lot of ideas and modifications to make after the inaugural grow is complete:

-I need to add an oscillating fan for more air movement on the plant tops.

-I want to eliminate the two intakes with elbows in favor of a darkroom vent (or two) positioned higher up at the top of the pots. I haven’t ruled out vents on the floor of the cab though, with a slide out shelf for the plants.

-I’d like to get an S&P TD-100 or TD-100x fan for exhaust, and wire that with a speed control and thermostat as per this DIY.

-I eventually want to replace the luan with melamine or plywood for additional strength.

-Originally I planned to divide the utility room to have a small veg area for clones or a mom, but now I’m leaning towards a separate veg box as the space would be so small. Having only one space to grow will complicate things when I order seeds and want to get them started. Or what if I want to have a mom?

-I’m going to build a removable base using 2x4s with casters, which could be attached underneath the cab with L brackets if necessary.

-I’d like to put a small normally closed disc thermostat inline with the HPS light. Mount it inside the dryer hose near the lamp base. I’m not sure which one to get, perhaps 115 degrees, so if the exhaust fan were to die the light would cut off instead of overheating. Something like this.

-Nutes! I definitely want to try some flowering nutes next time. I can't help but think that it might have helped the buds gain some weight.

And now for some more photos!

picture.php


picture.php


By now there was a delicious aroma filling my room reminiscent of ripe pineapple and mango, with a heady, exotic spice note hanging in the background. Truly a great smell, but as I didn't want others wondering about the source I closed up the cooltube and installed the carbon filter.

I also switched the exhaust fan to 12v, which increased the noise level enough to be audible, but still not as loud as my desktop pc. The fan does suck the doors closed, so I probably need larger intakes. My temps tend to stay 2-3 degrees over ambient.

Wednesday, December 10th, 2008. Day 35 of 12/12, day 23 of flower

picture.php


Back with more after a smoke break!
 
Last edited:

foescan

Member
Thanks. It's great to be able to share this here. We're nearly up to date!

picture.php


Note the two colas in the rear. They've got nowhere to go now but sideways.

picture.php


Finally seeing some trichomes.

picture.php


Keep an eye out for bugs (mites especially)

It was at this point that I spotted some mites. My humidity had been steadily dropping and was staying between 30-33%. I have to admit that I spend an hour a day just staring at my two babies, so I did catch them early. There were only a few leaves that had any. I misted the cab to up the humidity, and ran out and bought a no pest strip. I know it's somewhat of a controversial choice, but I didn't want to take any chances, and I believe it to be safe for use in this manner.

I shut off the exhaust fan at lights off, and left the strip in there for the 12 hour dark period. That's it. Haven't seen a mite since. Considering that I do a lot of outdoor gardening it was bound to happen sooner or later.

Some fan leaves starting to yellow. I pruned any that were completely yellow.

picture.php


A view from below.

picture.php
 

guanito

Active member
damn, those girls are long & tall!

nice job.

that cool tube works good. you should put it on a little pulley system.

cab is real nice. you'll do better when you star tfrom seed of clone next time.
 
Last edited:

Latest posts

Latest posts

Top