
-
Happy Birthday ICMag! Been 20 years since Gypsy Nirvana created the forum! We are celebrating with a 4/20 Giveaway and by launching a new Patreon tier called "420club". You can read more here.
-
Important notice: ICMag's T.O.U. has been updated. Please review it here. For your convenience, it is also available in the main forum menu, under 'Quick Links"!
You are using an out of date browser. It may not display this or other websites correctly.
You should upgrade or use an alternative browser.
You should upgrade or use an alternative browser.
Smells like LouDog inside the van...
- Thread starter LouDog420
- Start date
LouDog420
Well-known member
Thanks all.
Tleaf, about 4.5' tall (above coco, not including pot/riser height) and 4' diameter")
The GB is a bit smaller, but thinking she will pack the weight with her density, and if not, should still yield plenty to hit my minimum targets, which would be a half unit per plant for the 4 corners, and a unit for the girl in the center. Hopefully we can make that happen and then some
[FONT=Arial, Helvetica, sans-serif]

[/FONT]
Meanwhile, irrigation
Manifold. Far right is a hose connection we'll convert to flex tubing and run back to the res for an anti siphon/flow control. Next over, the connected hose is from the pump outlet, then the pvc up feeds our mainline into the treehouse, and finally far left is another hose connection if needing to handwater
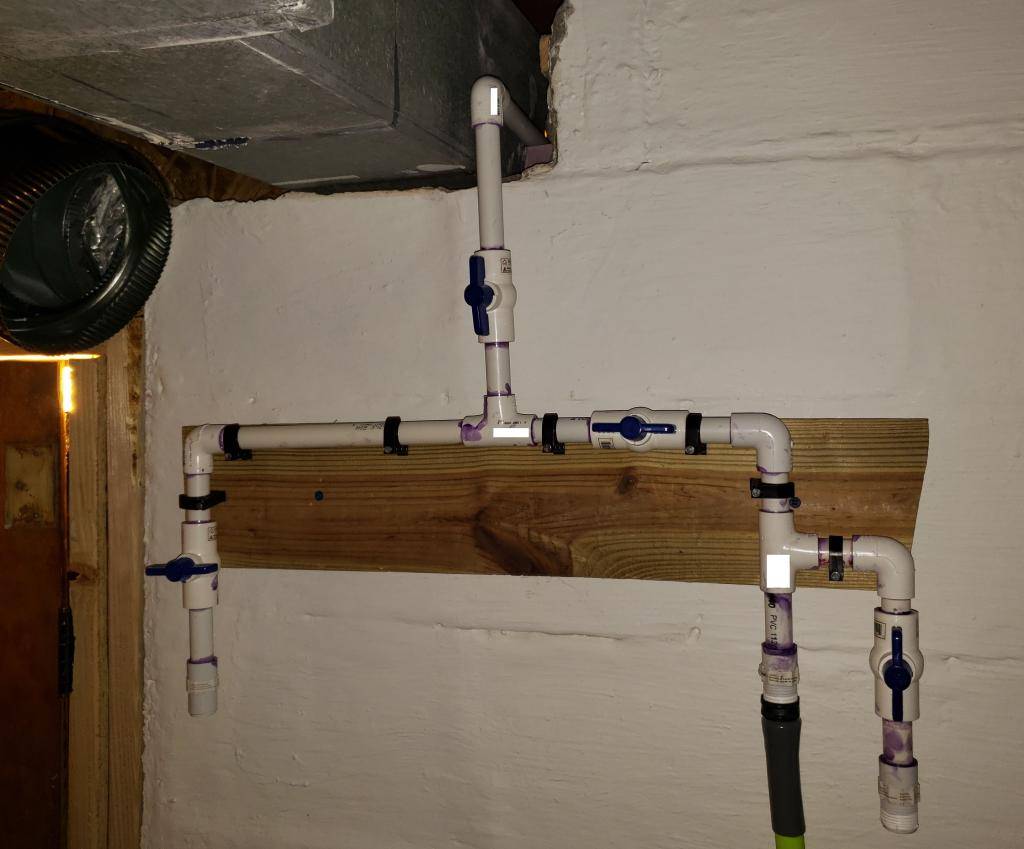
Mainline, ball valves to each to control flow individually or shut off completely. A midway kind of mounting point so we can convert between 5 plant-4 light grows or 4 plant-5 light grows. Ball valve leads to adapter for flex tubing, then it will mount to the base of each plant on a stake, with an orbit 4 port manifold feeding four 1/4" lines to each plant, open ended on stakes.
We've mounted up high to keep the floor relatively clear to move around for plant maintenance and to drain completely between nutrient feeds. We'll see how it works. Ball valve on each end of the mainline, and we'll connect a hose adapter so we can mix up a sterilizing solution to run through the pipes when needed, and either drain to waste or recirculate before draining to waste, keeping the pipes and manifold nice and clean. Probably just between runs...
We're almost free from the hose...
Tleaf, about 4.5' tall (above coco, not including pot/riser height) and 4' diameter
The GB is a bit smaller, but thinking she will pack the weight with her density, and if not, should still yield plenty to hit my minimum targets, which would be a half unit per plant for the 4 corners, and a unit for the girl in the center. Hopefully we can make that happen and then some
[FONT=Arial, Helvetica, sans-serif]
[/FONT]
Meanwhile, irrigation
Manifold. Far right is a hose connection we'll convert to flex tubing and run back to the res for an anti siphon/flow control. Next over, the connected hose is from the pump outlet, then the pvc up feeds our mainline into the treehouse, and finally far left is another hose connection if needing to handwater
Mainline, ball valves to each to control flow individually or shut off completely. A midway kind of mounting point so we can convert between 5 plant-4 light grows or 4 plant-5 light grows. Ball valve leads to adapter for flex tubing, then it will mount to the base of each plant on a stake, with an orbit 4 port manifold feeding four 1/4" lines to each plant, open ended on stakes.
We've mounted up high to keep the floor relatively clear to move around for plant maintenance and to drain completely between nutrient feeds. We'll see how it works. Ball valve on each end of the mainline, and we'll connect a hose adapter so we can mix up a sterilizing solution to run through the pipes when needed, and either drain to waste or recirculate before draining to waste, keeping the pipes and manifold nice and clean. Probably just between runs...
We're almost free from the hose...
Last edited:
DunHav`nFun
Well-known member
Free from the hose......It`s the little things huh Bro...... .....Automation good.....hose bad......lol....Everything I see shows the details gone thru for consistent runs once dialed.....Elevated containers for proper drainage , with plenty of room for improvement once Electrical can be updated and gain more room wattage......
Keep dialin Lou.....Here`s my old ass pullin for a lot more than your hopeful expectations of 3 lbs , so ......Good luck and.....
Peace.....DHF...... ......
.....Automation good.....hose bad......lol....Everything I see shows the details gone thru for consistent runs once dialed.....Elevated containers for proper drainage , with plenty of room for improvement once Electrical can be updated and gain more room wattage......Keep dialin Lou.....Here`s my old ass pullin for a lot more than your hopeful expectations of 3 lbs , so ......Good luck and.....
Peace.....DHF......
...... late but I'm here...
Man those are fat leaves on the GB

LouDog420
Well-known member
Day 14
Day 14
Always like to remain cautiously pessimistic and even if yields are minimal, what does that mean for operating expenses and feasibility? Just making sure we're landing in a comfortable zone is the goal, and everything else is gravy/room for growth. I certainly hope you're right tleaf!
Waiting on sediment filter, so still on the hose in the meantime, hoping to kick the habit here soon. Probably doesn't hurt with the extra time to let the pvc cure, adding a few things here and there still. Waiting for the post-spill fumes to clear. I'll run a flush through of clean water prior to using the new irrigation lines.
Day 14, stacking nodes, a little stretchy. We might have a few branches that need a little training to keep from hitting the ceiling (mainly low point where I had to frame around existing ducting), but shouldn't be more than a handful of tops. Looking like we sized it nicely as of now, but still a bit more stretch to come.
Girls are drinking about 3gal per day per plant. We finally hooked up the cold air intake as temps got a little warm, 83-84F at canopy by the 1k, so a tiny bit of cold air and we're back to 80-81F at canopy with the extra wattage, 45-50%RH.
Running 3,200w now. Still not on fire, so all good
Here's an OG Chem
SQ
Day 14
Always like to remain cautiously pessimistic and even if yields are minimal, what does that mean for operating expenses and feasibility? Just making sure we're landing in a comfortable zone is the goal, and everything else is gravy/room for growth. I certainly hope you're right tleaf!
Waiting on sediment filter, so still on the hose in the meantime, hoping to kick the habit here soon. Probably doesn't hurt with the extra time to let the pvc cure, adding a few things here and there still. Waiting for the post-spill fumes to clear.
I'll run a flush through of clean water prior to using the new irrigation lines.Day 14, stacking nodes, a little stretchy. We might have a few branches that need a little training to keep from hitting the ceiling (mainly low point where I had to frame around existing ducting), but shouldn't be more than a handful of tops. Looking like we sized it nicely as of now, but still a bit more stretch to come.
Girls are drinking about 3gal per day per plant. We finally hooked up the cold air intake as temps got a little warm, 83-84F at canopy by the 1k, so a tiny bit of cold air and we're back to 80-81F at canopy with the extra wattage, 45-50%RH.
Running 3,200w now. Still not on fire, so all good
Here's an OG Chem
SQ
LouDog420
Well-known member
So, the cold air intake is working on a temp basis as of now. We plan to upgrade eventually to a motorized damper that plugs into a temp controller for more exact climate control (during winter).
Right now, the flow diagram would be:
exterior vent --> spring damper --> 4" insulated duct --> 4"-6" converter --> 6" x 6" x 8" duct wye --> intake fan --> end registers
The 6x6x8 wye is where the magic happens. One of the 6" vents is pulling from the insulated duct/cold air intake, and the other is pulling ambient air from the basement (lung room). This mixes the air to a non-shocking temperature for use in the grow room. Everything up until this mixing point is insulated to keep from condensation build up when the cold air is traveling through.
The exterior vent is a single flap, so we have a piece of tape holding it open just enough to regulate temp as needed. Very high tech.
The intake fan only runs during lights on, so we don't have to worry about freezing out the girls during lights off with a cold air intake. And once the intake fan turns off, the spring damper closes, sealing the duct from the exterior vent. Exhaust runs 24/7 and the negative pressure pulls ambient from the lung room, but isn't powerful enough to overcome the wye, duct run, and damper to pull exterior air.
A few changes I would consider, would be adding another duct wye for mixing cold air with ambient at the exterior vent point of entry to have less cold air traveling and less potential for condensation. I also want to throw the motorized damper on the current duct wye so we can only pull cold air as needed and don't have to have a finely tuned exterior vent propped open just enough to regulate temps. Another mixing wye would probably be smart to keep a motorized duct from having any condensate form with motors, electricity, and moving parts.
Otherwise, working as intended. Cheap and effective. Will probably leave it as is unless something prompts change or we find a spare $80 laying around, as it would be nice upgrades, but not necessary.
Last edited:
LouDog420
Well-known member
Day 18
Day 18
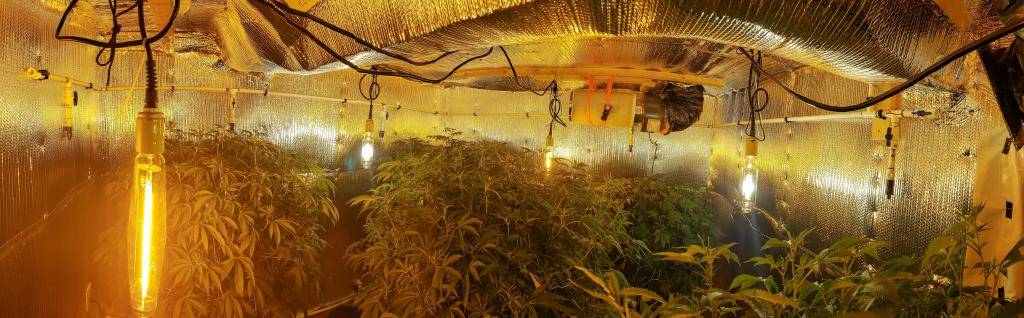
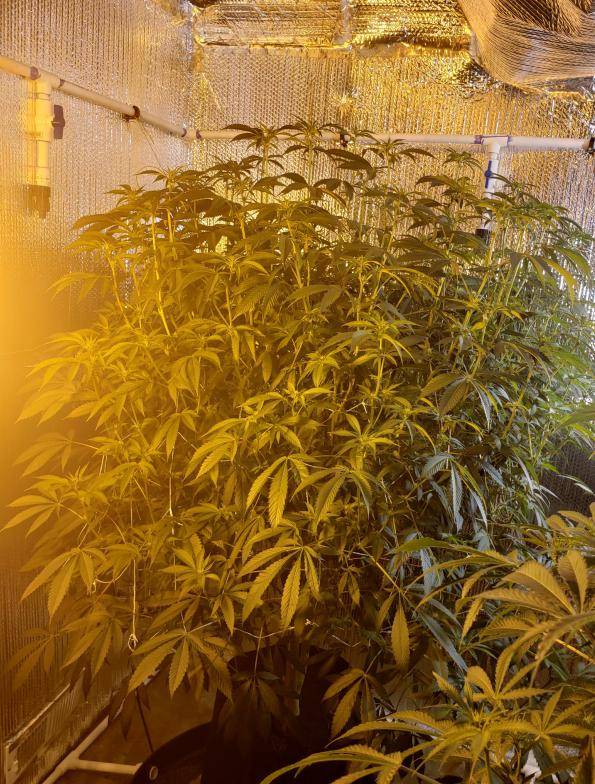
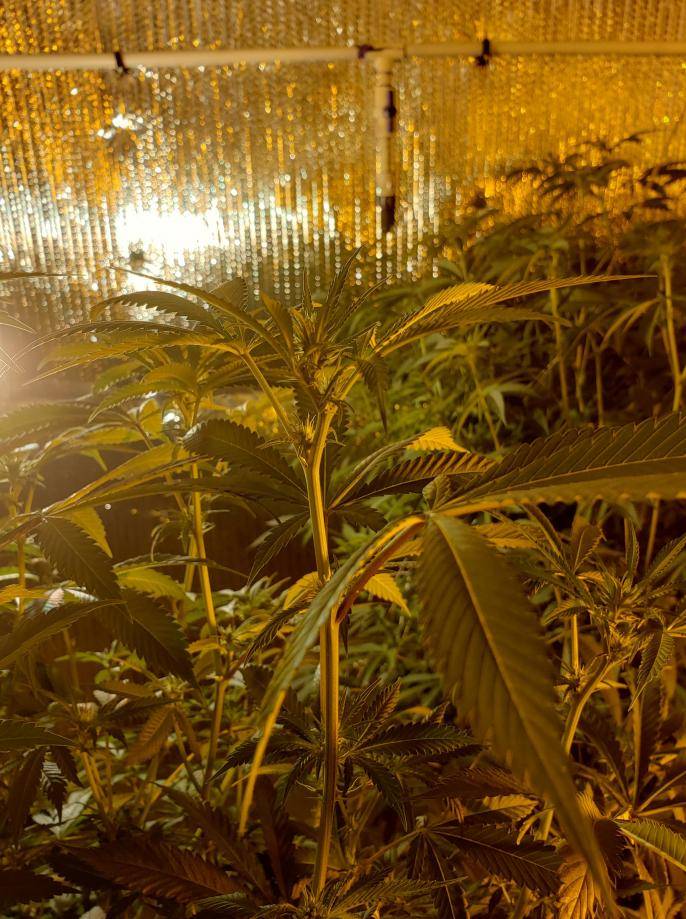
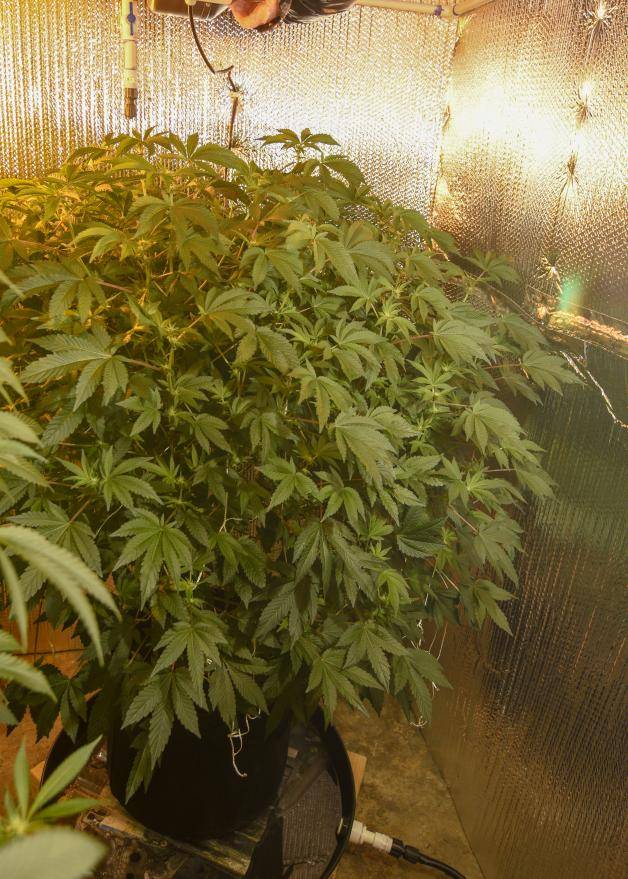
Finally took out the nice camera. Stacking, looking like we hit the flip and stretch pretty nicely. Thinking there won't be any colas hitting the ceiling, but still some stretch time left. Second layer of trellis is on, and more ceiling ties for support
Got a few wide angles to try to show some idea of size. Sitting in #10 fabric pots with standard trellis netting, some of the only points of reference.
OGC - stacking soon to be colas, just a great plant all around and responding well to tree styling
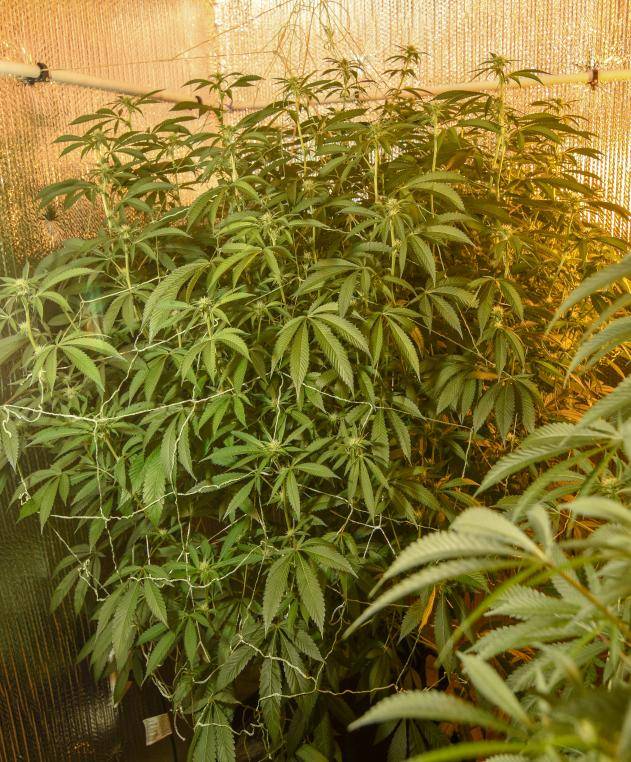
SQ - center girl, getting blasted on 4 sides, killing it. A little more branchy than the OGC, wondering if that will translate to more yield or more larf.
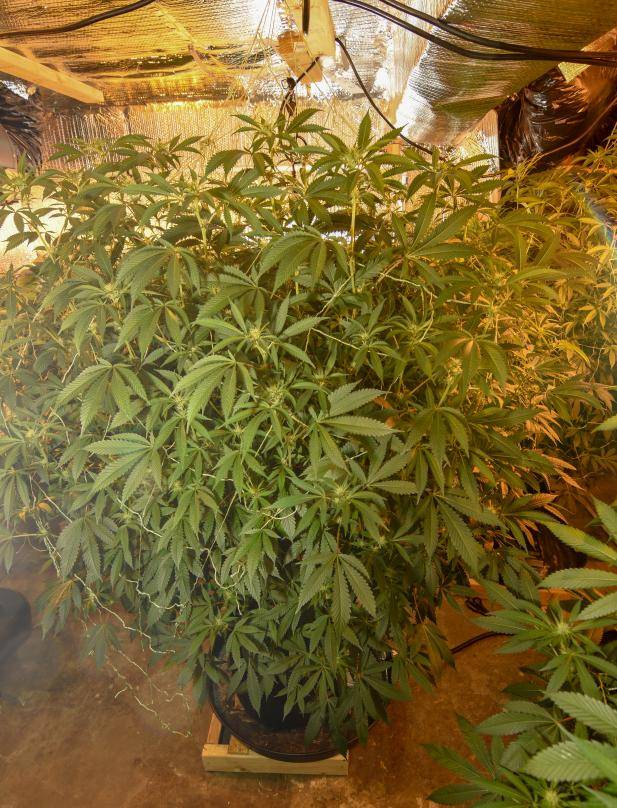
GB - certainly a bit behind in size compared to the other two, as expected from the sour bubble phenotypic selection. A bit light in flower formation, but she's changing gears now by the day, and looking forward to a nice shrub of golf balls
Day 18
Finally took out the nice camera. Stacking, looking like we hit the flip and stretch pretty nicely. Thinking there won't be any colas hitting the ceiling, but still some stretch time left. Second layer of trellis is on, and more ceiling ties for support
Got a few wide angles to try to show some idea of size. Sitting in #10 fabric pots with standard trellis netting, some of the only points of reference.
OGC - stacking soon to be colas, just a great plant all around and responding well to tree styling
SQ - center girl, getting blasted on 4 sides, killing it. A little more branchy than the OGC, wondering if that will translate to more yield or more larf.
GB - certainly a bit behind in size compared to the other two, as expected from the sour bubble phenotypic selection. A bit light in flower formation, but she's changing gears now by the day, and looking forward to a nice shrub of golf balls
Last edited:
Noice, definitely some healthy ladies. Fuckin ten gals of coco definitely got them big. Just grabbed some 15 gals and few bails of promix my self, definitely a busy time with x mas, work and garden would be in here more, but.....
Always lurking tho ... Be safe out there Lou.
Oh and for your intake termination outside what are you using a old dryer vent?
Always lurking tho ... Be safe out there Lou.
Oh and for your intake termination outside what are you using a old dryer vent?
LouDog420
Well-known member
Oh and for your intake termination outside what are you using a old dryer vent?
Yep, single flap 4" dryer exhaust vent. I probably would have installed something different that's actually meant to be used as an intake vent, but this was already in place and asking to be used, so we made due with what was available. The single flap helps control temp as we can change the opening size to control cold air flow, to some extent.
We often install fresh air intake barometric dampner a that are actuated by the neg. Pressure of the return duct. They're adjustable via weights on the actual dampner , no electricity involved. Not trying to critique you or anything but im a hvac installer, so just curious of your system.
LouDog420
Well-known member
All info and thoughts appreciated, I'm no HVAC expert, or even intermediate. Just throwing together what we can over here.
With a weighted damper powered by negative pressure, is it still hooked up to a thermostat so it can be temp controlled? That's the goal here, essentially acting like an AC turning on only when it gets too warm.
We have a cheap little inkbird temp and humidity controller, that's why we were leaning towards motorized damper that can just plug right in to existing equipment and only pull cold air as needed to maintain set points. All ears for a better or alternative way to achieve that free cold air cooling.
The barometric dampner a aren't temp controlled, summer time you just adjust the weight so it doesn't open when the fan is running. More of a less moving parts to go bad kinda thing but if you have the controller I would use it.
Most of the time the fresh air intake is there if there isn't enough return in the house or if replenishing fresh air in the home is a problem or. Mold, smelly space, damnpness ect.
Most of the time the fresh air intake is there if there isn't enough return in the house or if replenishing fresh air in the home is a problem or. Mold, smelly space, damnpness ect.
LouDog420
Well-known member
Understood, I think we already have the same sort of system that would be achieved with what you describe.
Seems similar enough, like a horse of a different color. With the weighted dampner, we'd have to replace the exterior termination or still prop it open as we're doing now, since it's designed as a single flap dryer exhaust.
I still think the motorized damper is in the future, as the only way to achieve on/off fresh air free cooling as needed around a temp set point and still let intake run at full bore either during lights on only or 24/7.
My .02 unless I'm missing something...
- Cold air intake is only open when fan is on (due to spring damper in place)
- Adjustable flow rate (we use the exterior vent door to regulate flow instead of weighted adjustable dampner)
- For summer, we'll simply disconnect the insulated duct leading to the fresh air intake from the mixing wye (same as increasing weight to keep it closed, but with more flow since we'll remove the wye and let the 8" duct pull straight from the basement)
- More likely come summer, we'll just get a mini split behind the wall in our storage space to cool the grow. We'll connect the exhaust and intake fans at the header board to recirculate for nice airflow, with the addition of CO2 and maybe an additional exhaust to dump humid air at night
Seems similar enough, like a horse of a different color. With the weighted dampner, we'd have to replace the exterior termination or still prop it open as we're doing now, since it's designed as a single flap dryer exhaust.
I still think the motorized damper is in the future, as the only way to achieve on/off fresh air free cooling as needed around a temp set point and still let intake run at full bore either during lights on only or 24/7.
My .02 unless I'm missing something...


