-
Happy Birthday ICMag! Been 20 years since Gypsy Nirvana created the forum! We are celebrating with a 4/20 Giveaway and by launching a new Patreon tier called "420club". You can read more here.
-
Important notice: ICMag's T.O.U. has been updated. Please review it here. For your convenience, it is also available in the main forum menu, under 'Quick Links"!
You are using an out of date browser. It may not display this or other websites correctly.
You should upgrade or use an alternative browser.
You should upgrade or use an alternative browser.
PPK staring Grateful Casey and friends
- Thread starter hotboxes
- Start date
there looking lovely mate, good job..
so this sytem pulse feed for 1 min every hour or w/e time u specify pending medium, and the run off is collected?
if this is so would it not overflow if feeding so much? sorry for the bombardment just really interesting mate
best of luck
first off no worries about the questions I welcome them especially if helps a fellow member understand this great almost fail proof system.
with that being said everything is connected to the main control container by 3/4 inch pvc pipe and the water lvl is controlled by a float valve inside the control container creating an air gap between the bottom of the plants and the top of the bottom bucket. My air gap is about 3-4 inches and everything is controlled by gravity so once the water lvl evens back out to the lvl of the float valve, then the add back stops and everything is back to normal. equalibrium sets in and its ready for the next pulse an hour later and it all only takes but a minute. with your add-backs on every time the top feed kicks on you are replenishing your food supply inside the pots and inside the control container along with used gases inside the medium and pulling fresh air in letting the plant eat as much as it wants when it wants. Hope this helps you understand I will try and throw a pic up of the system before I put it in the tent, how its all tied together
crazy fat plants, nice one
Thanks bro, i kinda wish they were a lil taller though. Thanks for stopping in man I just flipped everything last tue. so stick around things are going to start getting interesting in here.
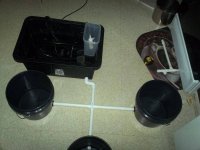
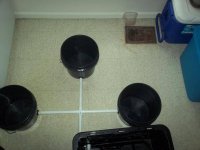
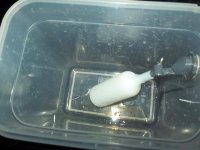
here you go bro this is a few pics of the system before it went into the tent, the only thing I hanged was i took the inside container out and hooked the float valve directly to the side of the big tote. the hole I drilled in the bottom of the injector container was too big and was draining my whole add back bucket within hours when it should take days, but since I did so things have been just fine. again hope this helps you understand a lil bit more how this system rocks
Attachments
tomfoolery29
New member
lookin good HB! keep up the good work my friend.
Sqydro
Member
reading ur old thread maybe thatl help looks like recirc coco/perlite mix the way the pic of set up looks...
i was under impression these were non recirc tho, il maybe do a tester 1 pot in next batch before going full hog with it..
in your experience u like it better than DTW or autopots etc?
i was under impression these were non recirc tho, il maybe do a tester 1 pot in next batch before going full hog with it..
in your experience u like it better than DTW or autopots etc?
reading ur old thread maybe thatl help looks like recirc coco/perlite mix the way the pic of set up looks...
i was under impression these were non recirc tho, il maybe do a tester 1 pot in next batch before going full hog with it..
in your experience u like it better than DTW or autopots etc?
Way more now I dont have to worry about feeding or if they are being fed, plus the water you basicly dump down the drain is some what still holding nutrients that can be better used to sustain growth and save $. Lets face it $ plays a big factor in how/what we do here with this hobby.
If I am feeding 1 gallon per plant a day x 3 thats 3 gallons now figure the run off from all three would probably total close to 3/4 of a gallon of water that once the PWT (perched water table) is quenched it discards of any liquid still present in the medium thus dumping it down the drain. by keeping that liquid combined with the add backs nothing is waisted the add back buffers the run off PPM's may drop some but IME PH going in has been the same coming out so I see no need in tossing it after it's done. getting old helps me to understand what my mammy and pappy ingrained into me that to squeeze the buffalo nickel till it shits, well this is one of those instances. also with the wick in the bottom of each pot if a top watering pump was ever to break or clog the plant will sustain I also know this from experience.
I checked out that link you sent to me by PM and thats a nice set up but what if you never had to worry about a water chiller, or an air pump failing to keep enough D.O. in your water, something like that can be catastrophic in a bubble bucket or undercurrent, RDWC, where this can never happen in a PPK because there is no need for these types of equipment. Thanks for the questions man we will get you straightened out how it works. and thanks for checking out my first ppk vert thread it really give you a real birds eye view of the massive difference between hand fed dtw to a ppk
Sqydro
Member
ok sinse im not very good with explaining what i mean ive frew up what i think is going on here lemme know if i have it right ir not mate....
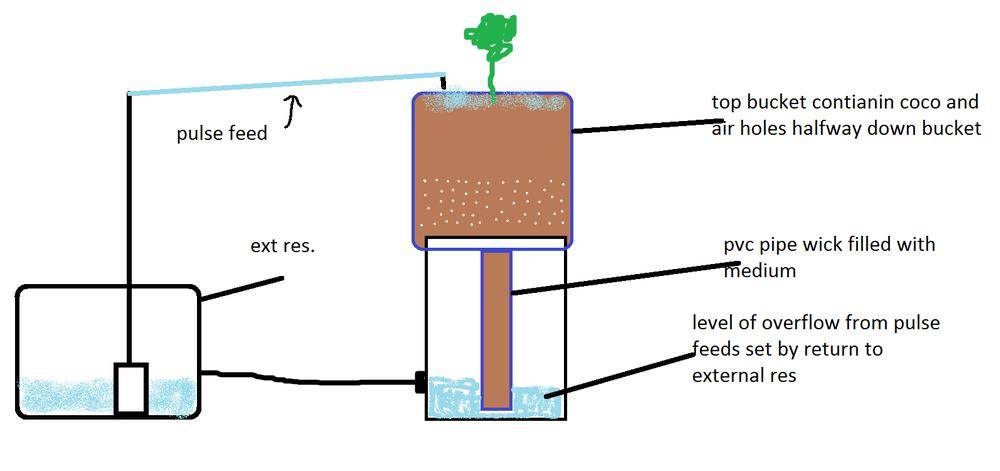
as for the external res this is then topped up by a water butt with a float valve like in the video i PM'd you... and i just ad more and more on of course per my system requirements, but the return to ext res is through gravity, and is my level of nutes for the wick to be at certain height depending or?
hopefully i have it right im loosing sleep over this, everyone saying how simple yet i cant seem to grasp lol
thanks for ur patience, it will be rewarded with a very nice grow journal soon my friend
tc
pretty much spot on, thats a basic PPK set up in all its glory, others have different methods like the holes in the side some do some dont its what works for you and your situation.
You ask about your nutrient lvl. This is part of your air gap. You want to be able to keep enough water in the bottom bucket incase of top feed catastrophie but low enough if any roots make it into the bottom bucket they will not be effected by warm water, thus being air trimmed and not building a water root system that can and will be destroyed by low D.O. and high water temps this just breeds root rot and nothing you want. The roots in the wick are insulated by coco and some may be subjected to a lil bit of rot, but since your main root mass is consisted of air roots your plant will thrive.
You ask about your nutrient lvl. This is part of your air gap. You want to be able to keep enough water in the bottom bucket incase of top feed catastrophie but low enough if any roots make it into the bottom bucket they will not be effected by warm water, thus being air trimmed and not building a water root system that can and will be destroyed by low D.O. and high water temps this just breeds root rot and nothing you want. The roots in the wick are insulated by coco and some may be subjected to a lil bit of rot, but since your main root mass is consisted of air roots your plant will thrive.
Sqydro
Member
pretty much spot on, thats a basic PPK set up in all its glory, others have different methods like the holes in the side some do some dont its what works for you and your situation.
You ask about your nutrient lvl. This is part of your air gap. You want to be able to keep enough water in the bottom bucket incase of top feed catastrophie but low enough if any roots make it into the bottom bucket they will not be effected by warm water, thus being air trimmed and not building a water root system that can and will be destroyed by low D.O. and high water temps this just breeds root rot and nothing you want. The roots in the wick are insulated by coco and some may be subjected to a lil bit of rot, but since your main root mass is consisted of air roots your plant will thrive.
ahhhh its making sense now, so if i have the wick bit like half the size of that or 3/4...so its not in the water but just acts as a secondary feed if shit goes tits up with pump...feed lines etc, lol its starting to make sense now, so my external res is were i monitor my PH and ec from the return of the pulse feed etc...and i dont need a chiller or anything for this? sounds to good to be true mate
ahhhh its making sense now, so if i have the wick bit like half the size of that or 3/4...so its not in the water but just acts as a secondary feed if shit goes tits up with pump...feed lines etc, lol its starting to make sense now, so my external res is were i monitor my PH and ec from the return of the pulse feed etc...and i dont need a chiller or anything for this? sounds to good to be true mate
the wick should sit about 1/4 on an inch from the bottom of the bottom container so if incase a failure was to happen the plant could feed to the bottom of the container and not only to the end of where the tail piece is mounted to sit.
I have been using a 1-1/2 inch in diameter tail piece or wick but some have been experimenting with multiple 1-1/2 inch, or bigger single wicks around 3 inches. if the plant has to depend on this type of feeding it must sustain the uptake that the plant is accustomed to.
also all your containers and pods have to sit at the same lvl to sustain accurate water lvls is both control and feeder pods for the gravity method to work.
lil before and after update
lil before and after update
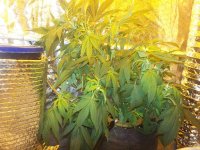
These four shots were from last night the first week of flower and before I trimmed some of the unwanted suckers and plucked some unwanted leaves covering potential bud sites, then the training began. The first shot is of the 3 of them about a minute before the light came on. The second shot is of the grateful Casey, then the AppleJack, and finally the Doctor in the next set of pics I will show how I trimmed them up and started training them, 1 more than the rest but I am sure you will see what i mean.
Everything has been pretty good temp has been staying around 75-80 lights on and 65-70 lights off, RH has been a lil low at 50% but thats a hell of a lot better than what it was the plants are liking it so I can't complain. I installed an intake fan to bring in fresh air from the outside I am just waiting on a variable speed control to arrive in an order I sent in, I also managed to replace my honeywell fan my last partner stole from me. Right now the fan is pulling too much cold air in and my temps weren't climbing over 72 so it stays unplugged till the speed control gets here, acting as a passive its pulling enough cool air to to cool the 1000 and thats all I need right now. So along with the show I will post the after shots on the next page. I really need to buy a subscription and a better camera who knows I might be able to afford both after this run (fingers crossed) lol enjoy everyone
lil before and after update
These four shots were from last night the first week of flower and before I trimmed some of the unwanted suckers and plucked some unwanted leaves covering potential bud sites, then the training began. The first shot is of the 3 of them about a minute before the light came on. The second shot is of the grateful Casey, then the AppleJack, and finally the Doctor in the next set of pics I will show how I trimmed them up and started training them, 1 more than the rest but I am sure you will see what i mean.
Everything has been pretty good temp has been staying around 75-80 lights on and 65-70 lights off, RH has been a lil low at 50% but thats a hell of a lot better than what it was the plants are liking it so I can't complain. I installed an intake fan to bring in fresh air from the outside I am just waiting on a variable speed control to arrive in an order I sent in, I also managed to replace my honeywell fan my last partner stole from me. Right now the fan is pulling too much cold air in and my temps weren't climbing over 72 so it stays unplugged till the speed control gets here, acting as a passive its pulling enough cool air to to cool the 1000 and thats all I need right now. So along with the show I will post the after shots on the next page. I really need to buy a subscription and a better camera who knows I might be able to afford both after this run (fingers crossed) lol enjoy everyone
Attachments


after
after
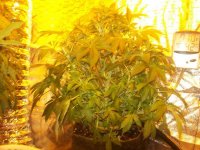
these shot were after the lights had come on and I know they arent that great but you get an idea of what i did. The first is of all 3, the next is of the Grateful casey, then the Apple Jack, and finally the doctor. The GC was basicly raped and strapped to a fence the apple jack was just thinned out a lil bit I am starting to worry if this thing is even going to stretch, and the doctor I had to bend over towards the door as the GC is stretching her legs . Hope everyone enjoys the end of weeks 1 of flower its only going to get better so stick around everyone.
after
these shot were after the lights had come on and I know they arent that great but you get an idea of what i did. The first is of all 3, the next is of the Grateful casey, then the Apple Jack, and finally the doctor. The GC was basicly raped and strapped to a fence the apple jack was just thinned out a lil bit I am starting to worry if this thing is even going to stretch, and the doctor I had to bend over towards the door as the GC is stretching her legs . Hope everyone enjoys the end of weeks 1 of flower its only going to get better so stick around everyone.
Attachments


lookin good HB! keep up the good work my friend.
hey there bud, you finally said something
everyone Tom is my roommate and my apprentice he is just starting to get into the scene so I took him under my wing to properly show him the ropes so any questions he should be to help out a lil bit he is still a lil novice but we all started out at the same place, so welcome Tom and I want to see more of you around here
")
tomfoolery29
New member
well im glad to be a part of it brother...not to much longer now and the girls should start strechting their legs...
Small lil update tom and I got an order in for some strawberry dogshit, and we got 5 cheese dog as freebies. Along with about 14 other genetics next season is going to get pretty interesting. I will be posting up week.2 of flower here shortly also, things are.starting to crown up its getting interesting.
week 2 flower update
week 2 flower update
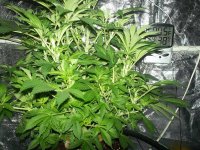
Hello all just popping in to post up some shots of week 2 of flower mostly of the Grateful Casey, she is by far the best lady in the tent the other 2 are doing well not nearly as well as the Casey. The first cpl shots are right before the light had come on, I believe the 3rd shot is of the Casey just about touching the top of the fencing that's just around 4ft. Hopefully I still have another week of stretch or so to get the canopy a lil more even maybe someone with some experience with the grateful Casey can chime in and let me know the average stretch time for these genetics. the last shot is of the lights on after i trimmed them up a lil bit , also we did a full rez change out from 7g/gal of maxigro to 7g/gal of maxibloom. I will be running this for the next 3 weeks then another full dump and change out to koolbloom powder and florabloom liquid for about 5 days then all the add backs will be just florabloom and koolbloom liquid for another week and a half then it will be just plain ph'd water till chop. I plan on taking them all to every bit of 70 days maybe longer depending on trichs. the doctor might finish a lil bit earlier she seems to be starting to stack sets already so it seems she might finish around 8-9 weeks. all is well so far. This tue. is the beginning of week 3 so thats just around the corner and I am sure things will be even more filled in till then hope you enjoyed week 2 of flower
week 2 flower update
Hello all just popping in to post up some shots of week 2 of flower mostly of the Grateful Casey, she is by far the best lady in the tent the other 2 are doing well not nearly as well as the Casey. The first cpl shots are right before the light had come on, I believe the 3rd shot is of the Casey just about touching the top of the fencing that's just around 4ft. Hopefully I still have another week of stretch or so to get the canopy a lil more even maybe someone with some experience with the grateful Casey can chime in and let me know the average stretch time for these genetics. the last shot is of the lights on after i trimmed them up a lil bit , also we did a full rez change out from 7g/gal of maxigro to 7g/gal of maxibloom. I will be running this for the next 3 weeks then another full dump and change out to koolbloom powder and florabloom liquid for about 5 days then all the add backs will be just florabloom and koolbloom liquid for another week and a half then it will be just plain ph'd water till chop. I plan on taking them all to every bit of 70 days maybe longer depending on trichs. the doctor might finish a lil bit earlier she seems to be starting to stack sets already so it seems she might finish around 8-9 weeks. all is well so far. This tue. is the beginning of week 3 so thats just around the corner and I am sure things will be even more filled in till then hope you enjoyed week 2 of flower
Attachments