StillOvergrowin
Member
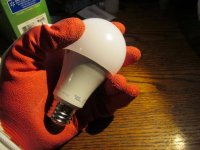
Removing the Globes from LED Bulbs
Removing the Globes from LED Bulbs
This an absolutely amazingly awesome thread! You guys are going to change the world with this!
You inspired me to try the SIL method (took me almost 10 minutes of research just to find out wth that meant) and I wanted to share some of my moderately-experienced newbie ...experiences.
I had a 125W CFL that I used for years, but recently the $35 bulbs have only been lasting 6-8 months, so I need an alternative.
The SIL concept makes purchasing supplies MUCH easier!
I can buy cheap replacement bulbs at walmart 24 hours a day and even have it delivered to my front door instead of driving 30 minutes one-way to get a damn bulb. It greatly simplifies and streamlines my logistics.
Gods be praised!
I spent hours reading through the thread, and then ended up impulse buying some Great Value 15Watters at Walmart on my way back from trying to replace yet another of the $35 bulbs. The store was out of the 125W CFLs i usually bought, so I left empty handed and wasted an hour.
Being a bit skeptical of the claims about the LEDs, curiosity got the better of me, and I decided I'd risk one bulb and try to crack it open and not cry if I broke it- cuz it only $2!!
I used a set of $1 'grippy' gloves from the dollar store to give me a better grip on the bulb and base and a little protection for my hands.
My 1st attempt was with a utility knife and a new, sharp blade and also a large screwdriver.
I carefully ran the blade around the seam between the globe and the base, and then started prying with the screwdriver... but it didn't give at all, and I was afraid of wrecking the electronics inside if the screwdriver slipped.
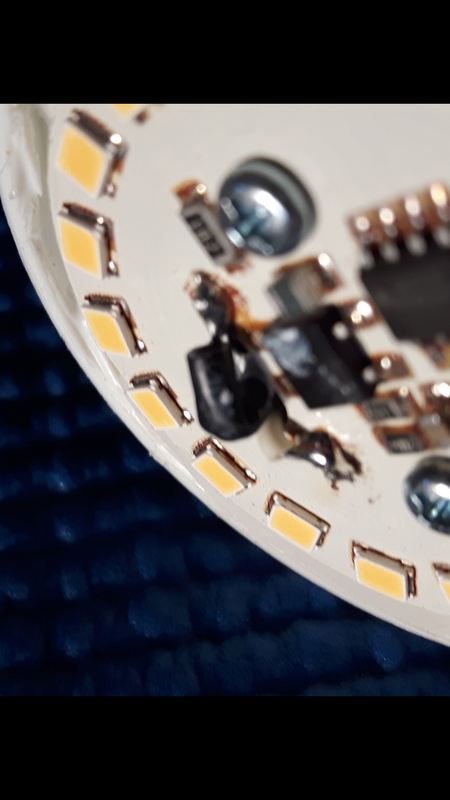
So I cut a small exploratory hole ( actually a triangle/wedge) and looked inside the bulb. Damn there's a high degree of precision engineering and manufacturing inside a $2 LED bulb! I could also see that the globe didn't sit directly on the edge of the base, but instead there was an interior lip or ledge that was where the 2 pieces were joined.
I ended up just slicing all the way across the globe and sort of peeling it back and then was able to see enough to get the blade of the screwdriver inside and eventually pop off the globe. I was working slowly, but I'm sure it took me at least 10 minutes to do my 1st bulb. I got the globe off, but it was slow and a pain in the butt.
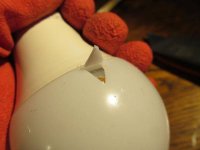
So I decided to try a 2nd bulb. I went for simplicity and ease on this one, so I just poked the knife blade through the globe about a half inch above the LED base. Sort of alternating between rotating the bulb and then pushing the blade down through the plastic globe, I got the globe off fairly easily and was left with a small collar of globe that I though I might try using a mini reflector later on. The plastic globe is surprisingly tough.
I did the 3rd bulb the same way as the 2nd, and it went a little quicker. It also left a slightly uneven collar, sooo...
Bulb #4, I used a hacksaw to cut the globe off. That was fairly easy if you go slowly and take your time...but I worried a bit about how much vibration I was subjecting the bulb to. And it created a LOT of plastic debris and dust that ended up on the electronics!
Embracing my new addiction, I sneaked out to the store later and bought another 4 pack of LED bulbs...
Bulb # 5 was done using the Channel Lock Grip it and Rip it method. I had some trepidation about how much force I had to put on the base to get the globe to separate from it...but that may just be my OCD.
My main method was to put one of the gloves down on the desk and place the bulb on top of it while I was working on it- mostly just to give it a softer work surface and to help hold the bulb in place (base to the left side and globe to the right). Then use your left hand (I'm RH) to hold the bulb in place while you open the pliers up as far as they can go and push then against the globe with your right hand. The globe is slippery and I had small pliers, but I found I could use my left thumb to apply enough pressure to the back of the pliers to force them to stay against the globe while I squeezed the pliers and crunched the globe.
I eventually pried off the globe, but it wasn't nearly as easy as I thought it would be. But - I did leave a nice clean edge on the base! I actually tore through the plastic globe a few times...it's sort of like peeling an orange if that makes sense... just pull off a small section at a time and work your way around.
I read more posts and some people talked about plugging the bulb in so it could heat up and then it might be easier to separate the globe.
I didn't have an extra socket handy... buuut I did have a preheated oven that was about 170F.
I cracked the oven door and held the bulb in the oven until it got too hot for me and I laid the bulb on the rack in the oven.
The IR thermometer read 130-150F on different parts of the base and globe. The bulb was inside the oven for about one and a half, to two minutes. I pulled it out, placed it on top of the glove on the desk and attacked it with the pliers.
To my surprise and delight, the globe was much easier to pry off of the base. It still took several 'bites' or 'crunches' on the bulb to be able to work the globe free, but it was much quicker, easier and cleaner than the other methods. One method that worked well was to hold the pliers at a 90 degree right angle to the bulb and work your way around the globe 'crimping' it with the pliers and pulling small segments away from the base as you go around.
I also think it would work if you dipped the globe into warm water to heat it up and dried it off before you opened it up. The plastic globe heats up quickly, but it also cools off quickly.
I can add some photos if anyone wants. I'm not sure if that's crapping up the thread and I should start another one, or if we want to keep all the SIL info in one thread.
I know this is long, but I'm trying to give back as much as I've learned from here.
Removing the Globes from LED Bulbs
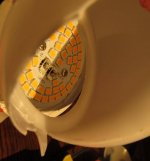
This is how I removed my globes.
Drill a hole put a screwdriver through it and use the handle for leverage.
No sharps.
View Image
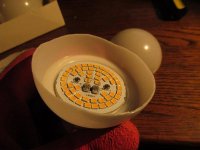
^My method is similar. Except for I use channel locks at the top where you put the screw driver through. Open them real wide, squeeze down on the globe. Close them shut, crushing the tip of the globe and pinching it between the handles, then use the base as leverage to wiggle, pry, pull the globe off. Squeezing the globe helps break the bead of glue. The Osram globes are glued on really well.
View Image
This an absolutely amazingly awesome thread! You guys are going to change the world with this!
You inspired me to try the SIL method (took me almost 10 minutes of research just to find out wth that meant) and I wanted to share some of my moderately-experienced newbie ...experiences.
I had a 125W CFL that I used for years, but recently the $35 bulbs have only been lasting 6-8 months, so I need an alternative.
The SIL concept makes purchasing supplies MUCH easier!
I can buy cheap replacement bulbs at walmart 24 hours a day and even have it delivered to my front door instead of driving 30 minutes one-way to get a damn bulb. It greatly simplifies and streamlines my logistics.
Gods be praised!
I spent hours reading through the thread, and then ended up impulse buying some Great Value 15Watters at Walmart on my way back from trying to replace yet another of the $35 bulbs. The store was out of the 125W CFLs i usually bought, so I left empty handed and wasted an hour.
Being a bit skeptical of the claims about the LEDs, curiosity got the better of me, and I decided I'd risk one bulb and try to crack it open and not cry if I broke it- cuz it only $2!!
I used a set of $1 'grippy' gloves from the dollar store to give me a better grip on the bulb and base and a little protection for my hands.
My 1st attempt was with a utility knife and a new, sharp blade and also a large screwdriver.
I carefully ran the blade around the seam between the globe and the base, and then started prying with the screwdriver... but it didn't give at all, and I was afraid of wrecking the electronics inside if the screwdriver slipped.
So I cut a small exploratory hole ( actually a triangle/wedge) and looked inside the bulb. Damn there's a high degree of precision engineering and manufacturing inside a $2 LED bulb! I could also see that the globe didn't sit directly on the edge of the base, but instead there was an interior lip or ledge that was where the 2 pieces were joined.
I ended up just slicing all the way across the globe and sort of peeling it back and then was able to see enough to get the blade of the screwdriver inside and eventually pop off the globe. I was working slowly, but I'm sure it took me at least 10 minutes to do my 1st bulb. I got the globe off, but it was slow and a pain in the butt.
So I decided to try a 2nd bulb. I went for simplicity and ease on this one, so I just poked the knife blade through the globe about a half inch above the LED base. Sort of alternating between rotating the bulb and then pushing the blade down through the plastic globe, I got the globe off fairly easily and was left with a small collar of globe that I though I might try using a mini reflector later on. The plastic globe is surprisingly tough.
I did the 3rd bulb the same way as the 2nd, and it went a little quicker. It also left a slightly uneven collar, sooo...
Bulb #4, I used a hacksaw to cut the globe off. That was fairly easy if you go slowly and take your time...but I worried a bit about how much vibration I was subjecting the bulb to. And it created a LOT of plastic debris and dust that ended up on the electronics!
Embracing my new addiction, I sneaked out to the store later and bought another 4 pack of LED bulbs...
Bulb # 5 was done using the Channel Lock Grip it and Rip it method. I had some trepidation about how much force I had to put on the base to get the globe to separate from it...but that may just be my OCD.
My main method was to put one of the gloves down on the desk and place the bulb on top of it while I was working on it- mostly just to give it a softer work surface and to help hold the bulb in place (base to the left side and globe to the right). Then use your left hand (I'm RH) to hold the bulb in place while you open the pliers up as far as they can go and push then against the globe with your right hand. The globe is slippery and I had small pliers, but I found I could use my left thumb to apply enough pressure to the back of the pliers to force them to stay against the globe while I squeezed the pliers and crunched the globe.
I eventually pried off the globe, but it wasn't nearly as easy as I thought it would be. But - I did leave a nice clean edge on the base! I actually tore through the plastic globe a few times...it's sort of like peeling an orange if that makes sense... just pull off a small section at a time and work your way around.
I read more posts and some people talked about plugging the bulb in so it could heat up and then it might be easier to separate the globe.
I didn't have an extra socket handy... buuut I did have a preheated oven that was about 170F.
I cracked the oven door and held the bulb in the oven until it got too hot for me and I laid the bulb on the rack in the oven.
The IR thermometer read 130-150F on different parts of the base and globe. The bulb was inside the oven for about one and a half, to two minutes. I pulled it out, placed it on top of the glove on the desk and attacked it with the pliers.
To my surprise and delight, the globe was much easier to pry off of the base. It still took several 'bites' or 'crunches' on the bulb to be able to work the globe free, but it was much quicker, easier and cleaner than the other methods. One method that worked well was to hold the pliers at a 90 degree right angle to the bulb and work your way around the globe 'crimping' it with the pliers and pulling small segments away from the base as you go around.
I also think it would work if you dipped the globe into warm water to heat it up and dried it off before you opened it up. The plastic globe heats up quickly, but it also cools off quickly.
I can add some photos if anyone wants. I'm not sure if that's crapping up the thread and I should start another one, or if we want to keep all the SIL info in one thread.
I know this is long, but I'm trying to give back as much as I've learned from here.

")