
-
Happy Birthday ICMag! Been 20 years since Gypsy Nirvana created the forum! We are celebrating with a 4/20 Giveaway and by launching a new Patreon tier called "420club". You can read more here.
-
Important notice: ICMag's T.O.U. has been updated. Please review it here. For your convenience, it is also available in the main forum menu, under 'Quick Links"!
You are using an out of date browser. It may not display this or other websites correctly.
You should upgrade or use an alternative browser.
You should upgrade or use an alternative browser.
may be the case coba, i tend to compost the chicken manure from my hens it does make the compost quite rich though.
guano isnt just bird/bat shit, afaik its also eaten by beatles or other insects so it is double processed as it were.
i went back recently and intruduced gypsum to my mix to make my liming dolomite/gypsum 50/50 (i realised i have a lot of lime in my rock guano/rock phosphate as well). that seemed to have a positive effect. had to cut my soil half and half with new to get the ratios right.
VG
V
vonforne
Building your Worm bin
Building your Worm bin
What´s up gang, for this part I will address the importance of creating compost or Vermicompost for sour soil mix. Some of you may think that you do not have the room or space to do this but your are in correct in that assumption. This can be done in a very large area such as a basement like I have or you can do this in your kitchen or backporch or a balcony.
First I will give you some links to read up on........
Worm Farming Alliance
Directory of Vermiculture Resources
these are just a couple links.
To me this is the most important part of your soil building.
You Need 5 Basic Ingredients to Start Vermicomposting:
1. a container (I use sterite totes and smart pots)
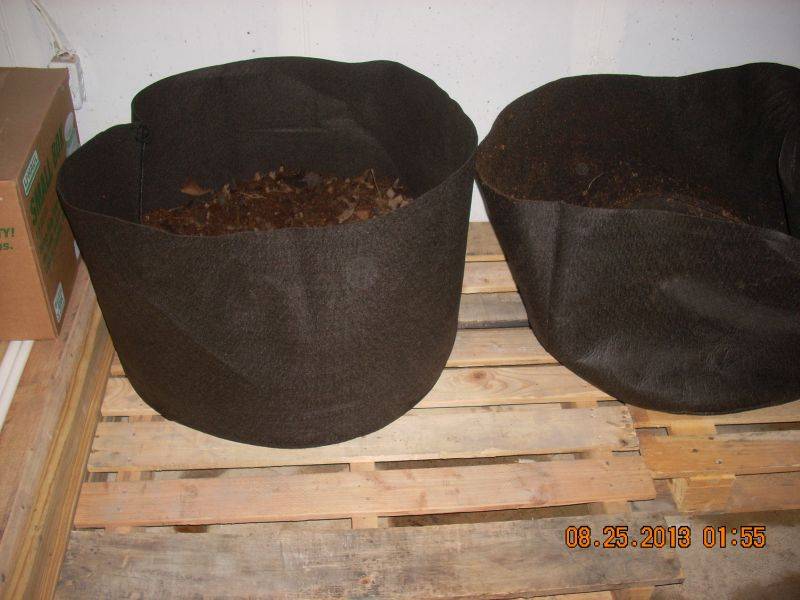
2. bedding (I use mulched leaves and peat)
3.water I use rain water when possible but if not make sure it is tepid or chlorine free.
4. worms There are many places to get these. Online, at the farmers market, a bait store near you etc. If you order online they will only send during spring and fall due to the heat and cold in most parts of the USA. Try and get them as close to home as you can and after a period of time you will not need to buy if you take good care for them and encourage them to multiply.
5. Food sources Kitchen scraps is the most common but when you are doing it for a longer time you can use custom inputs as I do such as Neem seed meal (worms love it), alfalfa, kelp meal, crab meal, fish bone meal, fish meal, bananas without peels (I only use the peels if they are organic) bio char (bins are also good for charging the char before use in the soil mis) and many more.
Worm bins can be purchased or made. I bought my sterite tote at Wally World for 8.00 and come in a variety of sizes. These containers are easily moved and are a nice alternative to heavier wood bins. Many growers choose to have several small bins as opposed to one heavier, large wood bin. Small bins work best in homes and apartments. They are easy to tuck under desks, place below kitchen sinks and keep out of the way in laundry rooms or on porches weather permitting.
Ok, now that you have your container size and type you need to gather the bedding. I do not like newspapers because it mats when wet. It does not provide enough air space and moving space when wet for the worms. You could use cardboard (worms love this stuff!) but I prefer to give them a more natural bedding of mulched leaves mixed with peat and native dirt. It makes them feel right at home. lol
You can just go out into your yard, park or along side of the road where you see the dried leaves have gathered and load up a couple 5 gallon bucket and wither mulch them with your lawnmower or just with you hands. I tend to leave in the small sticks and things as the worms love to house in things like this. It is something you will observe as time goes by.
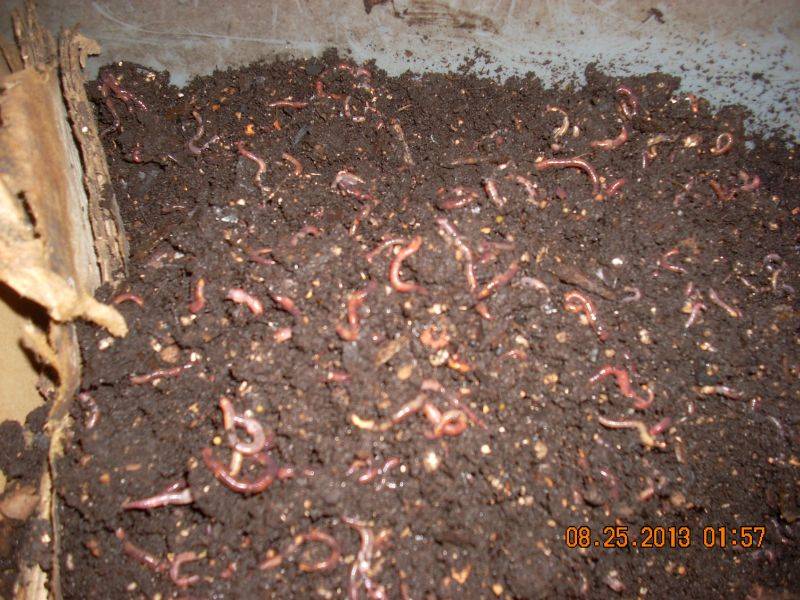
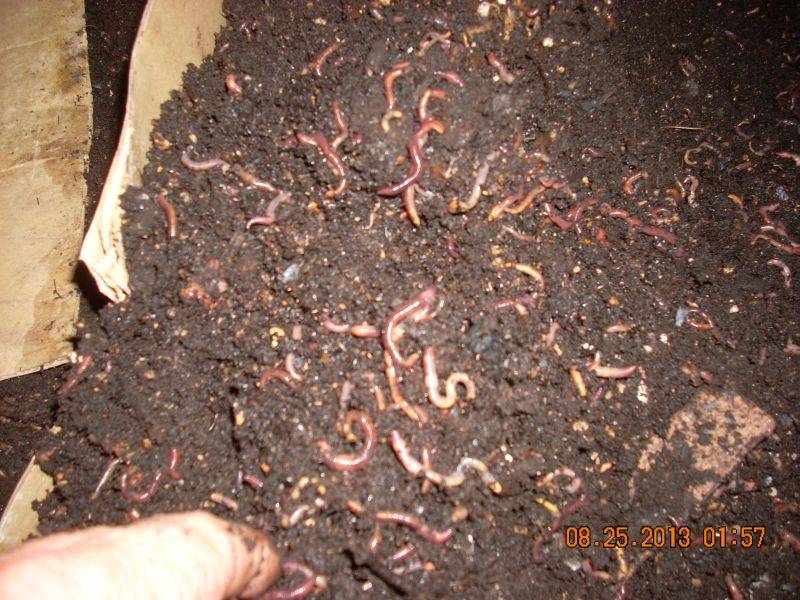
Now you have your worm bin picked out and the bedding for your new worms........the home is built now you just need an occupant or occupants. Choose the amount of worms that will fit you bin and your needs. The type of worms you need are Eisenia fetida or Redworms (Red wrigglers) manure worms are a common name for them also. They are top feeders or just below the surface of the soil or what ever rotting matter is laying around. If you have ever turned a cow pile over chances are you have seen them then.....or a rotting piece of wood, the wet leaf pile in your yard that has been there for sometime.
Now as your worms are coming in the mail you need to place the food source in there on top of the bedding. I actually make two layers in my bins. A bedding layer and another layer on top mixed with different food sources. In this picture I have a pile of coffee grounds with filters, crab meal, fishbone meal, fish meal and some Glacial rock dust.
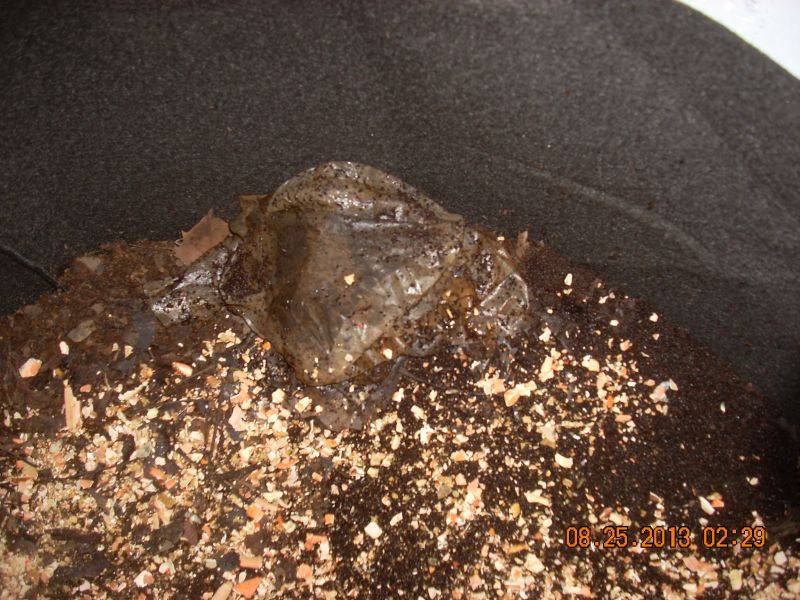
yum, yum!! Now it is all ready for the worms. I will then sift my breeding bin with a 1\4 inch hardware cloth
picture in next post......
I have added some handles on this but forgot to take the picture. I will sift all the finished casting to remove unprocessed foods, cocoons and worms and then transfer then to the new bin I made.
One half of this bin is finished. I divide thes with either a piece of card board or a half inch piece of hardware cloth the worms will pass through. When I use the card board I leave it off the bottom a couple inches and they will pass underneath to where I have put the food source. When you do put your food sources in there place them in different spots so the worms will pass back and forth through the bin and process all the organic matter in their travels.
I will have to make a second post as we are restricted from posting more than 5 pictures per post........
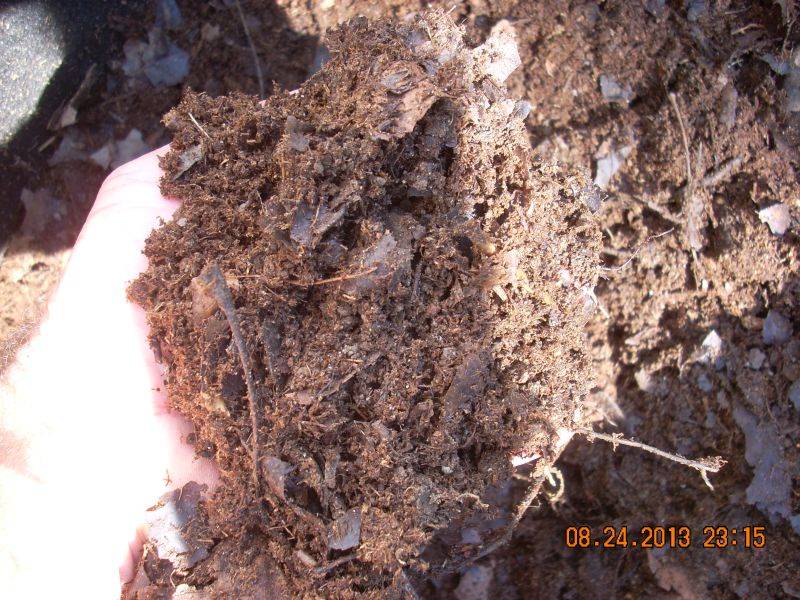
Now that you have your finished casting you are ready to mix a new batch of soil, make compost teas or just eat it. J\K
I will not go into to the detail on the finer points as you can do the reading yourself with some of the links I have provided and through your own research.
Until the next time.
V
Building your Worm bin
What´s up gang, for this part I will address the importance of creating compost or Vermicompost for sour soil mix. Some of you may think that you do not have the room or space to do this but your are in correct in that assumption. This can be done in a very large area such as a basement like I have or you can do this in your kitchen or backporch or a balcony.
First I will give you some links to read up on........
Worm Farming Alliance
Directory of Vermiculture Resources
these are just a couple links.
To me this is the most important part of your soil building.
You Need 5 Basic Ingredients to Start Vermicomposting:
1. a container (I use sterite totes and smart pots)
2. bedding (I use mulched leaves and peat)
3.water I use rain water when possible but if not make sure it is tepid or chlorine free.
4. worms There are many places to get these. Online, at the farmers market, a bait store near you etc. If you order online they will only send during spring and fall due to the heat and cold in most parts of the USA. Try and get them as close to home as you can and after a period of time you will not need to buy if you take good care for them and encourage them to multiply.
5. Food sources Kitchen scraps is the most common but when you are doing it for a longer time you can use custom inputs as I do such as Neem seed meal (worms love it), alfalfa, kelp meal, crab meal, fish bone meal, fish meal, bananas without peels (I only use the peels if they are organic) bio char (bins are also good for charging the char before use in the soil mis) and many more.
Worm bins can be purchased or made. I bought my sterite tote at Wally World for 8.00 and come in a variety of sizes. These containers are easily moved and are a nice alternative to heavier wood bins. Many growers choose to have several small bins as opposed to one heavier, large wood bin. Small bins work best in homes and apartments. They are easy to tuck under desks, place below kitchen sinks and keep out of the way in laundry rooms or on porches weather permitting.
Ok, now that you have your container size and type you need to gather the bedding. I do not like newspapers because it mats when wet. It does not provide enough air space and moving space when wet for the worms. You could use cardboard (worms love this stuff!) but I prefer to give them a more natural bedding of mulched leaves mixed with peat and native dirt. It makes them feel right at home. lol
You can just go out into your yard, park or along side of the road where you see the dried leaves have gathered and load up a couple 5 gallon bucket and wither mulch them with your lawnmower or just with you hands. I tend to leave in the small sticks and things as the worms love to house in things like this. It is something you will observe as time goes by.
Now you have your worm bin picked out and the bedding for your new worms........the home is built now you just need an occupant or occupants. Choose the amount of worms that will fit you bin and your needs. The type of worms you need are Eisenia fetida or Redworms (Red wrigglers) manure worms are a common name for them also. They are top feeders or just below the surface of the soil or what ever rotting matter is laying around. If you have ever turned a cow pile over chances are you have seen them then.....or a rotting piece of wood, the wet leaf pile in your yard that has been there for sometime.
Now as your worms are coming in the mail you need to place the food source in there on top of the bedding. I actually make two layers in my bins. A bedding layer and another layer on top mixed with different food sources. In this picture I have a pile of coffee grounds with filters, crab meal, fishbone meal, fish meal and some Glacial rock dust.
yum, yum!! Now it is all ready for the worms. I will then sift my breeding bin with a 1\4 inch hardware cloth
picture in next post......
I have added some handles on this but forgot to take the picture. I will sift all the finished casting to remove unprocessed foods, cocoons and worms and then transfer then to the new bin I made.
One half of this bin is finished. I divide thes with either a piece of card board or a half inch piece of hardware cloth the worms will pass through. When I use the card board I leave it off the bottom a couple inches and they will pass underneath to where I have put the food source. When you do put your food sources in there place them in different spots so the worms will pass back and forth through the bin and process all the organic matter in their travels.
I will have to make a second post as we are restricted from posting more than 5 pictures per post........
Now that you have your finished casting you are ready to mix a new batch of soil, make compost teas or just eat it. J\K
I will not go into to the detail on the finer points as you can do the reading yourself with some of the links I have provided and through your own research.
Until the next time.
V
Last edited:
V
vonforne
added pictures for above post........
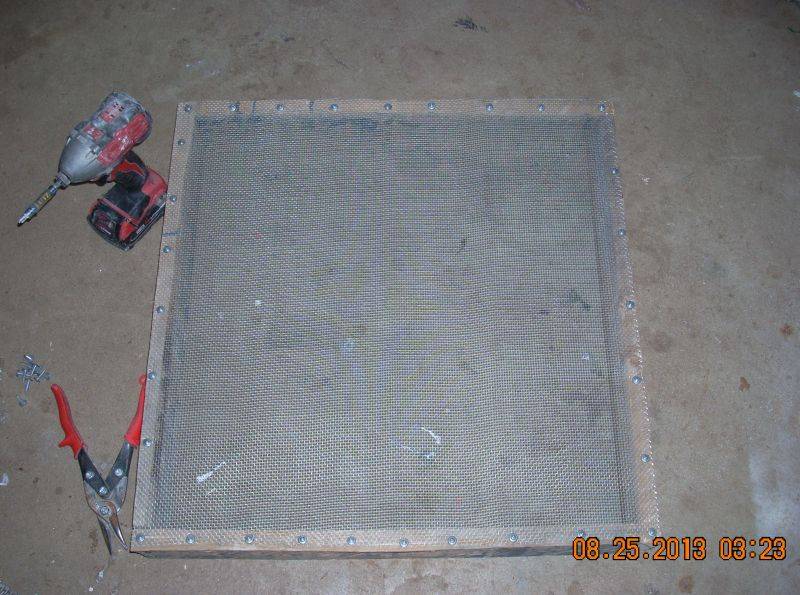
sifting screen
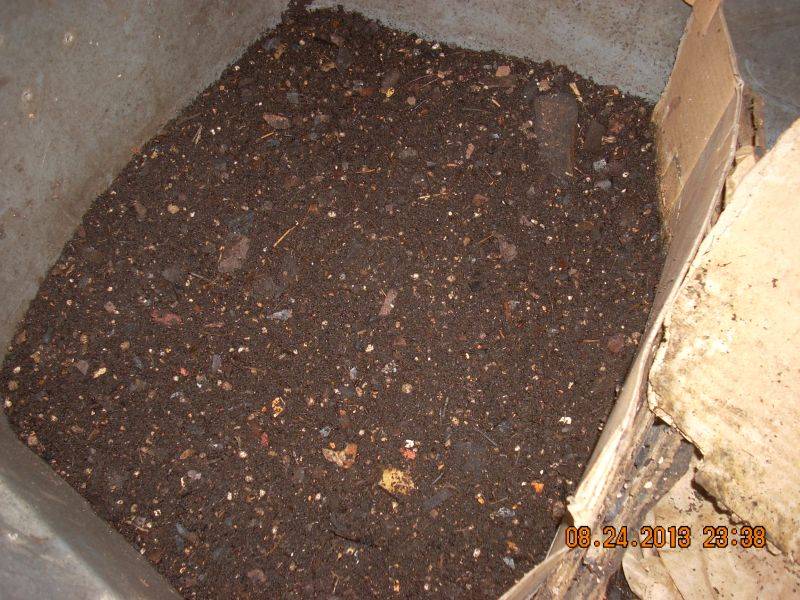
ready for sifting
sifting screen
ready for sifting
Applesauce
Member
Great post. How do you control mites in your bins? If you do.
I am trying to go through the original thread for information on putting pumice/lavarock on the bottom of no-tills like a SOMA bed. I am using 35 gallon rubbermaids with holes drilled but wondering if this would be a good idea.
Also, lava rock: I understand people are sourcing this from home depot/lowes. The stores near me have lava rock in the grill section, but the yard section only has viagro red vista decorative stone. These appear to just be stones painted red, not lava rock. I see online HD has "Viagro Decorative Red Lava Rock" but not in my area. Am I correct?
V
vonforne
Great post. How do you control mites in your bins? If you do.
I am trying to go through the original thread for information on putting pumice/lavarock on the bottom of no-tills like a SOMA bed. I am using 35 gallon rubbermaids with holes drilled but wondering if this would be a good idea.
Also, lava rock: I understand people are sourcing this from home depot/lowes. The stores near me have lava rock in the grill section, but the yard section only has viagro red vista decorative stone. These appear to just be stones painted red, not lava rock. I see online HD has "Viagro Decorative Red Lava Rock" but not in my area. Am I correct?
If you mean ´red velvet mites´ they are decomposers and are part of the process. The feed on gnats and other mites. If you do have them you bin might be too wet or have too much food in it. So I don´t think spider mites will be a problem if they are present. I try and not over load the bin with food sources the worms cannot digest fairly quickly. And about the only time you will have mites is with too much food or the bin is too wet.
Lava rock is Lava rock whether it is in the grill section or garden section. I have never seen stones just painted red. You can tell they are lava rocks by the texture and weight. I get mine in the garden section and just about any store will carry them in the garden section and some term them ´decorative´ and all of them charge about 3.00 a bag.
Last edited:
Great post. How do you control mites in your bins? If you do.
I am trying to go through the original thread for information on putting pumice/lavarock on the bottom of no-tills like a SOMA bed. I am using 35 gallon rubbermaids with holes drilled but wondering if this would be a good idea.
...
if having holes in the bottom of your bed/rubbermaids is not a problem then i would stick with it. putting a layer of pumice or similar in the bottom may help a little with air circulation if you vent it like soma did, but if you are looking for extra drainage then it wont make much difference.
the two forces acting on the water in your soil mix are gravity and capillary action, so putting drainage underneath will not effect either of these forces, it will also reduce the soil volume you can fit into the beds.
VG
V
vonforne
Great post. How do you control mites in your bins? If you do.
I am trying to go through the original thread for information on putting pumice/lavarock on the bottom of no-tills like a SOMA bed. I am using 35 gallon rubbermaids with holes drilled but wondering if this would be a good idea.
Also, lava rock: I understand people are sourcing this from home depot/lowes. The stores near me have lava rock in the grill section, but the yard section only has viagro red vista decorative stone. These appear to just be stones painted red, not lava rock. I see online HD has "Viagro Decorative Red Lava Rock" but not in my area. Am I correct?
I grew last year in 30 gallon and 50 gallon sterite totes.....the cheaper version of rubbermaid. lol Plants did great but were a bitch to move when I had to. Also getting them from the veg room to the flower room was a bit much with the stairs. I could not use rollers or wheels. Something you have to think about when you do this.
I am putting lava rock in the bottoms of my no-till smart pots and it seems to work very well. On this run I hooked up the Blu.mats to 6 out of 10 pots and they have shown a secondary stretch that the ones without the Blu-mats did not have and also the resin production seems to be higher with them.
How are you set up now? Do you plan on using the Blu-mats?
V
Nice post on making a worn bin Von.
If I can make some suggestions that I have learned in the time I have been making my own worm castings, watch your N sources.
I have added to much N (neem seed mean and alfalfa from mainly) and it heated everything up really fast. If you stick with a little on the top every once in a while you will be good.
I added to much and mixed it in a little and the next day it was hot to the touch and all of my worms were running away or the ones that couldn't got cooked.
Also watch how much you feed them at one time. Adding to much fresh food scraps will take to long to break down and will ad way to much moisture to a enclosed worm bin, not to mention the flying insects it brings.
Also in my opinion, this is the #1 thing a people can do who really want biologically alive, diverse, nutrient cycling, humus rich soil.
We all talk about using "good" compost or Worm castings, this is how you get it.
Timbuktu
V
vonforne
I am careful with the neem and alfalfa. Little bits each time. I prefer bananas just under the surface without the peels. Worms like it also. They dig the coffee grounds covered with the filters. I think there are about 10 to 15 lbs now iVn the 30 gallon bin so food does not last very long.
Vortexpower; Someone didn't heed my warnng about alfalfameal in the worm bin?
(;>{)
(;>{)
Applesauce
Member
What is the answer for root aphids in no-till? So many ingredients in my soil are sourced from outside, I find it hard to believe RA aren't in my mix. I have neem cake in there and other things but there are only anecdotal reports this is even slightly effective. Is the assumption that because no-till is so biologically active, RA won't be able to get a foothold?
What can I really do? In another life, coco life, I have had outbreaks of RA and they completely devastated things and were nearly impossible to kill off completely. I used heavy hitters and the only thing that "fixed" the issue was to tear down, bomb and wait. None of those heavy hitters can be used with this method.
What about MET 52?
SpicySativa
Member
Do you actually have root aphids, or are you just thinking hypothetically?
I believe that a diverse, living soil will be much more resistant to pests than a dead, sterile medium. I've never faced root aphids, but if it came to that I may just retire the batch of soil (put it outside in an unused garden bed to let the root aphids die off naturally).
Another possibility may be to solarize the soil, but I dont know if that would be completely effective or not.
Applesauce
Member
Hypothetically. A lot of time and effort is put into building this soil. It is concerning to me if throwing it all away is the only defense when you're invaded and it seems like that's only a matter of time. Previously I have kept things as clean as I could and still ended up with them. Though this was in a dead medium.
SpicySativa
Member
Applesauce- I just posted this in another topic "why aren'tore people using..."
---
My soil seems to have a healthy population of predatory mites, which I imagine don't make for a very hospitable root aphid habitat. The mites originated in my worm bin where they were attracted by an outbreak of fungus gnats. They laid waste to the gnats, and now inhabit my soil.
I guess time will tell. Been about a year now with the same two batches of soilwithout any root-zone pests or pathogens.
---
I think the key is to have a diverse, living soil. Your outdoor garden isn't getting ravaged by root aphids is it? Sterile, dead substrates are very inviting for pests and pathogens because they have ZERO competition, and root exudates and sluffed off root tissue just build up like a five-star buffet for the first opportunist. In a healthy living soil, these exudates and dead tissue are rapidly used by beneficial organisms, keeping the root zone healthy.
---
My soil seems to have a healthy population of predatory mites, which I imagine don't make for a very hospitable root aphid habitat. The mites originated in my worm bin where they were attracted by an outbreak of fungus gnats. They laid waste to the gnats, and now inhabit my soil.
I guess time will tell. Been about a year now with the same two batches of soilwithout any root-zone pests or pathogens.
---
I think the key is to have a diverse, living soil. Your outdoor garden isn't getting ravaged by root aphids is it? Sterile, dead substrates are very inviting for pests and pathogens because they have ZERO competition, and root exudates and sluffed off root tissue just build up like a five-star buffet for the first opportunist. In a healthy living soil, these exudates and dead tissue are rapidly used by beneficial organisms, keeping the root zone healthy.
Yea MM i got over zealous once and my worms were running. You casn tell me to do things but sometimes I'm on my own planet.
V- it amazing what they can eat when you have thousands. I really like melon rinds to bump the populating. They LOVE melons.
Timbuktu
V- it amazing what they can eat when you have thousands. I really like melon rinds to bump the populating. They LOVE melons.
Timbuktu
InjectTruth
Active member
V,
we've got a 6 beds that are 1 cubic yard of soil and under 2 - 1000W lights. The beds are on their 6th recycle at 2 packs per yard of soil. Using a "recycle mix" that was mostly comprised of rock dust, basalt, kelp, and alfalfa, we averaged just over 3 lbs per bed. Amending with the Nutrient Pack (only 1 bed), it got 3.83 lbs on the last harvest, which has brought us back to using the Nutrient Packs for recycling.
Can you clarify a little? You have 6 beds under 2k? or each bed has 2k over it? Cuz if you are pulling 18 lbs per 2k, we are gonna have to talk!

C
CT Guy
Can you clarify a little? You have 6 beds under 2k? or each bed has 2k over it? Cuz if you are pulling 18 lbs per 2k, we are gonna have to talk!
6 beds, 2 K per bed. Yeah, don't I wish it was the other case....
I'm just commenting that it does work. Much better to get the amendments in the soil and establish proper nutrient cycling PRIOR to planting, rather than us gardeners trying to play God and adding nutrients while the plant is growing. It's a different philosophy than with chemicals because we are not adding our nutrients in a plant-available form for the most part.
its has a remix lol.

