What's new
  • Happy Birthday ICMag! Been 20 years since Gypsy Nirvana created the forum! We are celebrating with a 4/20 Giveaway and by launching a new Patreon tier called "420club". You can read more here.
  • Important notice: ICMag's T.O.U. has been updated. Please review it here. For your convenience, it is also available in the main forum menu, under 'Quick Links"!

DIY Organic Potting Mix's for Grass - Ace Spicoli

pipeline

Cannabotanist
ICMag Donor
Veteran
Found this at the pathology thread, and I thought it would be useful here.

Thanks for all the great information Acespicoli! Your contributions make ICMAG even more valuable because people are able to have all this information available in one place. :smoke:


acespicoli

Well-known member
Found this at the pathology thread, and I thought it would be useful here.

Thanks for all the great information Acespicoli! Your contributions make ICMAG even more valuable because people are able to have all this information available in one place. :smoke:

Thanks man :huggg: that means alot!
 

acespicoli

Well-known member
How To: Culture Lactobacillus (LAB) for Horticultural use


6f8f92_00da76a5bf6f443c82931df167312f1a~mv2.png


Generally when it comes to bacteria and microbes we'd be referring to the aerobic type you'd hope to produce in a Compost Tea (AACT) system, the reason being that the presence of anaerobic bacteria in these systems are nearly always 'bad news'. However there are useful anaerobes out there and it is very much worth looking in to putting them to use in your horticultural endeavours!!

Enter Lactobacillus....​


Lactobacillus is a facultive anaerobe that we are generally interested in for it's ability to ferment a wide variety of things. It is this process that makes Lactobacillus or LAB the cornerstone of a range of processes the savvy gardener will find extremely useful. I'll mention more about that later in this piece and in further blogs, but lets show you how to culture your own Lactobacillus first....

Step 1 - Rice wash​


Technically you can use any reasonable carbohydrate source (preferably not simple sugars) but in this instance we'll go with a Rice wash - I will be trying other more exciting things in the future, but until then..... Well the title says it all really, wash some rice and collect the water. This milky wash will now contain some of the starches from the rice and provide a food source for your bacteria.

Step 2 - Collect your initial culture​


Place your rice wash in a suitable vessel (a jar...) and protect the neck with some kind of net to stop anything random getting in. Ideally you'll want to place this outside, in a garden, on a balcony ect away from the elements but open to the air. This will allow the bacteria to go to work on the wash. A day or so should be fine. You will notice a change in the wash as the bacteria start to work, it will start to smell slightly sour and three distinct layers should be visible. You now need to collect the middle of these layers - the best way is with a siphon, but a syringe or whatever you have to hand will work - just try not to disrupt the layers.

Step 3 - Feed the LAB​


Now it's time to culture just the LAB that are present and nothing else. To do this we add milk to the liquid we collected at about 10:1, so for every 10ml of liquid you want to add 100ml of milk - You can use pretty much any milk as it's the LAB in the wash we are culturing, however the least adulterated milk you can get your hands on the better. It's probably worth saying you can't use a lactose free milk for fairly obvious reasons....Finally we want to store this in an anaerobic state, so you have a few options - Ideally you can use a container with an airlock - the same as homebrewers use (or make one), you could use a bottle or jar and release the pressure every so often (not the best plan) or as I have use a heavy lid with a seal so any gas can escape but will then re-seal (not ideal to be honest....go buy some airlocks, you'll want them for further projects!)

Step 4 - Prep & Store the LAB​


After about a week you should notice a distinct change - You'll have a layer of curds and a liquid layer - whey. It's this liquid layer we want. Nothing too stressful here, just use a sieve and collect the liquid in a vessel - The curds can be put on the compost or whatever, it will be a great addition. Again your brew should smell sour (actually quite pleasant if you're in to sour beers at all....) but not rancid, if it is bin it. OK, now you have your liquid you have 2 options, store it in the fridge where it will keep for about a week or mix it with Molasses to stabilise the culture where it will keep for 6 months or more. To stabilise mix the culture 1:1 with molasses, so 1 litre culture to 1 Litre of Molasses gives you 2 Litres.....it's worth airlocking this too until the mix stabilises.

What's the point?​


Excellent question :eek:
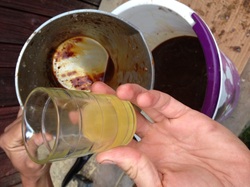
) The more mundane uses for LAB include using it as an odour neutraliser if you happen to keep chickens etc - Mix 30ml per litre of water and spray around the coop to reduce the smell - Unblock drains - 15ml per litre and let it go to work over night and many more! For your growing needs however mix 30ml or so with every litre of your plant's water. The microbes will help cycle the nutrients in the soil making them more available to the plant! Add your LAB to compost - 30ml per litre and damp down every time you add to the pile or as you're layering up. The Lactobacillus will speed up decomposition and start to cycle the nutrients! Finally (and more excitingly), I mentioned earlier that LAB is the cornerstone of further processes that are highly beneficial to a gardener. For instance LAB can be used for Bokashi composting, no more need to buy bran for your indoor composting! If you've never heard of Bokashi, I'll cover it at some point. LAB can also be used to ferment plant material, for instance if you already add seaweed meal to your feeding regime, imagine if you could 'pre-digest' the nutrients held within the seaweed - making the non soluble elements readily available at application....with LAB you can. If you're a gardener familiar with the process of rotting comfrey or nettles in a bucket to annoy your plot mates, why not use LAB to break down the vegetable matter without the smell, and more importantly, without the risk of culturing the bad anaerobic bacteria. Using these principles it's basically possible to make your own organic liquid plant food for free and without losing friends or neighbours..... The last point for this post is probably my favourite - With LAB it's possible to create your own fish fertiliser (Fish hydrolysate) this in conjunction with your nettle/seaweed/comfrey/grass brews will give you the perfect base for making your own liquid organic fertiliser.... ...that's not bad for a little milk and help from a bacterium.

Foot notes - There should really be a sequence of pictures to go with this post, but frankly they weren't up to scratch. If anything needs clearing up drop me an email or comment below. - N.D
1707392324419.png

Tractor Supply- Live stock feed stores 18$
Sucrose, Dried Whey, Sodium Silico Aluminate, Dried Enterococcus Faecium Fermentation Product, Dried Lactobacillus Acidophilus Fermentation Product, Dried Lactobacillus Casei Fermentation Product and Dried Lactobacillus Plantarum Fermentation Product.
 

acespicoli

Well-known member

Process​


A household bokashi bin with a supply of fermentation starter, namely bran inoculated with Lactobacilli.
The basic stages of the process are:[citation needed]

  1. Organic matter is inoculated with Lactobacilli. These will convert a fraction of the carbohydrates in the input to lactic acid by homolactic fermentation.[3]
  2. Fermented anaerobically (more precisely, microaerobically)[4] for a few weeks at typical room temperatures in an airtight vessel, the organic matter is preserved by the acid, in a process closely related to the making of some fermented foods and silage. The preserve is normally applied to soil when ready, or can be stored unopened for later use.
  3. The preserve is mixed into soil that has naturally occurring micro-organisms.
  4. When water is present (as in the preserve itself or in the soil) the lactic acid progressively dissociates by losing protons to become lactate – the acid's conjugate base or ion salt.[5] Lactate is a fundamental energy carrier in biological processes. It can pass through cell membranes and almost all living organisms have the enzyme lactate dehydrogenase to convert it to pyruvate for energy production.
  5. Suffused with lactate, the preserve is readily consumed by the indigenous soil life, primarily the bacteria, 'disappearing' within a very few weeks at normal temperatures. Earthworm action is typically prominent as bacteria are themselves consumed, such that the amended soil acquires a texture associated with vermicompost.

Characteristics​

Accepted inputs​


Inside a recently started bokashi bin. Food scraps are raised on a perforated plate (to drain runoff) and are partly covered by a layer of bran.
The process is typically applied to food waste from households, workplaces and catering establishments, because such waste normally holds a good proportion of carbohydrates. It is applied to other organic waste by supplementing carbohydrates and hence lactic acid production. Recipes for large scale bokashi in horticulture often include rice, and molasses or sugar.[6][7] Any carbohydrate-poor waste stream would benefit from this.

Homolactic fermentation can process significantly more kinds of food waste than home composting. Even items considered problematic in traditional composting, such as cooked leftovers, meat and skin, fat, cheese and citrus waste are, in effect, pre-digested to enable soil life to consume them. Large pieces may take longer to ferment and concave surfaces may trap air, in which cases cutting down is advised in support literature.[8]

Pieces of input are discarded if they are already badly rotten, or show green or black mould. These harbour putrefying organisms which may overwhelm the fermentation.
 

acespicoli

Well-known member
1707393986749.png

Espoma Organic Compost Starter is the ideal choice to help make rich, fertile compost – nature’s original soil conditioner. It is formulated to accelerate the process of home composting materials including manure, grass, leaves and food waste. Compost Starter contains billions of microbes specially cultured to speed the decomposition of difficult to compost organic matter. These are combined with the proper energy sources and pH balancers to assure composting success.


  • Helps Make Rich Fertile Compost
  • Contains Microbes for Fast, Healthy Composting
  • Speeds Decomposition of Difficult Materials
  • Quickly Converts Organic Waste to Rich Humus
  • Safe for People, Pets & Planet

Select a partially shaded site that is on level ground and at least 4 foot x 4 foot.
Add initial layer of waste including twigs and branches for air circulation. Layers should be 6 to 12 inches deep.
Add Compost Starter – one cup for 16 square feet of layer area.


Evenly moisten the layer but do not soak. Repeat with additional layers of waste adding Compost Starter and moisture with each new layer. Turn the pile once a week to allow air to penetrate the center.


Tips and Suggestions


  • Reducing the size of waste by shredding will speed the composting process.
  • Any organic waste can be composted including kitchen scraps, leaves, grass clippings, etc.
  • Composting meat scraps may attract animal pests.
  • If you experience problems, these can often be addressed by adding Compost Starter and turning the pile.
  • If you notice a foul odor, the process has turned anaerobic (not enough air). Turn the pile more often to allow air to penetrate the center.
 

acespicoli

Well-known member

Best Compost Starters in 2022​

Now that we understand not only what compost starters are, but why you might need them and the ingredients to look out for, let’s check out the top 3 compost starters in 2022 that we recommend:

1. Jobe’s Organic Compost Starter​

To speed up the composting process, Jobe’s Organics created a granular compost starter. This one-of-a-kind, fast-acting organic fertilizer produces visible effects.

Mycorrhizal fungi, bacteria, and a special type of Archaea make up Jobe’s Biozome, the trio of microorganisms responsible for the composter’s success.

You can get great results by using two cups of the Jobe Organics Compost starter for every cubic yard of organic waste. Within three weeks of application, you should start seeing positive benefits.

The OMRI is listed by the USDA for organic gardening, which indicates that it is free of synthetic chemicals. During the growing season, the Biozome also aids in protecting against insects, drought, and disease.

The easy-pour bag is convenient, but you may notice an unpleasant smell due to the microorganisms that make up this top compost starter.

2. Dr. Earth Compost Starter​

Dr. Earth’s compost starter is hard to beat. This starter is a one-of-a-kind combination of seaweed extract, alfalfa meal, and beneficial soil microbes.

It can be used for all kinds of composting, which makes it unique and useful. You can have full faith that this starter will produce humus that is one hundred percent natural and organic.

This special mixture is safe for both humans and pets and contains all the bacteria required to break down organic materials in a compost pile.

3. Espoma Organic Compost Starter​

The Espoma organic traditional compost starter is intended to cover your compost pile completely. When building up a compost pile, the Bio-Excelerator should be used on the final layer.

If you moisten the extra layer after adding the Bio-Excelerator and stir the pile on a regular basis, you can reduce the time it takes to produce humus to roughly 3 months.

It’s not only easy to use but is also natural and pet-friendly! Just follow the instructions on the label and you’ll have great compost for your home garden
 

acespicoli

Well-known member
Soldier Worms, the live larvae of the black soldier fly (Hermetia illucens), are a naturally nutritious, protein-packed, calcium-rich treat for your pet. Their balanced Calcium to Phosphorus ratio is ideal for reptiles (without the need for dusting), and can help prevent Metabolic Bone Disease. They also contain natural antimicrobial properties that may help boost your pet’s immunity. While most flies are considered pests, BSF are actually beneficial to the environment as very efficient decomposers of organic waste and a sustainable source of high-quality protein. Learn more about our production process and research at www.soldierfly.com
 

acespicoli

Well-known member

Making Fish hydrolysate

Picture

Fish hydrolysate is an awesome product for promoting plant growth. It’s high in Nitrogen, can be naturally produced, and is an awesome food for microbes. Fungi love it and it is easily produced at home. We use it as straight fertiliser, animal supplement and an ingredient in compost teas (Fungi: Bacteria balanced- Fungi orientated).

Fish hydrolysate is composed of fish and glucose based sugars and uses lacto bacillus to break everything down using enzymes. Fish hydryolysate doesn’t undergo the heating and skimming process that you get with fish emulsion products. Heating breaks down beneficial amino acid chains and this cold process also retains the fats and oils that microbes love.


How to make it;

1. Get some fish, you might as well use fish discards like fish heads, guts, etc. We use whole fish as there are naturally wider range of nutrients present.

2. Cut fish into chunks then either blend or run through a meat mincer. The finer the fish bits, the more effective the fermentation.

Picture

Cut fish into chunks

Picture

Blend or mince fish

3. Add water. We're adding 3 parts water to 1 part ferment material. (1litre fish mince: 3 litre water) ALWAYS USE NON-CHLORINATED WATER. Chlorine kills microbes.

Picture

Add sugars 3:1: here 750g fish:250g Sugarcane Molasses

4. Add 3:1 Fish: Sugar. Sugarcane molasses or Raw (unrefined/ unbleached) sugar is good.

5. Add lacto bacilli to blended fish mixture. Approx. 2tbsp per L. We used liquid from a Lacto ferment, eg, Kimchi/ Sauerkraut.

6. Now you have liquefied fish, sugar, and lacto. Pour this mixture into a container to ferment. Cover with a cloth/ mesh to stop insects, etc. The process takes anywhere from 2 weeks to over a month. You know its finished by the smell. During fermentation there is a pungent smell, but once completed there should be little more than a faint vinegar smell.
7. Transfer it to a smaller container

1707404505938.png

spolier alert for vegans :huggg: like it or not you can save the native fauna

Aquatic (water-dwelling) invasive species are non-native plants, animals, and other organisms that have evolved to live primarily in water (aquatic habitats) rather than on land (terrestrial habitats). Aquatic habitats are habitats that are covered with water all or part of every year. From oceans to bogs, many types of aquatic habitats exist.
Aquatic invasive plants include algae, floating plants, submersed plants, and emergent plants. Aquatic invasive animals include insects, fish, reptiles, mollusks, crustaceans, and amphibians. Other aquatic invasive organisms include pathogens (disease-causing organisms), such as molds, fungi, bacteria, and viruses. (Source - eXtension: Aquatic (Water-Dwelling) Invasive Species)
 
Last edited:

acespicoli

Well-known member

Fish and Other Aquatic Vertebrates​


Fish and Other Aquatic Vertebrates are members of the subphylum Vertebrata who spend the majority of their lives in freshwater, marine, or estuarine environments. In the United States, invasive aquatic vertebrates are primarily fishes (including Invasive carp), but may also include reptiles, amphibians, and mammals.
Citations:

Note: Our species profiles provide general information about species considered to be invasive. This is not a list of all invasive species, nor does our information have regulatory implications. The large numbers of invasive species prevent us from maintaining detailed information on ALL invasive species. In addition, determining the invasiveness of a species depends on a number of local factors, including type of habitat. Our species profiles are provided as an educational informational tool.

NOTE: Been fishing for a very long time DNR here says not to release a invasive back to non native waters
Another note never ate it but my buddy says snake head is one of the best eating fish hes had!!!
He even likes it better than walleye rockfish and tuna...so might wanna save those for the grill
1707405210640.png
 
Last edited:

acespicoli

Well-known member
Last edited:

acespicoli

Well-known member

5 Ways Blumat Watering Systems Benefit Living Soil​

https://irrigation.equipment/5-ways-blumat-watering-systems-benefit-living-soil/

1) Happy Microbial Communities​

Blumat systems keep constant, steady levels of moisture in soil. The regular supply of moisture keeps microbial communities happy, in homeostasis, and with the ability to multiply. With hand-watering systems, the dry/wet cycles can stress out bacteria and other microorganisms. When these organisms are stressed, they produce chemical compounds that can negatively affect your soil (anyone who has seen hydrophobic soil, or water that runs off the top of a container has seen this 1st-hand!) and plant health.
Hydrophobic soil is actually due to water-resistant glues produced by bacteria. The bacteria sense an impending drought, and produce a membrane around their colony that prevents moisture from escaping. However, this membrane also prevents moisture from getting in if the bacteria die! When you water your soil after it dries out, you might notice water running off the top and over the sides of the pot, rather than integrating with the soil. You’re watching the water contact these membrane compounds produced by bacteria.
These compounds are not easy to remove! By keeping your microorganisms healthy and happy, your soil and plants will stay happy too.

2) Goldi-Locks Moisture Zone​

Hand-watered gardens or those on timers go through fluctuations of moisture levels. If you water in the morning for example, it is likely your plants are over-watered for the beginning hours of the day. They are not in optimal growth/metabolism, and likely won’t be for several hours. Then as moisture levels get optimal toward the middle of the day, your plants begin to grow rapidly. As the soil dries toward the end of the day, plants slow growth as they work to conserve water supply.
Instead of going through a daily cycle where optimal growth is achieved for only a few hours a day, Blumat systems keep your soil in the “Goldi-Locks” Zone all the time. This means you will see bigger plants in shorter periods of time, and increased yields. When you are moving in/out of the Goldi-Locks zone, you are wasting precious time and opportunity. Blumats minimize moisture swings, and you will see this translate to constantly-vigorous growth and flowering.

3) Optimized Composting/Decomposition​

When moisture levels in soil are at optimal levels, this keeps the decomposition process in the soil going. Many cultivators top-dress or practice “no-till” style gardening. The decomposition process is done by worms, fungi, and other arthropods and microorganisms, and is key to rejuvenating your soil with vital nutrients. Without the decay and decomposition process, plants would have no available nutrients and could not grow!
Nutrient availability is optimized by catalyzing and encouraging these processes. The decomposition and composting processes require moisture, as the organisms consume moisture when they break organic matter down. When there’s too much moisture, pathogenic and anaerobic organisms can get a foothold in your garden and cause problems. By keeping moisture levels optimal, you encourage aerobic soil conditions, which means fast decay of organic matter, compost tea/extract, and top-dressed materials. That translates into faster plant growth and bigger yields!

4) Increased Fungal Activity​

Anyone who has grown mold (even on a sandwich, accidentally) knows it loves moisture. The same goes for beneficial fungi in the soil. Beneficial fungi are much harder to develop in soil than bacteria! These organisms are more complex than bacteria, and require optimal growing conditions and complex food molecules. They are less resilient than bacterial populations, and must be catered to.
While more difficult to keep alive, beneficial fungi also offer greater boons to plant health than most bacteria. Gardens with beneficial fungi thrive, and become more resilient to environmental stresses over time.
These fungi are more temperamental than the bacterial communities referenced in point 1). They like constant and steady supplies of moisture, and need them to survive and thrive. If you want to reap the rewards of these beneficial fungi in your soil, you’ll need to keep them happy with constant levels of moisture that blumat systems provide.

5) Eliminate Human Error​

Whenever friends visit my home garden and remark on the plant health, they are always surprised to hear how little maintenance I actually do. “Less is more” is the motto with blumat systems. In my days as a beginning gardener, I often caused more harm than good by giving my plants and soil “too much love.” You certainly can kill plants with kindness!
By installing a blumat watering system and automating your watering based on plant demand, you minimize the possibilities of making mistakes. Watering is one of the most simple aspects of gardening, and yet has the biggest potential to make or break a crop of any aspect of plant life.
Blumat systems take out the guesswork, and offer water “on tap” to your plant roots. Let them drink as they please, and stop harming your plants with good intentions
 

acespicoli

Well-known member

What IS Muck?


4/13/2015

6 Comments


Muck soils are a unique soil type that exists in pockets across Ontario including in the Holland Marsh and surrounding marshes, Keswick, Thedford, Grand Bend, and Leamington Marshes. They are found in low-lying areas, usually bogs or marshes, which have been drained. The organic matter, commonly peat, that is found in the bottom of these bogs forms the basis of the soil. The peat base also gives the soil a spongy texture which is most noticeable when walking through a field and feeling the bounce. It has several characteristics that separate it from mineral soil including colour, organic matter content, fertility, and size.

Picture

Figure 1: Examples of (from left to right) sandy, silty, clay, and muck soils. [Sources: http://www.nrcs.usda.gov/wps/portal/nrcs/detail/soils/survey/office/ssr7/tr/?cid=nrcs142p2_047969 / http://nesoil.com/images/enfieldRI.htm / http://www.nrcs.usda.gov/wps/portal/nrcs/detail/nj/soils/?cid=nrcs141p2_018867 / http://www.cals.uidaho.edu/soilorders/histosols_04.htm ]

Picture


These soils are easily identified by their colour (Figure 1). Muck has a high concentration of tannins which gives it the distinct black colour. Organic matter, which can be divided into three categories of plant residues and living microbes, detritus, and humus, form less than 10% of mineral soils (CUCE, 2008). Muck soils are made up of between 20 and 80% organic matter. Soil fertility is tied directly to the decomposition of plant residues, dead microbes, and detritus; because of the greater proportion of organic matter present, muck soils are more fertile than mineral soils (CUCE, 2008).


Muck soils are comparatively similar to clay and silt particles in size, but have less than half the specific gravity of them (Table 1). The muck particles also don’t aggregate like mineral soils. Thus, even though individual particles of mineral soils can be quite small, the aggregation will create a larger mass. The lack of aggregation in muck soils combined with the low specific gravity means that muck is susceptible to being picked up by the wind and blown around, creating something that is similar to a sand storm.

Really owe this knowledge to @Greg
 

acespicoli

Well-known member
1710946261528.png

1710946292054.png

Fresh epsoma is ammonia fresh so pre mixing for the nitrification cycle can be beneficial
Also seeding fresh mixes with the bacteria

Typically, the pH of an ammonia solution will be between 11 and 12, compared with a pH of about 14 for sodium hydroxide solutions.
1710946689629.png

1710946820432.png


The aerobic nonphotosynthetic lithoautotrophs are those bacteria that not only use carbon dioxide as their sole carbon source but also generate energy from inorganic compounds (electron donors) with oxygen as an electron acceptor.
1710947469355.png

 
Last edited:

acespicoli

Well-known member
The purple color is promoted by foliar feeding twice a week, using a special fertilizer mixture we call Purple Juice. Purple Juice is derived from bat guano, chicken manure, sea kelp, blood meal, mung beans and our secret sauce (ascophyllum nodosum). This hydrolyzed mixture of organic precursors is utilized by the plants’ metabolic pathways to assure intense color and increased yields. We apply to undersides of leaves in the morning once a week using a garden sprayer, and use for soil feeding every third watering of plants.
 

acespicoli

Well-known member
BREW IT YOURSELF
June 1 2012 David Bienenstock
BREW IT YOURSELF
Compost tea provides a 100 percent organic fertilizer-and-pesticide combo capable of feeding your plants exactly what they need while keeping pests and diseases at bay—all at a fraction of the cost of conventional products.
David Bienenstock
When you’re growing ganja way off the grid, it’s vitally important to become as self-reliant as possible. At this lovely medical marijuana garden in Northern California, that means not just cultivating your own medicine, but also growing your own food, brewing your own beer, sewing your own socks, pickling your own vegetables, playing music on a guitar instead of an iPod, and learning a million other frontier skills that quickly become crucial when you’re way up in the mountains, more than an hour from the nearest small town.
For the record, these modern-day homesteaders grow amazing marijuana and brew only so-so beer. Of course, that may be because the “homebrew” they’re most proud of is meant for the garden, not the gardeners.
“Compost tea is the foundation upon which the entire success of our farm depends,” says Spore, the head gardener and plant manager of this operation. “We use it to create an ideal soil for growing ganja, to provide our plants with the nutrients they need, to protect them from insects, molds, diseases ... I can’t tell you the number of different products compost tea can replace, for a lot less money.” Compost tea starts, obviously enough, with compost, a mix of decaying organic matter that farmers of all kinds have used
since the dawn of agriculture to enrich their soils. Organic compost can be inexpensively obtained from your local garden store and mixed directly into your existing soil—or, better yet, you can build and maintain your own compost pile as an easy and cost-effective way to supply your plants with the nutrients they need to thrive throughout the growing season.
One important thing to be aware of, however, is that there’s a world of difference between a compost pile and a garbage heap. So while it’s not that hard to make garden-ready compost, you do have to follow this basic recipe diligently or you’ll end up with a stinky, useless mess.
Start with a mix that’s 25% highnitrogen ingredients (such as manure, legumes and grass clippings from early spring), 45% green ingredients (like
green plant debris, food scraps and coffee grounds), and 30% woody material (like dried leaves, wood chips and shredded newspaper). You’ll need to create a compost pile with a mass of at least one cubic yard of this combined material to ensure that, as it decomposes, the pile reaches a temperature above 135°F and stays there for three days-long enough to kill off weed seeds, pathogens and cannabis-eating nematodes.
Measure the pile with a long-stemmed thermometer that can reach its center in order to verify the temps. When the temperature reaches about 155°F, turn the pile over with a pitchfork so that the cooler outside material is now on the inside and has a chance to get hotter in its turn. Keep in mind, however, that the inside of the pile must always remain below 160°F, since that’s the point at which the beneficial microorganisms within the compost will start being killed off.
For the first week or so, expect to turn the pile every day or two, then much less frequently after that. In a few weeks, the temperature will gradually start to drop— a sign that the compost is maturing.
About two months after you’ve started, the center of the pile should be cool or barely warm to the touch, which means that it’s ready to add to the garden.
“Proper compost has an amazing aroma,” Spore reports. “It might be an acquired taste, but it’s certainly not overtly unpleasant in any way—unless you fucked it up.”
So that takes care of the compost. But if compost is so great on its own, why bother brewing compost tea?
Primarily because that’s the most efficient way to get all of the beneficial microorganisms living in the compost to your plants in a form they can readily absorb, while also speeding up the breakdown of any toxins in the surrounding soil. Compost tea supports plant growth in two key ways: First, it helps to build a “soil food web” by introducing billions of beneficial microorganisms and nutrients into the soil in a way that makes them readily accessible to plant roots. Second, at the root level and especially when used as a foliar spray, these same beneficial microorganisms protect the plant from pathogens, molds, insects and other buzz killers.
In Spore’s garden, with its dozens of large outdoor plants, the head gardener has several compost piles going at any one time, which he uses to brew up large batches of compost tea at key points in the growing season. To handle his needs, Spore has also acquired a relatively simple pre-made compost brewer capable of producing 50 gallons of the tea at once, which is then delivered by hose to the garden, where aerating wands allow the growers to apply it both to the plants’ roots and to the leaves as a foliar spray.
COMPOST TEA INSTRUCTIONS
REQUIRED MATERIALS y An aquarium pump
(with at least three bubblers or air stones) y Several feet of tubing
> A gang valve
y Unsulfured organic molasses An old pillowcase (to strain the tea)
> Two 5-gallon plastic buckets Compost
(from a homemade pile or store-bought)
NOTE: If your water comes from a city source, you should start by filling one of the buckets and running the bubblers in it for about an hour to remove any chlorine, which can kill the beneficial organisms in your tea. Well water can be used straight from the spigot.
Over time, Spore has developed his own special recipes for the vegetative and flowering stages that incorporate locally sourced organic amendments. “Aside from the benefit to plants, compost tea is also by far the most environmentally friendly way to grow cannabis,” he explains. “Teatreated plants don’t need chemical nutrients and pesticides, they require less water overall via increased retention, and they don’t require shipping in tons of soil and amendments from distant, ecologically sensitive lands. And, oh yeah—the buds smell and taste fantastic!”
Naturally, not everyone has quite as many plants to tend as Spore does, so over a few glasses of homebrewed beer, we decided that it would be most helpful to HIGH TIMES readers if we provided a set of instructions for constructing a simple, inexpensive compost-tea brewer that anyone can build at home using an aquarium pump and a few other basic items from the hardware store.
This simple bucket system is based on instructions from Elaine Ingham, a recognized leader in the field of microbiology and the author of The Compost Tea Brewing Manual. So start small, witness the amazing power of compost tea firsthand, and you’ll soon become a convert.
BENEFITS
Compost tea is 100 percent organic and has been shown to:
Suppress pythium, phytophthora, powdery mildew, fusarium and other plant pathogens.
Reduce or eliminate the need for chemical pesticides and fertilizers.
> Increase retention rates for water and nutrients.
) Break down toxins in the soil, helping root systems to thrive.
y Save growers a lot of money while boosting both the health and yields of their plants.
After three days of constant brewing, remove all of the equipment from the bucket and let the
tea sit 10 to 20 minutes to allow the compost to settle to the bottom. Empty the contents into the other bucket using the pillowcase to strain out any solid compost. You should yield about 2.5 gallons of usable tea, while the strained-out solid matter can either be returned to your compost pile or added directly to the soil.
At this point, you can also add any foliar micronutrients to the tea (such as rock dust and kelp) that you think will benefit your plants.
APPLICATION
Since compost tea works by bringing beneficial living organisms to your plants, it must be applied to the soil or used as a foliar spray immediately after you finish brewing. Compost tea is best applied in the early-morning or earlyevening hours, so plan accordingly before you start brewing.
As a foliar spray, compost tea is ideally used as a preventative applied to the leaves at the beginning of the season, before problems develop, and then reapplied every two weeks or so until flowering (or as the need arises). Any type of spray bottle designed to apply pesticides can be cleaned and converted into a composttea sprayer.
Compost tea gardeners also use the tea as a soil drench, applying it heavily in the beginning of the season in order to build up a “living soil" filled with beneficial microorganisms, and then reapplying it all the way up to the flowering stage to support the formation of strong, resinsoaked buds.
 

Latest posts

Latest posts

Top