What's new
  • Happy Birthday ICMag! Been 20 years since Gypsy Nirvana created the forum! We are celebrating with a 4/20 Giveaway and by launching a new Patreon tier called "420club". You can read more here.
  • Important notice: ICMag's T.O.U. has been updated. Please review it here. For your convenience, it is also available in the main forum menu, under 'Quick Links"!

Breaking Bud w/ Drop: A mobile hydroponic RV grow room trailer conversion gone mad!

Drop That Sound

Well-known member
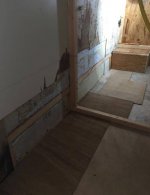
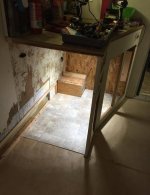
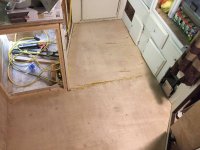
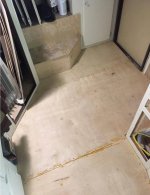
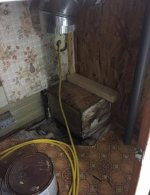
It was time to take on another boss. I didn't take too many pictures, but you can sort of see what I was dealing with. I got rid of the worst rotten floor panel sections under the cabinet. Some so soft and dry under the lenoleum that I could poke my finger through to the foam. I had already dug out most of the rotten wood frame boards down in the metal skirting, as I had access from inside, and everything was pretty dried out since.

Everywhere you see shadows/gaps was framing, that had eventually rotted away from moisture (I think the sink plumbing might have leaked at some point too, and the main door frame as well as the bad spot on the metal skirt).

On the missing floor joist section closest to the flower room wall/wheel well, there used to be two or three 1/2" pex like water lines running along the floor joist, and underneath the second floor panel layer from the other side with the water heater to feed the sink. And one for the main water tank that used to sit under one of the dining table benches. They did have some water when I removed them months before, so they could have leaked too and contributed to the rot.


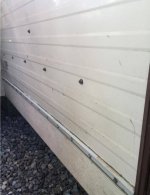
Outside, I had used a large prop stick and barely jacked the side wall of the trailer up, to take the stress off the whole area. Enough framing had rotted away that the lower outer side wall of the trailer kind of bowed out where the siding meets the skirting. Jacking inwards and upwards a tad on the upper part of the exterior wall made it go away.


Notice there is a rounded bolt head sticking up by the wheel well where the missing floor joist is... That's where the trailer frame runs underneath. I later re used it to bolt the new floor joist board down, that had I pounded all the way across and underneath the floor, to the other side of the trailer, from outside when I peeled up the metal siding and skirting. Tricky as heck but I pulled it off, and hard to explain exactly.

I went right next to what was left of the old one, down the empty channel where the water lines once were, as there was a perfect sized empty slot, and no foam in the way either.


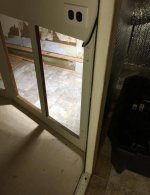
Also notice the grey pipe, that's the conduit where my main power cord runs down through, both the countertop and floor. The sub panel is up directly above on the wall. Next to the pipe down by the floor, I'll be drilling a couple 2" holes through the wall to bring return large 2" plumbing lines to each of the control reservoirs, from the 2 RDWC systems coming from the flower room on the other side.


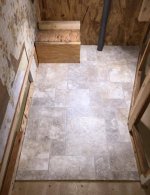
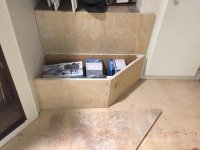
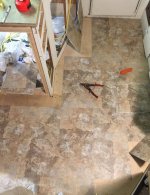
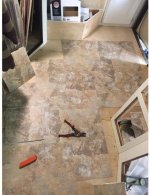
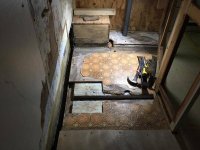
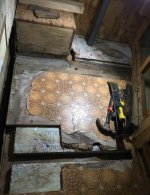
Finally having a good solid plan worked out, I just kept working and doing the best job possible, from inside a cramped cabinet no less. I would seal things up with different products, and start framing back in all the missing and extra lumber, ten times better than they way they built it in the first place. I fixed up the inside wheel well panels from underneath too, and sealed it off better, just in case the trailer ever see's a rainy road during a move. The other side of the trailer is all good at least, and should stay that way as I sealed everything over there too..


Man, most travel trailers and RVs are made cheap I tell you! Not meant to last at all. Absolute junk really. Good thing I have been levelling up my skills and learning how to repair them, and know exactly what to look for before I would ever buy one again. Haha I wouldn't unless its free, and probably not even then. Well. Maybe.

If I had to start over I'd just build a tiny house or enclosed cargo like structure on a bare trailer frame, and probably wouldn't choose wood to construct it with either. Steel or aluminum and composites only. Better yet just use a 28ft or longer semi dry van, but that's for another project on my list.

Just a heads up in case anyone gets inspired here to convert an older or even brand new trailer, your sure to run into many problems that get in the way of the build....
 

Attachments

  • IMG_2032.jpg
    IMG_2032.jpg
    53 KB · Views: 95
  • IMG_2168.jpg
    IMG_2168.jpg
    62.4 KB · Views: 99
  • IMG_2169.jpg
    IMG_2169.jpg
    75.9 KB · Views: 100

Drop That Sound

Well-known member
With the demo job going on, and taking so much time, I didn't want to bring in any plants yet, and be stalled off for the third time. I really wanted to hook up the RDWC flower room systems that I had collected all the parts for, and was itching to get something going, so instead I set up a little greenhouse right next to the grow trailer. I figured having one next to it could be a good idea, and a place to dump exhaust heat, or even slightly used runoff from res changes during fall/winter grows. I consider it an attachment to go along with. I even got a bare trailer frame to make it (or another better one) mobile too eventually, once my indoor trailer is done first of course.

I used an old trampoline frame with some top rails, to make a hoop like structure, and covered it with plastic. Made a plywood and pallet deck inside, with some green turf carpeting on top, and slapped a brand new undercurrent system together in a few hours. Stole a few little parts from my other kit to make it work.

A little something to keep me happy until I got to a better stage on the indoor build. Oh and the plants that were growing in Mr Whites living room again too. :biggrin:
 

Attachments

  • Week 3 of flower
    Week 3 of flower
    91.2 KB · Views: 110
  • IMG_2930.jpg
    IMG_2930.jpg
    66.1 KB · Views: 92

Drop That Sound

Well-known member
Nice and clean instalations, thanks again forsharing this!

For sure! Thanks again for letting me park my trailer here. It was getting kinda lonely out there in the desert working on it all by myself. :tumbleweed: Oh and about those lot fees you wanted, and the extra high power bill.. I'll uhh... Ya, er, uhhh...
 
Last edited:

Drop That Sound

Well-known member
Guy's look what I just found:


cheeisenberg.jpg


Cheeisenberg Feminized Cannabis Seeds
Cheeisenberg Feminized Cannabis Seeds by Breaking Buds Seeds: Cheeisenberg was born out of an auto pollination of a clone from UK that reached its apogee in the mid-90s. This clone moved from hand to hand until ending up in an alternate community that used to organise free parties in order to support and claim for the legalization of cannabis. In these parties some samples of this variety were shared among participants and this strain spread rapidly throughout Europe.
Cheeisenberg predecessors presented scrawny structure and branching, which was unbearable due to their big and heavy buds. That is why we had to choose the strongest and highest parental lineage for Cheeisenberg and, by doing that, generation after generation and in an evolving way, we finally got stronger and more resistant plants.
Suitable for experienced growers. It misbehaves with novice growers, but actually it's something you can deal with when using foliar feeds or a higher dose of micro elements. It behaves very well indoors, reaching a production rate upto 1gr per watt. This all terrain will do fine in any kind of substrate and it adapts perfectly to all types of hydroponic cultivation.
Its strong scent is easy to recognize from its early stages. It penetrates the walls of your wardrobe or even your house even days after the harvest. Its dry scent reminds of nachos or corn curls. If you're thinking about having a macro or mono cultivation, Cheeisenberg is your plant.


Haha, I'm totally gonna have to get some seeds from Breaking Bud Genetics now.. The Crystal Meth strain too.
 

Drop That Sound

Well-known member
Once I removed the exterior seam trim (where the lower metal skirting meets the metal siding, at floor level) and what was left of the rusted out screws holding it up, I was able to pull the metal away and actually get to what needed to be done.

New framing down in the skirt channel, from the wheel well all the way towards the front loft, even going under the main doorway. It was all rotted. And above the floor in the wall too, extra places as well to attach wall panelling.

Also in the floor under the cabinet. I had replaced the floor boards by pounding new ones in, going under the main work room floor, after I dug out the old ones as far as I could. Had to do it from the outside when the siding was out of the way. I bolted the the one floor board down where the metal trailer frame is, right next to the old hole. I had to drill through the frame, and also countersink the board so the bolt head wouldn't stick up. Then I patched in the empty spaces over the new floor boards with plywood and foam.

Then, from outside the trailer again, I put the metal siding and skirt back together, up against all the new framing in the walls (which was tied into the new floor as well making it super strong again). I used new butyl putty tape and sealed it all back up. I used new roofing screws with the rubber lined washers to put the trim piece back on. I also decided to throw some more roofing screws right in the metal siding, where the new wall framing was. Kinda ugly but serves a good purpose. I used metal roof sealant anywhere the was a seam. The metal siding used to actually be glued to the foam wood panels, and now it wasn't, other than me spraying some aerosol adhesive the best I could without peeling it up worse.

I could release the prop stick + ledger boards outside, and it didn't bow out and sag anymore. Solid :)

Afterwords, I made a one piece plywood floor board cut from template, and managed to stuff it down in the cabinet floor, right over the old patched up floor, and even around the conduit with 240 volts running through.

A few other new panels I replaced too, like on the wheel well. Screwed & glued the heck out of everything, and made sure everything was sealed up good. There was even a small stud running all the way up to the upper cabinets, making the whole wall pretty stout. from bottom to top.

After I determined the whole side wall area, and the floor under the old sink cabinet was solid AF, I put another small roll of vinyl flooring down, and replaced the foam insulation. No more hiding it all with boxes in the way. It was nice to look at, and know it was done right!
 

Attachments

  • IMG_2185.jpg
    IMG_2185.jpg
    31.8 KB · Views: 89
  • IMG_2184.jpg
    IMG_2184.jpg
    44.3 KB · Views: 89
  • IMG_2182.jpg
    IMG_2182.jpg
    30.2 KB · Views: 91
  • IMG_2181.jpg
    IMG_2181.jpg
    60.2 KB · Views: 99
  • IMG_2180.jpg
    IMG_2180.jpg
    48.3 KB · Views: 95
  • IMG_2187.jpg
    IMG_2187.jpg
    40 KB · Views: 92

Drop That Sound

Well-known member
Oh I almost forgot. As usual, things can never be going too perfectly, as I've come to find out...


While I spent days being cramped up under a small cabinet doing RV surgery with my neck kinked up, the 1000 watt 7.1 channel stereo system I had bought just for the grow trailer decided to crap out. Happened after I tried plugging my phone into the MP3 USB flashdrive slot to charge it up. Man, I had barely even listened to it, and hadn't even unwrapped most of the speakers, that were gonna go in all the rooms with wall mounts. The sub/receiver box failed and wouldn't light up. Never could figure out how to fix it. Ah well, I might still use the speakers, and mount one of those mini bluetooth amplifiers to the top of the sub.

I mean, not that I could really hear it anyway over the sounds of sawzalling, multimax oscillating, grinding and whatnot. But still..

I think losing the basically brand new sound system was the real villian of this season 3 of Breaking Bud.

Don't let my whiny post about dealing with major F'ing RV repairs discourage you all from a cool mobile grow trailer conversion build of your own. Any can be made into a clean stealth grow space in no time, but..It's crap like losing your stereo that really makes it difficult!
 

Drop That Sound

Well-known member
After getting the hardest RV repair job yet completed, I could start tricking it out the way I wanted.


The 2 cabinet doors would be access to the 2 RDWC flower systems control reserviors. 1 behind each door, for each system, using trash cans with flip top lids. Also room down under there for a chiller, and another door to access it to the left of the control res access doors.

I wanted it to be water proof as well so I made more little wall splash guards to go all the way around the floor in the cab. Also new plywood wall panels to replace the water stained parts I ripped out.

I decided I'll use Plastex plastic wall panel to cover the walls inside my res cabinets, instead of reflectix bubble wrap, to be more waterproof. $20 a sheet isn't bad either, and will cover quite a bit of space. I might even use it in more areas where water will be.


I fixed up the loft steps, put new panelling over the old, so tiles would stick better. It used to be ugly brown carpet that I ripped out, and had tons of staple holes everywhere.

Also I made a new lid for the lower step, where the veg chamber hydroponic system pump house would now be. Room in there for a strainer and a 1360gph pump!


Then, I smoothed out the new plywood underlayment in the main walkway, sanding it out, and got it ready with a few coats of floor tile primer to seal it all up.
 

Attachments

  • IMG_2193.jpg
    IMG_2193.jpg
    40.6 KB · Views: 90
  • IMG_2192.jpg
    IMG_2192.jpg
    31.4 KB · Views: 91
  • IMG_2191.jpg
    IMG_2191.jpg
    33 KB · Views: 96
  • IMG_2190.jpg
    IMG_2190.jpg
    55.8 KB · Views: 90
  • IMG_2189.jpg
    IMG_2189.jpg
    47.9 KB · Views: 99

Drop That Sound

Well-known member
Season 3 Finale:

Season 3 Finale:

And to wrap it up, I finished out the main work room flooring.

Used sticky tiles for now, figuring I will replace them with something else someday if they get too beat up, and will be easy to remove them if or when I do. The primer alone sealed the wood pretty good, in case of little accidents. Everywhere else that would be holding water basically has a built in drain pain as the floor, so no real chance for floods over the sticky tiled floor. I'll make it 100% waterproof someday as well.


It was mid summer 2018 when I left off, making Season 3 a shorter one, but taking care of one of the biggest problems. I had taken on a huge job elsewhere at the same time, that lasted the rest of summer too. Also started another big unrelated project of my own, that I worked on all through the next year in 2019 too. I was too busy to get anything done, or get it up and going again.

I had my outdoor RDWC greenhouse going through that fall too, so that run has kept me supplied... up until I just ran out a few months ago from today.


So that was pretty much it, so far anyway! I had finished the floor off, and then started using the grow trailer as a heated tool\supply shed. All the parts, materials, and supplies for the hydro systems + future trailer upgrades I had collected all got boxed up and stashed in the corners. The rooms piled up quick with all kinds of stuff I've brought in, to the point I could barely get in and out of the trailer to grab tools since then.

I've kept the radiant heater on the lowest possible setting depending on the weather the whole time, and everything has stayed just the way I left it, minus a little dust here and there.


And now, I just about got it all cleared out again. ready for another upgrade/grow season.. and chillin' out in the RV in my undies, cooking up some new ideas :smoke:
 

Attachments

  • IMG_2194.jpg
    IMG_2194.jpg
    68.4 KB · Views: 88
  • IMG_2195.jpg
    IMG_2195.jpg
    65.4 KB · Views: 92

Latest posts

Latest posts

Top