What's new

from Seeds to Seedlings in Soil (play-by-play)

Shmavis

Being-in-the-world
Hello ICMag Friends!

I’d like to share with you what I’ve been up to this past week and a half. And why.

I am a Newbie here. This is the first site of this sort that I’ve ever searched, let alone joined. (I’m still somewhat it awe of all the great knowledge and information here. :respect:)

I’ve noticed in my time here that some new growers struggle with going from Seeds to Seedlings in Soil. It breaks my heart to see babies - and subsequently their caretakers - suffering like this. This has inspired me to document and share a seed pop.

I’m no expert by any stretch of the imagination. And over the years I have made more than my fair share of mistakes along the way (still do!); but I have learned from most of them. And more often than not my method results in happy healthy seedlings.

That said, I thought I’d like to do a detailed play-by-play with lots of pics (I know visuals help me) of how I go about it. If it benefits just one new grower out there, then it will have been worth my time. I was going to post this once completed. But it now looks as though it will be easier to do this in real time. (Probably be better anyway, if we’re all in on this together.)

So let’s get y’all caught up to real time!


Germination:

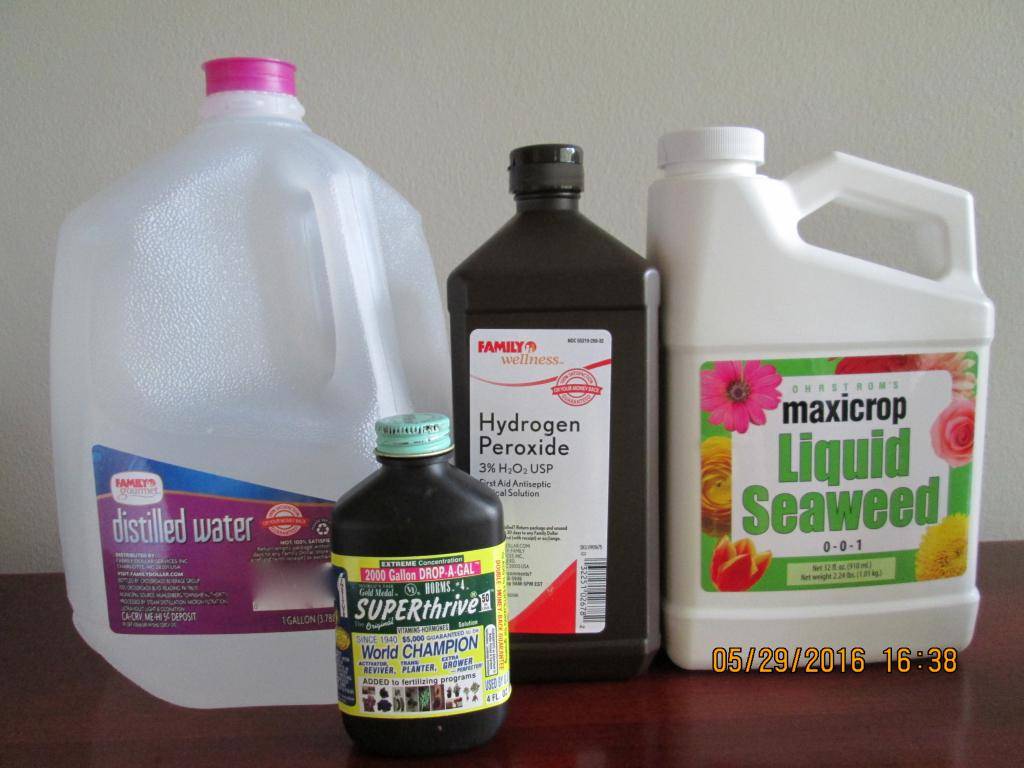
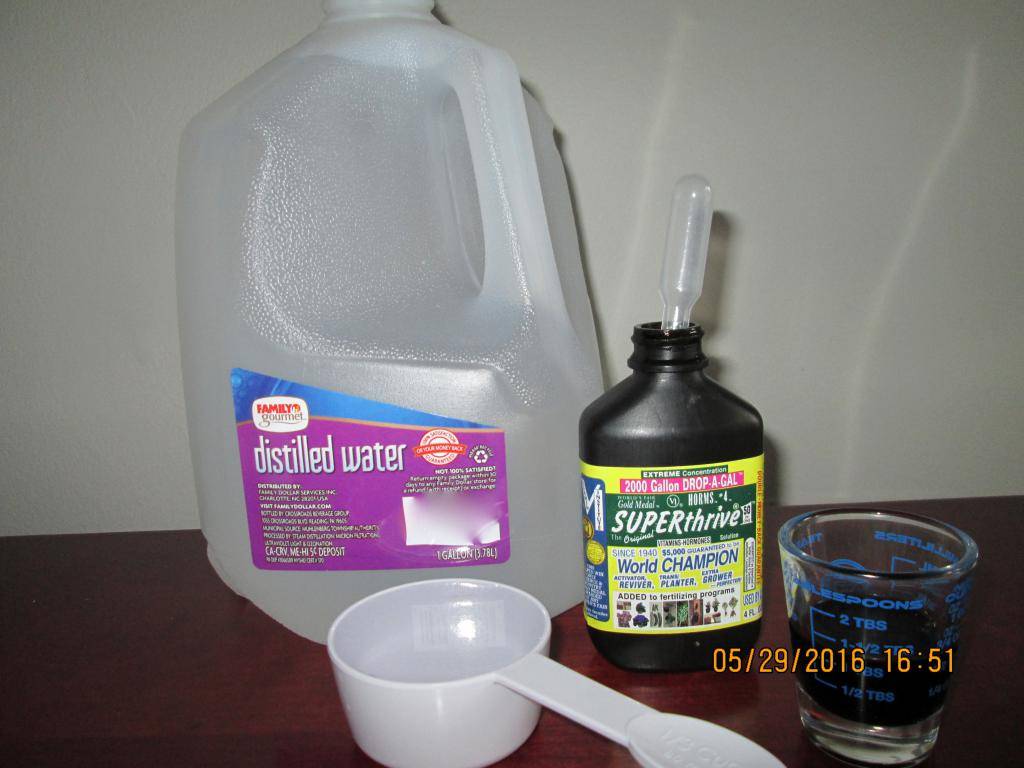
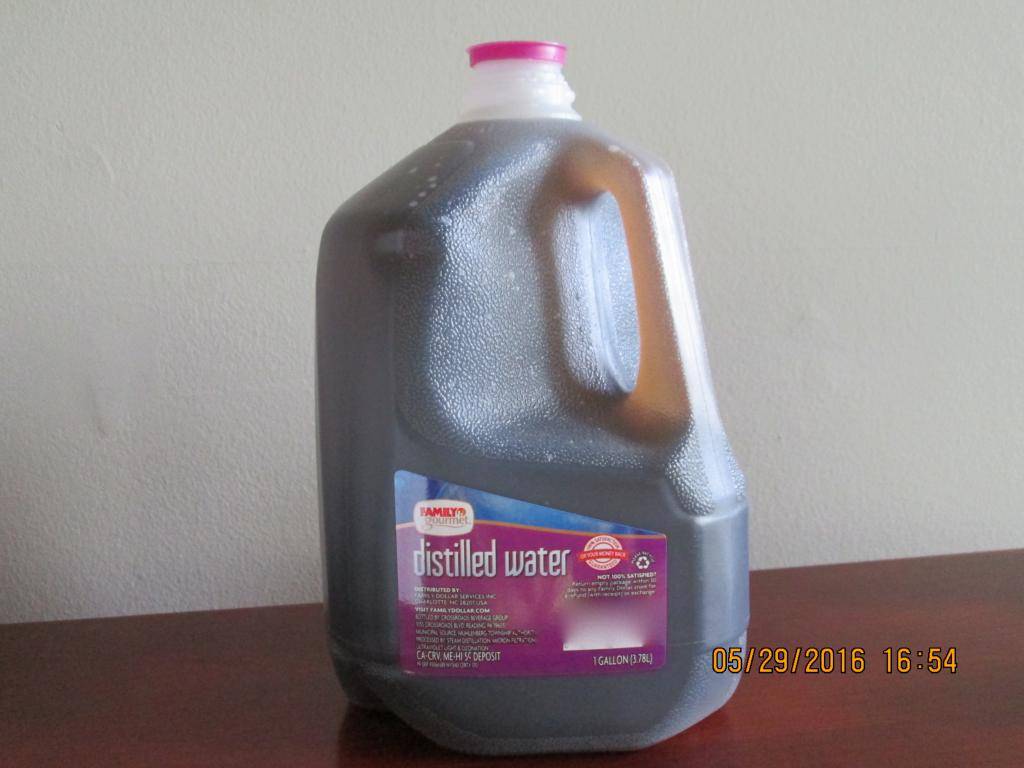
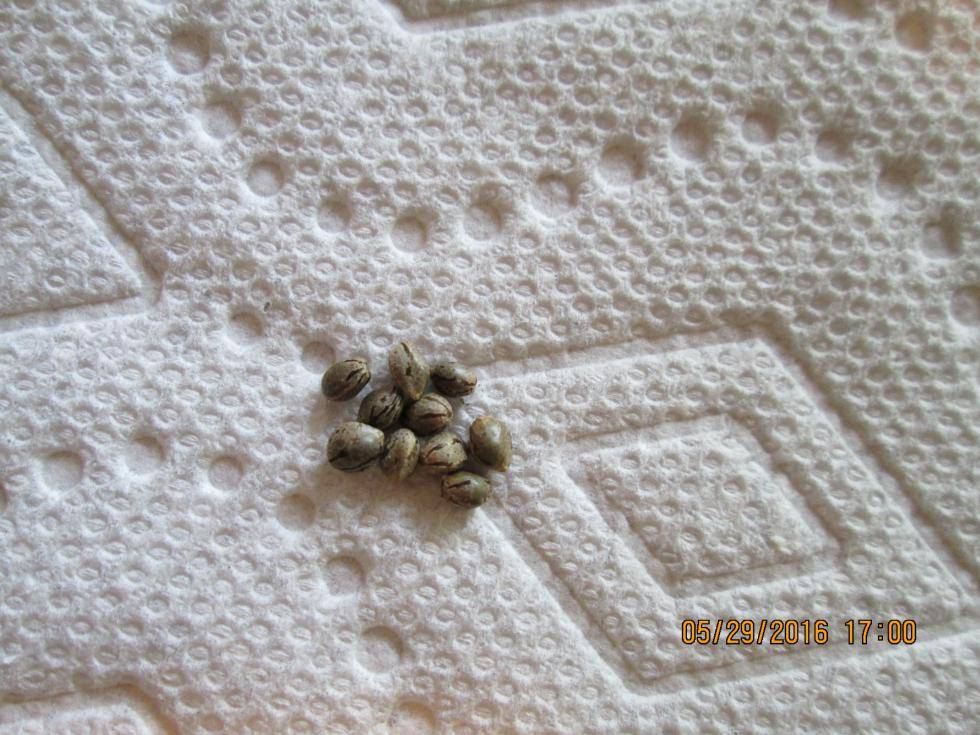
One gallon of distilled water. Pour out roughly a half cup. Add to the water 1/2 ounce of maxicrop, 1/3 cup hydrogen peroxide and two drops of Superthrive. Pour a few inches of this solution into a cup. Toss your seeds in. Once they sink they’re ready for a paper towel nap. I let these soak overnight. Next morning I found they all had sunk. This was a bit more than ten hours. (It’s fitting that the pic is kind of blurry as it was a holiday weekend and I was feeling a bit blurry myself that morning.) They’re now ready for a paper towel nap.

picture.php

picture.php

picture.php
picture.php
 

Shmavis

Being-in-the-world
picture.php
picture.php
picture.php


Paper Towel Nap:

I use two full sized sheets not ripped apart. Fold in half. Fold in half again. And again. And one more time. Soak the towels with the solution. I just pour it over them over the sink. Wring out. Don’t wring out too much, but at the same time you don’t want the towels literally dripping — need a happy medium here. Add your seeds. Fill a spray bottle with some of the solution. Mist the seeds before folding over the paper towels and placing them into a sandwich bag. Toss the bag on top of the fridge. I have a cabinet above my fridge so no direct light gets to the bag. (If the cabinet were not there I’d place a paper plate over the bag.) Check the bag regularly. At least once every twelve hours. (I keep the spray bottle nearby and spritz them each time I open the bag to check their progress.)

picture.php
picture.php
 

Shmavis

Being-in-the-world
picture.php


Seed Starting Soil Mix:

OK. While we wait for babies to pop, let’s mix up our medium. First things first. Don’t forget your proper safety gear... Overkill? For mixing up such a small batch - probably. Did I wear this to mix up this little bit? No. But when mixing a soil recipe that calls for 8 quarts of perlite, I most definitely do. Perlite dust (and it’s dusty!) is not something you want to be breathing in or getting in your eyes.

picture.php


This seed starting medium will consist of equal parts Fox Farm Light Warrior, Ocean Forest and Perlite. I used an 18 oz SOLO cup. I’m a big fan of seed starter peat pots. These fit perfectly in a tray when ran vertically. You can get five in there for a seed pop of fifty. Since we’re not doing anything of that size, I’ll run it horizontally for better placement under the light. Fill the peat pots with the mixture. This is a well aerated mixture and as such I pack it rather tightly into the pots using my thumb. Now we’re ready for when the babies pop... Looky here! We’ve got taproots! Eight of ten so far. About 25 hours of napping. We want to get those that have popped down for their dirt nap, don’t wait on the other two.

picture.php

picture.php
picture.php
 

Shmavis

Being-in-the-world
Sowing Seeds (aka Dirt Nap):

For this you want a sharpened pencil and tweezers. Thoroughly water peat pots for the number of seeds that have popped. Notice this brand that I’m using (Plantation) has channels joining some of them. So I made sure I left dry two that join together. Note the amount of runoff in the tray. Leave it in. Now take the pencil and poke into the center of the watered cells just to the end of the sharpened area. Once the holes are poked grab the tweezers. Gently grab a seed so that the taproot is pointing down. Guide it into the hole. Lightly push some of the mixture over top of the seed. Do not push down or exert any real pressure. Just cover it up. Take the spray bottle and give a couple spritzes directly over the seed. Repeat until they’re all down. Cover with a humidity dome (vents closed) and turn on your fluoro. I’m using a 125 watt compact fluoro here... G’night babies; wake up soon!

picture.php
picture.php
picture.php
picture.php

picture.php
 

Shmavis

Being-in-the-world
Check it out! A few hours later our two holdouts have popped! They’re down for the nap too and as you can see here, we have a good sweat going on:

picture.php
picture.php


Oh yeah! Two babies are awake after roughly thirty-six hours of dirt napping. And then about forty-eight hours later all are up with one exception. Looks as though we may have a soldier down. I had to carefully pry the husk from that pale baby... Ah, looks like some minor surgery will be required. See the sheath holding her closed? Let’s see if I can help out... looks successful! 100% germination. :groupwave:

picture.php
picture.php
 

Shmavis

Being-in-the-world
picture.php
picture.php


At this point I like to start drying things out. During the day I opened the vents on the dome and then I removed the dome and lowered the light for the night. (four days after the initial watering and sowing). The fan is on low but not pointed directly at the babies. I wouldn’t recommend leaving them unattended when uncovered for the new grower... I have a pretty good sense of how fast they dry out so I felt pretty safe doing it overnight. That’s another nice thing about these peat pots. They’ll dry out fast. This will help with the expansion of the root system. They’ll start reaching for water. You can see that they’ve dried up some. There’s no longer any standing water. Time to mix up some tap water. To this I added a 1/2 oz maxicrop and 1/2 tsp of Thrive Alive B-1. Balance Ph to 6.5. Add to a spray bottle and mist the babies. Also spritz the peat pots... it’s time for a second watering... for the remainder of their time in peat pots they will not be watered with the watering can, but instead with the spray bottle.

picture.php
picture.php

picture.php
 

Shmavis

Being-in-the-world
picture.php
picture.php
picture.php


So to sum up: the last pic is where we’re currently at. Ten days from seed. They’ve been misted and received their second (light) watering. Won’t be long and I’ll be transplanting into SOLO cups.

I’ll update as they move along...
 
Great thread Shmavis! Timely too. I had "so so" germ rates recently. I know I jumped the gun on popping the seeds out of frustration. I should have waited a week to get things completely sorted. I did get 10 for 10 on my Shishkaberries though. I'm gonna study your guide before I pop more beans in two weeks.

LH
 

Shmavis

Being-in-the-world
Great thread Shmavis! Timely too. I had "so so" germ rates recently. I know I jumped the gun on popping the seeds out of frustration. I should have waited a week to get things completely sorted. I did get 10 for 10 on my Shishkaberries though. I'm gonna study your guide before I pop more beans in two weeks.

LH

Hiya LH.

Ten for ten with one... kind of calls into question the viability of the others. Or so it would seem, all things being equal.

Hope you find a tip or two in here. :tiphat:

great thread man thank you

You're welcome. Hope it helps!
 

Shmavis

Being-in-the-world
Alright. So the last couple days I’ve been misting the babies regularly. The dome stays off and the light is lowered when I’m around. The dome stays on when I’m at work and when sleeping. They’re starting to root up rather nicely. This is what you want to see, along with a thickening of the stem and changing of color just above the cotyledons.


picture.php
picture.php
picture.php


These are definitely ready to be transplanted into SOLO cups. Last few years I’ve been using 18 oz square bottomed cups. Really like them. So that’s where they’ll be going next...

I’ve decided to do this in halves. This will conclude the first half. I’ll be back in roughly two to three weeks with the second half. It’ll be more coherent if I compile it beforehand. (And I now have a better understanding of how pictures are handled here.)

Coming Soon: Goin' SOLO
 

Shmavis

Being-in-the-world
PART II

PART II

Goin' SOLO:

We’re back!

So we left off with the babies at eleven days from seed and ready to be transplanted. I’m transplanting these into the following soil mixture: One bag each of the following Fox Farm products: Original Planting Mix, Ocean Forest, and Light Warrior. To this add 1 cup Happy Frog Fruit & Flower 5-8-4 and eight quarts of perlite and mix well. This will make roughly thirty-six gallons worth. I split it in half and store in eighteen gallon totes with air holes drilled in the top. Splitting in half helps considerably for handling. So let’s get to it!

I did a shitty job with this. I was short on time and didn’t get the proper depth and soil level for each one. But it shouldn’t be a problem. Here’s what you want to do: First add some mix to the bottom of the cup. Position your baby to get an idea if you need to add more mix or remove some to get to a point where your baby is in soil up to the cotyledons, but there’s still about a half to three-quarters of an inch from the brim of the cup to the soil. Backfill accordingly. It helps to peel away the top edge of the peat pot. It’s not necessary but I recommend doing it. I didn’t have time to do it with all of these... Once all the babies are down, heft a cup to get an idea of its dry weight and then water thoroughly. To the point of runoff. Lift again to know the weight when watered. Lower the light, kick back and wait. No more dome. The tent itself will serve as a dome of sorts. There’s no intake or exhaust in this tent. The only airflow is provided by the little fan. So I like to open the tent regularly to allow for fresh air. The high humidity and temp readings are when the tent is closed up. The lows are when it’s open. Do not water again until each cup has returned to its dry weight. Some will be ready before others. Here they’ve all been transplanted - twelve days from seed.

Let the fun begin!

picture.php
picture.php
picture.php
picture.php
picture.php
 

Shmavis

Being-in-the-world
picture.php
picture.php


Water:

Two are ready for their first watering five days after being transplanted. You can visually see the difference in the two that are ready when compared to the others. But we’re not going by the visual alone. We’re going by weight. The visual dryness serves as another indicator though. But don’t make the mistake of thinking your babies are ready to be watered just because the top is dry — go by the weight of the container! They’ve been watered until a decent amount of runoff. Everyone deserves a good misting at this point. Looking pretty good... seventeen days from seed (in the misted pic).

picture.php
picture.php
picture.php
 

Shmavis

Being-in-the-world
More Water:

Four days later the others are ready to be watered. So nine days after going into SOLO cups everyone’s been watered a second time after the initial watering at transplant. Four days later they’re all ready again. Then two days later, again... this is what we’re looking for as an indication that they’re ready to be transplanted. Once you start watering every other day or every day, then it’s time. It tells us that we’ve most likely got a nice rootball going that’s ready to explode into one gallon containers under MH.

picture.php

picture.php
picture.php
picture.php

picture.php
 
Top