
-
Happy Birthday ICMag! Been 20 years since Gypsy Nirvana created the forum! We are celebrating with a 4/20 Giveaway and by launching a new Patreon tier called "420club". You can read more here.
-
Important notice: ICMag's T.O.U. has been updated. Please review it here. For your convenience, it is also available in the main forum menu, under 'Quick Links"!
You are using an out of date browser. It may not display this or other websites correctly.
You should upgrade or use an alternative browser.
You should upgrade or use an alternative browser.
Sammy's Chinese COB-FEST
- Thread starter sammyz2646
- Start date
luvdemshrooms
Member
Perhaps I missed it but:
How many LED/heatsinks per full length of tube?
What temperatures are measured at the last LED in the airflow? The first?
What size/cfm fan?
How many LED/heatsinks per full length of tube?
What temperatures are measured at the last LED in the airflow? The first?
What size/cfm fan?
sammyz2646
Member
Perhaps I missed it but:
How many LED/heatsinks per full length of tube?
What temperatures are measured at the last LED in the airflow? The first?
What size/cfm fan?
I still only have this thing partially erected, so with the two walls together , the pipe is probably about 12 feet long and contains 7 led's/heat sinks (4warm whites/3 full spectrum). I figured about every 18 inches on average
Not sure on the temps exactly and every time I measure them, I damage my eyes-even with the proper gear on---but---I have been using this setup now for many months and have not lost a single LED. I do remember the heat sinks being warmer than I thought they would be, but still well within the comfort zone. I will probably insert the sinks further into the pipe, once I continue the project, but "active" gardens keep me from completing the job. The temporary fan operating this short run is a simple 4" 170 cfm inline fan. the entire run once finished will utilize a single 6" 440 cfm fan in the center--- pulling from each end
sammyz2646
Member
looks great.how many did you end up putting around the room on the pipe?
Thanks---I have 7 up on this partial run and the other side of the room has another re-build LED hood mounted vertically on moving on a light rail----plus the HID's in addition---
I am thrilled with the results these led's have added to my garden
Below is the link to my thread on how I re-built this light plant--and since the re-build, I have had ZERO issues with LED failures. Prior to the rebuild, I couldn't keep these LED's to stay on--at all!! As you will see in this thread below:
https://www.icmag.com/ic/showthread.php?threadid=277441
Last edited:
sammyz2646
Member
I bought this single COB unit that is -- 64 x 3 watt with a draw of ~ 110 from ledaquagrow.com. I am NOT a fan of the way this company handles its customers. I love what it does for my plants however, but these lights fail every time from the factory--EVERY TIME---mainly simply because the heat sinks and exhaust fans are not sufficient by any means.
The COB itself and the results from it are unbelievable
This is what it looks like directly from the factory--

And on the inside (from the factory)--
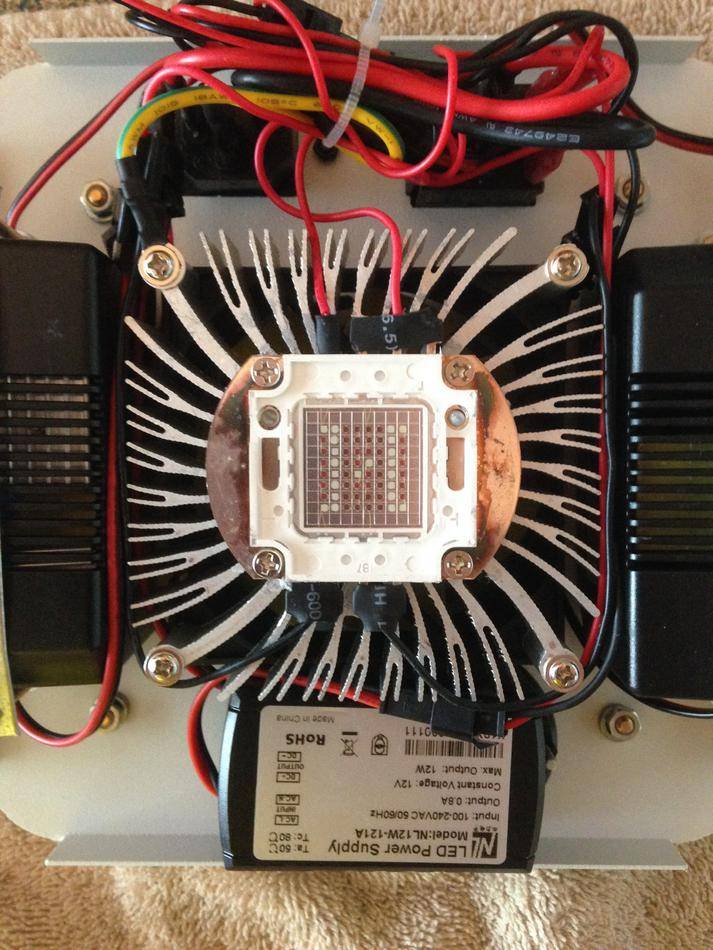
This is the culprit in most Chinese LED's and the weakest link---
This pathetic little thing ---with a silly hole in the center, the hottest spot

Two drivers run each side of the chip. Each driver runs 32 x 3 totaling 64 x 3
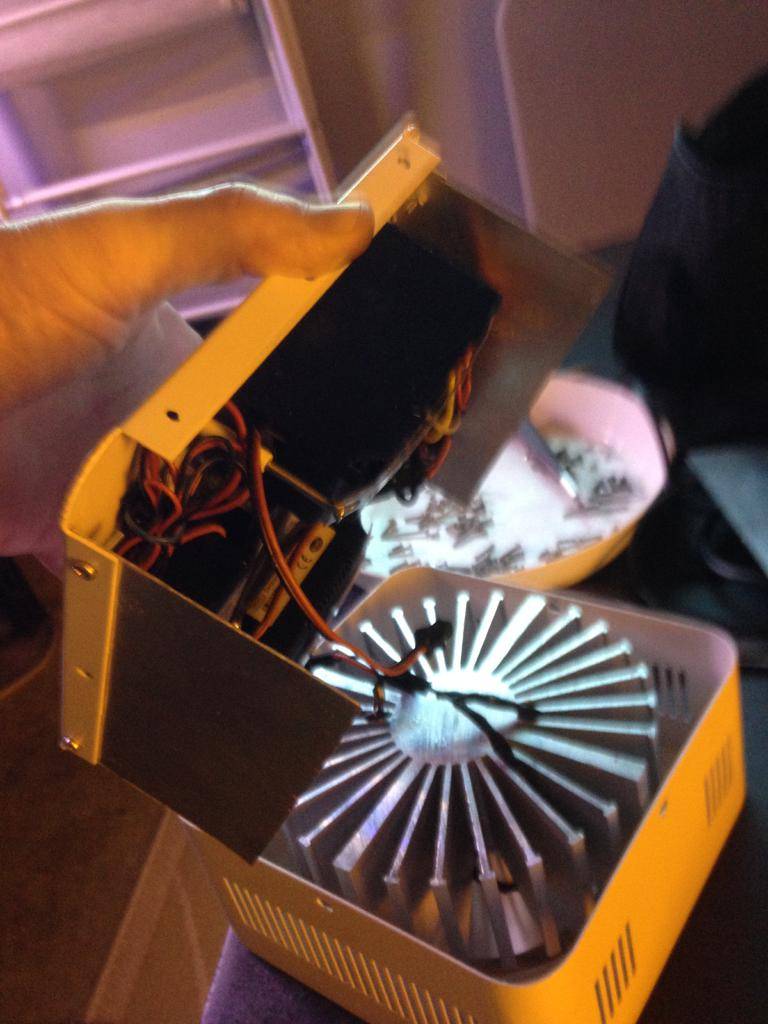
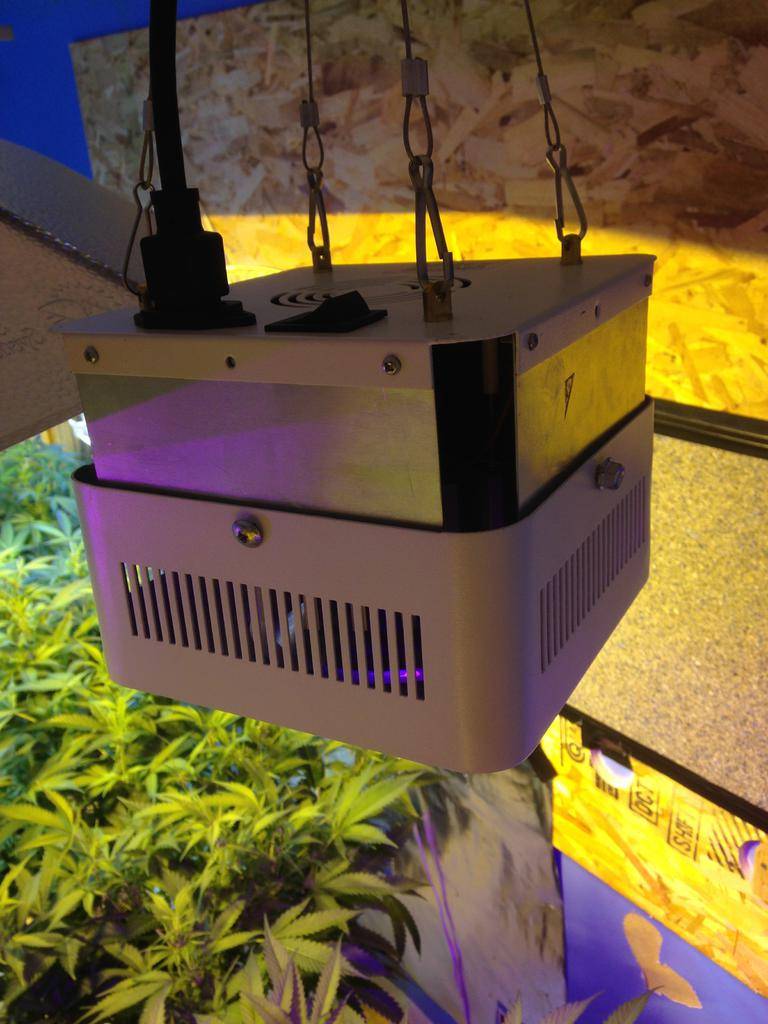
I went ahead and re-built this lamp and upgraded the heat sink big time----- and had to build wider sides and ends to accommodate the larger guts ----

The COB itself and the results from it are unbelievable
This is what it looks like directly from the factory--
And on the inside (from the factory)--
This is the culprit in most Chinese LED's and the weakest link---
This pathetic little thing ---with a silly hole in the center, the hottest spot
Two drivers run each side of the chip. Each driver runs 32 x 3 totaling 64 x 3
I went ahead and re-built this lamp and upgraded the heat sink big time----- and had to build wider sides and ends to accommodate the larger guts ----
Last edited:
sammyz2646
Member
To re-cap, after buying the lamp originally, it lasted about a month--before HALF of the chip went out. After a painful, lengthy wait to receive the new 64 x 3 replacement, I wasn't about to put it back into that crappy heat sink to bake alive.
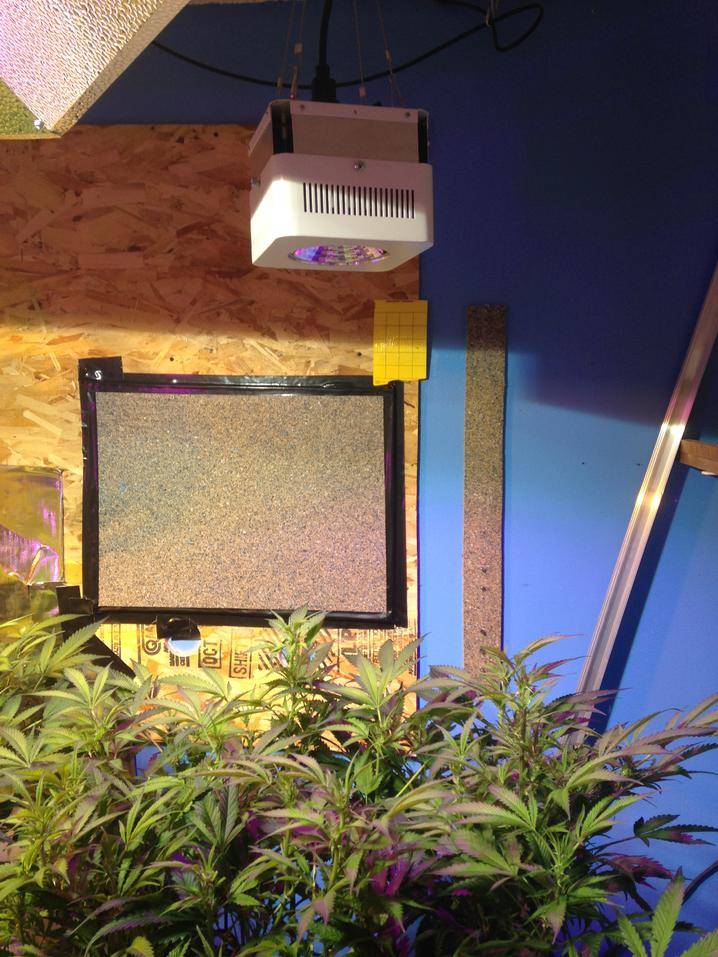
After the re-build and installing the new chip, I have been using it for 2 months already with zero issues and amazing growth underneath it.
Its running nice and cool with added airflow
After the re-build and installing the new chip, I have been using it for 2 months already with zero issues and amazing growth underneath it.
Its running nice and cool with added airflow
sammyz2646
Member
I have been pondering on how best to insert some red (660nm) and blue (450nm) that will be spinning around underneath the solar revolution in the in another custom built light I've been planning for many months now. Took me a while to figure it all out but it is working so well
---------------------------------------------------------------------------------
I finally put this plan into motion the last few day with custom parts and my own ideas- based on past experiences
This is the basic setup before I installed the drivers-- with 2 heat sinks and a powerful fan in the center pushing from one heat sink and pushing it away from the other----
Last edited:
sammyz2646
Member
Always spinning underneath the solar rev.--assuring that no one plant or area gets too much red or blue ---at one time
They are both running at ~ 48 watts per LED --using a 100 watt COB
That combined with the fan, the heat sink feels almost cold. way cooler than any of my other projects. This is my finest LED creation to date, in my opinion
Last edited:
sammyz2646
Member
nice work again!i want to copy your warm white build.are you using a 50 watt driver or just dialing down a 100 watt?part numbers and or a how to would be much appreciated!
I am running all these COB's @ less than 50 % with the driver in this pics. These are the heat sinks I used--
http://rover.ebay.com/rover/0/e1140...rg=20140602152332&rk=6&rkt=10&sd=360767420688
This is a link to the Chinese whites---- (these prices fluctuate down to $6.99 per if you are patient)
http://rover.ebay.com/rover/0/e1140...60&exe=9760&ext=22535&sojTags=exe=exe,ext=ext
And the driver-----
http://rover.ebay.com/rover/0/e1140...0&exe=10013&ext=100025sojTags=exe=exe,ext=ext
I bought boxes of each------- and went nuts. I have improved my yield and resin production noticeably since this purchase, and elbow grease was applied
Again--If I was using LED's----- and LED's ONLY (for primary lighting)----for my garden, I would look into higher quality diodes, but as supplemental additional lighting, these WW's are great for the sides , etc
Last edited:
sammyz2646
Member
That double COB light you built is great. I'm excited to see what other lights you build. Keep up the good work.
-Funk
Thanks FUNK! I am really looking forward to the added supplemental colors and their potential further enhancement of the meds. I am super excited about my new Harley TSU CBD baby

whats the brand from your light ?To re-cap, after buying the lamp originally, it lasted about a month--before HALF of the chip went out. After a painful, lengthy wait to receive the new 64 x 3 replacement, I wasn't about to put it back into that crappy heat sink to bake alive.
After the re-build and installing the new chip, I have been using it for 2 months already with zero issues and amazing growth underneath it.
Its running nice and cool with added airflow
[URL=https://www.icmag.com/ic/picture.php?albumid=10746&pictureid=1323472&thumb=1]View Image[/url]
[URL=https://www.icmag.com/ic/picture.php?albumid=10746&pictureid=1323473&thumb=1]View Image[/url]
sammyz2646
Member
whats the brand from your light ?
This is the piece that is defective from the factory and WILL burn up soon--- But again after I re-built it, it is working wonders under that full spectrum 64 x 3 COB
I will say with emphasis ----- I DO NOT APPROVE OF THIS CHINESE COMPANY!!! (Shenzen Hyoui lighting) They are dicks
http://www.aliexpress.com/store/pro...ed-grow-lights-with-ce/114449_2032426197.html
sammyz2646
Member
thanks for the info!i ordered some to test out.i went with the 45 mil 100 watters.
Good luck my friend
I am certain that with some knowledge and even more hard work, you will see AMAZING results ---with this addition to your garden.
I recommend spreading out these COB's evenly over your garden to cover lots of area, (as opposed to a LED light plant or fixture that really limits your coverage--- and empties your wallet)---having said that---I do support some LED units that are very effective
These things don't build themselves, but after your project is complete--- the rewards will be that much richer---and you will reap the rewards of a better harvest, I am certain
This has been the case for me, but I live for my plants---every day starts and ends with plant management
i have been using leds in tests since the original hid hut ufo(which i still have and use for back up)my veg cab has been all led for 5 years i think.the first test with these will be to see if i get same results with 4 50 watters and a 600 hps instead of 2 600's that i have to dial down to 75 % for half the year.
sammyz2646
Member
A few people are running into the same silly question that I had when I started working with these Chinese COBS.
I will try and make it easy
The + and - on the bugger is really quirky. 2 tabs one + and one -, so how hard can that be? well, if they are both on the same side?????
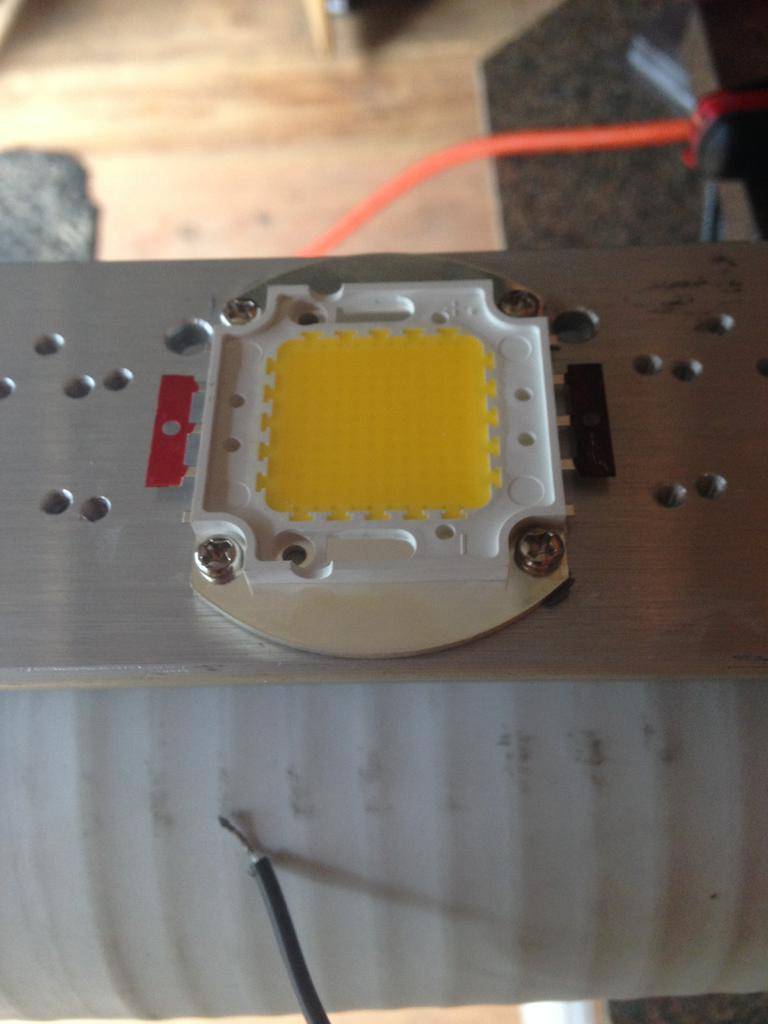
The side with NO markings is the NEGATIVE side and the side with both markings ---is the POSITIVE end.
I also colored them with a felt pen to minimize stupidity in haste
There is also (on most) a horseshoe shaped piece in the front---remember that the FLAT side of the horseshoe is POSITIVE and the rounded end is NEGATIVE

I will try and make it easy
The + and - on the bugger is really quirky. 2 tabs one + and one -, so how hard can that be? well, if they are both on the same side?????
The side with NO markings is the NEGATIVE side and the side with both markings ---is the POSITIVE end.
I also colored them with a felt pen to minimize stupidity in haste
There is also (on most) a horseshoe shaped piece in the front---remember that the FLAT side of the horseshoe is POSITIVE and the rounded end is NEGATIVE

