
-
Happy Birthday ICMag! Been 20 years since Gypsy Nirvana created the forum! We are celebrating with a 4/20 Giveaway and by launching a new Patreon tier called "420club". You can read more here.
-
Important notice: ICMag's T.O.U. has been updated. Please review it here. For your convenience, it is also available in the main forum menu, under 'Quick Links"!
You are using an out of date browser. It may not display this or other websites correctly.
You should upgrade or use an alternative browser.
You should upgrade or use an alternative browser.
Building a 4x6 hidden room
- Thread starter budderfly
- Start date
DAVES NOT HERE
Member
this has to be one of the sickest growroom build thread around. learned a lot that i plan to incoproate. sorry to bump a dead thread, but this is great read
N
noyd666
he's in there somewhere lol.

IntelliGeneS
Member
Very impressive!
budderfly
Member
this is the biggest blue balling thread besides that Anti and Mega yields outdoor thread lol
I suppose an update is past due. Found some old pics
")
Here's the walls right before painting. If you look by the door opening you can see 3 layers. First is 1/2" OSB, then 5/8" Type X (fire resistant) drywall. The inner layer is 5/8" impact and fire resistant drywall. All the seams are caulked with Gren Glue's acoustic sealant.
Here is it taped up and getting painted. I didn't really bother making it finish quality. Too many puzzle pieces of drywall and too many screws all over to bother mudding things flat. The walls are largely covered by plants anyway. The floor never got epoxied white as originally planned, either. I would still like to some day, if I can ever clear the room out for a week (ha). Bare concrete acts as a heat sink in the room. I'm using reflectix and it keeps the temp down a couple of degrees versus without.
Next is installing the subpanel. Man was I happy to get to the electric. Finally the easy last stretch of putting this room together! I will say, throwing a subpanel in any room/area is a good idea. Electric is simple to do and you can be sure things are wired well and where you want them.
Wiring some outlets. The switch is a double throw so it turns on green led strip lights while at the same time turning off the active intake. 240v for the ballast. It runs on either but slightly more efficient at 240v and half the amps just makes me feel safer.
Last edited:
budderfly
Member
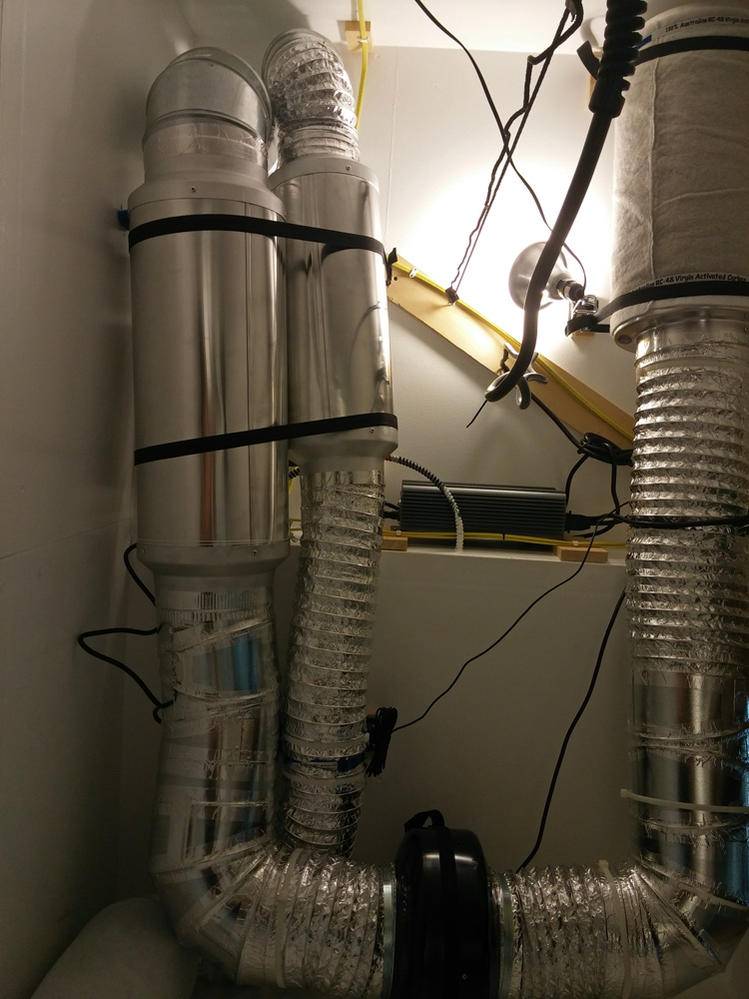
Here's a shot of the ceiling to show the ventilation setup. I did try it without the mufflers but you could hear the fans somewhat clearly in a couple of the upstairs vents. With the mufflers you can't hear anything but a bit of air movement.
I used hard elbows and taped up every seam in the ducting. The active intake helps significantly versus just leaving an open duct. After I built this, Phresh came out with their Hyper fans. Great little fans. I tried the 8" for exhaust but since it's a mixed vent similar to the S&P's it just didn't have the pulling power and I went back to a centrifugal. I am using the 6" Hyper for the intake fan now though. Great fans, the speed control is awesome and they're tiny. Just as loud as centrifugals at full power and not as good if you have a winding duct path.
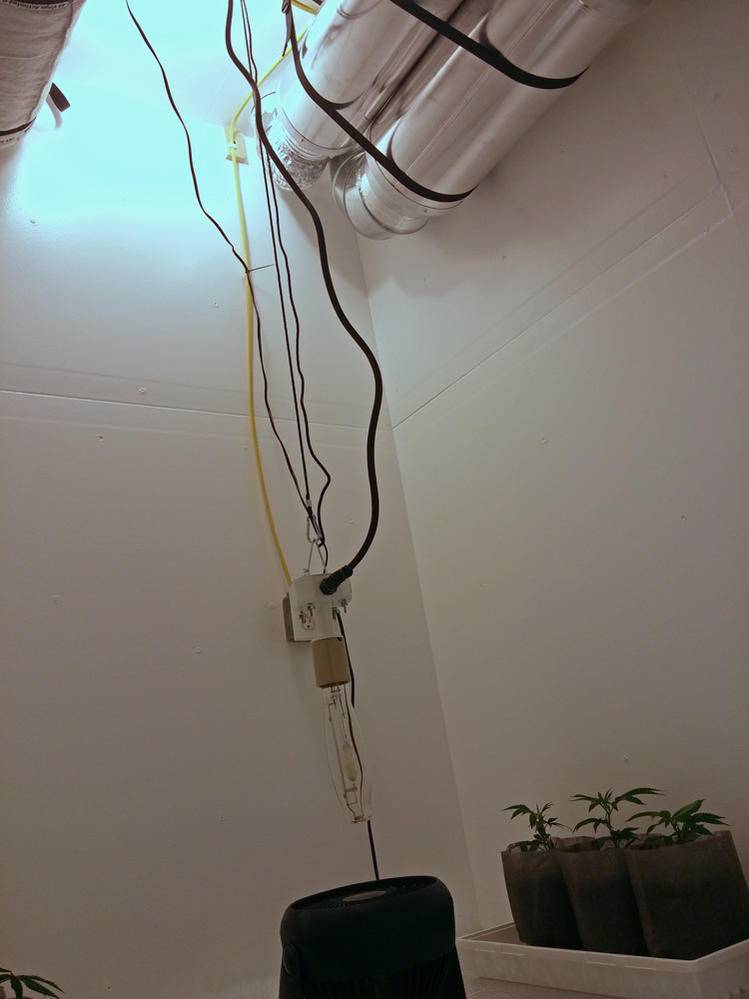
Here's a shot of the room with a few girls vegging in front of a 400w MH. That's the intake filter up in the corner.
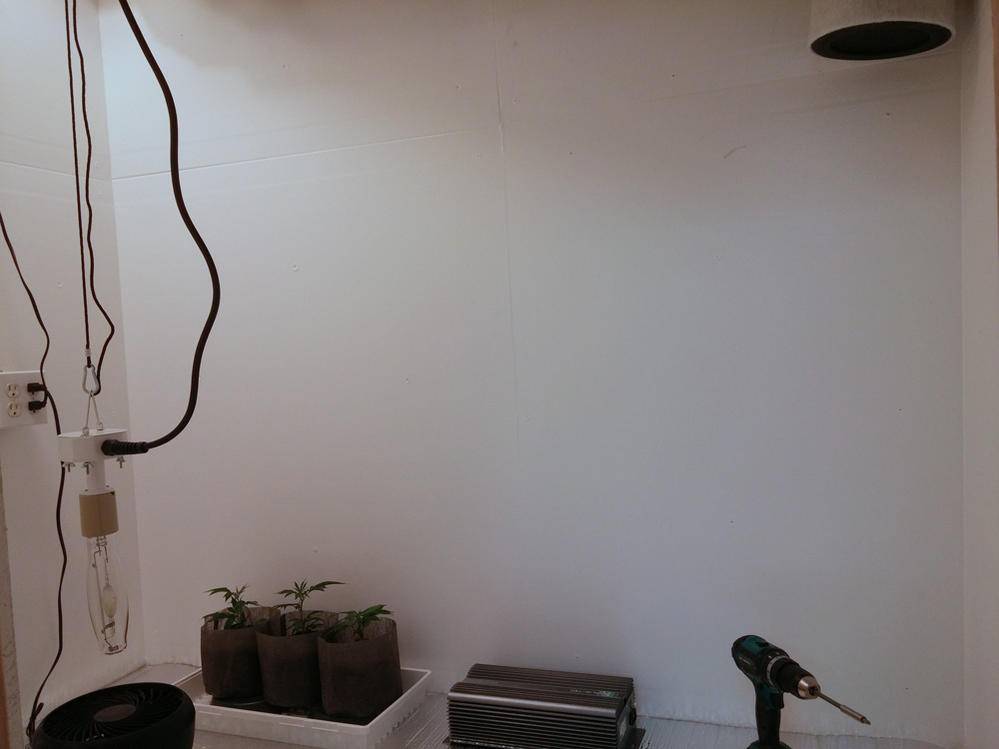
Here's another room shot to give some context with the ventilation. The bottom of the intake filter is the lowest thing in the room at about 5 feet off the floor.
I did end up allocating this room entirely to flowering. I had some neat plans to build veg into here but the extra space was too tempting so I stuck veg on the other side of this room under the stairs with a bare 400w hanging.
I used hard elbows and taped up every seam in the ducting. The active intake helps significantly versus just leaving an open duct. After I built this, Phresh came out with their Hyper fans. Great little fans. I tried the 8" for exhaust but since it's a mixed vent similar to the S&P's it just didn't have the pulling power and I went back to a centrifugal. I am using the 6" Hyper for the intake fan now though. Great fans, the speed control is awesome and they're tiny. Just as loud as centrifugals at full power and not as good if you have a winding duct path.
Here's a shot of the room with a few girls vegging in front of a 400w MH. That's the intake filter up in the corner.
Here's another room shot to give some context with the ventilation. The bottom of the intake filter is the lowest thing in the room at about 5 feet off the floor.
I did end up allocating this room entirely to flowering. I had some neat plans to build veg into here but the extra space was too tempting so I stuck veg on the other side of this room under the stairs with a bare 400w hanging.
Last edited:
DAVES NOT HERE
Member
Oh hell yeah
Always wondering what hapen ? Have you being trap in there LOL
this is the biggest blue balling thread besides that Anti and Mega yields outdoor thread lol
I think we know what happened to the poor guy who was killing it in the mountains, found footprints in his garden, and then decided to be sneaky and go back to his spot.
What about the thread by the former Marine who lived on an island with his native wife and her family? That one was really interesting until it just stopped.
what a thread ! truly inspiring work sir budderfly. Thank you
budderfly
Member
Got something a bit more recent.
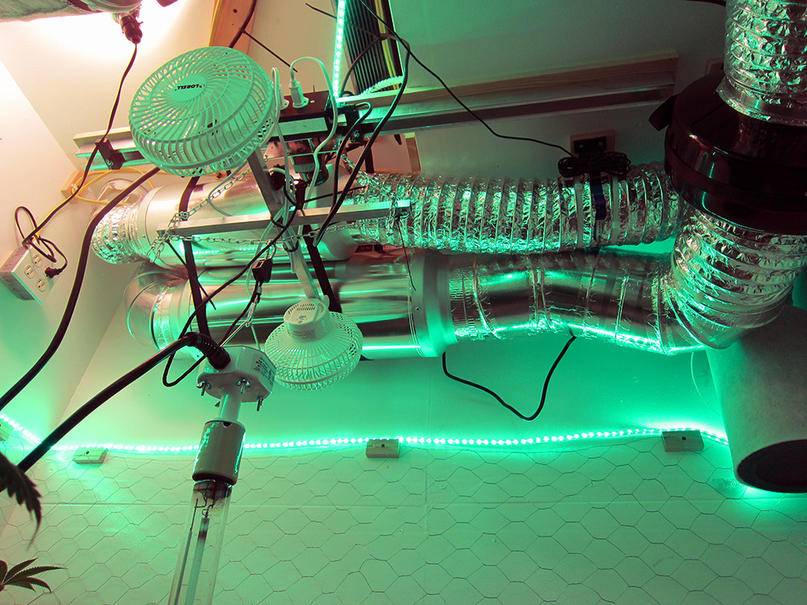
I added a 4' light rail in the room. It's an AgraMover Plus, 4RPM. The light rail carries a couple 6" or so fans. I also have a fan or two on the floor pointing up at the light as well. Environment is on point.
Green leds around the wall. When you flip the light switch the mover and intake fan stop and the led's come on. I've tried to blow smoke out the door and you can't, it pulls back in.
Here's a top shot of some plants. I lined the wall with chicken wire fencing so I can tie the plants back. It also works well to stuff the fan leaves behind and out of the way.
You can also see I have the floor lined with PVC tub liner. I just used one sheet 2' larger than the floor print in each direction and held it up by screwing little wood blocks over it and into the wall around the room. It's just folded in the corners. Wish I had a floor drain in this room but I didn't feel capable of doing that myself.

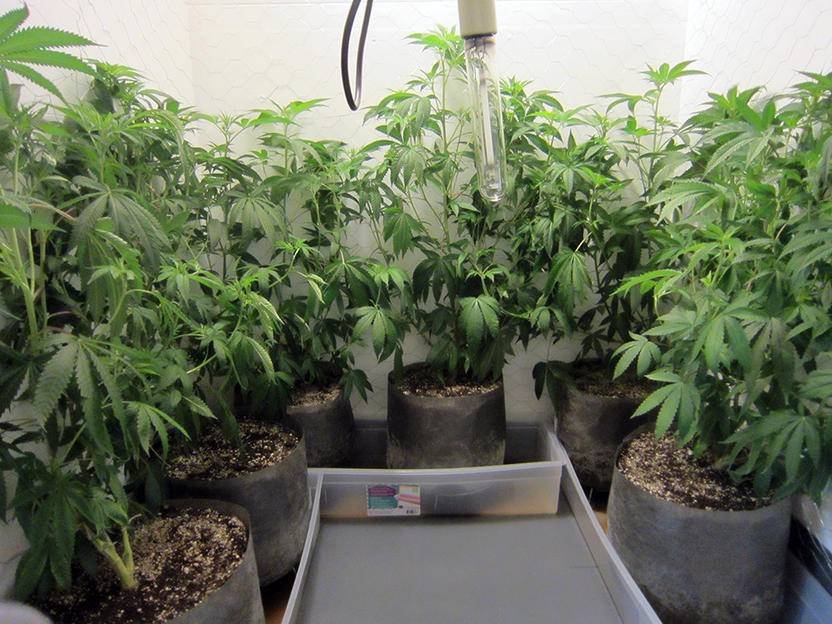
Lower shot of the same plants. I ordered some plastic containers meant for rolls of gift wrapping paper that happened to fit just right around the room leaving the doorway clear.
In this pic I'm using 12" diameter smart pots but I soon switched to ~10" diameter air-pots.
And here's some finished buds, though I forget just what strain this was. Some headband cross if I recall correctly.

I added a 4' light rail in the room. It's an AgraMover Plus, 4RPM. The light rail carries a couple 6" or so fans. I also have a fan or two on the floor pointing up at the light as well. Environment is on point.
Green leds around the wall. When you flip the light switch the mover and intake fan stop and the led's come on. I've tried to blow smoke out the door and you can't, it pulls back in.
Here's a top shot of some plants. I lined the wall with chicken wire fencing so I can tie the plants back. It also works well to stuff the fan leaves behind and out of the way.
You can also see I have the floor lined with PVC tub liner. I just used one sheet 2' larger than the floor print in each direction and held it up by screwing little wood blocks over it and into the wall around the room. It's just folded in the corners. Wish I had a floor drain in this room but I didn't feel capable of doing that myself.
Lower shot of the same plants. I ordered some plastic containers meant for rolls of gift wrapping paper that happened to fit just right around the room leaving the doorway clear.
In this pic I'm using 12" diameter smart pots but I soon switched to ~10" diameter air-pots.
And here's some finished buds, though I forget just what strain this was. Some headband cross if I recall correctly.
Last edited:
DAVES NOT HERE
Member
Welcome back budderfly, can't tell you how many people you have helped and inspired to be stealth. Put me on the top of that list. Thanks again
Coughie
Member
Man, I picked the best time to read this thread from the front to the back, in one shot.
From an idea, to buds!
Beautiful!
Had me worried for a few pages, when you came up missing, but I'm glad everything panned out with the bank, and hopefully the wife's things as well.
I dont know how many posts said something like "i hope he didnt get locked inside".. but it was more than a couple, lol. Might be fun to count them, silly folks.
Congrats on the build!
budderfly
Member
Welcome back budderfly, can't tell you how many people you have helped and inspired to be stealth. Put me on the top of that list. Thanks again
Thanks
Man, I picked the best time to read this thread from the front to the back, in one shot.
From an idea, to buds!
Beautiful!
Had me worried for a few pages, when you came up missing, but I'm glad everything panned out with the bank, and hopefully the wife's things as well.
I dont know how many posts said something like "i hope he didnt get locked inside".. but it was more than a couple, lol. Might be fun to count them, silly folks.
Congrats on the build!
Ha, yep, good timing. I had forgotten about this thread for a while. Then one day I was here looking for some info and browsing this sub-forum sorted by most views and there at the bottom of the first page (21st most viewed) is my little build thread.
It's a thread that deserved to be completed, but I'd lost most of the pics by then. I started looking around and have found a couple folders here and there.
I still can't believe how much time and effort I poured into this, but it was totally worth it! It was a lot of fun to bring together so many components in a build.
While the room is overall a great success, some things aren't great. The door situation is meh. The outer door fits its role of being extremely discreet, but it's also a bit of a pain to operate. The magnetic lock did not work with this design, there was no way to mount it that secured the door. Hopefully I'll get to try again on a different, bigger room sometime. It needs to be on hinges, or a track, easy to operate - and well sealing. With my constrained space I just couldn't come up with a better idea. Still haven't really.
I also wasn't able to make it as compact as I thought and fit in mothers, veg, clones, drying, etc. lol. that was a bit ridiculous. It might have been possible with a little 400w vert circle but I would've had to build a ton more crap in the room.
As a flowering room is awesome. I'm free to run just a bit when I'm busy or fill it up when I'm not. Just swap larger or smaller bulbs and adjust the light mover. I've had a pulley up there to do up and down vs. side to side movement. 600w or 1000w or dual 600w's. The room stays good with any of that. The 1000w gets a bit intense, if you let branches grow towards it much at all they get fried a bit.
I've hit 20oz a month with 1000w in there - 14 plants in ~10" air-pots (they are great btw) on a rotating harvest, the strain was mammoth, no topping just straight up and lollipopped - but I usually just have a few going. I just don't have the time to run a full room honestly.
I would like to improve the door situation somehow at some point. I'd also like to implement an automated watering system, or possibly hydro. Something so I don't have to hand water every other day.
I was thinking of getting some soil mosture sensors and running them off a microcontroller. I don't want to be tied to running everything on the same schedule though. I could do 2 schedules though, as long as I can easily vary the # of lines feeding off each. Not a lot of room for reservoirs in there but I could maybe fit a couple 10gals and that would get me a week.
Coughie
Member
Blumats might be your answer to the automated watering..
Drip lines from a reservoir, that are used in conjunction with ceramic cones that 'read' the level of moisture in the soil.. When the ceramic dries out too much, the drip lines kick in, and they turn off again when the ceramic cones reach the appropriate moisture level.
Can use them with almost any size reservoir
budderfly
Member
Blumats might be your answer to the automated watering..
Drip lines from a reservoir, that are used in conjunction with ceramic cones that 'read' the level of moisture in the soil.. When the ceramic dries out too much, the drip lines kick in, and they turn off again when the ceramic cones reach the appropriate moisture level.
Can use them with almost any size reservoir
I'm familiar with blumats, but I wasn't sure if I really wanted those. I read they can be fairly finicky. It's a process to get them restarted if your soil gets too dry, and a process to dial them in. I'm also a bit concerned about them overwatering and flooding with runoff.. but I suppose if the res is only so big the pvc liner will certainly hold a lot even if the containers overflow.. and there is value in simple.
I'm just really hesitant to change anything with the medium and nutrients, too. It kind of took me a long time to figure out correctly feeding plants and I've been using basically the same soil - advanced mix #4 or what have you, basically coco coir, peat moss, perlite - and botanicare nutes since I started.

