What's new
  • Happy Birthday ICMag! Been 20 years since Gypsy Nirvana created the forum! We are celebrating with a 4/20 Giveaway and by launching a new Patreon tier called "420club". You can read more here.
  • Important notice: ICMag's T.O.U. has been updated. Please review it here. For your convenience, it is also available in the main forum menu, under 'Quick Links"!

Building a Home Made LED

positivity

Member
Veteran
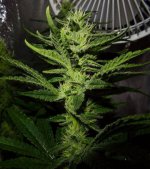
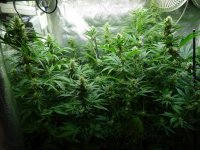
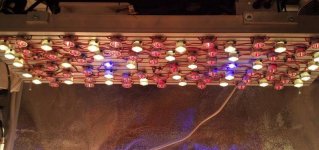
Here's a early shot of xmls nw, ww + 660, 740

I'm yanking most of the 740 and adding just a few cool and royal blue leds to counter the massive stretch the reds promoted.

Otherwise plant health and quality is awesome. Pretty sure the 660 is a good addition just perhaps needs to be balanced a little with blues.

Wanted to share my results with you all, a lot of my inspiration comes from icmag.
 

Attachments

  • image.jpg
    image.jpg
    94.4 KB · Views: 17

rrog

Active member
Veteran
Very cool! How much light is the main panel putting out relative to the footprint?

My XM-L panel is 300W and the super intense light combined with the lack of red really kept any stretch from happening, even in flower.

Now lights are raised and 60W halogen for red and things are stretching nicely.

picture.php
 

positivity

Member
Veteran
The light is 240w xmls, 80w Philips deep red, 20w far red, 5w 405nm. 3' x 2' tent...24" x 8.5" t slot heatsink.

Pretty sure the 20w far red is the main culprit for stretching, it's run full time.

If my revision yields too little stretch I'll just take out a few blues. Or maybe replace the 10 nw xmls with ww and then adjust the blue after that.

Either way, good enough till the next led breakthrough. Cobs look good, but not quite enough to make me redesign my whole panel yet.
 

woogille

Member
hey positivity nice grow man

say, can you explain a bit more about the layout of your leds ?
the xmls are single low power chips right ? so you probably used a whole lot of them...
how the whole thing is arranged ?

thanks,
and good luck
looks sweet
 

positivity

Member
Veteran
I'd probably use cobs if starting a new panel, just for simplicity. The smaller ones though. And three up reds on stars to minimize soldering.

This way works good too though. More leds usually equals better light spread, and it's easier to broaden the spectrum which I'm a fan of right now.
 

Attachments

  • image.jpg
    image.jpg
    56.2 KB · Views: 20

crbs

Member
hi guys!
hello hempfield in post # 255 you said mounting your panel. I'm putting one in the same way. 3w leds are, and have a source 24V 15A, I will use the current limiter as you showed. In his panel were 11 chains of leds. 11 current limiters were used? Connection of switches on / off was taken if you can explain? Sorry if the question seems silly but that part is not quite understood. Thanks for sharing your knowledge and experience, peace!
 

hempfield

Organic LED Grower
Veteran
hi guys!
hello hempfield in post # 255 you said mounting your panel. I'm putting one in the same way. 3w leds are, and have a source 24V 15A, I will use the current limiter as you showed. In his panel were 11 chains of leds. 11 current limiters were used? Connection of switches on / off was taken if you can explain? Sorry if the question seems silly but that part is not quite understood. Thanks for sharing your knowledge and experience, peace!

I have used a 48V (360W) power supply to power the leds. Each led string has it's own current limiter, so there are 11 circuits. Some are set to 350mA (for 1W led strings) and others to 700mA (for 3W led strings).

I grouped the blue leds and some of the red leds on a switch (in parallel) and the rest of the red strings on the other switch.

The fans are ON no mater which switch is turned on.


crbs

Member
How you made the connection of fans? Regardless of the switch on, the fans care, but when the two switches are connected? How do you select which of the switches feed the fans?
If I'm not mistaken in the drawing are transistors? What used and how to call? I'm newbie in electronics.
 

exploziv

pure dynamite
Administrator
Veteran
Those diodes he put before the fans only allow current to pass in one direction. And, assuming he used same cable and cable lenghts they both carry same current. You just separated the wires and joined them together after a while. No shorts or other problems can arise from that.
 

hempfield

Organic LED Grower
Veteran
If I'm not mistaken in the drawing are transistors? What used and how to call? I'm newbie in electronics.

Those two are cheap rectifier diodes (1N4007). My panel has 6 fans, all of them connected in series , powered directly by the 48V power supply (actually it is set to 50V). The voltage drop on this diode is 1V at 1000mA, so the fans will run smoothly at about 8V each .

The diodes have been soldered directly on the switches. When the both switches are ON, the current pass both diodes, each diode supporting (more or less) half of the current drawn by the fans (they are supposed to draw 120mA at 12V, but I have measured the current the actually draw and is way bellow 100mA).
 

crbs

Member
hi guys!
Thanks explosiv and hempfield. Now I understand the logic operation of the fans. So I make my mounting panel so I lack the U-profile, so they'll have to open a topic. Many thanks for everyone's help, and the information shared here. Peace!
 

hempfield

Organic LED Grower
Veteran
Hello hempfield!
Looking your albun panel, and re-reading the topic, I saw that the 300w panel you set the regulator circuits on the top plate with small individual sinks, and other minor panel this https://www.icmag.com/ic/picture.php?albumid=40244&pictureid=1083820 you set directly in the main sink. What is the difference? And what you used to put between the sink and mosfet? Already grateful! Peace!

The only reason to do so was because on the big panel I did not had the possibility to mount the current regulators on the big heatsink because of the fins . Actually this made things a little more complicated and it was a pain in the ass to assemble the entire panel.

Please keep in mind that the MOSFET should be electrically insulated from the heat-sink (the middle pin is connected to the heat pad) to avoid to short-circuit the load resistors (which are connected between the middle pin and the ground). To insulate them I used silicone thermal pads, plastic washers and 3mm bolt.

520214-40.jpg


Mounting them on the main heatsink will give a better cooling , but those MOSFET are designed for higher currents so it's not quite a problem if they run hot. But keeping them at the same temperature will also balance the current through the LEDs (less temperature variation, less current variation) .

:tiphat:
 

crbs

Member
Hi hempfield!
Understand the fins prevent the attachment in the large heatsink. I am recovering from a bad back, but I can not wait to be able to start my mount. It's all very well explained only by the hands to work. Again many thanks for the information shared here by you hempfield and all who contribute here. Peace!
 
How to choose lens for LEDs?

How to choose lens for LEDs?

Hi,
I found it easy to source leds from suppliers but how do I know which lens to choose for which leds? Often the lens- such as Osram- are for multiple leds. Are lens a real necessity? And also how do i determine the degree of angle and how to install? If I missed that page on this thread just send me back and I'll read it. Thanks!
The Afficianado
 

hempfield

Organic LED Grower
Veteran
Hi,
I found it easy to source leds from suppliers but how do I know which lens to choose for which leds? Often the lens- such as Osram- are for multiple leds. Are lens a real necessity? And also how do i determine the degree of angle and how to install? If I missed that page on this thread just send me back and I'll read it. Thanks!
The Afficianado


Try to use reflectors instead of lenses, there is no loss in this way (the reflector interfere only with the light that goes into 'wrong' direction).

For better penetration use narrow angle reflectors - 45 degrees.
For even distribution of the light use 60 degrees reflectors.
For wide distribution use 80-90 degrees reflectors. - recomended (to avoid overlapping hotspots also).

Each reflector/lens has it's own method for installing on top of the leds, but most of them only use epoxy glue.

Reflector/Lenses are useful only when the light source is way up above the plants. The lower the distance between the plants and the leds, the wider should be the reflector angle.
 

Latest posts

Latest posts

Top