What's new
  • Happy Birthday ICMag! Been 20 years since Gypsy Nirvana created the forum! We are celebrating with a 4/20 Giveaway and by launching a new Patreon tier called "420club". You can read more here.
  • Important notice: ICMag's T.O.U. has been updated. Please review it here. For your convenience, it is also available in the main forum menu, under 'Quick Links"!

RDWC build

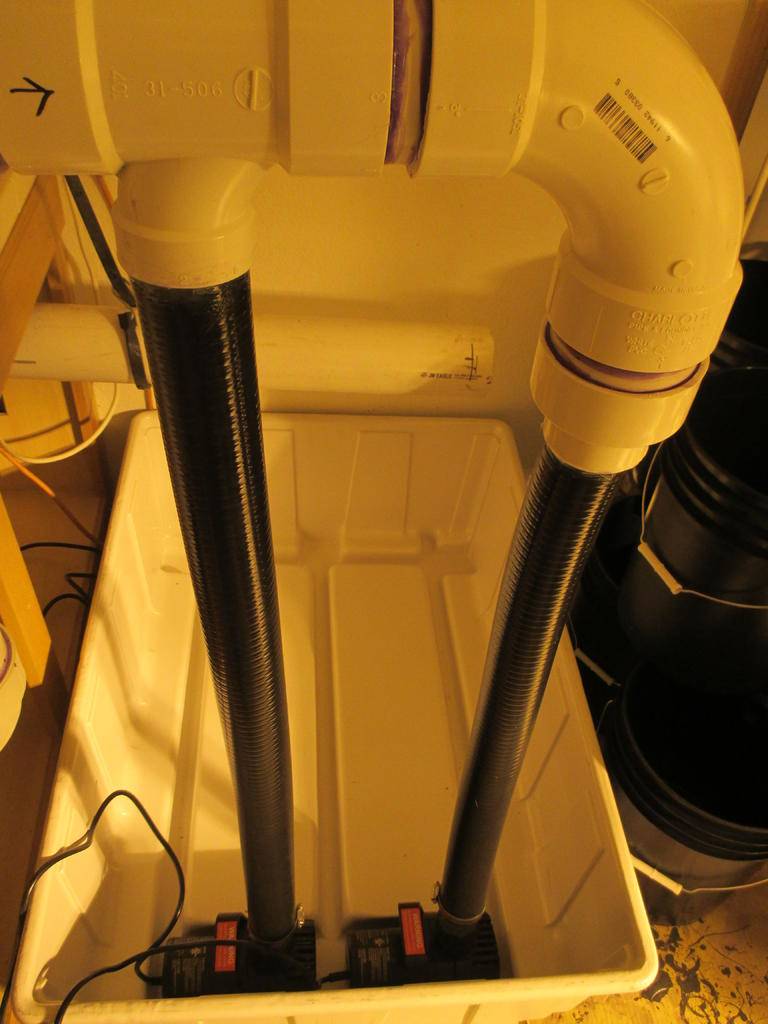
Ok, the system is almost finished, and I took a break to post some pics. The water gets from the reservoir via the following path...

First it leaves the reservoir from two 2500 GPH pumps through 2" ID hose line. These both become a single 3" PVC line.


Then three 2" PVC come down from the 3" PVC and the split again into two 1.5" manifolds.


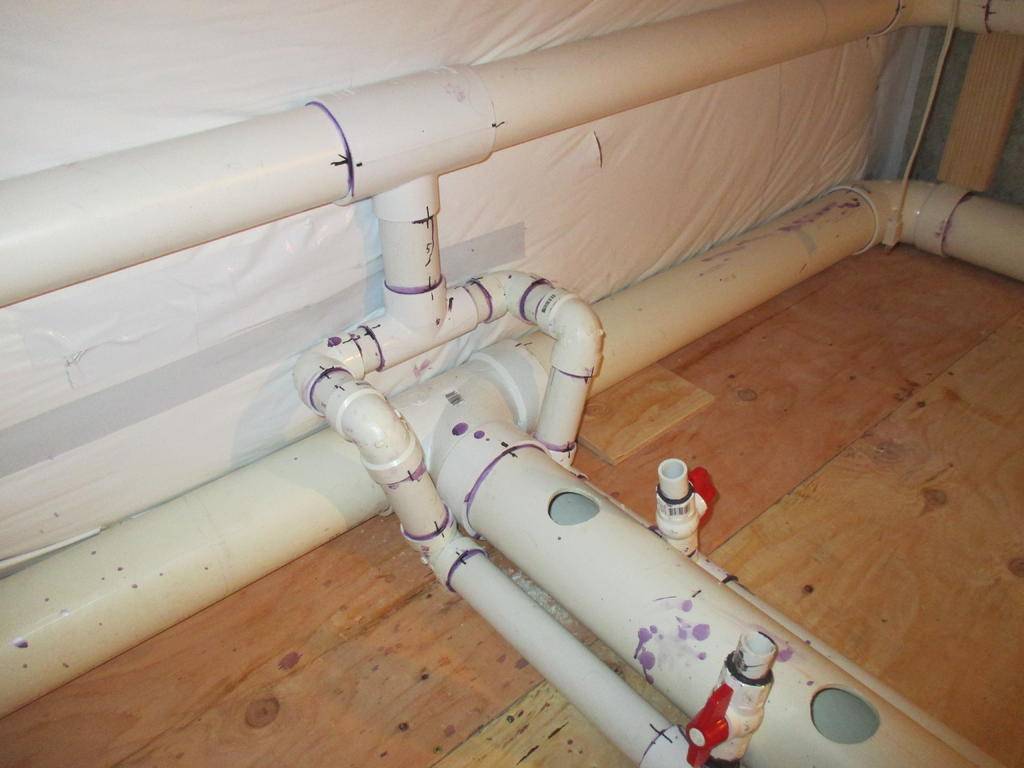
Each manifold supports six buckets.

 
This is the venturi valve. It is just a 3/4" elbow with 1/4" tubing stuck into it. It works great!


Here is a bucket with the venturi valve. The blue 1.5" hose is the drain hose.

 
WaIt cheaper to build a 1000watt ballast then add resisters to step down voltage to 750 and 600.
I tried that venturi idea but I didn't think it was enough 02. Air pumps move lots of water the more the better imo especially with a chiller. I wouldn't bet my grow on venturi alone$$$
U always see plants die from too little air, you will never see any thing die from too much air!

Not to worry friend... I haven't killed a plant in over a decade, and this system is getting more oxygen that the system it was modeled after. One important fact to note is that air pumps pale in comparison to moving water. This reservoir will be saturated with O2 for a few reasons:

1. The water is constantly moving across the surface due to the waterfall, chiller, and circulating pumps. This has been proven more effective that air pumps/stones.

2. The waterfall will constantly be bringing O2 saturated water into the reservoir.

3. The venturi valves, which are designed to supplement oxygen used by root systems in each bucket, will keep O2 levels near saturation in each bucket. This will make the waterfall's job pretty easy. ;-)

We will be booting this thing up tonight, and I'll report back then! =)
 
Once upon a time, about 90 minutes ago, an epic struggle took place. We encountered a foe that we greatly underestimated... The Dreaded Black Hose.


The Dreaded Black Hose spends its life alone. It lives a solitary life... because it doesn't fit on anything else. We made the mistake of not believing what The Dreaded Black Hose tried to tell us, and we embarked on a mission: To make The Hose fit.


This is the Dreaded Black Hose next to the glass of wine I poured, after I was forced to accept defeat.

I can't tell you how much time, strength, and mental energy we spent trying to get this hose to fit. My body hurts, as does my pride. Now the motivation to try and finish this, and the necessary hose, are gone for the evening. Tomorrow will be a new day with renewed hope and a new hose.
 
Hey Breeze,

Here is some info on electricity that might help. I'm a little blazed, so I hope this comes out right:

If you can imagine electrical current as water running through a pipe, then the voltage would be the size of the pipe, and the amperage would be the speed of the water. The wattage would be the amount of water passing through the pipe. Here is an equation to remember:

Volts x amps = Watts

If you increase the size of the pipe (Voltage), and the speed of the water (amperage) stays the same, the total amount passing through the pipe at any given time increases. If the pipe stays the same size, but the speed of the water increases, then the total amount passing through the pipe increases.

If you want to solve for Volts:

Volts = Watts/Amps

If you want to solve for Amps:

Amps = Watts/Volts

If you are running four 1000 Watt lights on a 220V circuit, then your amperage would be:

4000 Watts / 220 Volts = 18.18 amps

If you were running four 1000 Watt lights on a 110V circuit, then your amperage would be:

4000 Watts / 110 Volts = 36.36 amps

If I want to figure out the amperage for the 9 Phantom ballasts I am running, I would:

750 Watts x 9 lights = 6750 Watts

6750 Watts / 220 Volts = 30.68 amps

Actual numbers vary a bit, but you can estimate pretty closely with these numbers.

-------------------------------------

You generally want to use only 85% or less of the available amperage on a circuit to be safe. So, if you had a 50amp circuit, you wouldn't want to go much higher than 42.5 amps.

Hope that helps a bit. =)
 
Once upon a time, about 90 minutes ago, an epic struggle took place. We encountered a foe that we greatly underestimated... The Dreaded Black Hose.

[URL=https://www.icmag.com/ic/picture.php?albumid=50521&pictureid=1184854&thumb=1]View Image[/URL]

The Dreaded Black Hose spends its life alone. It lives a solitary life... because it doesn't fit on anything else. We made the mistake of not believing what The Dreaded Black Hose tried to tell us, and we embarked on a mission: To make The Hose fit.

[URL=https://www.icmag.com/ic/picture.php?albumid=50521&pictureid=1184853&thumb=1]View Image[/URL]

This is the Dreaded Black Hose next to the glass of wine I poured, after I was forced to accept defeat.

I can't tell you how much time, strength, and mental energy we spent trying to get this hose to fit. My body hurts, as does my pride. Now the motivation to try and finish this, and the necessary hose, are gone for the evening. Tomorrow will be a new day with renewed hope and a new hose.

What is that hose for? Looking good man
 
Hey Breeze,

Here is some info on electricity that might help. I'm a little blazed, so I hope this comes out right:

If you can imagine electrical current as water running through a pipe, then the voltage would be the size of the pipe, and the amperage would be the speed of the water. The wattage would be the amount of water passing through the pipe. Here is an equation to remember:

Volts x amps = Watts

If you increase the size of the pipe (Voltage), and the speed of the water (amperage) stays the same, the total amount passing through the pipe at any given time increases. If the pipe stays the same size, but the speed of the water increases, then the total amount passing through the pipe increases.

If you want to solve for Volts:

Volts = Watts/Amps

If you want to solve for Amps:

Amps = Watts/Volts

If you are running four 1000 Watt lights on a 220V circuit, then your amperage would be:

4000 Watts / 220 Volts = 18.18 amps

If you were running four 1000 Watt lights on a 110V circuit, then your amperage would be:

4000 Watts / 110 Volts = 36.36 amps

If I want to figure out the amperage for the 9 Phantom ballasts I am running, I would:

750 Watts x 9 lights = 6750 Watts

6750 Watts / 220 Volts = 30.68 amps

Actual numbers vary a bit, but you can estimate pretty closely with these numbers.

-------------------------------------

You generally want to use only 85% or less of the available amperage on a circuit to be safe. So, if you had a 50amp circuit, you wouldn't want to go much higher than 42.5 amps.

Hope that helps a bit. =)

^ thanks! good to know because I'm going to be getting a custom board made. In the near future I'm hoping to power 6x1000s for my flower room and 2x1000s in my veg room. I plan on making a separate box for each because I like organization. But I plan on leaving room for more lights or I'll just make another box. Upgrading to 240v line so I can run e-paps! I just wish they weren't $100 more than the Gavitas.
 
What is that hose for? Looking good man

The hose was for the supply line. It was non-flexible, so it was nearly impossible to fit around anything. We ended up beveling the fittings and the hose itself, and we also used a significant amount of "personal lubricant," and we still couldn't get it to fit. So, we just got hydrofarm 1" tubing, and that solved the hose issue.

The next issue to solve is the fact that a single 4" PVC drain pipe is not nearly enough to handle 5000 GPH, without the help of gravity and a vertical drop. Since our space limited us vertically, our drain pipe is all on the same vertical plane, which caused it to spill out of the top of the drain pipe, when we first turned it on. We are now adding another 4" PVC drain line, and we also sealed the drain pipe around the hose.

We had to bore two holes through a 10" concrete wall to build this system, and only one of them was designated for drainage. Now, since drainage can't go uphill, we are going to reroute the supply line up through the ceiling to get over the stupid concrete wall. This will allow us to use the other hole for the second drain pipe.

What a strange room. What kind of room has 10" thick concrete walls, floor to ceiling, on all sides??? It has definitely made this project more interesting.

Here is the room with the buckets hooked up.


HOVAH2.0

Active member
Man, What a room..
But if I had a room like that... i would build 3 tiers in an oval with all that wattage in the middle.. talk about grams per watt!$
 
Man, What a room..
But if I had a room like that... i would build 3 tiers in an oval with all that wattage in the middle.. talk about grams per watt!$

Hey Hovah, glad to see you're still around. Not sure I understand what you mean by 3 tiers, and and oval?

The lights in this room are situated so that each light is centered over 4 buckets, and there are nine lights total. Three lights to each manifold row. I did this to keep the "isles" clear of pipes and lights, and to keep the light concentrated on plant tops. I have bumped my head on more hoods than I care to admit!


The hoods I use shine light straight down with a very focused spread, so there is not much loss. The lights will drop down once the plants go in the buckets, and the isles will eventually grow together and catch all the light. The spacing between buckets separated by the manifold is 11.5" edge-to-edge, and the spacing between buckets across an isle is 15" edge to edge.
 
I think he is a vertical grower?

All that money invested in that grow and you don't have a mini split for cooling??

Hmmm... I'm sorry friend, I don't know what a mini-split is. I have a one horsepower chiller, which will keep water temps where they need to be. What is this mini-split you speak of??
 
Hmmm... I'm sorry friend, I don't know what a mini-split is. I have a one horsepower chiller, which will keep water temps where they need to be. What is this mini-split you speak of??

They mount to your wall with the compressor mounted outside. It is a ductless A/C unit. They also control humidity pulling excess amount out of the air. It my opinion that it is better to cool the room than it is to cool the light. Cooled reflectors are expensive and decrease your bulb output. Much better to run an open hood or even bare bulb. Cost effective too!
 
They mount to your wall with the compressor mounted outside. It is a ductless A/C unit. They also control humidity pulling excess amount out of the air. It my opinion that it is better to cool the room than it is to cool the light. Cooled reflectors are expensive and decrease your bulb output. Much better to run an open hood or even bare bulb. Cost effective too!

Ahhh... I see. Maybe I should explain the ventilation system:

In the past, I have used electric heaters, air conditioners, and all kinds of other tricks to try and regulate temperature and humidity. I have found the easiest way that uses the least electricity during the winter is to allow the thermostat/furnace in the house to regulate the room temperature. This is done by circulating the air from the room into the house (through a carbon filter), and from the house to the room. If the room gets cold, the house will too, and the thermostat will kick on and bring both spaces up to room temperature. Of course the room stays a little warmer than the house, but the much of the heat generated by the lights is recycled into the house, which cuts down on heating costs in the winter. When summer comes, I just send all the heat outside instead, and the room never gets hotter than high eighties. With a 1700 CFM fan, humidity is never a problem.

So the intake air (during winter) is split between cold outside air and warm air from the house. Outgoing air is split up the same way. This is how I manage to keep temps and humidity down without using AC. As the weather warms up, I just start adding on one duct at a time to the lights to start grabbing more hot air with each duct. In the hottest part of the year, all the air runs through the lights first and is all vented outside.

The end result of all of this is that humans and dogs give CO2 to plants, plants give oxygen to humans and dogs, lights give heat to the home, plants donate some humidity to the dry house air (which is normally around 15% here in the winter), the room receives dry air from the home as well as outside, and I don't have to use any available amps to regulate temperature.

I know a lot of growers use AC and CO2, but I just prefer to move a shitload of air instead. :tiphat:

In the past, during summer months, I never see temperatures above 90 F in the rooms. Humidity stays pretty consistently at around 30% in the room year round.
 
Oh Breeze!

By the way, we learned something that I wanted to pass along to you. You were talking about using a pump with a venturi on it as well as adding a venturi to each bucket.

We tried something similar, but the air that was in the line caused the venturis on the buckets to spit water. It seems the venturi valves work only when there is just fluid in the pipe... no air. When we stopped injecting air into the manifolds, they stopped spitting.

Just a heads up!
 
So we booted this thing up a second time, and it runs like a dream! The venturis are great, and the dual-waterfalls are churning the water to the point where the entire surface of the reservoir is covered with bubbles. =)


Here are the bubbles from the venturi. It's not an amazing amount, but the water going to the buckets is already saturated from the reservoir, so I think it's enough to keep it at saturation level. The pictures don't do the bubbles justice.

 
Here is the concrete wall we had to go through.


And here's how we got over it with the supply line. Notice the lonely air pump on the shelf in the cabinet. ;-)


All in all, this was a successful build, and I learned a lot more than I expected to. Looking forward to dropping some ladies in it!

Thanks again to BreezeEasy for the heads up on the venturi valves. I will never use another air pump again!

Grow in peace friends!
 
Hella cool man! That rez looks nice and bubbly. Good to know about the venturi on the pump. I decided to scratch that because it seemed problematic, now I know for sure without having to try it myself :p
 
Top