Ok guys, starting out a thread to post all my questions about a basement setup I'm building. It has two 4'x4' rooms that will be used to flower in, in I'm thinking a flip flop manner. Figured others might like to see the progress and provide input / suggestions. Here we go!
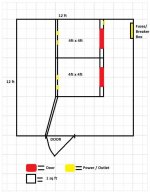
General layout:

I didn't want to have to do major changes later to upgrade, so I am trying to build it out right the first time, which is part of why I'm doing this thread. I started by walling off the (on the diagram) the left side main interior wall. I did standard framing method with 2x4's. All interior walls in the diagram are this made with that same standard method. The floor of the room is concrete, so I put down 2x4's and then a 5/8" sheet of plywood. I then framed the two outside walls of the room (bottom and right main) and then a middle wall to create the two 4'x4' rooms. I'm currently drywalling (probably tomorrow) the interior of the bottom room, I finished the top one tonight.
For power I have one circuit already ran. Although I did most of the prework (holes, boxes, running wire), my friend who is an electrician by trade did all of the actual connection points and difficult stuff. I used 12 gauge romex wire, which should be perfect for a 20a circuit (which is what the breaker is). The run comes from the breaker box, along a ceiling joist and then down the outer right side wall of the top 4x4 room. The first outlet on the circuit is a 20a GFCI plug, which I'm told makes the rest of that leg GFCI as well. The GFCI outlet is the one on the outside right side of the top 4x4 room, so it can be reset even if one of the rooms is dark. After that, each room has 2 outlets (also 20a). The outlets are probably 18 inches off the floor maybe? Because I have a friend who can help with electrical, I'm planning on adding more power outlets on a new circuit on an as-needed basis.
I also have an existing 240v (I think) plug on the board with the breaker box. The plug looks like this and it says it's apparently 30a 125v/250v. I'm thinking I could maybe use this for the ballast, or an AC when I eventually add one. I'd like to do a flip-flop setup so maybe that receptacle could feed the flip box.
I have no for sure idea what I'm doing yet for ventilation, but lots of ideas and options. My goal is to minimize on fans and control temperatures. VERY open for input on this. I will be using air cooled hoods, I'm thinking 6" size. Also, let me give a little more info here first: The area to the left of the flowering rooms is bigger than the left side wall shows. I only made it that size to be easy to draw, but in reality the room continues on for probably 15 more feet. Anyway, because it's winter rather than venting hood air outside, I'm thinking of using the room the left as a big lung room to absorb the heat produced by the light(s). More thoughts to come on this, I'll probably draw up some example diagram ideas.
For lights I currently have 1 400w in a hood, but am eventually wanting to do probably 1 kw lights on both rooms in a flip-flop setup. First run will probably use the 400, unless I end up with extra money for an upgrade quick. I'm thinking at first, I'm going to do just one room (the top one) while I finish the rest of the build. Then when the first cycle is done in the top room switch to flip-flop. I figure this will give me time to adjust to the larger area, do additional planning to figure stuff out, etc. I haven't decided on soil or hydro yet. Soil seems easy to get setup so I can put my efforts into the build, but I was considering doing a 5 gallon bucket single non-recirculating DWC setup too. Basically just 4 buckets per room, not hooked together yet because I'm not that experienced yet.
Anyway, that's where I'll trail off for now. There's some general setup info to get the discussion started and I'll definitely be adding more as I go.
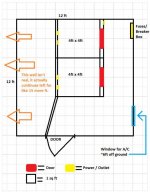
General layout:
I didn't want to have to do major changes later to upgrade, so I am trying to build it out right the first time, which is part of why I'm doing this thread. I started by walling off the (on the diagram) the left side main interior wall. I did standard framing method with 2x4's. All interior walls in the diagram are this made with that same standard method. The floor of the room is concrete, so I put down 2x4's and then a 5/8" sheet of plywood. I then framed the two outside walls of the room (bottom and right main) and then a middle wall to create the two 4'x4' rooms. I'm currently drywalling (probably tomorrow) the interior of the bottom room, I finished the top one tonight.
For power I have one circuit already ran. Although I did most of the prework (holes, boxes, running wire), my friend who is an electrician by trade did all of the actual connection points and difficult stuff. I used 12 gauge romex wire, which should be perfect for a 20a circuit (which is what the breaker is). The run comes from the breaker box, along a ceiling joist and then down the outer right side wall of the top 4x4 room. The first outlet on the circuit is a 20a GFCI plug, which I'm told makes the rest of that leg GFCI as well. The GFCI outlet is the one on the outside right side of the top 4x4 room, so it can be reset even if one of the rooms is dark. After that, each room has 2 outlets (also 20a). The outlets are probably 18 inches off the floor maybe? Because I have a friend who can help with electrical, I'm planning on adding more power outlets on a new circuit on an as-needed basis.
I also have an existing 240v (I think) plug on the board with the breaker box. The plug looks like this and it says it's apparently 30a 125v/250v. I'm thinking I could maybe use this for the ballast, or an AC when I eventually add one. I'd like to do a flip-flop setup so maybe that receptacle could feed the flip box.
I have no for sure idea what I'm doing yet for ventilation, but lots of ideas and options. My goal is to minimize on fans and control temperatures. VERY open for input on this. I will be using air cooled hoods, I'm thinking 6" size. Also, let me give a little more info here first: The area to the left of the flowering rooms is bigger than the left side wall shows. I only made it that size to be easy to draw, but in reality the room continues on for probably 15 more feet. Anyway, because it's winter rather than venting hood air outside, I'm thinking of using the room the left as a big lung room to absorb the heat produced by the light(s). More thoughts to come on this, I'll probably draw up some example diagram ideas.
For lights I currently have 1 400w in a hood, but am eventually wanting to do probably 1 kw lights on both rooms in a flip-flop setup. First run will probably use the 400, unless I end up with extra money for an upgrade quick. I'm thinking at first, I'm going to do just one room (the top one) while I finish the rest of the build. Then when the first cycle is done in the top room switch to flip-flop. I figure this will give me time to adjust to the larger area, do additional planning to figure stuff out, etc. I haven't decided on soil or hydro yet. Soil seems easy to get setup so I can put my efforts into the build, but I was considering doing a 5 gallon bucket single non-recirculating DWC setup too. Basically just 4 buckets per room, not hooked together yet because I'm not that experienced yet.
Anyway, that's where I'll trail off for now. There's some general setup info to get the discussion started and I'll definitely be adding more as I go.