What's new

1st Grow_10 Double Gum's_CFL's_450w_Rubbermaid

sman

Member
[Basic DIY Modifying a Lasko Blower for Cooling (part 1) = POST 19]
[Basic DIY Modifying a Lasko Blower for Cooling (part 2) = POST 20]
[A Friendly Tip On ODOR CONTROL = POST 27]
[SKIP TO SOME GREEN POST #28]
[plants got sick on POST 41]
[nursed back to health POST 89]
[WORLD CLASS CLONER NEW AT WALMART! 100% success rate EASY - CHEAP]
[PROOF IT WORKS]
[START OF BUDDAGE]

[HARVEST]

Hey everyone, I posted some of this info a wile back but I've decided to make and official "grow diary". Here's my 1st attempt at building a semi-stealth box and growing delicious fruit.

Let me start with my set-up

-I based my box on Red_Greenery's Rubbermaid Lodge


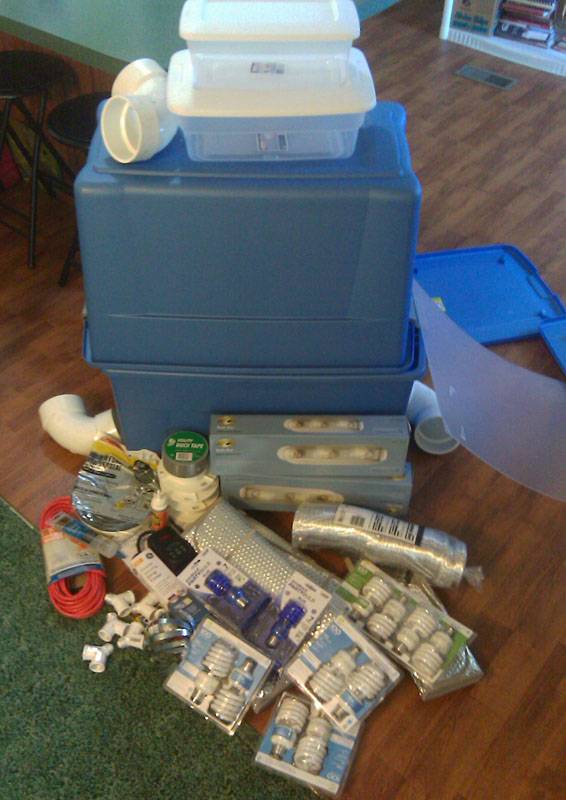
After finishing the box I started having instant heat problems because i based my exhaust system on red's 18 gal design while my box is 35gal.

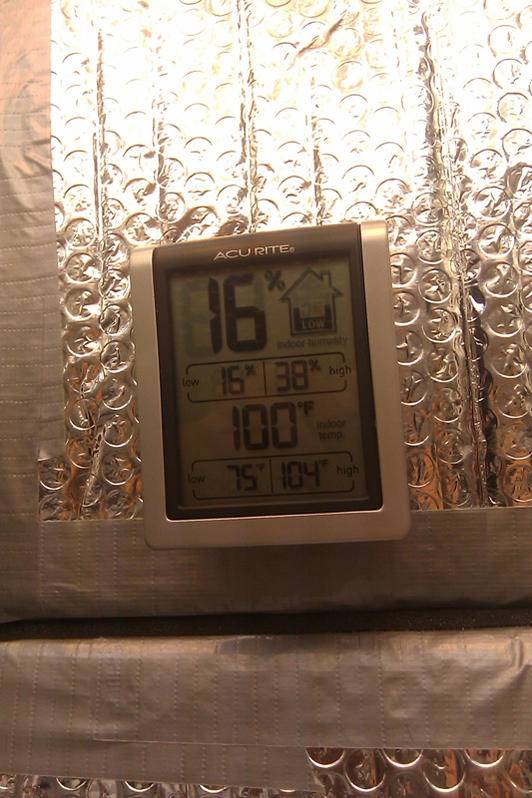
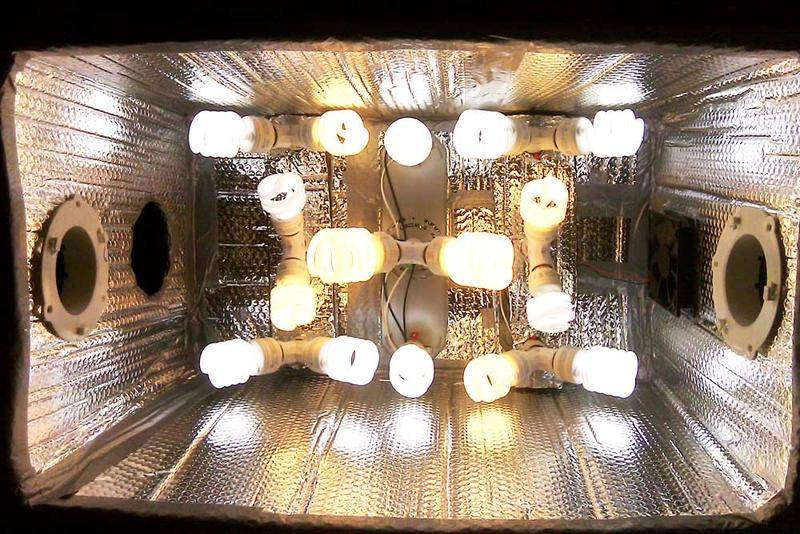
I was using 122mm computer fan to cool 450 wats!
but now i just use the comp fans for inside the box.

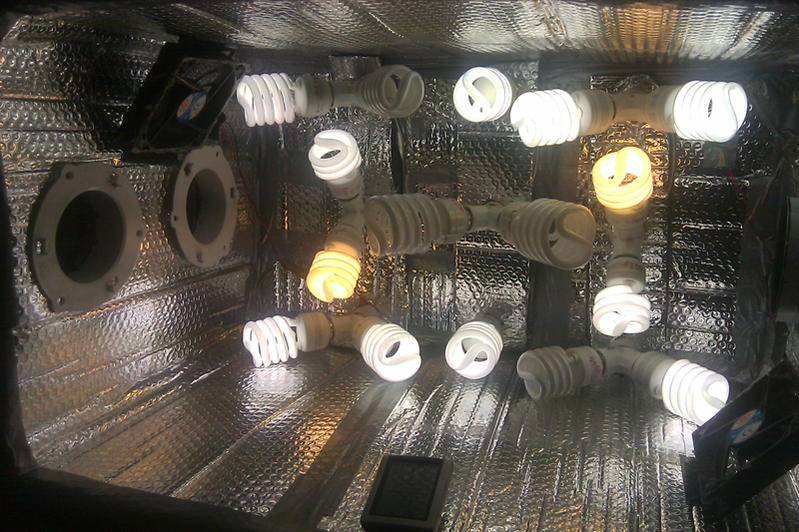
I did some research and found a DIY blower fan to mod the box (i highly recommend it) and now my temps around 80F. I'll make a post on it later. (post #19 & #20 for the tut)

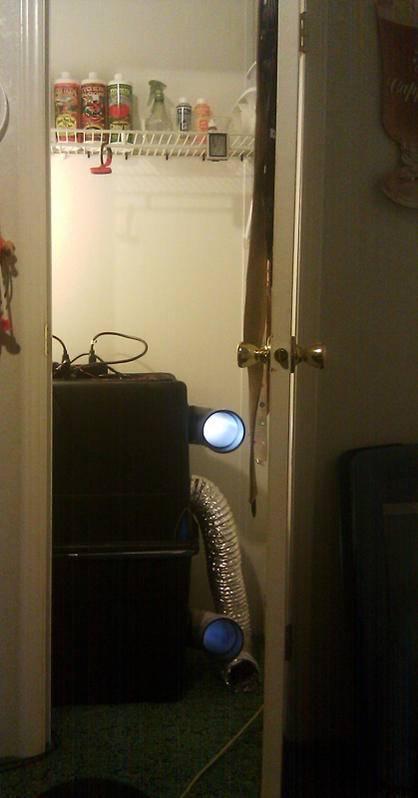
I put the unit under the house and made a 5'' hole through the closet floor for venting out the hot air and it works like magic.

-The first batch of seeds (lowrider), (after 1.5 months), never showed so i ordered from a more reliable place
(edit- the seeds finally showed up 4 months later LOL! WTH)
 

sman

Member
day 02

day 02

-Finished exaust set-up and cleaned the grow area. The lasko blower set-up is 3x better then the old 120mm computer fan design I was using. Temp with comp fans were 105+ F but now with the blower design I get roughly 75-80F

-Put soaked seeds in 6 oz party cups w/soil and put them in the box under 24 hour light.
 

sman

Member
Day 04

Day 04

-As I lifted the top of the box to water, one of the computer fans fell and knocked over all the cups. I was only able to save 3 out of the 5 seeds. This sucks because now 3 plants will be 4 or 5 days ahead of the rest.

-This is the fan that fell...


-Starting germination of 5 more Double Gum seeds in water.


-I need to find a better method for opening the box withought knocking over the cups…

-Went to walmart and found these clamps for holding up the top so no more knocking over of cups!


(EDIT- those clamps got annoying so I made a new method with rope)

-Also bought some heavy duty tape so this wont happen again
 

sman

Member
Day 5 - 1st seedling emerged

Day 5 - 1st seedling emerged

-The first seedling erupted today! Hopefully the rest will follow shortly.


-Put the 5 new germing seeds in papertowel n baggie, will probably put them in soil tomorrow and put them under the lights with the rest. They will end up being almost a week behind the other 3. I hope it doesn't cause problems later on
 

sman

Member
Hey Sman,

Looks like a good, clean set-up. What's with the blue pary lights? What's the color/kelvin on those?

thanks MeLikesPCs, I got the blue lights just for fun really. I don't use them because ppl on here told me they don't actually make the blue kind of light I thought they did. I might put them in later on when the plants are old enough to party!
:party:
 

sman

Member
Day 6

Day 6

-The other two kids popped out of the soil.


-Took germing seeds from paper towels and put them in soil with the other kids. I hope they come up in 2 days minimum so they wont all be too far behind.


-I added water + perlite in a container and plain water in another to bring up the humidity


-Heres a pic of the kids in the box


sman

Member
Day 12

Day 12

ok so far only 4 out of the 9 seeds have popped up. I'm probably going to go ahead and transplant the 4 into real pots because I think I'm getting some algae growth in the clear party cups. I'm not going to give up on the other 5 just yet though. but if they do not come up then I guess 4 would be easier to manage for my 1st time then 9 would. I just hope I get some females out of the 4!

some pics now.


sman

Member
Day 14

Day 14

-transplanted


-i have a runt with deformed leaf


-i'm not giving up on the other 5 that have not emerged from soil just yet.


-starting to smell pretty tasty
 

Hermione

New member
Subscribed! Looking very good and professional, I'd be very happy if my girls look anything like this at day 14 =)
 

sman

Member
Day 21

Day 21

Thank you guys for the encouragement! :wave:


-I finally gave up on the other 5 that never emerged :(

-Plants are coming along nicely so far, about 2 weeks from popping the soil. I should start LST them soon.


-I still have a runt, I’m not sure wut it’s going to do but it finally made a new leaf and looks like it's growing.


-I plugged in 4 more lights. I'll see what the temps do.


Pic update
GROUP SHOT


I Topped one plant (FIM) to see what happenes


The runt/retard


And here are the current temps, btw, it's been rather cold hince winter time, I don't know if I would have these temps if it were summer. I guess ill find out when the time comes.
Inside box temp-->
Inside Closet temp-->
 

Hermione

New member
How big are your pots? Are you planning to put them in bigger pots?
Please take good picture of the development of the FIM =)!
 

sman

Member
How big are your pots? Are you planning to put them in bigger pots?
Please take good picture of the development of the FIM =)!

they're in 6 1/2 inch pots right now, and yes they will probably end up in 8-10 inch pots depending on how much room i have. and if i have the monies i might also get some supplies to build some screens, but considering this is my 1st time i dont rly know the proper way to screen yet. as for the FIM i think i missed ^_^ lol because only 2 shoots from the cut so far.

it's been 2 weeks so maybe ill start nutes starting 3rd week depending on how they look

edit- I think i'll try another FIM on one of the other plants also...the runt is building nice leaves now... so ill have 2 plants topped with (FIM) one runt, and one untopped just LST'd
 

sman

Member
Day 23

Day 23

-FIM’d another one
-Started LST on 1st and biggest one
-The 1st attempted but I think probably failed FIM
-aaaand the runt/retard is looking better
 

Emph

Member
Looking good man. Are you testing the PH of your water? Also, post that DIY fan setup you found... or at least the link to it! :p

I just built a 36"x24"x36" box for veg and I'm gonna flower in my closet... Need to find a good way to ventilate at least 18CFM for the veg box for as cheap as possible.
 

sman

Member
Basic DIY Modifying a Lasko Blower for Cooling (part 1)

Basic DIY Modifying a Lasko Blower for Cooling (part 1)

P.S... before we start here, this tut uses a moded 6'' valve box lid instead of a 6'' flange.... well you can easily find a 6'' flange at lowes in the ducting aisle... and because i use 4'' ducting i bought a 6 to 4 inch reducereasily available at the same place

1- Getting Started. Half the battle right there.
-This is a pretty simple DIY, but it lets you get the most circulation out of the least money. If you have some glue and tape laying around, you can have an adjustable blower that moves a stout amount of air for around $50.

Items List: (Name of vendor, price)
-Lasko Blower model 4903 (Wal-Mart, $44.99)
-6'' flange with built in adhesive (Lowes, $2)
-6'' to 4'' reducer (lowes, $2)

Tools needed:
Long Phillips head screwdriver
1 1/2" to 2" Hole saw (Size not critical)

2. Opening the Shell
The object in question is the Lasko Blower, or squirrel cage blower or whatever. This is the little one they sell at Wal-Mart, model number 4903. They do make larger versions of this, but this DIY covers the smallest one, like this:

P50300281.JPG

The process of adapting it to our use will apply to other similar blowers as well. This is not the same type of centrifugal fan as a Vortex, but these squirrel cage type fans can pull pretty well against static pressure (ducting.)

To begin with there are 3 screws that hold the two outer shell halves together. The first two are inside the feet that the blower sits on.

P50300291.JPG

You can see where the assembler missed with the screw while driving it in.

To get to them, slide these rubber feet off to the sides. There is a bit of rubber cement holding them in, but a firm push with the thumbs will pop them off.
P50300301.JPG

Like you see on the left, this reveals the two holes that we need to remove screws from.

Now remove the easily accessible third screw you can see holding the two outer shell halves together through the handle. (Not pictured.)
P50300311.JPG

This is all you need to do to get the shell halves apart. At this point, you can skip to the 4- Hustling the Flow section, but if you want to see how to get the end cap off you can continue reading here.

In addition, you might find it useful to remove the blower wheel as detailed in the next section, to facilitate the modification we will make to it later.

3- Removing the end cap/outlets- For the Sake of Science!

There are 3 easily accessible screws holding the end cap with the outlets in it to the blower.
P50300321.JPG

The final screw holding the end cap is actually under the blower wheel. Don't try to pry the end cap off yet.

The blower wheel needs to be removed to get that last screw- taking off the nut would be easy enough- but they put it on with red loctite.
P50300331.JPG

The trick to red loctite is to back the nut off a little at a time, then tighten it again, over and over, each time blowing away the little red dust that chips off the threads. Take your time and keep backing it off little by little as you use the nut to clear the loctite out of the threads. Patience! The plastic blower wheel hole that mounts on the shaft has a flat that holds the shaft in place, but if you put gorilla torque on it you might damage it.

When you finally work it off, you can get to the last screw holding the end cap.
P50300351.JPG

Why they couldn't move that 3/8" over where we could get to it, who knows.

Now you can look in there to your heart's content.
P50300361.JPG

In here you can see the speed control and the outlets. No reason to mess with any of this really.

4- Hustling the Flow

This part is easy. We only need to block off the vents that once let air into the far side of the fan. This way the fan will spend all of its energy pulling air through the duct.
P50300431.JPG

The first piece of tape easily covers the bottom of the slots.

The next piece closes off these slots completely. You can't say I never use duct tape- but I do try to avoid it.
P50300441.JPG

Wouldn't be real DIY without a bit of duct tape anyway. The motor stays plenty cool, as we feed plenty of air into it.

5- Reinventing the Wheel. So easy a Cave Man could do it.

The only real internal modification needed is to open up a passage between the two halves of the blower wheel. Here it is removed from the motor.
P50300371.JPG

The 2" hole saw was a perfect fit- I wouldn't go much bigger but you could use a bit smaller if it's what you have.


We needed to open a way for air to get into the far side of the turbine- these holes will do the trick. The wheel has three bolsters or gussets that neatly divide the wheel into three pie pieces. You can use this to place three holes evenly, effectively making it into a "Mag" wheel rather than a "Solid" type.
P50300381.JPG

I positioned the holes by centering it left to right, while resting the hole saw against the blades of the wheel. Then I moved it 1/8" in toward the center and drilled the hole. Repeat twice more and the holes will be close enough to be balanced.

These holes effectively feed the side of the blower wheel that would have pulled air from the vents we covered.
P50300401.JPG

Take some time to clean up the edges of the holes the best you can. I used my plastic knife but you could use sandpaper or a dremel maybe. If you didn't take the wheel out of the housing to drill these holes, make sure to blow out the blower (heh heh) very well to keep any drill shavings out of the motor.

The plastic of the wheel is pretty thick there at the center.
P50300391.JPG

The wheel won't lose much strength from this, but the blower will work much better if you don't omit this step.

At this point we're done with interior stuff so stick the blower wheel back in and replace the nut, nice and snug.
P50300411.JPG

No need to loctite again if you get it tight.

Put the case back together and slip the rubber feet back on. Now the blower looks pretty much new, except how you can see right to the motor now.
P50300421.JPG

In this pic the fan is actually running, but the camera was fast enough to catch the wheel turning. You can see that plenty of air will be going by the motor for cooling.
 

sman

Member
Basic DIY Modifying a Lasko Blower for Cooling (part 2)

Basic DIY Modifying a Lasko Blower for Cooling (part 2)

--OK HERE'S THE PART WHERE I JUST USED A 6'' FLANGE, BUT IF YOU CANT FIND ONE IN YOUR AREA, YOU CAN USE THIS--

6- In-Duct-ion

I thought for a long time and went to many stores trying to find a quick and easy duct flange. Turns out 6" flanges aren't that common. You can order them, bu this is about instant gratification.
P5050059.JPG

This "valve box lid" came from Ace and is meant to plug a 6" hole. It's got little cleats on the other side that hold the duct- the size is perfect for 6" flex duct.

The Ace part number is 4026597 if you want to ask for it.
P5050058.JPG

You can see the upc too.

I chose to use a router with a top bearing bit to quickly and easily make it open inside. It conveniently had a hole for me to start my cut!
P5050061.JPG

You could accomplish the cutout with any of several saws, a jigsaw, hacksaw, etc. or get a buddy with a router to help you. Just get rid of the flat part inside, leaving the ring with a lip.

I cut it out rough the first time. This lets the router make an easy, smooth second cut. You could probably achieve similar results with a hammer.
P5050063.JPG

Whatever you use, just hack out the middle. You can see the cleats that actually hold the duct really well, just snap 2-3 turns of the metal wire over each side of the flange, and it holds it snug and leak free. I gave a pretty good tug and it held. It's working fine on mine right now with no clamp, but a clamp is never a bad idea, just in case.

The router bit with its guide makes this part easy. For me, and other router owners, that is. . .
P5050064.JPG

The next part is easy to make up for this.

7- Stick'Em Up!

Take that nifty flange you made, and the blower. Test fitting them shows we can glue the thing on and still preserve the rotational capability of the blower.
P5050065.JPG

As long as we do a careful and complete glue job, the thing should serve us well for years to come.

These preperation steps are optional, but try to at least do the cleaning with a solvent part. Plastic is tough to bond, especially two different types like we have here. Instead, we're going to use a contact cement, (Household Goop) to join the pieces with its sheer stickyness.
P5050067.JPG

One such step is to sand the area where the flange will mate to the blower, with 180 grit or so. Whatever you have. These little scratches actually increase the surface area and irregularity, aiding the grip of the glue.

Here I am doing the same thing with the flange.
P5050066.JPG

By rubbing the flange mating-surface down on a piece of 180 grit sandpaper, it helps flatten and roughen it at the same time. This is always good practice when you have to rely on the adhesive strength of a glue, rather than the bonding strength.

Another important step is to clean the surfaces to be mated with a solvent, such as isopropyl alcohol.
P5050068.JPG

This is also important when gluing. The combination of these techniques can greatly improve the strength of the adhesion. It would be a disaster to have this flange come off at the wrong time!

The next part is pretty obvious- glue it and stick it. Take care not to get too much on the inside, but be sure not to have any voids in the glue between mating surfaces.
P5050069.JPG

Surface area is our friend here, so we need a continuous, unbroken layer of sealant between mating surfaces. That will also preclude any leaks.

This stuff dries clear and dries pretty fast, just hold it in place for a few seconds after you put it on and then let it sit for 30 minutes.
P5050075.JPG

You can even run a fillet around the outer rim.

I was frankly quite surprised at how well this glue worked. The duct is well attached, with a good few square inches of surface area glued to the blower.
P5050073.JPG

I gave it some pretty good tugs, and I trust it. Glue like this will also withstand any temperature this setup will normally see.

Now you have an adjustable speed, strong blower with handy duct flange.
P5050076.JPG

The blower can still rotate to accommodate whatever direction you'd like it to exhaust in.

The duct fits right on. The valve box cover really is just the right size.
P5050077.JPG

The cleats that originally held the cover in do a great job of holding the duct. I feel as long as you snap two or three turns of the wire over each cleat, the duct pretty much is secure. A zip tie would seal the deal though.

Speaking of the exhaust, it would be really simple to adapt the output back to 6" duct or to a carbon filter by using a register box like this.
P5040009.JPG

Just stick it over the nozzle and tape it, you got instant 6" adapter.

Here is the blower in action in the attic. I simply set it on top of my original blower, a Panasonic Whisperline FV-20. I switched the duct connected to my light to this blower.
P5050079.JPG

There was an immediate increase in airflow- I could tell right away it was a stronger blower.

8- Conclusion. Of High Blower Prices!

So I switched this out for my regular fan, a Panasonic Whisperline FV-20 whole-house air circulator. These two fans are essentially the same thing motor and blower wise, the difference lies mostly in the case. They are both essentially a squirrel cage fan, but the Panasonic is permanently set to low speed, and has a lot of insulation, both to make it quiet.

This blower can run flat out thanks to its on-board speed control and less restrictive design.

The original blower was rated at 240 CFM. I figure if it does 80% of that against 6 feet of duct, that's 200 CFM actual, probably. Just a guess, I have no way to measure.

With the new blower, I feel that I get about 15-25% more flow, (as measured with my calibrated hand, on the high setting) which means probably 240-250 actual cfm out of the new blower in the same situation.

The cost was about 2/5ths of the $127 Panasonic. It is a little louder, but the dull rushing sound doesn't penetrate and since mine runs in the attic I can not hear it downstairs except for at the intake.

When I close the closet door, I can hear and audibly larger inrush of air under the door. This blower pulls like a champ.

Basically, if absolute stealth is not required, this blower will do a fine job of cooling your HID light or small grow room. It can be adapted to a wide variety of situations and will do a great job for you, the carpet cleaning lady for our business uses this exact item to dry carpets, runing them for days on end and she says hers (she has 10) never break. Most modern fans will run for years, and these have a continuous duty motor suited to this use.
 
Top