What's new

My Cabinet (w/DIY's and lots of love)

hoosierdaddy

Active member
ICMag Donor
Veteran
Thanks, tngreen! I am about 29 days away from harvest with the cabs first grow, and then I will start the VScroGs. Thanks for the kind words my friend.

hey, stke_fingas!
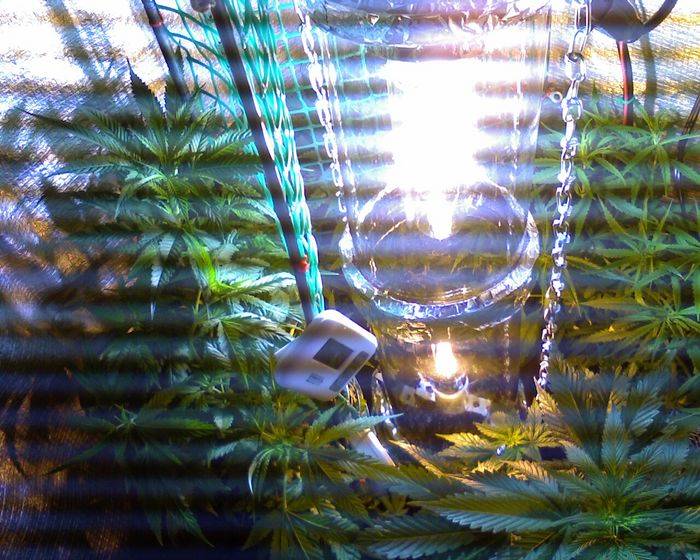
Man I am real curious how you did the tucking on your vscrog? I have had several ideas of how to proceed, and have not yet figured out exactly how Im gonna do it. I think I will LST the 4 plants to get plenty of branches goin then maybe do more pulling down than anything. I've thought about weaving as well...
I was gonna do the exact same hurricane fencing that you did with the 1" squares, but I decided to go a bit bigger.

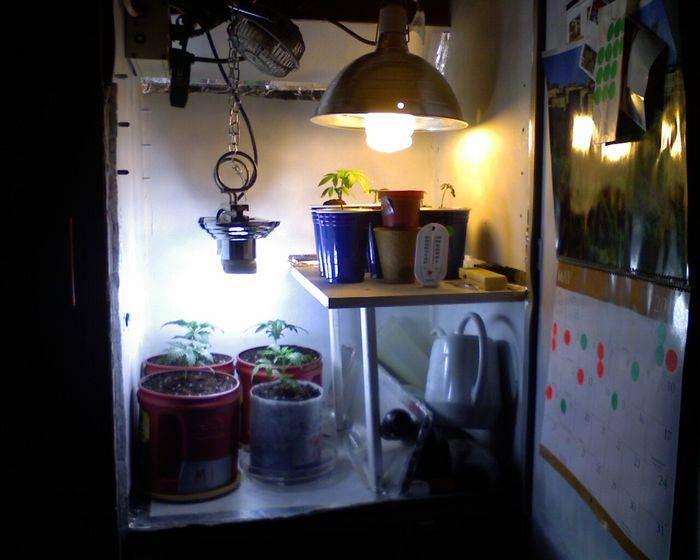
The plants in there now I can still turn them around so that all of the plant gets light.
I have already seen an improvement on the small popcorn at the bottom that was going to be just bud fluff before I did the vert light.

Your grow should be about ready to chop, no?
 
hoosier, sup man!
the training that i did was half ass now that i look back at it. i'd say the best way is to find how many holes you want to fill and top the plants when the nodes match. try to keep everything behind the screen until after stretch and then feed the bud sites through the screen. only putting the growing tip through the hole and trimming up the rest of the branch. this is how i'm doing my next v-scrog. the way i'm starting to look at it is that i want to have the cola's aligned in the same fashion as any flat grow. you want even space between each tip not the jungle i have now.

i feel that the 1'' netting is just right, it's strong and doesn't get pushed like the yarn will. i use paper clips and twisties from trash bags. the paper clip and the 1'' net is a perfect combo, once you have the clips on the plant it's easy to move and reposition. the twisties work well for holding a branch back to the netting if they try to kiss the light. weaving is out of the question for me, hydro and Co2=very fast veg. you could do it but i would stick to the paper clips, unless you can train twice a day.

heck yeah i'm bout to chop on the 20th. everything is filling out very nice, i honestly can't wait to give this light a little more room to work it's magic. i'm going to shoot for 12'' space between the light and net. i hope for about 10'' of room to get my hand in to train(only 2-4'' of space now). i could see me pulling a lb easy when i get the distance/training right. i didn't do much this run but it still looks to be a nice pull, especially for the small space. i'll hang it up for a pic shoot to show the screen before i trim anything. i'm pretty sure i can take the whole thing out at once.
 

hoosierdaddy

Active member
ICMag Donor
Veteran
petemoss,
I simply ran it under the flex duct and fixed it with aluminum tape, like you mentioned. I did not affix a collar to mount the ducting to, or I would have done what they did and used a grommet. I probably would just use a simple rubber grommet rather than a strain relief. I'd probably also secure it with aluminum tape to be safe, although the strain relief would be the proper way to do it.

stk_,
I have two of the four for next run the same strain. I am going to go ahead and fix up one of them with the 1" hurricane fencing and see which works out the best. I thought about cutting the stuff to make it have 2" squares, but I have seen a few folks use it as is with good results.
I plan on LST to get the branching proper, and I may do some FIM, although I am not a big fan of cutting on bud sites. But, it may need to be done.
I am going to do the LST in the veg chamber, and I will have to wait to put them into flower chamber as soon as the current batch finishes.
I am thinking like you and hope to prepare the plant for the screen, rather than letting it do it's own thing as we would with a horz ScroG.
 
C

Classyathome

SomeGuy said:
Awesome cab porn!
I agree - love seeing someone think "outside the cab"... :headbange

Great idea - great cab - great thread...

Two green thumbs up...
 

Illadelph

Member
Very Impressed. You got skillz I wish I had. I'm all thumbs when it comes to building things. You had some really good idea's, especially with the hurricane lamp and pipe straps. I used to work at a hardware store so I am familliar with all these parts, I just don't have all the great Idea's to put em to use that you do.

Check out my build if you like under "Stealth Mother Box Build, Please Comment"
I could use some help. My skillz are seriously lacking. I can't even cut wood without fucking it up.
http://www.icmag.com/ic/showthread.php?t=88402
 
Last edited:

hoosierdaddy

Active member
ICMag Donor
Veteran
SomeGuy, Classyathome, and Illadelph...thanks for stopping in to see my work.
Your kind words are much appreciated!
 

FRANKENBLUNT420

me blunt is like, wicked yo!! owight
DAMN FINE JOB WITH THE CAB!!!

i will live vicariously through your efforts. i too had to abandon some recent building of a cab due to precondition to my agreement of growing.

once the wife saw the cab, she didnt flip out, but she did "remind" me of said agreement. (i couldnt help myself, the DIY gods just kept callin). it was s 4x4x7 grow cab with atleast 5.1/2 of actual grow space. the beauty of it is that i would be able to break it down and put it up easily, so needless to say, where ever i went it would have went. with a hydro table i will be putting together with the scraps, so i could ebb&flow, aero, buckets or whatever hydro i wanted to do. still building it though, just wont be using it right now.

so rock it out for all oof us that cant man!!! awesome job, love the designing BTW! you have proven the old adage : "measure twice, cut once" !! lol

im officially tuned in
 

hoosierdaddy

Active member
ICMag Donor
Veteran
What's up, FRANKENBLUNT420!
Yeah, a man has to conform to the wifes wishes...most of the time. :)
Thanks for the kind words friend!

Here is a shot of my veg chamber as is. I have added a 3 light fixture with 3 6500K CFL's (on left) which is vegging my next run.
The silver chrome fixture can be found at Home De Pot for $7.15 USD (can't beat the price, and I highly recommend this fixture) A gold model like it goes for $5.

A more red 45watt CFL is above some rooted clones on the added shelf.

42896Photo_051908_003.JPG
 
Awesome cab man. Love the veg chamber set-up, i did mine the same exact way. Will you use that shelf for mothers after you stop growing from seed?

I like looking at peoples pictures and seeing what they build in comparison. Yours looks really accurate. What is below your veg chamber? Also that Vertical screen looks pretty tall. Will you put plants just on the "ground" on each side or do you plan on maybe adding one halfway up the net in future grows?

Thanks for the inspiration...
 
Last edited:

THoC

Member
Like the new modification Hoosier! Just love your cabinet layout. Had to shut down my grow ( lions prowling about ) a couple of weeks ago. :/ but I fill the days for the next setup..... and vertical was something i was looking into.

keep up the good grow!
 

hoosierdaddy

Active member
ICMag Donor
Veteran
Thanks THoC!
Man, hate hearing the bad news about your grow...but I'm sure you will be back at it. I would definitely consider vert if you are starting over.

FMJ, Thanks for the props.
Yeah, I will probably have moms up there as well as in the lower portion. I plan on having about 4-5 different moms on board.
Below the shelf is air ducting. This shot you can see the pvc pipes, and in front of them are an equal amount of holes covered with duct filter.
Can't have too much air flow.
42896cab01.JPG

Did I mention the Hoosiers rule? :spank:
 

wishbone420

Member
well built budmaking system. only thing i see is give the cool tube its own intake. ie vent pipe to suck air from underneath cab. but i see big yeilds once your system is dial in. peace. and tagged
 

hoosierdaddy

Active member
ICMag Donor
Veteran
Thanks wishbone.
There are ventilation holes in the floor directly below the tube and a 6" fan blowing up at the intake.
 

tngreen

Active member
Veteran
hey man, curious as to what fan you use to exhaust this cab? you mentioned a 230cfm fan but not what type. im building a cab similar to your dimensions and having trouble deciding on a fan. thanks!
 

hoosierdaddy

Active member
ICMag Donor
Veteran
tngreen, I have two of the 6" duct booster fans ($28 Home dePot)
I had both connected and pushing into the scrubber, but I took one loose and using it to exhaust my vert tube.
I plan to connect the other to the vert tube, and put a fan in the attic. I will then suck through the scrubber and exhause into the attic with the new fan.

When I had both fans inline, it handles the heat of my 300w of HPS just fine. With them separated, the pull is not as efficient as I am going to need it real soon. So I decided to add another ~450cfm with the new fan.
 
Wow.. That was an absolutely awesome read... I definitely know what I'm planning for my next step up from my PC case. Very ingenuitive.. Love the ideas.. And I notice all the ventilation holes you have... This is bookmarked for sure to watch and for reference down the road :D

Love it!

Mushu
 

hoosierdaddy

Active member
ICMag Donor
Veteran
Thanks for stoppin by MushuHappines and bud_me!
Your kind words are appreciated.

I am using Autosketch and just import the sketch to a jpeg file. Same people that build Autocad released the windows Autosketch before the Autocad windows version. I've had it for years.
 

hoosierdaddy

Active member
ICMag Donor
Veteran
This cabinet thing has gotten to be very addictive. Seems that ever time I get close to dialed in, I change something up and it presents a whole new set of issues that have to be addressed. I think maybe the challenge is the allure.

Anywho...
I upgraded from the two 150HPS' to a 400CMH. I simply took away one of the two tubes, and replaced one with a 400CMH. I also added a small fan to the entrance of the tube to help with the CFM.
In the next pic, I have the 400CMH in the tube with the fan attached. 4" flex duct leads away from the tube and into the exhaust chamber via two 250cfm Suncourt inlines.
42896Photo_062008_001.JPG


This set-up was fine, except the heat issue came back big time. I found that there is a problem with using the hurricane type glass for the cool tube.
Anyone who has a bit of understanding of air flow knows that the smallest orifice in the air stream is the bottleneck. Whenever there is a bottleneck in the line, the total volume of flow is restricted. Even though there may be some more velocity created, the volume of available cooling air is hampered by the smallest opening.
I also see that this higher velocity of air movement seems to not want to keep anything outside of the airflow path cool. This may be a bit confusing to follow, but hopefully the diagram will help to describe what I'm talking about...
42896kelwtoob9.JPG

With the 150HPS in the tube, I can hold onto any part of the globe and it will not be super hot. But with the 400CMH, the bulging part of the tube is far too hot to keep your hand on. Even though just above and just below the bulges is very cool to the touch, the bulges are putting out mucho radiant heat that is hard to deal with.

One thing I did to fix this problem is to change to a larger diameter tube with no bulges. A conventional cylindrical cool tube.
I also saw that the tube set-up was taking any available cool air from the bottom of the cab and sucking it through the tube. So, I mounted another piece of flex ducting to the bottom of the tube and connected it to a hole in the floor so all the air used to cool the tube was from outside ambient air, and not from the cab itself.
42896cab3.jpg

My sketch still shows 4" ducting on the tube, but I have since switched to 6" ducting, which allows for far greater volume of air.

You can also see from the sketch that my scrubber is now connected to ducting that runs to the attic. I was simply running the air out the back of the cab previously, but that would help to heap up the non temp controlled garage that the cab is in, which in turn would cycle through the cab and increase temps. These changes helped with the heat issue alot.
My attic fan is a Stanely blower from WaldoWorld, which I screwed on and caulked a 6" duct starter collar. (sorry I have no pics of the fan DIY, although the Stanley blower is the berries for a fan less than $50)

But, being that I am always tinkering and looking to do something new, I decided to put one of the 150HPS' back into action. So, I mounted one below the 400CMH. Of course this increased the heat.
42896kelwtoob10.JPG

BTW...The tubes that I got were from:
http://www.save-on-crafts.com/glcycash10in.html
These 5" dia x 10" long tubes are thicker than I expected them to be. I really like them for $6 each. They will definitely provide more airflow than the conventional Bake-o-rounds from Pyrex, which have a lesser diameter.
Although one end of the tubes has a slight edge, I do not trust my connections, so I added some hanger chains to the bottom lamp as a safety.

OK, some may have noticed another change I have made, if they were paying attention to my last cab sketch...
I also added AC to the cab!
I took the space I was using for storage and installed a 5050 BTU unit inside the cab itself. This took a bit of thinking, but it all turns out to be so simple.
42896cab2detail.jpg

What I did was to fashion a box out of SupertuffR insulation board that surrounded the hot exhaust side of the AC unit. This led to a opening in the side of the cab itself. I then fashioned a piece of rectangular ducting that led up the side of the cab and into the exhaust chamber above the veg chamber.
What this did was take the air that was previously going from the veg chamber and into the flower chamber, and redirects it through the AC unit only. I had to open up some holes in the flower chamber floor to get some ambient air back.
The air circulation on the cold side takes in air from the flower chamber only and cools it before placing it back into the flower chamber. I put a divider between the cool air and the hot air flows, this way none of the cool air gets used to cool the AC unit.
42896acclose.jpg

This is a shot of the rough-in of the AC install.
42896Photo_070208_005.JPG


This is the new 150HPS/400CMH Kewl Toob in action:
42896Photo_070208_002.JPG


I have a remote temp/hum sensor in the cab mounted at the canopy. The top temp reading is the ambient in the garage, the bottom in the flower chamber with lights on.
Humidity is up due to it raining very hard with the garage doors open at time of shot. High humidity is a fact of life here...and usually stays around ~50%-60%. I only have the AC unit set on about half to sustain these type of numbers.
42896Photo_070408_001.JPG


:pimp3: Hope you like my latest obsession!
 

Latest posts

Latest posts

Top