What's new

coco+wick+gh flora nova=never dump run-off|pdg’s imaginary/enjoyable garden

bunta*bun

New member
hello mistress,

thanks for explaining this system. Do you think it would be possible to do an imaginary sog with wicks on a perlite + vermiculite mix?
or would the roots of the small cutting be to weak to suck water through the wick?
Also, could i use such a system with the gap between plant and watertank being more than 5"? or would the wick be too long for the plant to suck the water?

thx for your input
 

*mistress*

Member
Veteran
hello mistress,

thanks for explaining this system. Do you think it would be possible to do an imaginary sog with wicks on a perlite + vermiculite mix?
or would the roots of the small cutting be to weak to suck water through the wick?
Also, could i use such a system with the gap between plant and watertank being more than 5"? or would the wick be too long for the plant to suck the water?

thx for your input
yes.
perlite+vermic work.

roots find water. perlite/vermic :good: 
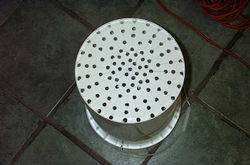
to make clones, even w/out wick. the wick should only make so root zone never dry out.

depens on wick material, wick girth (thickness of rope, etc) how far water may wick up...

test
maybe, cut cut 8-12" piece of whatever wick material selected...
pour food dye into container of water....
note the capillary rise of the colored solution...
measure how far the solution went up, how much water was taken from the water-holding container, & squeeze drops from the top end of the rope, to see if the ec/ph changed...

so... simple dye to find how high:D the water rise.

washing the wick material, :yes:...
 
Last edited:

Dr. Tingles

New member
Plea for help

Plea for help

Hi Mistress,
First, thanks much for your thread. I've been following your imaginary garden off & on for a while. My gardening goals are similar to yours in that I didn't want to farm machines. I was so enamored with your method that I decided to replicate it. For the most part it's been producing excellent results. The stalks on all plants are quite girthy and the growth rate seems very fast. We started with six babies, two each of Master Kush, Green Crack and Super Silver Haze. We kept one each as mothers and are flowering off the extra MK & the GC together while we await the first crop of clones to mature. The extra SSH was culled. We've got separate veg & flower space. The MK & GC are just over four weeks into flowering and in the last two days we've seen several burned leaves. I've attached some photos I took tonight showing my concerns. We've had leaf upcurl on and off, especially with the GC. In the future we'll be flowing a crop of the same strain at one time. We're watering with tapwater and don't have a Ph meter or kit. We're scrogging these and learning as we go. Since mine is a passive garden modeled on yours I thought of you as the authority.

PPMs around 1100
Humidity 34% +-5
Temp 70 to 80F
Excellent ventilation & Circulation
Using Flora Nova Bloom

:thank you: in advance for any help you can offer.

Dr.T
 

Attachments

  • 640x480-P4300025.JPG
    640x480-P4300025.JPG
    57.2 KB · Views: 23
  • 640x480-P4300029.JPG
    640x480-P4300029.JPG
    60.1 KB · Views: 22
  • 640x480-P4300036.JPG
    640x480-P4300036.JPG
    59.3 KB · Views: 22
Last edited:

*mistress*

Member
Veteran
Dr. Tingles said:
We've had leaf upcurl on and off, especially with the GC. In the future we'll be flowing a crop of the same strain at one time. We're watering with tapwater and don't have a Ph meter or kit.
potassium
symptoms appear 1st on older leaves, & goes from base of plant to top...chlorosis appear 1st @ margins of older leaves, which may curve downwards. later, chlorosis move to inter-veinal areas, towards center of leaf & necrosis of leaf margin follow....
effects of potasssium supply depend on inter-actions w. several elements.
generally, nitrogen & phosphorus have antagonistic effects & induce or accentuate potassium deficiency...
calcium & to less degree, magnesium antagonize potassium uptake, & also calcium deficiency can create potassium deificency...
ammonium decreases potassium uptake...
potassium deficiency induces, or accentuates iron deficiency.

calcium
@ inital stage youngest leaves show transparent white dots neart edges, between veins...
inter-veinal chlrosis, while veins remain green. plant stops growing & inter-nodes are short near top of plant (apex).
younger leaves remain small, edgers curled upwards...older leaves curl downwards...older leaves are @ top of plant, lower part of plant younger (more juvenile)...
petioles become brittle & break off in severe deficiencies...

magnesium
mottled chlorosis & brown spotting on lower leaves. yellow spots on inter-veinal areas, veins stay green. green margin may remain around edge of leaf, even if yellow areas have become brown... the deficiency may arise due to high levels of potassium, oor high levels of calcium, or ammonium, or too low media ph...
those conditions make plant move mag from older leaves to new leaves...
this condition develops in soilless culture (ieg, coco), if mag in nutrient solution is allowed to drop to minimum levels of mag, or goes out of balance w/ other cations, ie, k+ (potassium), ca++ (calcium), nh4++ (ammonium nitrogen) & h+ (hydrogen)...

iron
resembles magnesium deficiency but appears on young, rapidly growing leaves, as chlorosis. youngest leaves become yeloow, veins remain green. later chlorosis spreads to veins, then to veins & affected leaves turn yellow to white... shoots stop growing & necrosis appears on leaves that have lost chlorophyll (iron essential for chlorisis)... side shoots & fruits show deficiecies as well...

as w/ calcioum deficiency, iron deficiency is induced by

-too high ph
-too much manganese in media
-anaerobic condiditions in media (sour smell...)
-poor root growth (maybe toop wet?...)
-root death in over-watered media...

improved oxygen to roots & insuring good transpiration improves iron (fe++) uptake...

solution
found that lowering ph to 5.0-5.5 greatly improves micro-nutrient availability, esp iron... as the nitrate nitrogen in hydro ferts make the ph climb in the media, starting it @ slightly acidf 5.0-5.5 seem to make it drift up to only 5.7-5.9 in run-off...

this mean that plant very healthy, lush, gr**n, etc... even after 10wks flower, as long as input solution >5.5 or so, no more than 5.7... & cal-nit applied thru-out. cal very immobile & mag center of chlorophyll molecule... so they special & get fed high rate & separately thru-out... only cal mixed w/ other nutes cal-nit or cal-chloride... no pk flower booster mixed w/ cal or mag - though h!dr0 comp never say this, those elements react not good w/ ea other... greenhouse fruit/veggie gardeners know this though;)

if feed @ 6.0-6.2, afgter cation exchange, media can easily go to over 6.3ph, which make iron very unavailable & make more difficult to process cal & mag...

so... maybe lower input solution to 5.0-5.5 ph...

also, found that feed mag entirely separately @ ph 5.5 or so, that it get thru much better, w/out interacting w/ other chem in the solution. this can be done by regular epsom salt @ 1tbsp/gal...

calcium
supplied thru calcium nitrate - thru-out entire garden - also :yes:... if no cal-nit, then mag-ii-cAl (technaf0r@), which cal chloride+mag nitrate+iron edta... fed separately, maybe @ 5.5 or so ph...

if have regular cal-mag type solution, maybe feed it seprately than regular nute regime... if not & mix it, maybe reduce input ph to 5.5 or so, thpough 5.0 workl very well... just like fnb bottle state:D;)

watering plant too much, or rather not enough aeration in media also :no: esp if 100% coco... can get water-logged @ middle of root, under-neath root-ball, where gardener dont see if dont check...

mixing potassium & or phosphorus booster-type w/ regular mix may be cause of leaf damage, or mixing cal-mag w/ pk-booster, etc... esp if ph over 5.8 initially... :yes: to feed cal separately than other nutes...

cheapo ph drop tester
(>5 coin) very :good: garden tool...essential, if nothing else, especially if using tap water...

get water report
which may show high lvels of calcium bicarbonate, magnesium bicarbonate, lead, copper &/or nitrates, which seem common in many tap water sources... this may affect nutes, but mainly only if ph over 5.7-5.8, as it mostly rise in media, after cec, due to nitrate nitrogen, etc....

so...

maybe drench media w/ total water flush.
let dry for 1 day, then feed fnb @ ph-adjusted to 5.0-5.5... but, should test tap water 1st... to observe how ph changes/reacts, etc... ph very important, esp for passive hydro, that dont recirculate much & media can become over-saturated if not enough perlite, etc in it to let oxygen thru...

how often are they watered?

why a ppm meter & no ph meter?

seem like cal-mag-iron issues, which fixed by lowering ph so that they all can be held in solution & get thru to plant in media...
:2cents:

hope this help.

enjoy your garden!
 
Mistress,

I was intrigued by your method, and have successfully (so far) replicated it for micro-growing. I debated about different types of nesting containers, and on a whim I came up with a method using 2 Litre bottles. I cut the bottle approximately in half, the bottom is the overflow. The top inverted inside it is the container, I made 1/4" holes about 2 " from the "top" which becomes the bottom in use. I used 1/4" twisted nylon rope for wicks. I also hot glued a screen across the top opening from the inside, so that I can drain the reservoir too by removing the bottle cap. Filled with perlite just past the holes, and 50/50 perlite & coco mix.

Working like a charm, water about twice a week. Right now I'm using up the FF stuff I already had. The container probably holds about a litre of medium, the top is cut a little longer than the bottom. I take another cut off bottom when watering, place the container in it and pour the run off back into it, then add fresh nutes.

I've been thinking about trying a big bucket setup outside, I'm in a rural area with a long growing season. I think if I come up with a way to cover the top of the bucket and prevent rain water from entering, it could work well and only need weekly watering.

Thanks so much for sharing your knowledge.
 
C

Carl Carlson

older leaves are @ top of plant, lower part of plant younger (more juvenile)...

Do you grow your imaginary plants in an anti-gravity chamber?

I kid, because obviously it's the other way around.
 

*mistress*

Member
Veteran
micro-passive hydro...

micro-passive hydro...

redneckhippie said:
I've been thinking about trying a big bucket setup outside, I'm in a rural area with a long growing season. I think if I come up with a way to cover the top of the bucket and prevent rain water from entering, it could work well and only need weekly watering.

Thanks so much for sharing your knowledge.
member PhilCuisine does, w/ trashbags:):
https://www.icmag.com/ic/showpost.php?p=3136005&postcount=13

:tiphat:
 

*mistress*

Member
Veteran
planty aging...chrono/physio/ontogenic...

planty aging...chrono/physio/ontogenic...

*mistress* said:
older leaves are @ top of plant, lower part of plant younger (more juvenile)...
Carl Carlson said:
Do you grow your imaginary plants in an anti-gravity chamber?

I kid, because obviously it's the other way around.
?

no... if was other way around, then gardeners would harvest lowest limbs 1st, not fully mature tops... or, oldest part of the plant...

plantys have 3 different ages

1. chronological/actual age...

number of months/years plant has been alive... whether in coco, soil, soilless mix, or no media... age of plant from seed, or cut...
other-wise known as chronological age.

2. physiological age...
stage plant is @ in individual lyfe cycle... some cedars may have 500yr cycles... bristle cone pines are over 3,000 yrs old... some members of mulberry family are annuals;)... but can be re-vegged:D some plants germinate & mature to senescence in only several wks...
some mature in 50 days, some in 60, some may take 100+ for fully developed s foxt@!ls:)... ea species and cultivar has its own physiological age...

3. hormonal age...
ontegenic age... all planty parts are @ different hormonal ages. newest growth @ top of plant & ends of branches is hormonally the oldest... also termed terminal flowers/b*ds... the growth closest to bases of branches & stems are hormonally youngest...
why gardeners take tops 1st, & not popcorn tomatoes closest to main stem 1st...
this is the ontogenic age...


also why cutting taken from juvenile zones (lower, closes to stem) of plant root faster...

.................................|.hormonally oldest/~50% cuts root:yes:
............................\\\|///................................................
.........................\\\\ |////..inter-mediate part/60-70% root
.......................\\\\\|//////.........................................
......................\\\\\\|///////.juvenile section/80% cuts root

so... while the new growth @ top of the plant seem youngest, it actually is hormonally oldest part of planty... terminal flower dominanance, auxins, etc, etc...

this why use this tech-nique w/ trees:
veg until 4x4x4...

flower until @ least day 60, planty ~5x5x5-6x6x6' - take tops...
which reduce planty to ~4x4x4, & give plenty lyght to growth right under-neath tops...

flower 5-7 more days... next set of (new)tops taken, as all of energy sent to new terminal flowers... they get big & swell & fill in...

maybe another 5-7 days for 3rd harvest - of same planty -... then remainder finish...

can change this by removing lower 1/4 of planty @ ~day 21, then only harvest 2-3 of very large tops -... depends on cultivar which tech best...though on ~, planty have 3 layers of ages, from top to bottom, from outside to inside & from actual amount of light/dark tyme in given season (cycle)...

either way, when apply, entire planty get fully mature & not tech of harvest entire plant @ 1 tyme, when 2/3 may not be amber:D:D

either/or, best cutting from mum-stock taken from zone-of- juvenililty (lowest, closest to main stem, ~6" long), which root fastest & perform better than cut taken from top (terminal flower, which is oldest & have less rooting hormones)...

*edit*
Juvenility
All woody seedling plants progress through a series of developmental stages known as phase changes. This process, known as ontogenetic, meristem, or developmental aging, is distinguished from chronological or physiological aging. The first or juvenile phase is often associated with superior adventitious rooting relative to mature, adult phase tissue. It begins when the seed germinates and is characterized by vegetative growth and an inability to respond to flower-inducing stimuli. The length of this period varies by species but can persist for 30 to 40 years in some tree species. The various phases may be associated with distinct morphological, developmental, and physiological characteristics (cit). Juvenile tissue is often distinguishable from adult phase tissue by differences in leaf shape, leaf retention, stem thorniness, and pigmentation. Vegetative propagation of a meristem from a particular phase on the donor plant will reproduce its physiological and morphological features (cit). This may prove valuable in terms of promoting early flowering or perpetuating a distinct morphological trait in the rooted cuttings.
It has been noted that the adventitious rooting ability of many woody species declines with ontogenetic age, when the source is a seedling-derived mother plant. The upper, more distal portions of the stock plant are first to exhibit this reduced rooting potential. Cuttings from the lower, typically juvenile, regions of the plant generally maintain a higher rooting capacity than those taken from the upper portions (cit).
Cone of Juvenility
The majority of juvenile growth occurs when a plant is young and still exhibiting juvenile characteristics. As a plant ages, the older and lower parts retain their juvenile traits and the adult phenotype appears on the newest growth. On a tree, the trunk and lower branches that formed when the tree was young will retain their juvenile characteristics. Once the tree is older, the newest branches that form exhibit adult traits.
hope this helps. enjoy your garden!
 

Dr. Tingles

New member
Plea for Help - Update

Plea for Help - Update

Thanks for the quick but thoughtful response Mistress.

Let me answer your questions first. We water/feed about every 1 1/2 weeks. And we didn't have the facility to test pH because I thought I read in this thread that I might be able to get by without one. What I also read in this thread but didn't do either was that I should be alternating watering and feeding:spank:. I have been keeping the ppm of the reservoir at a fairly steady level instead. This is how we learn...right?

Since reading your reply I've purchased a pH test kit, the type where you take a sample, add a few drops of the test solution and then do a color match. The reservoir was at about 7, our tap water tests at about 6.5 or just under. I was surprised that the reservoir pH wasn't higher.

The relative humidity in the garden is pretty low (35%ish). I imagined that would amplify the possibility of light burn so I've moved the lamp up from 14" to about 18" above the canopy. If nothing else, that should prevent it from exacerbating the situation.

I've pruned off all the dead/burned leaves in hopes of minimizing exposure to infestation. We have to stay up on our Neem oil treatments (1 1/2tsp per qt + 1/4tsp dish soap) or spider mites move right in.

We've irrigated both plants with five gallons of fresh water each and then drained the reservoir. Per your suggestion we will feed them tomorrow with FNB at pH 5-5.5.

Considering the pH levels noted, do you still think I've got a cal-mag-iron uptake issue?

Thanks Again,
Dr. Tingles

PS I have now also started a thread in the infirmary with the Stitch triage form info here: https://www.icmag.com/ic/showthread.php?p=3459849#post3459849.
 
Last edited:

*mistress*

Member
Veteran
Thanks for the quick but thoughtful response Mistress.

Let me answer your questions first. We water/feed about every 1 1/2 weeks.
?

1/5-1/4 volume of container/48hrs seem to work, ok. 1x/7day too little water, maybe:chin:

And we didn't have the facility to test pH because I thought I read in this thread that I might be able to get by without one.
?

fnb do get steady ph, but also >ph also made by simple vinegar...maybe that also in thread. apple cidar or dist. white...
ph w/ fnb generally settle to 6.0-6.2 w/ tap...
that work ok... esp for smaller plants. 5.0-5.5 input maybe get to 6.0 after ~wk or so though as nitrate in media make ph increase, maybe...
if have issue, lower ph seem to let micro-nutrients stay in solution & get to planty...maybe... if not, something else, maybe air circulation, air for roots, etc...
We've irrigated both plants with five gallons of fresh water each and then drained the reservoir. Per your suggestion we will feed them tomorrow with FNB at pH 5-5.5.

Considering the pH levels noted, do you still think I've got a cal-mag-iron uptake issue?
only imaginary gardener/fictitious planty/all inter-net data:D:D....
but...maybee see what that solution & ph do over ~7-10 day... moist media, not dry/not too wet, maybe 1/2" solution in basin...every other day feed-water-feed. check run-off & lower input ph if over 6.2...

container syze? light?
 

Dr. Tingles

New member
Plea for help - Update

Plea for help - Update

We fed with FNB at pH5.0-5.5 and it looks like following your direction has stopped the hemorrhaging and is tickling growth back into them. The burning has either slowed to imperceptible levels or stopped altogether. Hopefully in a day or so we will see a return of color to some of the leaves that showed chlorosis and if the planets align, resumed flower development. Symptoms sure progressed quickly.

Thanks so much for sharing freely your means & methods. We'll be feeding/watering more often and in smaller quantities while keeping a close eye on pH. This being a sort of trial run for us it seems like we should be able to avoid repeating many mistakes once we get an actual crop started. Which is another way of saying we've made a lot of mistakes but we are learning from them.

We have our plantys in #2 nursery pots sitting in a common reservoir due to space constraints. The scrog will hopefully be filled much more efficiently with a full crop. However, I've read recently about harvesting in stages and am wondering if the yield for my space would be more efficient that way. It'll be fun to find out. On that note, thanks for helping us enjoy our garden.
:ying:
Dr. Tingles & Nurse Myla
 
I have a question, in an earlier post:

just feed every 2d-3d watering. and dont try to do too much.

Does this mean you feed every time you water, every 2 - 3 days, or does it mean to feed every second or third watering?

Also, I have been intrigued by the airpot system and am about to try them. If you haven't heard of this, here is a link with video:

http://www.superoots.com/air_intro.htm

I would like to incorporate the wick/reservoir concept using these pots. I could seal up enough of the bottom holes to allow the "hempy bucket" type reservoir, but also the bottom is just a lattice work that would need to be sealed. It seems to me that I could instead put round tray of appropriate height that fits within the pot. Or, I'm thinking to try the wick with separate reservoir container underneath, without the "hempy bucket." Just wondering if this method adds much to the wick action?
 

*mistress*

Member
Veteran
redneckhippie said:
I have a question, in an earlier post:

*mistress* said:
just feed every 2d-3d watering. and dont try to do too much.
please provide post #, so can id what the specific topic was...
Does this mean you feed every time you water, every 2 - 3 days, or does it mean to feed every second or third watering?
the feeding regime depends on comfort of gardener w/ applying nutrient solution to plantys...
if just starting & not run plantys few tymes, maybe feed-water-feed work well... full strength ferts...

if familiar w/ ph drifts/stability, cal/mag balances, n:k ratio, c:n ratio, etc... then maybe can feed every watering... (feed-feed-feed)... still, maybe give warm water-only every 4th or so, to displace any accumulation, if any thair...

every 2nd watering would be approx (~) feed-water-feed...
depends on:
1)how much run-off is in basin,
2)what media is used,
3)ph of run-off,
4)general age, health & vigor of plantys,
5)syze of plantys
6)amount of water dehumidified per 24-36hrs...

Also, I have been intrigued by the airpot system and am about to try them. If you haven't heard of this, here is a link with video:
maybe if read entire thread, find that cheapo (free) 4 gal buckets can be drilled full of holes, to in effect make diy 'a!r p0ttery'...
https://www.icmag.com/ic/showpost.php?p=3251070&postcount=177
1134Krusty_bucket_construction-thumb.jpg

redneckhippie said:
I would like to incorporate the wick/reservoir concept using these pots. I could seal up enough of the bottom holes to allow the "hempy bucket" type reservoir, but also the bottom is just a lattice work that would need to be sealed. It seems to me that I could instead put round tray of appropriate height that fits within the pot. Or, I'm thinking to try the wick with separate reservoir container underneath, without the "hempy bucket." Just wondering if this method adds much to the wick action?
...?...:thinking:...

part goals of thread:

1)>coins
2)diy parts, re-used from other industries
3)k.i.s.s.

if go back to post 1 of this thread, maybe find that 4 gal buckets usually free. 5gal also maybe free.
w/ drill bit, make as many holes as desire - any place on bucket desired.

maybe extend wick(s) thru 1-4 of these holes, into shallow basin of run-off nutrient solution. end.

no need to make more complex. if desire to run special type of proprietary container - try it out!
no experi w/ such container - just as useful to diy similar w/ pieces of material, re-used/modified.

sealing holes of container acquired for having holes kind of not required... if want to inc a!R p0ttery in wick system, simply raise a!r-type container over shallow basin, by using spacer, etc...


not sure what trying to accomplish,but...if go back to post 1, maybe see that already found that 4 gal (drilled full of holes) fit snug in 5 gal, leaves enough space between the 2 buckets & permits wick to be placed in 4 gal, extending down into basin/res of 5 gal.

hope this help.
 
1)>coins
2)diy parts, re-used from other industries
3)k.i.s.s.

if go back to post 1 of this thread, maybe find that 4 gal buckets usually free. 5gal also maybe free.
w/ drill bit, make as many holes as desire - any place on bucket desired.

maybe extend wick(s) thru 1-4 of these holes, into shallow basin of run-off nutrient solution. end.

no need to make more complex. if desire to run special type of proprietary container - try it out!
no experi w/ such container - just as useful to diy similar w/ pieces of material, re-used/modified.

ok, I understand all of that but my situation is a micro grow so 4 & 5 gal containers are not an option. There are several posters here who have reported substantially increased yields just from switching to these pots. It's not just that it has a lot of holes, it's the "egg crate" shape that keeps the roots from circling along the sides. I haven't found a way to create this, but they aren't very expensive and are re-usable. I received some last week, and I've started a couple now, with wicks poking out and sitting in a reservoir tray.

1litre200.jpg


My question was basically, your original post calls for the "hempy" style 4 gallon bucket with a built-in reservoir. Then it's sitting in another 5 gallon bucket reservoir. You have also stated that after the first couple of weeks flower you only add water/nutes to the 5 gal reservoir. It seems to me that at that point the hempy reservoir in the 4 gal bucket serves little purpose - unless you are filling the lower container up past the drain holes in the upper?

Thanks so much for sharing your knowledge.
 

*mistress*

Member
Veteran
ok, I understand all of that but my situation is a micro grow so 4 & 5 gal containers are not an option. There are several posters here who have reported substantially increased yields just from switching to these pots. It's not just that it has a lot of holes, it's the "egg crate" shape that keeps the roots from circling along the sides. I haven't found a way to create this, but they aren't very expensive and are re-usable.
the shape of the hole doesnt seem to be a factor. the roots will grow out of the holes if water is there, or be pruned if water is not...
I received some last week, and I've started a couple now, with wicks poking out and sitting in a reservoir tray.
that should work.
My question was basically, your original post calls for the "hempy" style 4 gallon bucket with a built-in reservoir. Then it's sitting in another 5 gallon bucket reservoir. You have also stated that after the first couple of weeks flower you only add water/nutes to the 5 gal reservoir. It seems to me that at that point the hempy reservoir in the 4 gal bucket serves little purpose - unless you are filling the lower container up past the drain holes in the upper?

Thanks so much for sharing your knowledge.
s
holes drilled into 4 gal bucket. 4 gal fits snug into 5 gal. no need for spacer. the 4 gal can have holes all over, or just 1-2" from bottom. either work. more holes generally requires more watering, as more air tends to increase evaporation. either, can place wicks in 4 gal that go into 5 gal. more holes seem to get more environmental air going thru container... so whole garden become air pump/stone. they still require top watering, but the majority of the water does come from sub-irrigation. the top 1/3 of media kept damp.

yes, they can be watered (top-fed) until the run-off goes up past the drainage holes of the 4 gal. best if in mid-flower when they drink a lot. the space between the 2 buckets does not hold more than ~1gal... the tech is to feed just enough that they drink whatever was fed w/in 24-36hrs... this generally makes ph mngt easier, as new solution replaces older solution. exact rates depend on syze of plant, dehumidification, lyghts, etc...

the method is scalable... can feed by sub-irrigation, top-feed, or both. they seem prefer sub-water 24/7 & top-fed ~every 48hrs...while can bottom feed 90%, still they require water coming thru from top-to-bottom. every other water seem work...

maybe try to maintain minimium 1-2" nutrient solution 24/7...
that can be 1-2" inside of the 4 gal (inner container), 1-2" inside of the 5 gal container (drawn up by wicks), or 5 gal filled to level just above drainage holes of 4 gal. or... 200 gal trough w/ 10 gal containers filled w/ holes & 2" solution in basin.
can drill entire 4 gal bucket full of holes, or only 2-4 for wicks...either/or...

w/ small plantys, maybe just 1/4"-1/2" solution in basin.
2" of nutruient solution maybe too muych for small plantys - as they cant drink that much per 24-36hr. roots should come out of the a!r-type container & into the solution - then fish-bone & branch out. if want roots to stay in container, only feed until slight run-off. that should encourage root pruning inside container & not further root growth in to res/basin... the low-walled basin permits the environmental air to go thru the container. regualr tote may block air flow.
the tech can be used to 1) force roots to grow outside of holes, or 2) pruned inside of container.
 
Last edited:

wellwaterblack

New member
How long do you think you can go without changing or topping off the reservoir if this wick system was hooked up with a float valve? How large of a reservoir would you need per plant? Your help is appreciated.
 
Top