What's new
  • Happy Birthday ICMag! Been 20 years since Gypsy Nirvana created the forum! We are celebrating with a 4/20 Giveaway and by launching a new Patreon tier called "420club". You can read more here.
  • Important notice: ICMag's T.O.U. has been updated. Please review it here. For your convenience, it is also available in the main forum menu, under 'Quick Links"!

Ambre's New Grow Setup

G

Guest

This is my first grow in about 7 years. My very first grow was about 30 years ago (yes, I know, I'm dating myself - my Mom still calls me an overgrown hippy).

I'm building two separate areas - the first is for mothers, cloning, & veg. The second will be the flowering area.

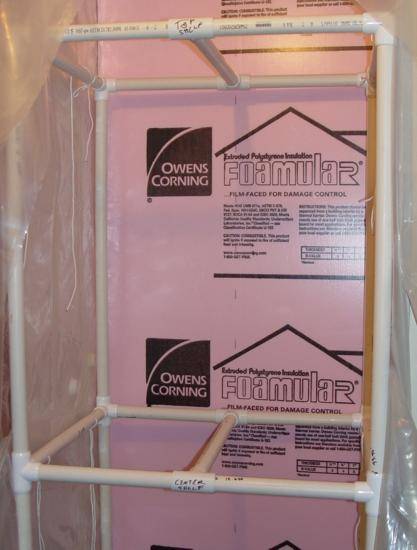
The first area is going in a corner of my walk-in closet (31.5"w x 25"d x 72"t). It's divided into two 3' tall chambers; the mothers will go on the top shelf and clones/veg will be on the bottom shelf. I'll be using DWC in rubbermaid tubs for this garden.

Here is the area with 6mil plastic in place as a moisture barrier


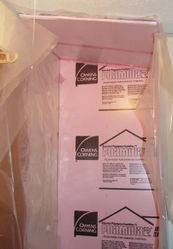
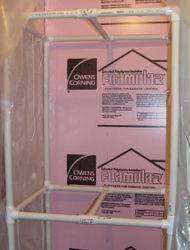
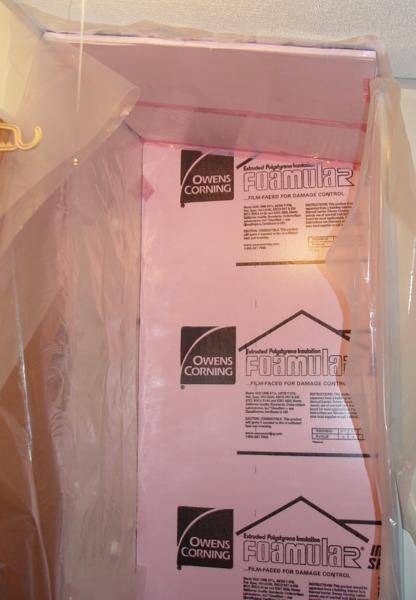
Here is the area with insulation added on the outside wall & ceiling


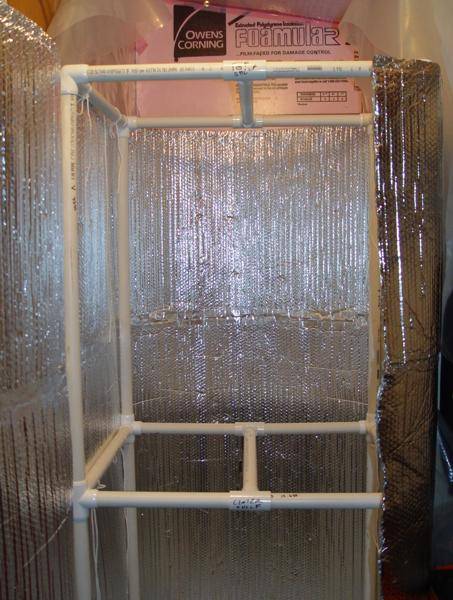
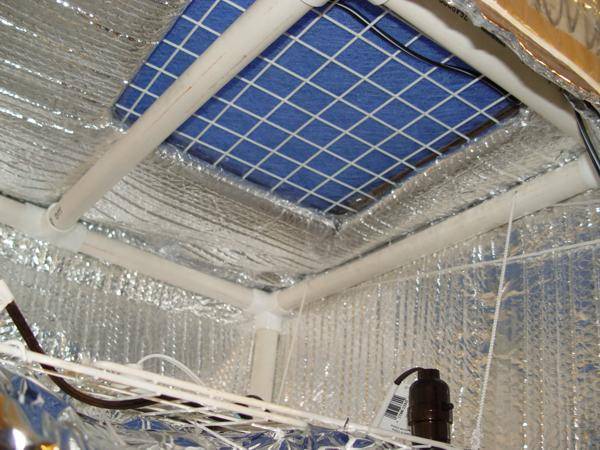
The framework for the garden is made of 1" PVC pipe. The ropes dangling from the top & center supports are to hold the light fixtures. I drilled holes through the pipe for the ropes to pass through & will be installing rope cleats on the uprights.


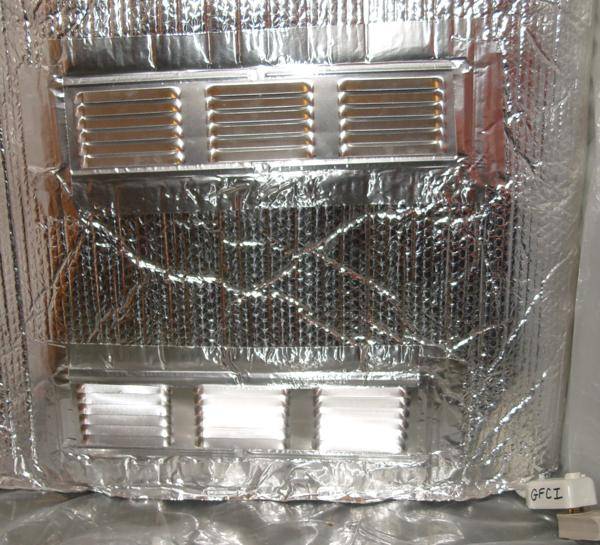
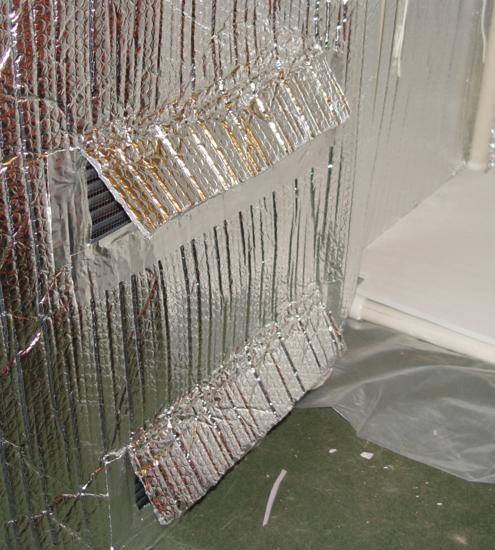
Here is a picture of the garden with some of the Reflectix shell in place.


The shelves are plywood which I am painting with several coats of Kilz 2. They will be placed on the bottom & center supports.

This is as far as I've gotten today. A carbon scrubber will be mounted on the top and passive air intakes on the bottom. Holes will be drilled in the center shelf to allow for free air flow.

Lighting in this small garden will be CFLs (a mix of Daylight & Warm White). The frame I'm building to hold the lights will allow up to 10 bulbs in each section, though I don't anticipate using that many very often. Capacity should allow for up to 8 mother plants (not that I will have that many except when waiting for sexing).

The flowering area will be in my unused bathtub. The reservoir will be inside the tub and the garden built above that. The main garden will be ebb/flow and probably SCROG. It will be 52"w x 26"d x 54"t.

I'll use fluoros to start with until I can modify my 400 watt HPS for air-cooling. The case is already enclosed with glass; I just have to cut ventilation holes & figure out how to connect the ducting.

I also need to cut a hole in the wall for the ventilation outlet since there isn't a ceiling fan in this bathroom. Putting a dryer-style vent in the wall in looks a lot easier than putting in a ceiling fan!

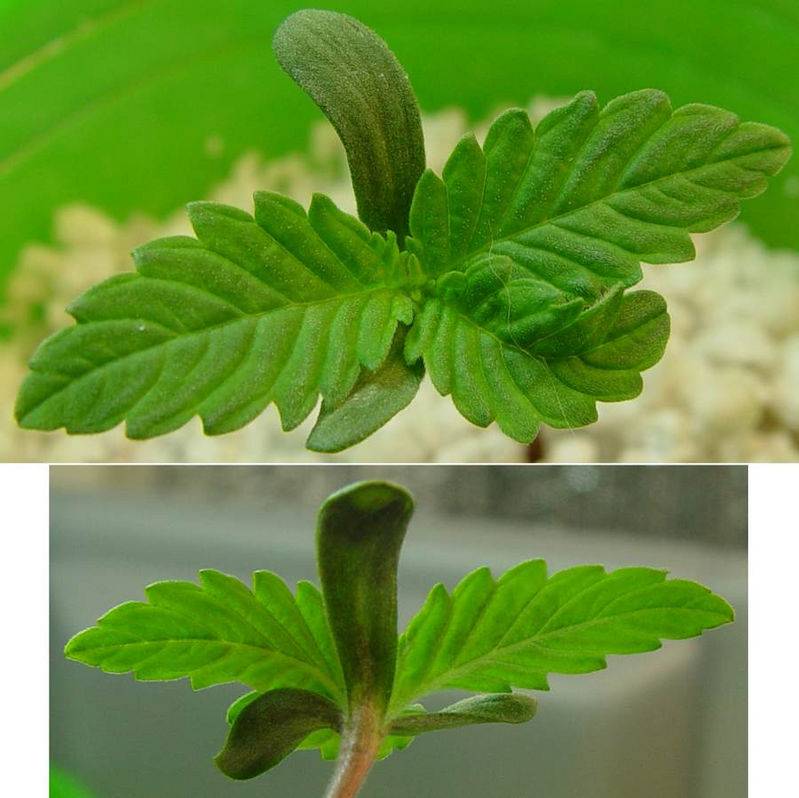
I've got Bogglegum, Lifesaver, and Gypsy's Magical Mystery Mix already on hand and just placed an order for the Nirvana 4-pack. The first grow will be the seeds I already have on hand; I'll start testing the Nirvana seeds for the next round.

What fun!!!!
 

Sleepy

Active member
Veteran
what a great start!!

can't wait to see what you do with the bathroom!!

you've got some fine genetics to work with, too!

:lurk: :lurk: :lurk: :lurk:
 
G

Guest

Work Sucks - but Money is Great!

Work Sucks - but Money is Great!

Thanks for the comments! I've had to get "paying" work done the last couple of days (my boss is a real slavedriver - I own my own business :smile:).

I've got the light rack with reflector and the shelves done, but I've got to get the ventilation and electrical done. I'll update with pics in a day or two.

I have a deadline - I've got 11 seeds germinating (4 Bogglegum, 4 Lifesaver, & 3 Magical Mystery Mix). Soaked them in water for 24 hours; several seeds were already cracked open when I transferred them to Perlite last evening :woohoo: . I have them in a makeshift unit with a couple of 20 watt 6500K CFLs for now and hope to have the small garden ready for them by Friday.

Then I get to start on the flowering unit. I figure I can take my time on that one since I want to get clones from the plants before I put them in to flower; I estimate 4-6 weeks before they'll be ready.

More later - got to earn more money to pay for the toys....
 
G

Guest

Sleepy - I just read about your upcoming surgery. Best of luck and come back as quick as you can!

5 babies are popping up this morning - 3 Bogglegum & 2 Lifesavers :canabis:
 
G

Guest

Electric & lighting

Electric & lighting

Here's the next set of construction. I have the basic unit done and am working out ventilation issues right now.

First, I found power strips that have GFCI protection. Walmart and Home dePot both sell the small ones (Walmart is quite a bit cheaper) and only Walmart sells the large one. Since these are supposed to be "tested and reset" each time you turn them on, I am in the process of testing one with a timer to see if it will work or if I actually need to hit the reset button every time it comes on. If it does need the reset button punched each time, then they are only useful for 24/7 applications.


The light "fixture" is made from two 14" square grids (originally part of a storage cube set). The grids are overlapped and held together with small cable ties. Plastic-coated wire hangers were cut and arranged around the grid to make the frame for the mylar reflector. Mylar was taped in place over the frame, the areas where sockets were to come through were reinforced with aluminum tape, then holes were cut. The socket is on the top and "Y" splitters are screwed in tightly from the bottom of the four mounted in the corners. The one mounted in the center gets a circle compact fluoro, so it doesn't get a "Y". The ropes that were run through the holes drilled in the PVC framework are tied to each corner of the grid and the light is done.


G

Guest

Carbon Scrubber

Carbon Scrubber

I didn't think to take pictures of this as I built it, so I am going to try to explain it. If this doesn't work, I'll draw some diagrams.

I didn't want the carbon scrubber inside the grow compartment because of lack of space. I also don't want to mess with ducting for this area, so I designed a unit that sits on top of the grow compartment.

Supplies:

4 - 16x20x1" disposable furnace filters
Pelletized activated carbon
1 cardboard box 16" x 16" x 24"
Rubber (not foam) weatherstripping
Metal grid or chicken wire to support the weight of the filters
9" Lakeside metal fan (3-speed)
6-mil plastic drop cloth to cover box
Packing tape

The shell is a heavy cardboard box. All seams and holes were covered with packing tape on both the inside and outside. Since I am using a 14" metal grid to support the weight of the filter, I cut a 14" square hole in one side of the box - this is the hole that will pull air out of the grow compartment. If you are using chicken wire, you can cut this hole the same size as the filter (note that the 16" x 20" filters are actually around 14" x 18" because the cardboard frame takes up some of the space). The box is mounted on top of the garden compartment on its side - this allows access to the box through what would normally be the top.

The box is then covered with a sheet of 6-mil plastic drop cloth. Tape every single seam securely and completely! Remember that air will follow the path of least resistance - if there are any leaks in the box, it won't pull air up out of the garden. Cut the plastic over the air input in an X shape (from corner to corner of the square). Pull the triangles this forms to the inside of the box and tape securely. I cut part of the points of the triangles off to make it easier to fasten. On the outside of the box, put rubber weatherstrip all around the hole to help prevent air leaks.

A circle just big enough to hold the fan is cut on one of the ends. I started by cutting the hole a bit small and enlarging until I could just force the fan into place (I figured it was easier to make the hole larger than it would be to make it smaller!) The plastic covering the hole is sliced into wedges (like a pie); the wedges are pulled to the inside and securely taped in place.

The Lakeside fan I used has a metal enclosure around the fan blades and a metal stand fastened on either side. I forced the fan into the box from the outside and the pivot points that hold the stand are sufficient to hold the fan in place. Eventually, I will probably replace the cardboard unit with a plastic container - at that time, I will probably unscrew the two halves of the enclosure and hold the fan to the container by placing the back half inside the container and the front half outside, using those screw holes to secure it in place.

Put the box on top of the garden unit in its final position. Use a couple of pieces of tape to hold it in place. Cut the Reflectix material forming the shell of the garden in an X shape the same as you did the plastic. Again, pull the Reflectix to the inside of the box (very tightly) and fasten securely with tape. The rubber weatherstripping should help seal this so no air leaks can occur.

Place the chicken wire or grid in place over the hole & secure with tape. I ran the cord for the fan across the grid & down the far edge since my electric connections are all on the right of the unit.

Now for the carbon scrubber. Take two of the furnace filters and tape them together on all 4 sides. The double layer will help support the carbon and prevent any dust from getting into the grow area. Make sure to pay attention to the arrows on the filters that indicate which direction the air should flow when assembling this. Put about 1/4" layer of carbon on top. Place the third filter on top and securely tape all 4 sides. Repeat with another layer of carbon & the last filter.

Place this filter unit inside the box. Tape it down securely on all 4 sides so that any air pulled into the box has to come through the filter, not around it.

The only disadvantage to this arrangement is that the fan speed has to be set from inside the box. I assumed I needed it set on high (and I was right). Close the open side of the box and seal all openings securely with tape. I left enough plastic loose from the top flap that I could pull it down over the bottom flap and slightly to the sides to make sure I had a good seal.

Here is a photo of the completed unit on top of the garden and another of the vent opening and filter from the inside of the garden compartment.


Last edited:
G

Guest

Ventilation

Ventilation

I used "under-eave vents" for the passive air intakes on the garden. These are thin vents with a screen on the inside. I assume the screen is intended to keep insects out, but it will also help keep cat hair out!

I cut a hole in the reflectix a bit smaller than the vent and used aluminum tape to secure the vent in place. I left the flap of Reflectix on the inside to help cut down on light leaks, but it is so heavy that it is interfering with air flow. I am going to cut these flaps off and replace them with lightweight mylar flaps that will more easily pull inward and let more air through.

These are placed at the bottom of the door so the air comes into the bottom compartment, is pulled up into the top compartment via ventilation holes drilled in the shelf, and then pulled out the top through the carbon scrubber.

Here are pics of the vents taped in place from the outside & inside:


G

Guest

That finishes the basics of this unit. I need to make a second light unit for the bottom half of the garden, but it will be a little while before the plants grow big enough to need more space than the top gives them.

I have a digital thermometer/humidity meter that has a remote sensor on the unit. The remote sensor is designed to be placed outside the house so you can see inside & outside temps at once, but I will be placing the remote sensor at canopy level to monitor actual temps. The meter also records high and low temps for both locations so I can monitor that, as well.

I am now in the process of tweaking the ventilation to keep the unit cool enough for the plants.

Speaking of the plants, 9 of the 11 seeds have sprouted. I have 4 Bogglegum, 3 Lifesaver, and 2 Magical Mystery Mix. I haven't given up on the last Lifesaver & MMM seeds; they are still covered with saran wrap & being kept warm in case they come up.

Ah, progress! :woohoo:
 
Last edited:

cough_cough_eer

Anita Bonghitt
Veteran
Nice lookin grow area you got there.:joint: I'm gettin ready to build another veg area, as mine is inefficient.I made everything in mine also.My flower room in an unused bathroom too. :joint:
I'm the cat lady in my neighborhood also. Im feeding about 5 of them now, they(strays) sure know a sucker when they see one. :cool:
 
G

Guest

Nice Job :yes: I just finished my new flower chamber. Well almost, I still gotta figure out how to make a light proof passive intake.

Best of luck on your new grow setup.

Mo,
 
G

Guest

Mr GreenJeans - Thanks! I put a lot of research and planning into this before I started (spent weeks reading books & collecting info off the web). I figure a 5 megapixel camera has to be good for something! I've got some macro shots of the seedlings for when I start the grow thread.

Cough_Cough_eer - Yeah, cats sure know suckers when they find them! I've got about 30 rescues at the moment. Did I see that you're around the Big D? If so, I'm not too far from you.

Bigmo - Glad to know I'm not the only one using a bathtub. They have one big advantage - spills go right down the drain :biglaugh: The hardest part is going to be installing the exhaust vent - this bathroom doesn't have an exhaust fan.

I've seen two different methods of making lightproof air intakes that are pretty good.
One is to use two PVC elbows (joined with a length of pipe) painted black coming in from the bottom or side of the unit. The double curve and black paint stop light from coming in and the length of the pipe can place the incoming air at whatever position you need it. If dust (or cat hair) is a problem, you can place a piece of filter over one end and hold it in place with a rubber band (I saw one guy using pieces of pantyhose as a filter - novel recycling idea!)
The other is to use a photography darkroom vent - this is a vent with louvers & flaps that open to allow air flow but are angled to stop light leaks (since darkrooms need to be lightproof, as well). These aren't cheap but do seem to work well.
 
Last edited:

Sleepy

Active member
Veteran
wow, i wish i was handy!!

congrats on the little guys poppin for you, ambre!! :woohoo: :woohoo:

thanks for your kind words, too!

my wife is the'cat lady' here, Anita, you're right!! they sure can find the suckers!! :pointlaug

nice job on your cab!
 

Secret Room

Member
All I have to say right now is WOW are you one handy creative individual. I am going to have to set up my own closet this week or whenever the light & fan gets here. I got a lot of great ideas about venting from your thread that was one of my concerns is how I am going to do it with a limited closet space.
 
G

Guest

Secret Room - Thanks! I'm a do-it-myself kind of lady; I figure that if I build it, then I know how to fix it if something goes wrong. And... I don't have anybody to blame but myself if something doesn't work right, either!


Updates:

GFCI power strips - these work just great with timers, so I'll be using them for everything in both gardens. The more protection I have against fire or other problems, the better.

Plants - the 9 babies are growing well. Second sets of leaves are out. One plant is a mutant - it's trifoliate (3 leaves instead of 2). Here's a picture


Ain't it cute?

As soon as they are big enough, I'll be moving the seedlings over to the bubbler cloner to grow a bit more before I move them into net pots in the tubbler. Since I have them in straight perlite right now, I'm feeding them with 400 ppm GH Flora nutes.

I'll be starting a grow thread in the Hydro group shortly and use this thread to document the construction of the flowering area. I have all the supplies I need to build the main area, all I need to do is figure out the ventilation system.

I discovered that the previous owners of the house blocked over the ceiling vent in the bathroom the flowering garden is going in with a ceiling-mounted heater, so I removed the heater. (I have yet to figure out what good a ceiling-mounted heater is when the ceiling is 9' tall and the bathroom is huge; it takes 25 minutes of running the thing before the heat gets low enough in the room to warm it up at human level!) I'm going to remove the low-power fan that's in there now and just hook up my garden blower directly to the exhaust hole. That solves the problem of my needing to have a 20' ladder to get up to the roof and cut my own vent hole.

Yeah - I'm getting there! :cool:
 

GMT

The Tri Guy
Veteran
Ok now I've found your main thread. I love the fact that your taking trouble from the start, to make things easier for yourself in the long run. Your planning on making this a permanent hobby aren't you. Esp now you have your own tri to start a breeding program with. I'm subscribing to this thread so it's easier to keep track of in the future.
 
G

Guest

Sysprog:

Thank you for the compliment. I've got to admit that I love the process of planning projects as much or more than I enjoy the actual building.


GMT:

As permanent as I can manage! I took down my last garden when I found an outstanding source of high-quality weed for more than reasonable prices, but he has retired (literally - he turned 65!) and I'm tired of not having anything to help me through my migraines.

Since I've built gardens & hydro systems before, I have a good idea of what works for me in the limited space I've got available. My mothers and veg areas are 25" x 32" x 36" tall each; the flowering area will be 53" x 26" x approx 54" tall. More than enough space to keep us supplied since I have no intention of selling (though some may end up being gifts to certain special people). My better half and I are looking for land so we can move out of town and get some privacy and quiet; at that time, I'll probably expand the garden so I have enough room to play with breeding. In the meantime, I'll be keeping mothers of the very best plants so I have a selection of genetics when I do have more room. I figure I'll be able to keep 6-8 mothers as long as I keep them small and replace them with fresh clones when they get too big.

I prefer to put in extra effort to start with to save a lot of effort later. I hate wasting time unnecessarily. There are also times that my business demands every minute I can give it, so I have to have a system in place that allows me to maintain the garden with a minimum of time investment.

Not knowing what's going to happen with the Emery bust increasing paranoia levels on the part of seedbanks, I'm trying to stock up on some good genetics now to keep in the fridge. I've got Bogglegum & Lifesaver from BOG and my order of Nirvana seeds was shipped a few days ago (Aurora Indica, NLxBig Bud, PPP, & Bubblicious). I got the Magical Mystery Mix (Sagarmatha genetics ) with my order of Bog seeds and hope to be getting the C99xblueberry as my freebie with the Nirvana order. I still want Bog's new Sweet Cindy (which isn't up on Seedbay yet). When I get some spare money, I'd love to have some others like pure blueberry, NL, Cinderella 99, etc.

All that should keep me busy for quite a while, especially with my limited growing space!

Sorry for rambling on so long. I guess I feel wordy tonight! But, I'd better get some more work done. :whip:
 

Latest posts

Latest posts

Top