I2KanGrow
Active member
Isn't it strange, you can be driving along, and in a flash, your life radically changes in a split second?
This is exactly what happened to me, please let me explain.
Me and a bunch of my ICMag friends were debating modifications to the ever-famous, ever-popular NGB cab OVER HERE, - I personally started-out like a ball-afire, but frankly, things weren't going so well for my design, as time went on. You know how things should get simpler & fall into place as the design gets more refined? well, just the opposite was happening to my NGB cab design - I was dispirited, to say the least!
Anyways, I built a bake-a-round cooltube hood, and some miscellaneous & sundry cab parts, and then I just kinda put it all-aside when life got busy - yes, I let the thread die, and my parts collected dust.
Oh - back to my car. I was driving to work last fall, when all of a sudden I came across this oaken armoir on the side of the road with a "Free" sign stuck on it. I turned the car around, sped home (all the while praying that nobody else needed a really great grow cab, and the county sheriff was hassling someone else/somewhere else!), I got the pick-up, and, well, picked-it-up. Needless to say I was late for work that day.
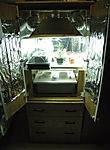
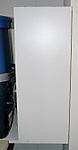
This baby was made for growing herb - here's what she looks like
when closed - And Opened:
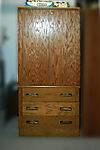
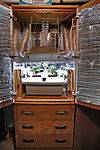
The cab didn't have doors, I added those, but the dimensions of the open area - 29" wide, by 24" deep, by 42" tall were PERFECT for my needs! I have an NGB styled 5 gallon SWC rez, made with busboy tubs, only 2 netpots for plants (any more would really be a waste for me), and up to 17" of clearance over the screen to the bottom of the hood, when it's in place. The whole mess slides-out on rails, for easy maintenance.
I'll just let pictures tell some of the story...


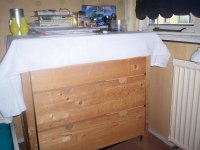
You may have noticed the lack of an electrical room, scrubber & associated wires? I decided to have the cab interior a veg/flower room only, and as clutter-free as possible, so everything supporting is external to the cab. I put the cab on lockable wheels, easy to move, if you know to unlock the wheels, a real bitch to move if you don't. The cab lives right next to another cabinet where I store my power tools - it fits right in. It's hiding in plain sight - stealth to the max! There is a bit of "aquarium gurgle" that can be heard - anyone have suggestions for muffling that?
The ballast is on a shelf 4 ft. away, and the scrubber is actually in another room. The mason jars on top of the cab hide the 4" exhausts for the scrubber & cooltube. with the cooltube in, the cab runs about 2-degrees F above room temps. I pulled the tube out, because my plants were growing slow, because of the low temps - a problem I can live with! I'm running 150w both for MH & HPS.

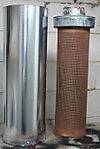

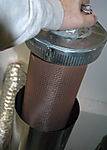

I mounted my ballasts (yes, I have seperate ballasts for MH & HPS, couldn't make a conversion w/ my HPS ballast - BUMMER!) on a hunk of heatsink, to dissipate heat, it still gets quite warm to the touch, I can't imagine how hot it would get inside an NGB box electrical room. I wanted to show you my scrubber, which I made a thread for HERE, but perhaps didn't explain too well. There's a shaded-pole blower in the bottom of my scrubber housing, so I pull air from the cab, and thru the scrubber - no pushing air here - works great!
Let me set the way-back machine to the very end of November, when I decided to germinate my only remaining seed - a Female Seeds Northern Light.


I got off to a shaky start with my girl - I was impatient with her and took cuttings way too soon (hey - 'Cause one is the loneliest number that you'll ever do! ), so the cuttings (and mom) were looking a bit worse-for-the-wear for a while, for sure.
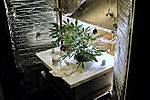

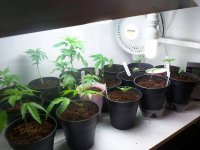
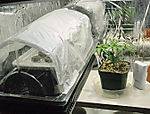
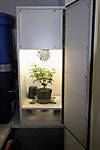
Here's what the girls look like now. I just placed the screen over them, time to start training them. In a few weeks, it'll be switch to HPS, and flip to flower. Perhaps you noticed that PVC cap on top of my rez? This allows me to take H2O quality readings, along with allowing me a means of adding fluids as needed, without the need to take the lid off. Works great!
I have a piece of plastic hose I can use to siphon fluids right into a sump hole, when I'm ready to change-out my fert-water. I also have a 2nd busboy tub, to hold my girls, should I need to repair/scrub-out my rez.
BTW - In case you're wondering - bonzai mom lives in a 12" X 12" X 36" room, and seems to be diggin' it.
So, that's what I've been doing in my spare time the past few months -
-what do you think???????
This is exactly what happened to me, please let me explain.
Me and a bunch of my ICMag friends were debating modifications to the ever-famous, ever-popular NGB cab OVER HERE, - I personally started-out like a ball-afire, but frankly, things weren't going so well for my design, as time went on. You know how things should get simpler & fall into place as the design gets more refined? well, just the opposite was happening to my NGB cab design - I was dispirited, to say the least!
Anyways, I built a bake-a-round cooltube hood, and some miscellaneous & sundry cab parts, and then I just kinda put it all-aside when life got busy - yes, I let the thread die, and my parts collected dust.
Oh - back to my car. I was driving to work last fall, when all of a sudden I came across this oaken armoir on the side of the road with a "Free" sign stuck on it. I turned the car around, sped home (all the while praying that nobody else needed a really great grow cab, and the county sheriff was hassling someone else/somewhere else!), I got the pick-up, and, well, picked-it-up. Needless to say I was late for work that day.
This baby was made for growing herb - here's what she looks like
when closed - And Opened:
The cab didn't have doors, I added those, but the dimensions of the open area - 29" wide, by 24" deep, by 42" tall were PERFECT for my needs! I have an NGB styled 5 gallon SWC rez, made with busboy tubs, only 2 netpots for plants (any more would really be a waste for me), and up to 17" of clearance over the screen to the bottom of the hood, when it's in place. The whole mess slides-out on rails, for easy maintenance.
I'll just let pictures tell some of the story...
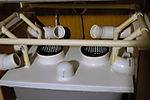
You may have noticed the lack of an electrical room, scrubber & associated wires? I decided to have the cab interior a veg/flower room only, and as clutter-free as possible, so everything supporting is external to the cab. I put the cab on lockable wheels, easy to move, if you know to unlock the wheels, a real bitch to move if you don't. The cab lives right next to another cabinet where I store my power tools - it fits right in. It's hiding in plain sight - stealth to the max! There is a bit of "aquarium gurgle" that can be heard - anyone have suggestions for muffling that?
The ballast is on a shelf 4 ft. away, and the scrubber is actually in another room. The mason jars on top of the cab hide the 4" exhausts for the scrubber & cooltube. with the cooltube in, the cab runs about 2-degrees F above room temps. I pulled the tube out, because my plants were growing slow, because of the low temps - a problem I can live with! I'm running 150w both for MH & HPS.
I mounted my ballasts (yes, I have seperate ballasts for MH & HPS, couldn't make a conversion w/ my HPS ballast - BUMMER!) on a hunk of heatsink, to dissipate heat, it still gets quite warm to the touch, I can't imagine how hot it would get inside an NGB box electrical room. I wanted to show you my scrubber, which I made a thread for HERE, but perhaps didn't explain too well. There's a shaded-pole blower in the bottom of my scrubber housing, so I pull air from the cab, and thru the scrubber - no pushing air here - works great!
Let me set the way-back machine to the very end of November, when I decided to germinate my only remaining seed - a Female Seeds Northern Light.
I got off to a shaky start with my girl - I was impatient with her and took cuttings way too soon (hey - 'Cause one is the loneliest number that you'll ever do!
), so the cuttings (and mom) were looking a bit worse-for-the-wear for a while, for sure.
Here's what the girls look like now. I just placed the screen over them, time to start training them. In a few weeks, it'll be switch to HPS, and flip to flower. Perhaps you noticed that PVC cap on top of my rez? This allows me to take H2O quality readings, along with allowing me a means of adding fluids as needed, without the need to take the lid off. Works great!
I have a piece of plastic hose I can use to siphon fluids right into a sump hole, when I'm ready to change-out my fert-water. I also have a 2nd busboy tub, to hold my girls, should I need to repair/scrub-out my rez.
BTW - In case you're wondering - bonzai mom lives in a 12" X 12" X 36" room, and seems to be diggin' it.
So, that's what I've been doing in my spare time the past few months -
-what do you think???????
Last edited:


 : ok but no laffing, it does what I need it to do and I'm the least handy person you ever met :wink: