What's new
  • Happy Birthday ICMag! Been 20 years since Gypsy Nirvana created the forum! We are celebrating with a 4/20 Giveaway and by launching a new Patreon tier called "420club". You can read more here.
  • Important notice: ICMag's T.O.U. has been updated. Please review it here. For your convenience, it is also available in the main forum menu, under 'Quick Links"!

NGB MicroBox Modifications

I2KanGrow

Active member
So, I've been playing with Google Sketch-Up, and I've been fascinated with the elegance of the NGB box... put the 2 together, and ya end-up doing what comes naturally - I've made modifications!! :woohoo: Let me show you what I've come up with, please comment on these mods!!


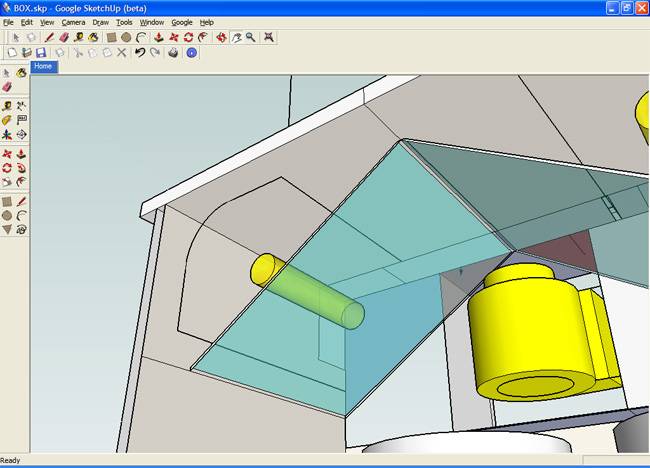
What I've done is removed all of the "plumbing", and replaced it with a "baffled manifold chamber", nestled between the grow and mommy rooms. THis 3-section chamber would exchange hot air with cold, baffle and isolate light between the rooms and the box exterior (no glowing holes - the cabinet intake needs farther mods!), and scrub the smelly air in 1 process.


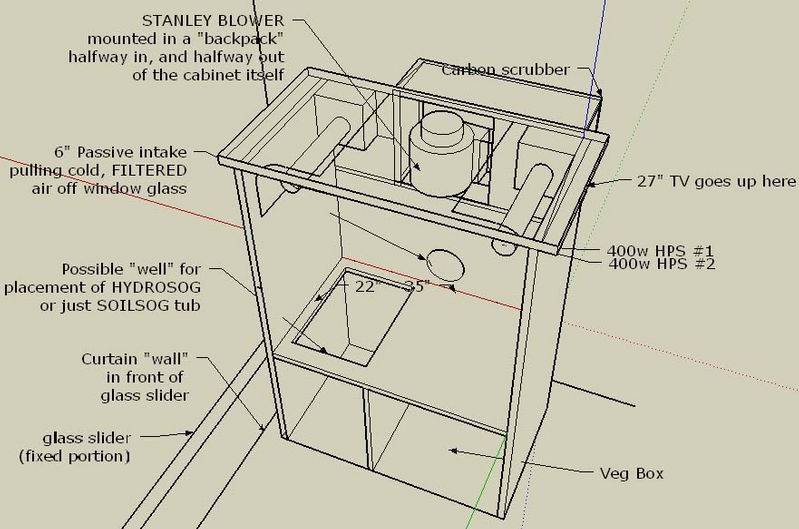
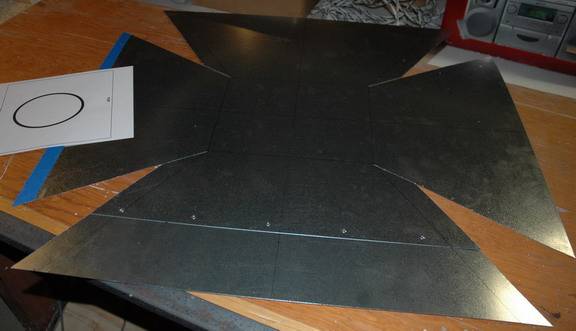
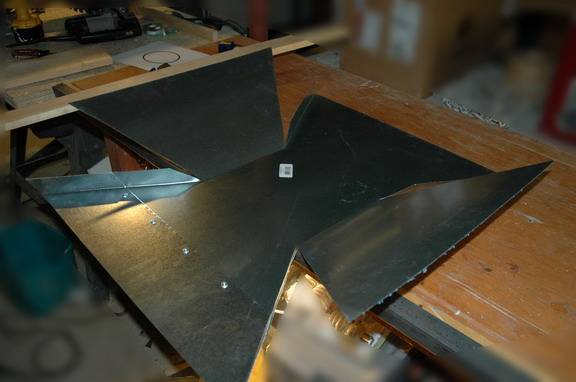
The hood is 8"x10" @ the top, 20"x22" @ the bottom, and will accomodate a Bake-A-Round cooltube. I needed to rivet 2 pieces of metal together, because I couldn't find sheetmetal large enough for my pattern (without it costing a fortune, that is - these sheets cost around $7.50 @ Lowes). After posting this, I'm gonna try to cut-it-out... wish me luck!!


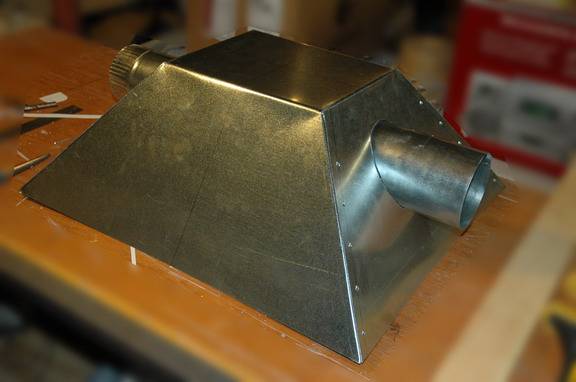
This is the backside of the MicroBox.

I like the idea of having all of the venting relegated to 1 side of the box. I also want to have separate air circulation systems for the cabinet, and the light/cooltube, which should allow me the ability to vent both the MicroBox and the light with smaller, quieter computer fans. All air would be "pulled", that is to say, the cabinet fan would be located in the top-most section of the baffles, and the Cooltube fan would be located on the exhaust side of the cabnet wall.

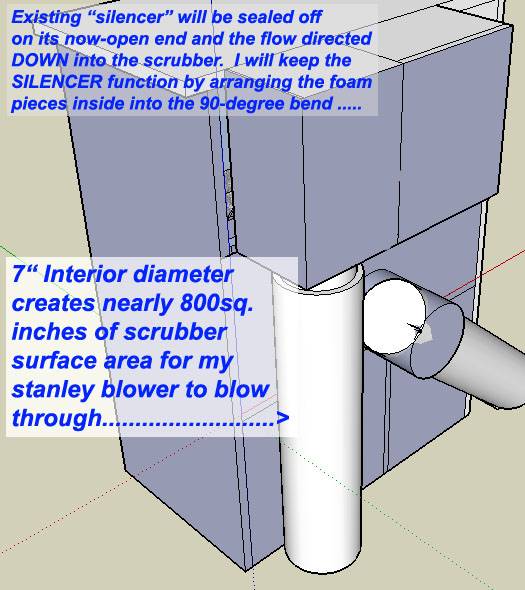
Air would be scrubbed by pulling it thru a smaller (say 6"x6" or 6"x9") rubbermaid box that would be cut into the floor of the top-most section of the baffle. this would be sealed w/ window weatherstripping, and would be easy to lift-out, in order to to easily replace the carbon. This is very similar to Red_Greenery's scrubber, the design of which I think is pure genius!!! See Red's Thread for more details. I like the idea of creating a chimney-of-sorts, within the box, I think it will actually aid in circulating air. The light baffles would probably be made of luan, and the chamber would be painted flat black.

This is a work in it's infancy - comments?????
 

thescissors

Member
NICE work with sketchup! One thing ... seems like you sacrifice some floor area for the new vent idea,,,, are the intake/exhaust ports actually on the back side? not sure i understand that part... :)


obviously i love sketchup too!! ;)


I2KanGrow

Active member
Hey Sciss -

I gotta tell you, you're the one who inspired me to play w/ SketchUp - it sure does a lot for a freebie!

I probably wasn't clear on that point - as far as actual grow area when compared to the NGB cab, there's actually a bit more width and height in the the mother and utility rooms - and there's more height in the growroom. The floor area of the growroom is the the same as the NGB. My box takes-up more area (it's outside dimensions are 11 inches wider & 5 inches taller) overall, however, because of that 3rd chamber and my desire for more height for a bigger utility room, and more growspace in the growroom.

For my purposes, the amount of actual grow floorspace on the NGB is about perfect for my needs.

About that middle chamber, the front will be sealed-off with a solid yet removable door (for access to the carbon-filled rubbermaid). the backside of the entire cabinet will have a non-removable panel on it, with the exception of the cutouts for the chamber & cooltube intake/exhausts. air will be drawn-in thru the bottom square hole on the back, sucked thru the 2 growrooms (the blue arrows), back into the chamber (the red arrows), then drawn thru my scrubber and out the top square hole on the back.

Does that help??
 
Last edited:

thescissors

Member
I2KanGrow said:
Hey Sciss -

I gotta tell you, you're the one who inspired me to play w/ SketchUp - it sure does a lot for a freebie!

I probably wasn't clear on that point - as far as actual grow area when compared to the NGB cab, there's actually a bit more width and height in the the mother and utility rooms - and there's more height in the growroom. The floor area of the growroom is the the same as the NGB. My box takes-up more area (it's outside dimensions are 11 inches wider & 5 inches taller) overall, however, because of that 3rd chamber and my desire for more height for a bigger utility room, and more growspace in the growroom.

For my purposes, the amount of actual grow floorspace on the NGB is about perfect for my needs.

About that middle chamber, the front will be sealed-off with a solid yet removable door (for access to the carbon-filled rubbermaid). the backside of the entire cabinet will have a non-removable panel on it, with the exception of the cutouts for the chamber & cooltube intake/exhausts. air will be drawn-in thru the bottom square hole on the back, sucked thru the 2 growrooms (the blue arrows), back into the chamber (the red arrows), then drawn thru my scrubber and out the top square hole on the back.

Does that help??


yes, thanks, but how does the cooltube factor into the center "chimney stack" deal? :)

edit: it looks like its a seperate vent idea, which would actually work well... if you drew in fresh outside air and pushed out hot cooltoob air, with no mixing with the box-air, thered be no reason/need to carbon scrub that air.... ;)
 
Last edited:

I2KanGrow

Active member
Yup - you got it.... the cooltube is it's own separate cooling "zone". That's how I think I'll be able to get-away with using 12V fans only - I'm hoping that I'll be able to forgo the Dayton shaded-pole route (too expensive).

...Although, I'll certainly get one if I must!!
 

I2KanGrow

Active member
Makin' the hood...

Makin' the hood...

Here's a pictorial step-by-step on assembly of my NGB hood. I couldn't find any information on the design of the original hood in the sticky, so I decided to "roll my own", so to speak:

This took some time, but with the pictures in the orig. NGB thread (THANKS Gantz!!), a pencil, paper, rulers and a calculator, I was able to design the hood, drafted in post #1, and cut-out, here. All cuts in the sheetmetal were made with a power handsaw (sabre saw), fitted with a fine metal blade.


I accomplished the bending by clamping the hood between a piece of angle iron and a piece of wood, right on the line where I wanted the bend, then I just bent it by hand... nothing fancy here!!

The hood actually bent quite well, not perfect, but good enough! - I'm now ready to stick it all together with pop rivets.


Fitting the cooltube:

I created a hole template by calculating the ratio of the "rise and run" on the hood slope, then distorted a 4" circle in Photoshop to reflect the calculations - the ellipse didn't look right...


...but it ended-up being a pretty great fit!


Here's a rough-in of my Bake-a-round tube loosely fitted into the hood, to give an idea of how it'll all come together in the end. I'm torn between gluing mylar or painting white - but I'm leaning toward white paint. I'm trying to design a "bat-wing" insert to put behind the Bake-a-round tube in order to deflect the light better, perhaps I'll mylar that portion only.

Total cost so far:
Bake-a-Round - Ebay $17.00
Sheetmetal - 2 pieces - $13.08, Rivets - $3.97, Washers - $1.97 - Lowes
TOTAL - $36.02

Any suggestions, or comments out there???
 

thescissors

Member
I2KanGrow said:
Here's a pictorial step-by-step on assembly of my NGB hood. I couldn't find any information on the design of the original hood in the sticky, so I decided to "roll my own", so to speak:

This took some time, but with the pictures in the orig. NGB thread (THANKS Gantz!!), a pencil, paper, rulers and a calculator, I was able to design the hood, drafted in post #1, and cut-out, here. All cuts in the sheetmetal were made with a power handsaw (sabre saw), fitted with a fine metal blade.


I accomplished the bending by clamping the hood between a piece of angle iron and a piece of wood, right on the line where I wanted the bend, then I just bent it by hand... nothing fancy here!!

The hood actually bent quite well, not perfect, but good enough! - I'm now ready to stick it all together with pop rivets.


Fitting the cooltube:

I created a hole template by calculating the ratio of the "rise and run" on the hood slope, then distorted a 4" circle in Photoshop to reflect the calculations - the ellipse didn't look right...


...but it ended-up being a pretty great fit!


Here's a rough-in of my Bake-a-round tube loosely fitted into the hood, to give an idea of how it'll all come together in the end. I'm torn between gluing mylar or painting white - but I'm leaning toward white paint. I'm trying to design a "bat-wing" insert to put behind the Bake-a-round tube in order to deflect the light better, perhaps I'll mylar that portion only.

Total cost so far:
Bake-a-Round - Ebay $17.00
Sheetmetal - 2 pieces - $13.08, Rivets - $3.97, Washers - $1.97 - Lowes
TOTAL - $36.02

Any suggestions, or comments out there???


looks great! and great idea about the seperate "zone". perhaps a pair of fans in push/pull config to give more cooling power... the other thing you could to do increase effectiveness is to separate the intake/exhaust air on the back of the unit with some ducting so the in comes in low and cool and out goes out high and hot... avoiding the mixture of the two would be a high priority for myseff! ;)
 
yea that looks good very nice work lots of care into it nice design you got going on too
what size light are you going to flower with? keep us posted and stay stoned
peace vagabond
 

I2KanGrow

Active member
Thanks, guys - I appreciate the encouragement. This is a longer-term project (translation: when I can afford to buy parts & have the time to build!). I'm not in a huge hurry, I'm doing my 1st. ever grow using a Red_Greenery rubbermaid setup, which works very well... but, I like to tinker in the shop, and this seems like the next logical step in "growth".

Vagabond:It's my intent to follow in the footsteps of the designer of the Overgrow NGB Marijuana Stealth Cabinet . As such, I'll be placing a homebrew 150W HPS/MH switchable light system into it. The way things are shaking-out so far, I'll probably purchase the lamps & sockets @ Pro Lighting.com, and purchase the transformer/cap/igniter thru Plant Lighting Hyponics.com. The thing I most want to accomplish is bringing my electric cunsumption down - I currently run 260W CFL, if I can do the same w/ a 150W system... well, then I WIN!!!! :wave:
 
I2 - Man - great work on the ventillation idea! That was real clever thinking. I guess we all did have boring weekends like you said lol. I think I like that a lot better than the PVC - although I wonder if it would work the way it looks like it would. Suppose you could tinker around with just the ventillation part of the cab and show it only in more detail? Thanks in advance man - keep it up! Check out my sig if you haven't already purchased your fan. The link is to the supreme vortech fans - and this site is VERY cheap w/quick shipping. Verry efficient company.

Peace and sticky green frosty trees
~DP
 

I2KanGrow

Active member
Thanks, Durban - I'm gonna keep a real close eye on you and thescissors, I bet between us, we'll come up with the best grow cab design ever!

I'm going to find some cardboard and make a mock-up of my vent design only - I'll post my results when I have them.
 
G

Guest

The NGB design is a seductive bitch. The ventilation system is terrible because all the cooling air is drawn from one chamber to the next and is full of bottlenecks that drastically cut air flow down. Each bottleneck causes a pressure reduction that needs 2x the intake/Exhast area to correct. You gotta gut the inside of the box to get enough airflow through it to cool the light. Plug up the exhaust with a scrubber and it turns into a EZ Bake Oven.

Here's an idea. Get a sheet of 1/8" plywood cut to the backside dimensions of the cabinet. Stand it off from the back with 1" x 2" and layout an intake and exhaust raceway using 1"x2" which acts as a light trap too. The benefits are you get back the cabinet space wasted for ventilation and a better airflow system.
 

stevr59

Active member
well speak for ur self durbin i am THC free lol but i tell ya what that is one fine ass hood sorry but i am a bit slow trying to catch up with the forums my sickness has my mind in other places so i am not thinking the way i should but hey i am trying, just wish i could hurry up and learn how to use skchech up so i can add some usefull input
 

pieceofmyheart

Active member
Veteran
I bet this ends up being great, you guys will get it all together. Nice lookin hood there, looks very professional.

Hi stevr59 :wave: Hope you are feeling better hun.
 

stevr59

Active member
hey pomh i am feeling some what better but still having chest pains off and on and feeling like i am speed balling on coffee seeing the doc tommoro for the resluts of the test done at the hospital hoping for good new but prepared for bad news but thanks for putting a smile on my face
 

minds_I

Active member
Veteran
Hello all,

Just some thinking here so please do not let anybody get bent about it ok.

I think the orginal style of the NGB box is good. The design concept of the utility room contain ballasts, times, electrical in general, fan and filter in one compartment makes the most sense. I say this because putting these elsewhere obviously removes space to go in.

I am sure the seperate venting of the hood will definately make a positive difference. In my box I use the one fan for all venting so this is not an option for me.

Anyway this leaves room for the veg/mom-clone chamber(s) and the flower chamber.

What I have found is that I do not have room in my veg chamber for moms and clones and seedlings as they all require different pot sizes at different times.

OK, with that said it is a nice setup if you are going from seed/cutting to veg then to flower it is an excellent design in the number of chambers.

But lets think about pertetual growing. for that effectively to be done you need three chambers.

One were you keep your moms (small) or where you can start seeds and have early veg time till transplant to a bigger pot.

Once transplanted you can go to the second veg chamber- let them grow into the thier pots and pre-sex. Once grown into pot and sexed you can cull the remaining plants and transplant your girls into the flowering pot let them veg about a week or so to grow roots into thier last home. My thinking is from seed you grow more then you need to pick the best females from. Anyway, for my circumstance I need two females ready for flowering a month.

Then move them into the flower chamber when ready.

I try to keep a monthly harvest withmy system and have major space issues.


Anyway, stoned as I am the key to any box efficiency is environmental control.

Also, in addition you should design in a speed control- that is a key element I think in addition to variable vents.

minds_I
 

I2KanGrow

Active member
Excellent point, Minds_I - I'm wondering if we can incorporate both your thoughts, along with stevr's fine "backside vent system", in effect giving us 3 rooms, side by side, and vent/utility room in the back...

....DEFINITELY gonna hav-Ta noodle that one!!!!!! :chin:
 

minds_I

Active member
Veteran
Hello I2KG,

Yes, using a manifold on the back side of the cab is an excellent idea.

minds_I
 

Latest posts

Latest posts

Top