
Chomp
Member
I've seen many posts dealing with problems people are having sprouting seeds (and keeping them alive after  ) in coco so I am sharing my method. This has worked for me on numerous grows and strains; since I started using it I have never lost a seedling.
I picked up the basics of this method back on OG (I wish I could remember the guys handle to give credit) and perfected it to my conditions...my temps and humidity are usually between 70-85 and 25%-50% depending on time of year.
I like to germinate seeds in the fold of a cotton T-shirt cloth in a covered small tupperware container like the orange drain catch in my pics. I place that on top of my satellite box which has produced 100% for me lately; it's 90F on top.
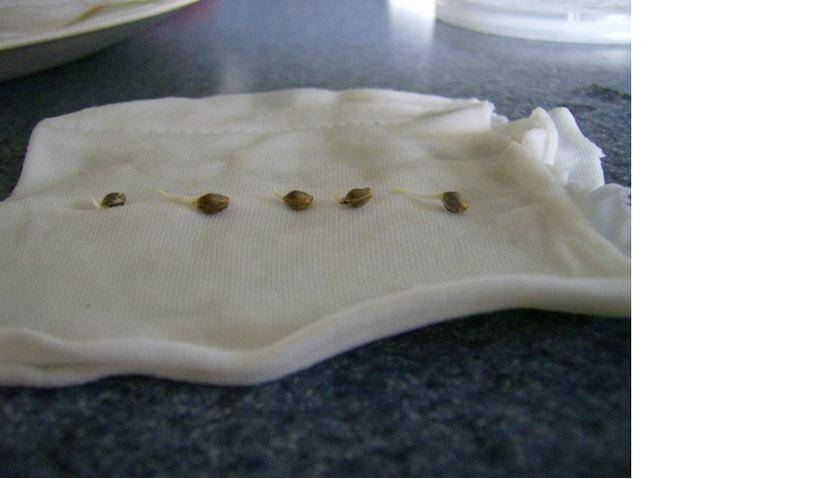
I try to catch the seeds when they first begin to crack to plant them to eliminate any damage to the tap root, but sometimes they look like this:
It is very important, especially with seedlings, that you rinse the coco very well to wash the salts out. I only use Botincare coco blocks, they have worked great for me. Hot water works the best for this. After the coco has cooled down squeeze the excess moisture out.
It is essential that the cups have really good drainage and are at least the 16-20oz size, any smaller and you lose moisture too fast, any larger and they remain saturated too long. I use a hot nail to melt 9-10 holes into the bottom of the cup like this:

DO NOT SKIMP ON THE HOLES!!!!
Fill the cup to the top with your coco:

This next part is very important. I use GH flora micro/bloom and cal/mag to precharge the coco with 5ml micro/ 5ml bloom/ 5 ml cal/mag per gallon at pH 5.5. Use this solution and water until run off like this:

Next dig out a little hole approximately 1/2" deep, it needs to be a little deeper than you would normally plant into soil. Don't worry; coco is much easier for the seedling to pop out of.

Place the seed in the hole and gently push the coco back on top of it. Don't tamp it down just fill the hole
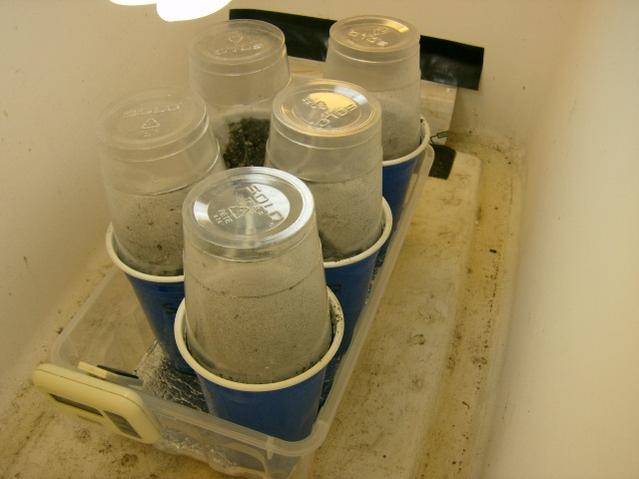
Then I place a misted clear cup over the seed's cup like so:

They are placed under lights to keep them warm in my op.
The domes stay on top until the seedlings start to break the surface; as soon as they start to break the surface, take them off. The domes ensure that the coco does not dry out before the seedlings pop, and that you don't need to water them for the first 2-3 days after they break the surface as long as the coco does not dry out. It is ok for the cups to get a little light as long as the surface is not dried out. When coco gets dried out bad things happen like burning from uneven salt buildup and nutrient lockout. That is why I recommend that you do not use any fans blowing on the seedlings at this point.
I water with the same 5ml/5ml/5ml micro/bloom/calmag per gallon solution every time I water them...this is also very important because coco will store essential nutrients and minerals and literally suck them out from the seedlings if they are not at proper levels.
They get their first watering at about 2-3 days above ground, but I don't water to runoff, only about 1/4 cup of nutrient solution when they are about this big water around the edges of the cup not directly on them:
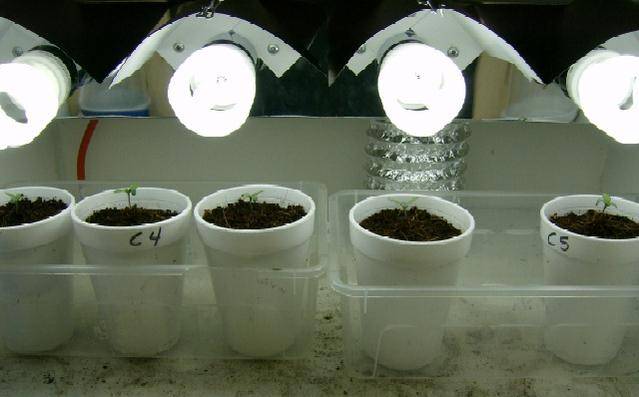
The next and all waterings after that until the first transplant are with the same solution every other day. Make sure you get a run off like in the pic above: These are about 8 days old...
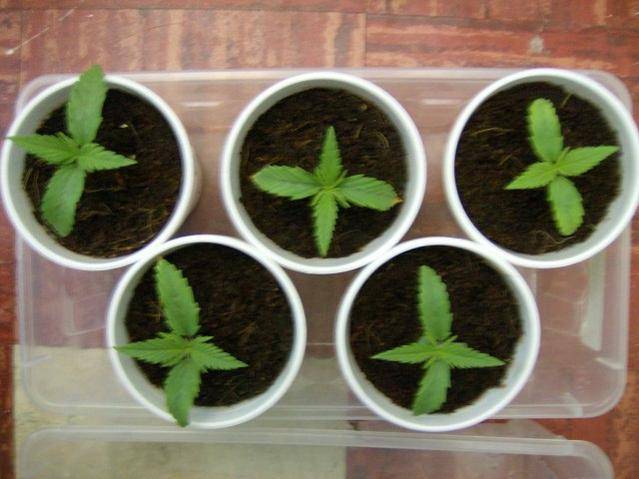
After the first transplant I usually up the solution to 8ml micro/8ml bloom/ 5ml calmag at every watering unless the plants show they don't like it and I adjust accordingly. At this point if you are growing under HIDs you can water everyday like a drip setup. Just make sure you get runoff to "flush" out any salt build up. Right now I am using a vert 150w for the last week of veg and for all of bloom and they still like water every other day so far. I used to grow with a vert 600w drip system and ran the pump twice a day at times so it all depends on what your plants need as they grow larger.
If you are growing in a very high humidity environment you may need to let the cups go longer in between waterings at first. Let the pot get a little light, but not completely dried out.
Again it is very important that you do not let the coco dry out like a soil grow and keep your nutrient solution pH at 5.5
I hope this helps someone and if there are any questions please ask
 Chomp
Chomp
) in coco so I am sharing my method. This has worked for me on numerous grows and strains; since I started using it I have never lost a seedling. I picked up the basics of this method back on OG (I wish I could remember the guys handle to give credit) and perfected it to my conditions...my temps and humidity are usually between 70-85 and 25%-50% depending on time of year.
I like to germinate seeds in the fold of a cotton T-shirt cloth in a covered small tupperware container like the orange drain catch in my pics. I place that on top of my satellite box which has produced 100% for me lately; it's 90F on top.
I try to catch the seeds when they first begin to crack to plant them to eliminate any damage to the tap root, but sometimes they look like this:
It is very important, especially with seedlings, that you rinse the coco very well to wash the salts out. I only use Botincare coco blocks, they have worked great for me. Hot water works the best for this. After the coco has cooled down squeeze the excess moisture out.
It is essential that the cups have really good drainage and are at least the 16-20oz size, any smaller and you lose moisture too fast, any larger and they remain saturated too long. I use a hot nail to melt 9-10 holes into the bottom of the cup like this:
DO NOT SKIMP ON THE HOLES!!!!
Fill the cup to the top with your coco:
This next part is very important. I use GH flora micro/bloom and cal/mag to precharge the coco with 5ml micro/ 5ml bloom/ 5 ml cal/mag per gallon at pH 5.5. Use this solution and water until run off like this:
Next dig out a little hole approximately 1/2" deep, it needs to be a little deeper than you would normally plant into soil. Don't worry; coco is much easier for the seedling to pop out of.
Place the seed in the hole and gently push the coco back on top of it. Don't tamp it down just fill the hole
Then I place a misted clear cup over the seed's cup like so:
They are placed under lights to keep them warm in my op.
The domes stay on top until the seedlings start to break the surface; as soon as they start to break the surface, take them off. The domes ensure that the coco does not dry out before the seedlings pop, and that you don't need to water them for the first 2-3 days after they break the surface as long as the coco does not dry out. It is ok for the cups to get a little light as long as the surface is not dried out. When coco gets dried out bad things happen like burning from uneven salt buildup and nutrient lockout. That is why I recommend that you do not use any fans blowing on the seedlings at this point.
I water with the same 5ml/5ml/5ml micro/bloom/calmag per gallon solution every time I water them...this is also very important because coco will store essential nutrients and minerals and literally suck them out from the seedlings if they are not at proper levels.
They get their first watering at about 2-3 days above ground, but I don't water to runoff, only about 1/4 cup of nutrient solution when they are about this big water around the edges of the cup not directly on them:
The next and all waterings after that until the first transplant are with the same solution every other day. Make sure you get a run off like in the pic above: These are about 8 days old...
After the first transplant I usually up the solution to 8ml micro/8ml bloom/ 5ml calmag at every watering unless the plants show they don't like it and I adjust accordingly. At this point if you are growing under HIDs you can water everyday like a drip setup. Just make sure you get runoff to "flush" out any salt build up. Right now I am using a vert 150w for the last week of veg and for all of bloom and they still like water every other day so far. I used to grow with a vert 600w drip system and ran the pump twice a day at times so it all depends on what your plants need as they grow larger.
If you are growing in a very high humidity environment you may need to let the cups go longer in between waterings at first. Let the pot get a little light, but not completely dried out.
Again it is very important that you do not let the coco dry out like a soil grow and keep your nutrient solution pH at 5.5
I hope this helps someone and if there are any questions please ask
Chomp ....
....

 Chomp
Chomp