What's new

Something wicked this way comes

Desert Hydro

Active member
Veteran
Id forget about adding mg. Jacks has more than enough. Id probably start at 1.5ec n see if they green up.

Nice rooms buddy. Im getting ready to go to cmh. Ive been debating on the dual bulbs vs the singles n more fixtures. My friend pulled 1.6 gpw off an all 630 dual cmh room. Ive seen the proof. There the best light going imo, unless your going large and want the raw power of 1k de's.

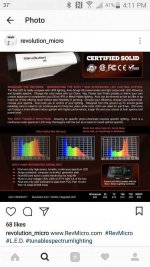
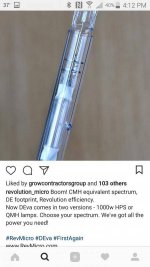
cool, i'll skip the mag then. i think that was just a notion from my LED formula lol. have you seen the DE 945 CMH? gonna throw one in my revolution micro and let her rip in flower!

they also have DE 630 cmh as well now. lots coming out for us lately. as soon as revolution releases their air cooled version DE(doesnt cool the bulb, just the fixture and convection heat it creates) im going to switch over with their new bulbs as well.

they are also releasing an LED that is supposed to contend with DE 1k's in the 8-900 range.
 

Desert Hydro

Active member
Veteran
Keen as to see how your shit pans out. How many watts per plant you got got?

Honestly never been more interested in someone's grow

theres 9k in there right now and im gonna drop two more in the corners soon. most big plants are hit by light on four sides. some are hit on three sides and the corners are getting 2 ish. on the corners i am training them to the light in the cages to maximize light where i can.

ive got so much work to do its not even funny. what? todays a holiday?? not for me lol. back to work!
 

p0opstlnksal0t

Active member
Rev micro was supposedly working with ushio on a 1000w QMH bulb too. Their LED looks sick but will cost 900.00 which is actually a good deal but for now out of my price range.
 

Attachments

  • Screenshot_2017-11-23-16-11-27.jpg
    Screenshot_2017-11-23-16-11-27.jpg
    60.8 KB · Views: 14
  • Screenshot_2017-11-23-16-12-02.jpg
    Screenshot_2017-11-23-16-12-02.jpg
    38.8 KB · Views: 12
  • Screenshot_2017-11-23-16-12-42.jpg
    Screenshot_2017-11-23-16-12-42.jpg
    54.6 KB · Views: 18

p0opstlnksal0t

Active member
theres 9k in there right now and im gonna drop two more in the corners soon. most big plants are hit by light on four sides. some are hit on three sides and the corners are getting 2 ish. on the corners i am training them to the light in the cages to maximize light where i can.

ive got so much work to do its not even funny. what? todays a holiday?? not for me lol. back to work!

I feel you bro. Spent today wiring up a whole house surge protector and an electric water heater to bypass our pos rinnai dhw
 

Desert Hydro

Active member
Veteran
Rev micro was supposedly working with ushio on a 1000w QMH bulb too. Their LED looks sick but will cost 900.00 which is actually a good deal but for now out of my price range.

thats the one! gonna order the air cooled ones with those bulbs when they come out. im gonna be downsizing to an over sized 2 car garage after this run but will soon after be building out the whole house with those if all goes well with these 2 runs.

900 isnt terrible considering it costs me about 4-500 to build a 16 cob array with citi 1212s and about 600w at the wall.
 

967

Active member
Here's yet another reason not to nest buckets people- mine are stuck and plants are way big, so i can't tell if plant containers are draining right. Or fix it if they're not...

Follow the tried and trusted methods
 

gmanwho

Well-known member
Veteran
Here's yet another reason not to nest buckets people- mine are stuck and plants are way big, so i can't tell if plant containers are draining right. Or fix it if they're not...

Follow the tried and trusted methods

i ran into a similar situation multiple times. i wanna fill the canopy so i wait, an most of the time i wait just abit to long. then they backup the buckets. an then u can't move the buckets if they are locked into multiple layers of trellis.

so to deal with the not draining i ended up getting a 30inch 1/4 drill bit an popped holes in the bottom of the top bucket. down thru the medium. and yes i had perlite in the 3" tail piece with no mesh screen. roots where like a brick in there when i harvested. clogged the drains right up.

after a few months i punched holes in all my bottoms.

but this hole punching is not part of the design.
 

delta9nxs

No Jive Productions
Veteran
i ran into a similar situation multiple times. i wanna fill the canopy so i wait, an most of the time i wait just abit to long. then they backup the buckets. an then u can't move the buckets if they are locked into multiple layers of trellis.

so to deal with the not draining i ended up getting a 30inch 1/4 drill bit an popped holes in the bottom of the top bucket. down thru the medium. and yes i had perlite in the 3" tail piece with no mesh screen. roots where like a brick in there when i harvested. clogged the drains right up.

after a few months i punched holes in all my bottoms.

but this hole punching is not part of the design.

actually it is. i have done it alternately for years to observe the effect. i call them bypass holes because they allow a significant portion of the solution to bypass the tailpiece, maybe reducing root travel down it.

if you are using the black easy on/off lids they won't drain water back to the center so we have been switching over to the indented lid designed for shipping. they have a gasket and lock down on the bucket when you hammer them on. there is a ring that has to be cut to get them off so we cut that off before use and remove the gasket.

we are drilliing 8 3/16" holes using the molded ring on the bottom of the muck tub as a rough guide.

so every watering event a significant portion of the solution goes around the tailpiece.
 

967

Active member
i ran into a similar situation multiple times. i wanna fill the canopy so i wait, an most of the time i wait just abit to long. then they backup the buckets. an then u can't move the buckets if they are locked into multiple layers of trellis.

so to deal with the not draining i ended up getting a 30inch 1/4 drill bit an popped holes in the bottom of the top bucket. down thru the medium. and yes i had perlite in the 3" tail piece with no mesh screen. roots where like a brick in there when i harvested. clogged the drains right up.

after a few months i punched holes in all my bottoms.

but this hole punching is not part of the design.

I can't even tell if mine are blocked or not. Seems to take a long time to equal out after feeding. Plants still look good anyway so I guess it's not imminent, and I'll find out at the end. I tie back to a trellis too so I guess I'll have that problem with proper buckets as well. Never thought about that...
 

gmanwho

Well-known member
Veteran
actually it is. i have done it alternately for years to observe the effect. i call them bypass holes because they allow a significant portion of the solution to bypass the tailpiece, maybe reducing root travel down it.

if you are using the black easy on/off lids they won't drain water back to the center so we have been switching over to the indented lid designed for shipping. they have a gasket and lock down on the bucket when you hammer them on. there is a ring that has to be cut to get them off so we cut that off before use and remove the gasket.

we are drilliing 8 3/16" holes using the molded ring on the bottom of the muck tub as a rough guide.

so every watering event a significant portion of the solution goes around the tailpiece.


i must have missed those holes in the photos. or somewhere.
 

Ravenboy

Member
except for my first PPK run, i have used had in the bottoms. LOTS of holes. about 3/16 so the perlite doesn't go thru. I run about 2" or pure chunky perlite in the bottoms for better drainage (and 50-50 coco perlite above.)
never any blocking of tailpieces, and i grow in 10 liter containers. talk about packed with roots.
 

Desert Hydro

Active member
Veteran
i see that ravenboy is running PPKs with coco. is anyone else? how does it compare to the turface/perlite mix?

i hate washing the gravel and i dont really have a safe easy place to do it. i end up rinsing into the toilet in a bucket with a million tiny holes in the bottom and just doing little amounts at a time. its terrible. thought about taking it to the river in a mesh bag and washing it lol
 

967

Active member
I use about 30% coco to 70% perlite but have nothing to compare it to lol. I can't get turface in my country, not sure I want to either with the rinsing requirements. Maybe try grow stones? I would but can't get them here in my country... been thinking about trying kitty litter
 
Last edited:

967

Active member
Nah, there is a site I can get it through but shipping to NZ is a killer from the U.S. same goes for jacks. I just kind of make do with what I can get locally
 

Thirdtime

Member
I believe some used a safety absorb / kitty litter instead of turface. Just have to get the kind that doesn't dissolve in water, hardened or heat treated clay I think. At one point they listed a brand from an auto part store.
 
I ran 80% Coco with the remainder perlite and castings. Monster roots in a 7 gallon feed tray but my pumps were undersized and drainage would have been a challenge with a "deluge".
 

Desert Hydro

Active member
Veteran
I use about 30% coco to 70% perlite but have nothing to compare it to lol. I can't get turface in my country, not sure I want to either with the rinsing requirements. Maybe try grow stones? I would but can't get them here in my country... been thinking about trying kitty litter

967 have you checked your local auto parts stores? they have stuff for cleaning up spills and its the same shit. some is calcined clay and others is calcined silica stone. looks like kitty litter and pretty much is. its dusty as all hell and need to be washed from the top downward.

thats where ive been getting mine.
 

967

Active member
Thanks for the tip I'll check it out. Though I do have a big bag of perlite now to get through. D9 seems to think coco and perlite works well he's the one that recommended 70/30 perlite to coco if i remember right. Seems to be going ok, now I have my humidity sorted I should be able to watch them fatten nicely. Looking top notch quality, frost for miles day 33 12/12...
 
Top