What's new
  • Happy Birthday ICMag! Been 20 years since Gypsy Nirvana created the forum! We are celebrating with a 4/20 Giveaway and by launching a new Patreon tier called "420club". You can read more here.
  • Important notice: ICMag's T.O.U. has been updated. Please review it here. For your convenience, it is also available in the main forum menu, under 'Quick Links"!

Round 7. Northern light feminised. 250 watt HOR/VERT. U.S.I.U. automised

Preparation fase. Sprouting question.

Preparation fase. Sprouting question.

Hi! Here one image of the stuff I want to use for the seeds to sprout in. Some unfertilised soil, peaten plugs and cups for the first 3weeks from sowing and a 55 watt lamp. The goal of this basic setup is touch/move the seeds/seedlings as less as possible. During these 3 weeks the peaten cups will not be moved around. Only after this period the plants will be moved to the vertical setup.

But I've never used the peaten tools to sprout the seeds in. It is suggested that the roots will grow through the peaten walls. And I am wondering if I should only use the peaten cups, or the pluggs in combination with the cups.

I just do not know what the extra value of the pluggs could be :S Don't even have experience with the cups.

Would the roots grow through there properly?

:thank you: 's
 

Attachments

  • Foto0014.jpg
    Foto0014.jpg
    55.5 KB · Views: 11
Preparation fase. Seeds and dirt.

Preparation fase. Seeds and dirt.

5 Northern light seeds of the Royal queen seeds bank. Eventually 4 or 3 seedlings will stay inside.

1 L Guano kalong bat crap
2,5 L Biovin granular
100 L Gold label special mix
25 L Plagron worm crap
120 L Ecostyle Coco peat yellow bag
All mixed together and warmed to 23 C for sprouting and 24C for the remaining time until harvest

:wave:
 

Attachments

  • foto0017.jpg
    foto0017.jpg
    38.2 KB · Views: 10
  • Foto0015.jpg
    Foto0015.jpg
    50.8 KB · Views: 9

bobblehead

Active member
Veteran
I find that running positive pressure vs. negative pressure, the room runs hotter. I tried it out for a week in my veg tent... Have you noticed this at all Hushem?
 
Hey Bobble,

I dunno what your airflow speeds are. But if the airflow speed of the positive pressure intake unit is lower then the result would be higher temperatures yes.

I question myself how much positive pressure was your tent in? Did you close basically all exhasut holes to pump your tent, or did you opened the exhausts a bit so that the tent looks slightly pumped. When you touch the walls of the tent these should resist a bit. Ofcourse this is to make sure you run a proper airflow speed to cool the room. After all the goal of it all is to get AN airflow going we aggreed on that.

I guess you have to work a bit on your design. I suggest you use your foggers also. And don't forget; so far I only found positive pressure effective (overgrow) during veg (from node 5 of seeds)
and about 2 weeks into flower (because of the odor). The foggers anabled me to cool my intake air -3C. The positive pressure most likelly causes the overgrow. I have no report on the fog being responsible, but perhaps this could cause the overgrow also.
:tiphat:
 
Preparation fase. Modyfied hood for 2 bulbs

Preparation fase. Modyfied hood for 2 bulbs

Ofcourse aircooled with a 80 mm fan on top. With a dimmer I can set flowspeeds.

Each bulb will do 1/2 time of daylight. A second relay and digital time switch enables me to switch as such. I will use this setup after the 2nd week from sprouting until I have longer branches. The main goal is to spread the light better in my surface. It looks like this will do the job much better then the vertical setup and perhaps even better then a 1 bulb horizontal setup.

:)
 

Attachments

  • Foto0018.jpg
    Foto0018.jpg
    56.6 KB · Views: 10
  • foto0019.jpg
    foto0019.jpg
    55.5 KB · Views: 8

bobblehead

Active member
Veteran
Hey Bobble,

I dunno what your airflow speeds are. But if the airflow speed of the positive pressure intake unit is lower then the result would be higher temperatures yes.

I question myself how much positive pressure was your tent in? Did you close basically all exhasut holes to pump your tent, or did you opened the exhausts a bit so that the tent looks slightly pumped. When you touch the walls of the tent these should resist a bit. Ofcourse this is to make sure you run a proper airflow speed to cool the room. After all the goal of it all is to get AN airflow going we aggreed on that.

I guess you have to work a bit on your design. I suggest you use your foggers also. And don't forget; so far I only found positive pressure effective (overgrow) during veg (from node 5 of seeds)
and about 2 weeks into flower (because of the odor). The foggers anabled me to cool my intake air -3C. The positive pressure most likelly causes the overgrow. I have no report on the fog being responsible, but perhaps this could cause the overgrow also.
:tiphat:

lol... :laughing: give me some credit...

using the same exact 435cfm fan, I reversed the flow. I even put the fan inside the tent, and ducted the intake out of the tent so that the air was still being sucked through the fan, b/c that's the most efficient way to use them....

The same inactive intakes are used for inactive exhaust, otherwise where is the air going?

Humidity is controlled with a humidistat to stay at 70% RH with a fogger inside the tent.

I'm not saying the growth was any different... but I did notice an increase in temps having an active intake vs. running an equal sized active exhaust.

I also run 1200w in veg... It's a much larger scale. Have you used active exhaust to compare temperatures? You're environment might be small enough to not have this issue. I'm not trying to discredit your theory, b/c I'm not doing the research to know exactly what I'm doing... but it just seems to me like the extra heat might be why most growers run active exhaust + active intake instead of just active intake. Maybe it's just odor control...
 
The same inactive intakes are used for inactive exhaust, otherwise where is the air going?

I forgot to say that I pumped it from below. The exhaust is in the top of the room. This in order to guide the warm air out. The cold air enters the room from below where it is blowing into a swirl.

Reading the quote i figure you used your passive intake for exhausts. I think this part is the lower part of your tent. Close the flaps and use the 100mm inlet for intake
 
I also run 1200w in veg... It's a much larger scale. Have you used active exhaust to compare temperatures? You're environment might be small enough to not have this issue. I'm not trying to discredit your theory, b/c I'm not doing the research to know exactly what I'm doing... but it just seems to me like the extra heat might be why most growers run active exhaust + active intake instead of just active intake. Maybe it's just odor control...

1 - Atmosphere is for odor control that is. And besides in lower pressure the plant transpiration behaves diffirently from higher pressure. In lower pressure areas the plant will transpirate better in latter life stages. 1 - atm. during sprouting, veg and early flower could result in lesser growth.

When I consider negative pressure vs positive pressure. Would negative pressure with a same airflowspeed cool the room better? Absolutelly not. Would you perhaps need a bit more power to get to that same airflowspeed, yes. But the diffirence will be minimal. The cooling capacity is all linked to airflowspeeds.

And as I mentioned in my last post; warmth goes up. Handle heat to guide it away from the source that has to be cooled. So one should ofcourse not make a reversed airflow (from top to bottom). This way you cannot compare one technique to the other. I.M.O. this is a very basic rule in controlling the climate and testing one techn. vs the other. W.O.W. you could have done the test without the reversed airflow. Sparing me time in explaining this only to you. I suggest you next time PM me a question like this.

:wave:

GL building it!
 
Preparation fase. Replacement poulty wire.

Preparation fase. Replacement poulty wire.

.. Little more expensive. This is covered with a plastic layer and is much stronger and the holes are larger. Dimensions; 75cm diameter * 75 cm hight and ~240 cm around. I wanna secure it inside the tent with wraps to have it in a static position during the round. The horizontal and vertical setup will be applied inside this cilinder fence.

Hopefully 4 seeds make it to be scrogged onto this fence. I want 24 branches to tigh up there. Every 10 cm on the fence one branch. :dance013:
 

Attachments

  • foto0021.jpg
    foto0021.jpg
    54.7 KB · Views: 9

bobblehead

Active member
Veteran
1 - Atmosphere is for odor control that is. And besides in lower pressure the plant transpiration behaves diffirently from higher pressure. In lower pressure areas the plant will transpirate better in latter life stages. 1 - atm. during sprouting, veg and early flower could result in lesser growth.

When I consider negative pressure vs positive pressure. Would negative pressure with a same airflowspeed cool the room better? Absolutelly not. Would you perhaps need a bit more power to get to that same airflowspeed, yes. But the diffirence will be minimal. The cooling capacity is all linked to airflowspeeds.

And as I mentioned in my last post; warmth goes up. Handle heat to guide it away from the source that has to be cooled. So one should ofcourse not make a reversed airflow (from top to bottom). This way you cannot compare one technique to the other. I.M.O. this is a very basic rule in controlling the climate and testing one techn. vs the other. W.O.W. you could have done the test without the reversed airflow. Sparing me time in explaining this only to you. I suggest you next time PM me a question like this.

:wave:

GL building it!

I hung the fan at the top of the tent, and ducted the intake to the bottom 8" port. I definitely have openings for inactive exhaust at the top and bottom of the tent. Is hanging the fan up what I did wrong? Really?

I won't ask any more questions in your thread, I'll just save them for PM... but I promise you I'm not the only one with these questions... I repeat myself a million times in my threads b/c people don't want to do their own research... but that's why they turn to me. B/c I'm informed.

I'm not the one calling bullshit in your thread. I asked you a legit question, with a problem that anyone else trying this could encounter.
 
Hey Bobble,

1st page I posted pictures of the intake unit. The other picture shows the exhaust valves. I think the picture is pretty clear. Intake at the bottom exhausts on top. Couldn't be easier.

I wonder what the H you are doing man. Yeah just pm it. Send some pics and stuff and data.

Thanks in advance
 
Preparation fase. Fertiliser, dirt and plant support.

Preparation fase. Fertiliser, dirt and plant support.

BAC Final solution. 1 day before potting the seedlings I will hand water ~25 - 50 liter on the dirt.

BAC plant vitality. In my case to spray the soil to kill vermin about 1 week before take-off. Tent will be closed off after treatment.

BAC flower fertiliser. I do have BAC veg fertiliser, but I'll not use it I think. I look for supporting the plants with the flower fertilizer in minimal- 1/2 dosis when flowering starts to about 2-3 weeks before harvest.

:wave:
 

Attachments

  • Foto0023.jpg
    Foto0023.jpg
    54.6 KB · Views: 10
  • Foto0024.jpg
    Foto0024.jpg
    60.7 KB · Views: 7
Sprouting fase! 5 seeds sprout to be selected.

Sprouting fase! 5 seeds sprout to be selected.

24/9/2011 the dirt was at the temperature of 23C. The optimal temperature for seedlings to sprout in. I couldn't wait and sew them rite away. Hopefully all sprout so I can select 4 seedlings.
:clock watch:
 
Sprouting phase.

Sprouting phase.

28-9 4/5 seedlings are up after 90 - 96 hours! :jump:
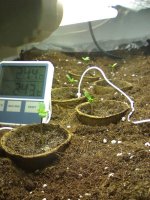
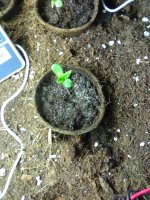
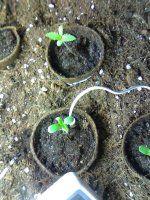
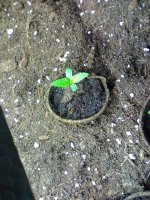
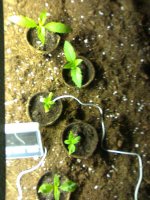
Nr 5 seems to be sprouting. But now I have 4 seedlings as I hoped for. I wanna put nr 5 in the fridge until the new outdoorseason arrives.

:wave:
 
Vegetation phase. Start 28-9

Vegetation phase. Start 28-9

Atmosphere 1
Light 24/0
Powerusage from 24-9 8 kWh
RH 70-80%
Temps 23-24 OUT 22-24 IN

Here they are. 100% came up. Nr 5 is the short one at bottom right. from left to right the following number were given. nr 1 sprouted first.

Plant 1, plant 3, plant 2, plant 4.

Temps seem to be just right. The upper indicator is OUT, injected in the top layer of the soil. If it indicates a bit over 24C that is not bad because the soil is cooler lower down the cup. The lamp is about 11cm over the dirt. Seedlings stretch a bit. I assume the stretch will not continue because the lamp is not that far off and the seedling do not need alot of light.

Another 12 days before we leave this setup into the horizontal duo 250 watt bulb setup.

:tiphat:
 

Attachments

  • 11022006541.jpg
    11022006541.jpg
    84.4 KB · Views: 8
Vegetation phase. Worries

Vegetation phase. Worries

I made a few images to show the diffirence in growth. From left to right.

Plant 1 the first node leafs stay behind in development. Plant 3 idem ditto. Plant 4 and 2 look just as they should look like.

Probably my air intake nozzle is blowing closeby the plants 1 and 3. I pointed it to the other direction to improve the situation.
 

Attachments

  • 02102011543.jpg
    02102011543.jpg
    114.4 KB · Views: 8
  • 02102011544.jpg
    02102011544.jpg
    112.9 KB · Views: 9
  • 02102011545.jpg
    02102011545.jpg
    124.9 KB · Views: 8
Vegetation phase. Shrooms on peaten cups.

Vegetation phase. Shrooms on peaten cups.

Next post i'll post an image of it if possible. But after I started handwatering them, way to late I must say, I started noticing some sort of fungus is growing on the cups. It must be related to the water I just gave them b/c before this moment I did not spot any of this stuff on the cups. All cups seem to be infected, hopefully this does not have any consequences later on in this round :S.

In future rounds I prefer plastic coffee cups.

Plants 1, 3 and 5 show dried out tips of those first node leafs (single leafs) I estimate those leafs are 50% dried out. But I think they'll make it since I improved the situation. The intake nozzle is blowing up now and I've been watering them now dayly. Plants 2 and 4 seems to be shooting leaf. I think these 2 are the most potent ones in growing larger leafs ;)

More l8er!
 
Vegetation phase.

Vegetation phase.

Powerusage from 24-9 25 kWh
Light 55 watt 24/0. 22/2 start tomorrow night period will increase with 0.5 hour p/d
Atmosphere 1
RH 70-80%
Temps 21-22C OUT 21-23C IN. The aquarium heater is now activated to get higher temps. Thermo-switch sensor is @ the exhaust of the intake unit set to 19C.

From bottom to top in the image. Plant 1, 5, 3, 4, 2. 3 and 5 are not going to make it to te next phase. Three plants will remain for production.

Now the plan is changed. I now have to increase the VEG phase a bit in order to grow an extra set of branches on each plant.

But I still have Rotting peaten cups and a number of fruit flies in the tent. Had to vacuum clean flies to decimate the numbers. Working on it dayly. It seems I have to reconsider my plans for the sprouting phase. Extra attention for my airflow. That meter inside the view of those 3 backmarkers maybe had something to do with it. I guess I have to put it somewhere else soon.
 

Attachments

  • 20111006547.jpg
    20111006547.jpg
    72.1 KB · Views: 8
Vegetation phase. Early veg plans adjusted.

Vegetation phase. Early veg plans adjusted.

Powerusage is shooting up because of the extra heating in a few days to 35 kWh total from 24-9.

Situation is improved in a few days. I stick to the water warming on a thermostat to use it the next rounds. Especially in order to save the very sensitive seedling first sets of leafs. Have to decrease flow speeds around the seedlings also. And no more meters close to them. And 0,5 liter plastic cups to sprout and veg in the first 2,5 weeks b/c the roots are already getting through the 0,2 l peaten cups. Have to be carefull next wednesday when they are moved to the 250W setup.

The image from bottom to top. Plant 1, 5, 3, 4, 2. Especially plant 1 is catching up now. 3 and 5 look like they are not going to make it.
 

Attachments

  • 20111008548.jpg
    20111008548.jpg
    96.9 KB · Views: 6
  • 20111008549.jpg
    20111008549.jpg
    82.1 KB · Views: 6

Latest posts

Latest posts

Top