What's new

Project Reject - Design help wanted

Hephaestus

Member
G'day all,

Well, title seems appropriate :) Time to build a new cabinet; one for me, one for a friend in need (he's mechanically useless - last time he picked up a drill, he was in a cast for 3 months; and the scar is impressive!).

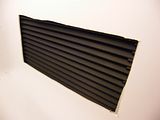
Material, recycled... Jobsite rejects :)

Scored about 200' of this great 20ga prefinished steel - broken into a ] shape - 24" with 2" returns each piece 10' long. Rejected - because it's powdercoat is just a weeeeee bit off... So off to the dumpster it went... :dunno: Makes for a nice box if you ask me :smokeit: Geeze architects and their shades of grey...

Then there I am "managing by walking around" today :biggrin: Ok, so I was making puppies... Screwing the pooch... Y'know Dogfucking! :biggrin: (it's nice to be the boss) :biggrin: And there's all these nice 5x10 sheets of 1/4" clear plexi going into the dumpster. Had to ask... Someone will have to fill me in some day - I can't tell the difference between plexiglass and acrylic - I thought they were just different trade names... Zoink... Into the truck those go... Love those architectural rejects :whistling:

So I'm kinda stuck with the 24x24" base - Thinking 36" tall, Give up the top 6" as room to hide the mechanicals; Use PL-L's for light (have to see if I can get those 80w ones) - Only need a couple inches vertical for those; vented separately.

Note quite sure how I'm going to manage the front door(s) - it'd help if I owned a shear/brake... Then it would be simple...

Here's my initial badly drawn sketchup drawing of what I'm thinking... Welcome any advise / suggestions
:smokeit:
 

Attachments

  • cabinet1.jpg
    cabinet1.jpg
    9.7 KB · Views: 12

Hephaestus

Member
What you can't see - is the double sided tape in the seams, but yeah, few more rivets coming - still sizing / fitting / finishing... Once done the outside - then we'll caulk her shut; and I probably should put a coat of white paint, even if that galvalume finish is friggin awesome :)
 
M

medi-useA

Are you going to have the lot pull out like a drawer for easy maintenance of the plant/s?

Will be looking in on this...

:)

muA
 

Hephaestus

Member
Not sure on that one... it's possible but... makes the door even more complicated :) I'm having enough trouble figuring out the front access :)
 

Hephaestus

Member
Got sketchup - see first linked pic :) Not that good with it yet... :joint:

Been thinking about just using some magnets to hold a sheet on as is - should be pretty good for a light seal on the sides, top n bottom however would need some work...
 

Hephaestus

Member
:dance013:Reworked the cabinet... Completely :biggrin: Cut was off - throwing everything out... Would have driven me nuckin futz over time... So started all over again...


So here's the basic layout, plexi heatshield mocked up, mechanical area floor mocked up (nice tight fits!).Will be trimming a slot into those returns on the front for the heatshield to slide in/out for maintenance.

Still drawing a bit of a blank on the front door...

Also trying to figure out the ventilation; Wondering if 36cfm is going to be adequate... 10.8 Sqft of space, leaning towards 4x55 or 4x80w PLL if i can find them...

Moment of lucidity this afternoon... My magnets wont stick to this - couldn't figure it out... Aluminium!
 

ScrubNinja

Grow like nobody is watching
Veteran
36cfm for the light section? I couldn't picture that being enough, but I've never used a heat shield and live in a hot place.

Some one here mentioned magnetic tape around the door and that's what I'll be using on my next cab. A light door (say, aluminium? ;)) and you're done.
 

Hephaestus

Member
That'd work but magnets don't stick to aluminum :joint: Though yeah - tight fit + rare earth magnets on each side...

Thinking of venting the lights separately still - they're pretty much isolated anyway by the heatshield anyway...
 

ScrubNinja

Grow like nobody is watching
Veteran
That's the whole point of tape being sticky, lol - my cab is plastic. But yeah, either will do it.
 

Hephaestus

Member
Here's the plan for intake...


in section (mocked up on a piece of scrap)


Pondering whether I go one up / one down... Or both down...

Insides will be painted; hole through is going to be ~2x8"
 
M

medi-useA

How I wish I had your construction skills!

Those vents look sweet...are they passive intakes?..
ScrubNinja has an interesting take on vents...something like th@ with one of your intakes over it would be cracking!

This visible from outside
picture.php


and this from inside
th_DSCF2791.jpg


???:)???

muA
 

Hephaestus

Member
Yeah I've eyeballed scrub's intake - just need something a little simpler to build :D

Debating whether to orient them the same way - or up on the outside; light infiltration shouldn't be an issue... But it only makes sense to add it anyway in case something changes...

How I wish I had your construction skills!
Hah! Mealtball fabrication is what we call this :D

My shear is the table saw... Brake is also the table saw (angles & clamping in the side extensions). Gits'r'dun but not in a particularly pretty manner...
 

Hephaestus

Member
:smokeit:Well it was a slow day... All these little pieces, take so much time and fussing to make em fit together right...

Think I've got the ventilation sorted...


This is the exhaust manifold; bottom is open, drilled area is where the PLLs will be mounted & enclosed.

Top down into the manifold, going to have a tray drop down on top of the fan basically - for my carbon filter - making sure I have enough access so I can swap this one out for a bigger / stronger fan if needed


Just gotta adjust the floor for the mechanical room to fit around this, then assembly can really start :)
 

Hephaestus

Member
:smokeit: Weee... Tape went away... Outside is mostly done (need a little squaring up trim at the top - then to cut/bent the top panels) Ventilation is installed, floor for the mechanical area is in place. Still contemplating the heatshield - and how I'm going to finish it out, probably slot out the front, add angles to support it - so it can be slid straight forward out of the cabinet for maintenance...

Gotta dig up the dremel later today; going to try to encorporate most of the arduino controller bits n pieces I'm planning to add later... Gotta think ahead! :joint: They'll be mounted on the front panel enclosing the Mechanical area.


Now the ventilation - This was a bit of a challenge, Tray of carbon will drop down ontop of the fan; fan is quickly/easily removeable - can accomodate up to a 90mm fan - current is 75mm; Just need to take out the sandwich plate and replace it and the fan with a bigger one.
 

Hephaestus

Member
Well... Now that it's mostly assembled... Maybe I should call it R2D2? :joint:


Haven't peeled all the protective plastic yet if you're wondering about some of those ripples :biggrin:

Grow area - gotta install the intake

Bottom up at the heatshield (protective plastic again)

Heat shield slides in from the front for maintenance... Used a lil punched angle to stiffen things up... I like steel :) I can weld it! (just little tacks in the corner in this case - to keep the shell from racking)

Just need to finish up the intakes, drill the exhaust (drill some holes - and modify the carbon filter to sit proper (screw heads... Damnit!)).

Getting closer :)
 
Last edited:

sx646522

Member
A metal cab...I like it! :)

Well... Now that it's mostly assembled... Maybe I should call it R2D2?...

How 'bout a 'R2THC2'? Maybe a 'WALL-THC'...


You know Heph, if you ever wanted to sell that thing down the road, I bet you could get some decent $$ for it from the right buyer...

Cheers,

-SX
 

Latest posts

Latest posts

Top