What's new
  • Happy Birthday ICMag! Been 20 years since Gypsy Nirvana created the forum! We are celebrating with a 4/20 Giveaway and by launching a new Patreon tier called "420club". You can read more here.
  • Important notice: ICMag's T.O.U. has been updated. Please review it here. For your convenience, it is also available in the main forum menu, under 'Quick Links"!

Preservation of an Afghani Landrace from 25 year old seeds

therevverend

Well-known member
Veteran
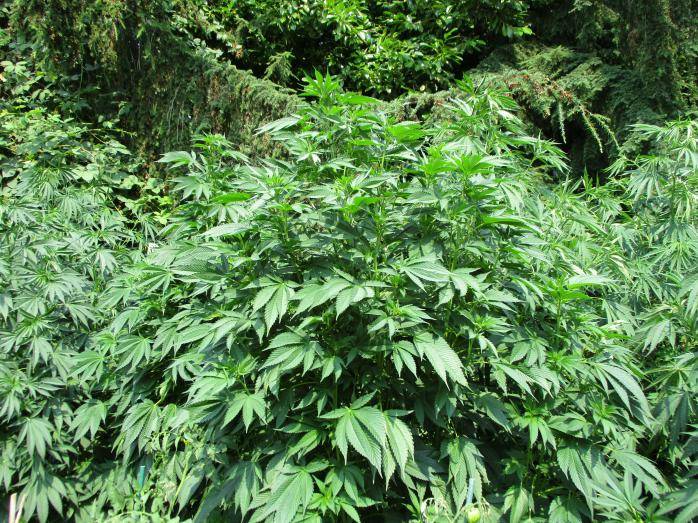
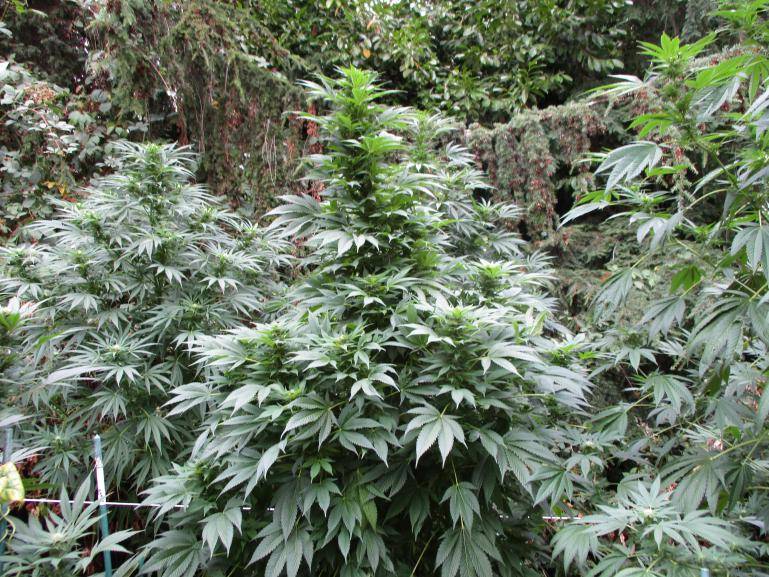
Great thread, glad to see an old Afghan strain brought back in it's un-hybridized form. My friend and I have about 2 dozen seeds of a wonderful Afghani called Pot of Gold Hashplant. (not the same thing as the Flying Dutchman strain) The original breeder lost all his seeds in the Mendocino fires a couple years back, they're all that's left. At least they're only a few years old so most of them should sprout. Instead of trying to describe it here's a few pictures.

picture.php


picture.php


picture.php


picture.php


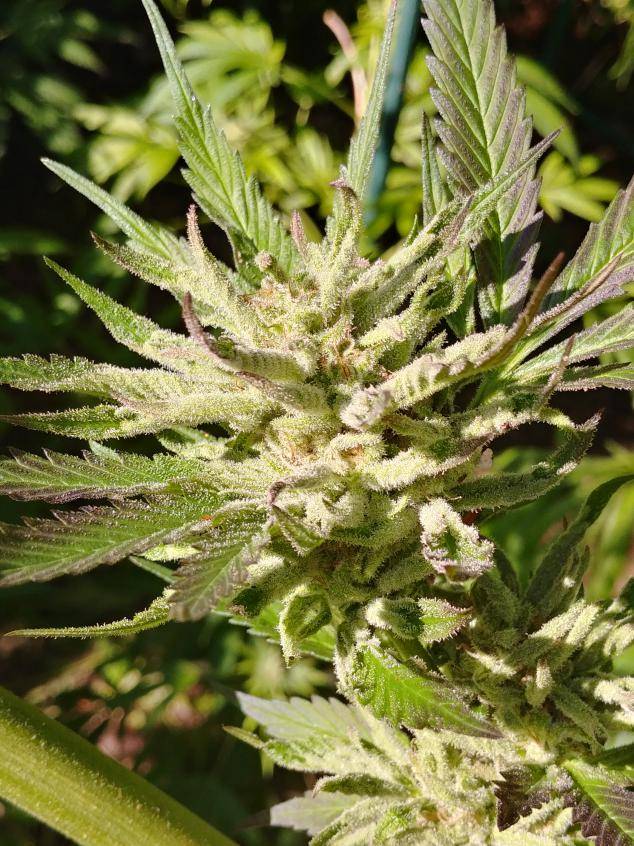
Strong stuff, makes amazing hashish. It's a dilemma as to how best to preserve it. It's got a small amount of hybrid genes in it, one phenotype you can tell has a bit of OG diesel type smells. It's awesome but I want to preserve the original Afghan genetics so an open pollination is out of the question. I grow mostly outdoors anyway so letting the males and females go at it isn't really a possibility unless I do a special indoor seed crop. I could pick the best males, mix all the pollen from them, then apply to the girls. Each phenotype is special, haven't found a dud one.

The other option which I'm leaning towards is keeping the males separate and labeled and applying them individually to each plant. Less of a total mixing of genes but it also allows me to select towards the phentotypes I favor. The hybrid genes aren't much of a problem, the plants are all hashplants and all excellent. I'd still like to separate out the different 'component parts' and breed along those lines.

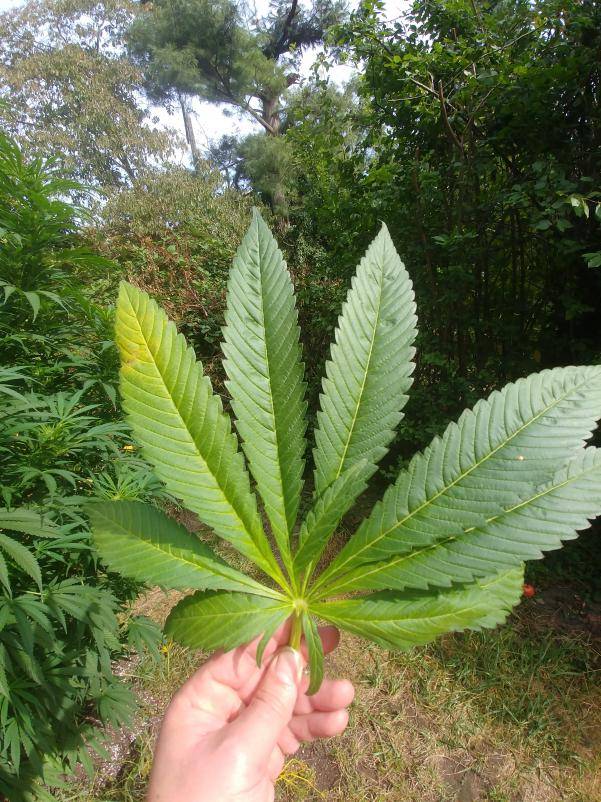
As far as finger counts, growing outdoors you see that 11 is the standard. Most plants get there regardless of whether they're tropical thin leaf or wide leaf. 13 is impressive but doable as long as the plant gets big enough. I'm curious what you'd call this Afghan monstrosity, 11 1/4?

picture.php
 

TheHatman

Active member
HI @therevverend, nice plants!! Thanx for presenting your rare genetics. I´ll write later more about your post. :tiphat:

very nice work Hatman.
Thank you my friend! Glad you´re here.


Because of holidays I have no time to write here on IC. At the latest end of the next week I´ll write the next chapter. :)
I wish you all an Happy New Year!

Greetz,
hatman
:tiphat:
 

TheHatman

Active member
3rd Chapter: The Beginning of Growth (Part I)
[Last Update: 22-04-15]


INTRO
Helloooo and Happy New Year to all Breeders and interested ppl all over the world!! I wanted to continue writing this report long ago
but whenever I get started: friends suddenly came over, I met old schoolfriends again after 18 yrs, or my girl asked me to continue
converting our appartement and last but not least, it was x-mas and the New Year´s Eve ….such days always come suddenly :lol:

There are days when nothing happens - then you can hear how the plants grow. And other days you have to work on thousands things.
Then you wish you could cut some clones from yourself that can do a few things for you.

But before I really write a novel about my everyday life, I switch to the topic no. 1: Cannabis afghanica =)


picture.php


A SHORT LOOK BACK
In the 2nd chapter you read a little bit about my oldschool afghan strain and my plans with this genetics. I told you about 900 very old
seeds I put into paper towels after I threw them into water to let them germ.

15 surviving seedlings want now to be buried - you know what I mean.. in contrast to humans, this means the start of life for plants.
And in this case a survival of an whole afghani-zivilizazion =)
But when seeds are two and a half decades old, we´re don´t dealing with youngsters that are highly motivated to master their easy life.

We are more likely to speak about measly, energyless half-plant-half-compost-beings, that demand so much attention like all my
social contacts I met over the last month.

The standard mainstream bling-bling grower propably would throw these alleged jerks into the trash and replace them with some kind
of marketing multihybrid breed - without knowing what he´s doing for a mistake. But the honorable breeder know about the great
treasure and looking forward to the hard work to develop a strong, stable cannabis line to that no kind of advertising plant can fool.
But before we can create a legendary strain, these seedlings have to cope with the following first development step:


THE BEGINNING OF GROWTH
This step is about the start of growing in soil. Awakening the dead is a major challenge, because starting growth is sluggish for these
candidates. There are a few steps that are important for a proper growth. In this game you aren´t only in the role of a grower, but
also in that of a midwife, of a nurse, of a doctor, and in addition you also do an apprenticeship to as a surgeon (you´ll see..).

Because the seedling is fighting above and as well under the earth: For one thing, the weak, little germ roots have to start sustainable
growth. This is a requirement for nutrient absoption and therefore for the growth of the plant. And on the other hand, above the earth
the plant has to develop stems, leaf mass with enough chlorophyll.

First, let´s have a look at…


picture.php

This pic shows two of my afghani seedlings that are fighting for the begin of growrh - here they still haven´t made it..


…Growing Roots.
Only a few seeds managed to germinate with their last strength. With such old seeds you have to act quickly. As soon as a germ root
is visible the seed must be placed in a substrate (e.g. soil) for growing. That shouldn´t be long in coming, because the zombie
junk that spreading out in the paper towels strikes faster then Rocky Marciano!! :lol:

If the mold catches the litte germ roots, it quickly ends.. But arrived in soil, the game is far from being won: We know it from fresh and
healthy seedlings how they grow immediately when there are suitable environmental conditions, but such handicapped seedlings
haven´t made it yet.

The root is weak and may has necrotic tissue (that means dead organic areas) which usually leads to a lack of cell devision. That´s
why growth is slow down or stagnating.

Some seedlings may be green and could show first leaf approaches but may not grow for weeks - it looks like a dummy =D - often there
is no life in them. Then have a look at the roots: if you can´t see any roots, cull them: it´s propably a cannabis zombie 2.0.
Adequate control is important. Adequate doesn´t mean that you continously dig up the seedlings to check weather they´ve grown a
little after a few hours. Then you´ll mutilated them by the well-intentioned welfare act. A behave like that detroys more then it
helps.


picture.php

Two examples for dead tails: The root on the left is totally necrotic. This one on the right first shows a fake-growth, but the dead root prevented further development of the seedling.

It´s better to put the germinated seeds into soil up to the shell. So, you can observe the slow development and, when nothing happens,
you can swipe the soil a little bit to check the state of root health. Sometimes the rootless zombies grow about 1 inch at the hypocotyl
and push a fake stem out of earth. But they deceive you, because a few days later after this growth spurt they stagnate and die (do you
know that from some people? :lol: )

A little plucking at the seedling gives you certainty. Because if a
germ root isn´t capable of cell division and growth, it is loose (it has no capillaries on it etc.) and has a hardened root tip. Often you can
see yellowish to brownish discoloration or it´s slackened like a small twine.

Survivable seedlings will certainly continue to develop. It can take days or sometimes weeks (and often you don´t see that above the
soil for a while) but then you´ll see first leaves. The development of a plant always happens on both sides: above and under the ground.
A tree cannot get branches and leaves without a strong root system.
You can support it by giving a nutrient poor soil and keeping the soil temperature about 21°C / 70°F and of course patience and hope.

Colder temperatures prevent growth and when it´s warmer it promotes mold etc. So, just keep room temperature!
That´s it. We cannot give more care under the earth´s suface - with these conditions the plant has to do the rest. This can sometimes
take 2-3 weeks before they stand on it´s own „feets“ (yes, it´s like a bad cold).


picture.php

Prehistoric dino seeds of this age are planted in such a way that the seedling can be easily controlled.


Above the earth we can do a few things more to support! So Part II of this 3rd chapter is about the appropriate survival measures. And
there is also a bit more to see =)

I´m pleased that some people now following my thread and some even write about their views and experiences (yeah thx and I´ll still answer your last entries!!). Thanx you for
that! And thanks a lot for your support and for welcoming me so warmly here at IC!!! I´m very happy about that!!

Happy New Year
hatman


🤠


————————————————————————————————
>> Continue with 3rd Chapter Part II: Support Methods
<< Back to 2nd Chapter: The Germination Process
<<< Back to Overview
 
Last edited:

TheHatman

Active member
@therevverend .. First, thank you for compliments and for your content!


Pot of Gold Hashplant. [..] Instead of trying to describe it here's a few pictures.

Ohh an original Pot of Gold - that´s nice!! And the pic show very lovely plants! And what for big afghani leaves. Would be nice to grow them (even if they have a little hybrid genes).. I would like to plant outdoors, but it isn´t possible in my area..


It's a dilemma as to how best to preserve it. It's got a small amount of hybrid genes in it

you´re right, it´s difficult to preserve an original strain when it has hybrid genes in it. Because you cannot seperate mixed genetics. Even with selection you´ll always keep an a part of both basic genetics. But I think you do the right, if you dont´t do an open pollination.


growing outdoors you see that 11 is the standard. [..] I'm curious what you'd call this Afghan monstrosity, 11 1/4?
Yes you´re right, my friend! Most ppl believe in the old indica-sativa dogma that they were two seperate species. But truth is: both are just cannabis plants that have developed certain characteristics under different conditions - and 11 fingers are genetically fixed in both varieties.

oh and yes, great 11 1/4 leaf ;-)


Greetz.
:tiphat:
 

madson

Active member
awesome presentation. love to see such a beautiful thread. even pics from 1997 :D.. keep this insane work up my friend.
 

TopHat.

New member
Hi Hatman its Tophat from denmark again I am bit dyslexia and i gives me a bit of a problem then i am spelling.

i really enjoy the post i live in Copenhagen and grow outside gurrila grow, i am curious about that afghani how will it grow here in the north outside. but i can see you don't have that possibility from the post.

i guess one of the reason for all the hybrids for outdoors, is a way to make sure they are blooming in time before vinter.

i just love the feeling in the spring then i pop my seeds,.:tiphat:
 

TheHatman

Active member
Short message:

Thanx a lot my friends for praising this thread. I love to read your messages :)

The reason why I´m so rarely active at the moment is that I´m evry busy at the moment in real life. And of course I´ll continue my report in february! I´ll also give an answer to everyone who left a message here.

Thank you for waiting so long my friends!!


Hi Hatman [..] i am curious about that afghani how will it grow here in the north outside. but i can see you don't have that possibility

But a short answer to your question: In the past I had a few plants outdoor and I can report that a few of plants were finished in october. But I´ll start more outdoor tests when this strain had a few selective runs.


Greetz,
hatman
:tiphat:
 

JustSumTomatoes

Indicas make dreams happen
Do you feel this strain would be effective for those who have insomnia or struggle with sleep? Afghanis are well known for their sedative qualities. I always have an eye out for sleep-inducing strains.
 

Chili_berkster

Badass
ICMag Donor
Veteran
Very interested in tagging along in this adventure. I love Afghanistan and it's wonderful cannabis. Most of the strains that I prefer have a lot of these genetics in there. Reading this thread has me itching to start the remaining seeds from old Afghani seeds, gifted from a good friend who collected them in Afghanistan back when they were at war with the Soviet Union.
Good luck with this project der Bruder.
 

KITCHA

Well-known member
Veteran
Loving your thread HatMan! Are these related to the real seed company's Afghan 90?
 

TheHatman

Active member
High!
I wasn´t here for a few weeks. But now I´ve more time to write here on IC and I´ll soon write the next afghani chapter
smile.gif

But first there are a few questions from you ..


Do you feel this strain would be effective for those who have insomnia or struggle with sleep
My affie strain has exactly this effect that you describe. With this shit you sleep like a baby..


Moreover I wrote in 1st Chapter:

>> Generally very potent, even with small trichomes the effect is strong, It´s a classic KO, If you´re not careful. My wife could smack
me, but my grin is cemented on my face. :lol:


Just ask If you have any questions..


Very interested in tagging along in this adventure. (..) this thread has me itching to start the remaining seeds from old Afghani seeds, gifted from a good friend who collected them in Afghanistan back when they were at war with the Soviet Union.
Good luck with this project der Bruder.
Yeah thx and great! Let me know, when you pop them bro..


Loving your thread HatMan! Are these related to the real seed company's Afghan 90?
Thx man!! I have this genetics over 25yrs. Back then I got it from friends, that kept this variety long years before. You never know it for sure, but it must be a big coincidence if this genetics is related to the Afghan 90 from TRSC.


Thanks a lot for your great feedback. I´ll try to write next chapter these days.. stay tuned!

Greetz,
hatman

:tiphat:
 

TheHatman

Active member
3rd Chapter: Leap into Life - Your Support Methods (Part II)

3rd Chapter: Leap into Life - Your Support Methods (Part II)

3rd Chapter: Leap into Life (Part II) - Your Support Methods
[Last Update: 20-03-06]


HELLO AGAIN...
In the last Chapter I said that you´ll read from me the next days. But then I kept you waiting for quite a while - Was that actually
several weeks or even years?! And that only because I'm a sadist who needs it. Oh no, I´m just kidding (or not? :lol: )..
There are many things to do in everyday life and you can't always just sit at your laptop. Sometimes you also have to work, meet
almost forgotten friends or tinker with things in the apartment because otherwise you´ll get into trouble with ya girl (and u know,
better do that what your wife tells u to do: lol: .) And sometimes you have to hang around and do nothing or get out into the fresh air
... ok, that was an excuse, there is no fresh air in Berlin =) But I write too much irrelevant. We better come to the actual topic ..

In Part I. of this third chapter, we took a look underground to the roots. However, to start growing is a developmental task of the
plant, in which various processes take place - below and above the earth.
Fresh seedlings need after they´re germinated only brisk 1-3 days to show their lush green cotyledons or even the first pair of real leaves.
Compared to these young-flowered models, old, clumsy seedlings need 14 days longer for a comparable result. But with a looking at
the inner values, some catwalk-indica looks pale. :lol: But before these inner values can be preserved, the tree must first “learn to walk”:

Often, the important tissue material of the embryo (root germ to cotyledon) required for growth has already largely died off in the
seed after all the years. But the motor, which is why a plant (and also every other species) being grows at all, lies in cell division
(further information in every good biology book ;-)).
This process can only take place in healthy or living cells. Therefore it is obvious that a seedling, whose cells were largely died off, only
can grow more slowly than fully intact individuals. So everything here takes much, much more longer. In addition, the immune
system is quite weak, which is why it must always be ensured that the environmental conditions do not promote diseases (suitable
earth, moisture, temperature, circulating air ..i think these topics were certainly be discussed 1000 times here).


However, it is also important to ensure that the working environment is reasonably clean to sterile. Hands and auxiliary tools
should be washed and disinfected again and again. Of course the pots, too, before the seedling is put in there. But even if you pay
close attention to everything, it is often not enough - and the seedling moves into the orcus —> But that´s Life (or rather the
death?), my Friends.

However, if the seedling has a chance, then it is important to do everything so that it can optimally use its strength to grow.
So in this part I want to show you what methods are required to help a seedling of a decade old seed survive.


picture.php

Something pleasant in between: Here you can see a well grown OA (Oldschool Afghanica) from a fresher seed.


THE START OF GROWTH - FROM UPPER PERSPECTIVE
Now, when the old beans really germinate and you´ve put them into the substrate, the slowly growing seed root become attached in soil
(e.g.) and can start it´s grow into length and it´s formation of the first capillary roots. So that cell division and growth can take place,
substrate, moisture, etc. are needed. Aaaand of course: light!
Sure, the seedling still manages for himself to make it above the
surface of the earth. But for further development upwards and downwards, the cotyledons and the one or two rudimentary leaf
pairs created in them (or what is still left after 25 years) must be illuminated with the appropriate light.

As soon as the light shines on intact plant tissue, the plant begins to produce chlorophyll. As a result leaves and stems normally turn
completely green. The more chlorophyll the plant can produce, the greener and the faster the plant will develop, because now the
individual can start metabolism. Sure: I would not need to write a special chapter about this process if it wasn´t clear that old seeds
often do not their job so easily. Therefore I give you advice with the following methods that can help your granny seedling:


1. Removal of the Seed shell
Well, those who never have opened their shutters will not know the sun. Almost dead seedlings often fail to break and throw off their
hard shell. On the one hand, it is due to the fact that we placed the seedling in the medium up to the nutshell. So it is harder because of
the lack of moisture. On the other hand, and thats the essential aspect, the necrotic cotyledons contained in the seed often are no
longer capable of swelling adequately and certainly cannot begin to grow. Normally, the cotyledons would get bigger and bigger, so that
the seed coat to breaks up and falls off.

If there is still intact plant tissue, light is needed to start photosynthesis. To do this, the seed shell must fall quickly. As soon
as the seedling has grown about 1 inch out of the soil and if it is firmly anchored, the time has come to remove it. Never wait longer,
because there is the risk that the seedling will unintentionally strangle itself by the growth of the stem into the broad. (But what
do I write, if he really wanted it, he could have had his suicide easier at any earlier point in time.. :lol: )
When removing the shell, it is important to be extremely careful. To the clumsy among you: A relaxed hand is required here! And just
don't use too much force, even it can solve problems in some cases. =P


picture.php

Individuals who do not have the strength to break the shell need help to get rid of it.


The following should be done:
>> Dab the seed coat with a drop of water. If you did it correctly, the drop will stick to the bowl.

>> Now wait 5 minutes. During this time, the shell is soaked a little and the capillarity creates a helping moisture through the edges
around the cotyledons and their protective cover, which make the shell slippery.

>> Now it is time to remove it: And there are two tested options for this:


Method A: Do it by hand =D
If you are a bit skilled in it and have let your fingernails grow a bit longer, you can hold the seed with your index fingers on the closed
side. Then you can hook in both shells with the thumbnails on the open side (or vice versa) and pull them open and break it. If this
technique is practiced, it can be effective and time-saving. Inexperienced, you quickly turn the little one's neck around and who
likes to play the hangman. :lol:

picture.php


Methode B: Needle work
A safer method, especially for inexperienced people, is the needle method.

>> For this you take two sewing needles. They should be
handy enough to be able to doctor around with them. Before using you should disinfect them by waving the needle tip a little over a
lighter flame and then rubbing with a piece of kitchen roll.

>> Now you can attach both needles to the edges of the scales. With more and
more pressure you break the shell and remove it softly from the seedling. Depending on the difficulty, it is advisable to support the
seed from the other side with one finger. Be patient, keep calm and prefer to start several tries. Because if the head is off ….
You can also come up with other aids here and try them out: Shaped wires, tweezers, (..)


picture.php

The needle method is a very gentle method, with a little practice it only takes a few seconds.


2. The removal of the seed skin (Endosperm)
Anyone who has watched the germination in more detail has surely already noticed that there is still a skin around the cotyledons. As
far as I know, this is the endosperm layer that occurs in many fruits and contains the necessary nutrients. On the one hand, this acts as
a protective layer during storage and on the other hand sit upports the embryo with necessary nutrients during the germination
process. In our case, this layer is often already a dried-up obstacle that has to be removed by hand. Residual nutrients are probably
only contained here in a homeopathic amounts.

However, the nutrients in the cotyledons are usually sufficient to start the germination process. Without help, it happens that this
endosperm layer staples the cotyledons together, which is why no light can shine on them, but this is essential for the process.


The following simple method creates birth and midwifery (and then you really become a surgeon :lol: )
>> First, the "head" without a shell is wetted again with a drop of water. After a few minutes, this endosperm layer is weighted up.

>> With disinfected tweezers or sewing needles (see above), the endosperm layer must be carefully removed from the seedling now.
Especially on the underside of the cotyledon, this layer is a little thicker and can be removed easily at this point. Just be careful,
because you quickly can become a bad-tempered grim reaper. Especially when you are dealing with such an old, brittle hypocotyl
(germ root; stem) and cotyledons like these of my oldschool affies.


Note:
Sometimes the endosperm layer adheres too strongly, so that it must be incised with a needle on the sides of the cotyledons. Then
you can seperate the two cotyledons from the layer.

picture.php

1. In this case, the endosperm is very easy to grip on the underside of the cotyledons and is easy to remove.
2. This seedling is free now: You can see the removed endosperm next to it (green circle).


PHEW,
so far with Part II of this 3rd Chapter. But that was not all, because there is still a lot to tell: about cotyledons, the "green spark of life"
and how some of the Afghan seedlings actually managed to grow. Therefore I will divide this chapter into a third part!!
But I still thank you for your interest and hard-working reading! I am extremely pleased that you like this report! My heart is beating!
The third part then deals with the necrotic cotyledons that turn into living beings - wow, it´s magic or like science fiction this stuff, isn´t
it? :lol:

Greetings from the „GrowThem City“ and stay healthy (don´t forget that corona is watching you =) )


hatman


---------------------------------------------------------------------------------
>> Continue with 3rd Chapter Part III: From living Dead to living Beings (coming soon)
<< Back to 3nd Chapter Part I: Beginning of the Growth

<< Back to OVERVIEW
 

resin_lung

I cough up honey oil
Veteran
Here’s another method for the list.

Although, once I was given this tip, it became the only method and the list was no more.lol

When the seedling breaks ground but wasn’t able to strip its shell casing, like you illustrated....

Dip your index finger in water or run it under the sink really quick.

Let the water run off as you only need a tiny bit.

Place about a 1/2 drop of water on the very top of the seed shell(knuckle/hinge) with the tip of your index finger.

Place the 1/2 drop there and wait.

When the water is absorbed, the knuckle/hinge part of the shell will be soft and the seedling will already be in the process of shedding it again, if it hasnt already fallen off.

Sometimes I’ll come back to check it with another 1/2 drop worth of water on my finger and if the shell hasn't popped off already, I’ll place another 1/2 drop on it. That usually takes care of it.

There’s no need to pick at the young seedling and risk damaging it. I’m speaking of when dealing with really old and weak seeds that need all the help they can get.

Pick away at the fresher, more viable and easily replacable seedlings.lol

This method usually leaves the entire shell hanging on one cotylodone. I often leave it be at that point but to each their own. God knows I accidentally tore my fair share of cotyledons off in my day.

I guess I should add that this should be done after hands have been washed if your trying to be kinda sterile about it.lol

:tiphat:
 

OrgAeroMan

Active member
Veteran
Great thread, subbed! I look forward to seeing your Afghani projects. They are such resilient plants, and long time staples of the breeding world. A must have (or at least a cross of) for any respectable p.m. smoke arsenal.
Thanks for your time and attention to detail in this thread, this is great stuff:)

Great tip on just wetting the un-hulled seedling too, Resin. I have never tried that.
 

Latest posts

Latest posts

Top