What's new

PLL Club. (if you don't know, now you know)

rives

Inveterate Tinkerer
Mentor
ICMag Donor
Veteran
1) Anyone know a site for getting 2700k 55 Watt 4 pin 2G11 PLLs without having to buy a whole case?
Thank you.

Alldaylighting has a much better price, but still sells in a case minimum. Like OldOne, I have had great luck with the Plusrites from 1000bulbs, but I am about to start a new run with the Osrams to see if there is a difference. I use 6 lamps, so a case isn't that much of an overkill for me.

http://www.alldaylighting.com/Osram_Dulux_L_4Pin.html
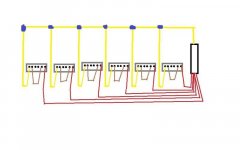
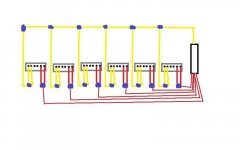
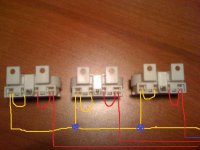
 
G

Guest 88950

? about the 2G11 base.

i ordered my 55w pl-l from 1000bulbs.com but the only base i saw was a 18w 2G11, no 55w 2G11. i spoke to someone @ CS but he was clueless if the 18w 2g11 base would work for 55w bulbs and he didnt find any 55w 2g11 bases.

will a 18w 2g11 base work?
 

oldone

Member
? about the 2G11 base.

i ordered my 55w pl-l from 1000bulbs.com but the only base i saw was a 18w 2G11, no 55w 2G11. i spoke to someone @ CS but he was clueless if the 18w 2g11 base would work for 55w bulbs and he didnt find any 55w 2g11 bases.

will a 18w 2g11 base work?
2G11 is the standard base for all of these PLL lights. It will work fine...
 

Keif

Member
Do you guys know of any prewired ballasts for 2g11?

I am not too handy and that would be awesome!
 

oldone

Member
Do you guys know of any prewired ballasts for 2g11?

I am not too handy and that would be awesome!
These PLL lights we use are much more common over in Europe and elsewhere than in North America. That why they are difficult to track down here. I found no pre-wired complete rigs but these kits are what I use and are very complete and pretty simple to construct.

Hope that helps,
OO
 

MeLikesPCs

Member
OO,

I got the kit and just finshed installing in my dresser. The reflectors looked like they were working pretty good....then I took the protective film off :) Bam! Now I see the value of a good reflector. I even used the spacers to get ventaliation above the reflectors. Thanks for pointing me to these.
 

yesum

Well-known member
ICMag Donor
Veteran
^^ I was afraid to slap together different parts, and went with ahsupply, real easy. Worth it for my piece of mind.
 

oldone

Member
OO,

I got the kit and just finshed installing in my dresser. The reflectors looked like they were working pretty good....then I took the protective film off :) Bam! Now I see the value of a good reflector. I even used the spacers to get ventaliation above the reflectors. Thanks for pointing me to these.


^^ I was afraid to slap together different parts, and went with ahsupply, real easy. Worth it for my piece of mind.

Yep, the AHSupply kits are fantastic. I even called them before I placed my order. The guy that answered was friendly and helpful. I love dealing with professionals and small business guys that answer their own phones!

I wonder if he knows what we're using his kits for? I doubt it...LOL

good luck guys,
OO
 

Keif

Member
Thanks for the help mate! I think I am going to get the (2) 55w kits for side lighting in my cab!

Awesome.
 
First of all I want to say I love all the info on this thread. Ive been over at RIU for my last grows but now that ive been researching about PL-L's Ive headed over to icmag to find tons of new info!

Im getting a Workhorse 8 and I already have 4 X 3000k 36w and 4 X 6500k 36w.
I will be running the 4 X 6500k for veg and then switch to 4 X 3000k and 2 X 6500k for flowering. Total of 216w and 17400 Lumens - 2.44 ft2 = 7131 Lumens per square foot. This will be in a space of 27"x14" and 22" Tall.

I just got my shipment of bulbs today and soon getting the ballast and sockets
 

Attachments

  • IMG_0504[1].jpg
    IMG_0504[1].jpg
    55.2 KB · Views: 15
I am not sure how to wire these things up. Someone please help.
I have provided 2 diagrams but I dont know which one to use with my Workhorse 8. The blue dots are wire nuts. Is this a "jumper" ?
 

Attachments

  • Wiring1.jpg
    Wiring1.jpg
    22.9 KB · Views: 17
  • Wiring2.jpg
    Wiring2.jpg
    22.9 KB · Views: 15
  • Wiring3.jpg
    Wiring3.jpg
    48.5 KB · Views: 16

420ish

Active member
I am not sure how to wire these things up. Someone please help.
I have provided 2 diagrams but I dont know which one to use with my Workhorse 8. The blue dots are wire nuts. Is this a "jumper" ?

your drawing on right is way i have mine wired
 
I talked to Fulham about how everyone I have seen wire it up is like the middle picture, they replied "Please do not wire up the way you wire in the drawing. we do not recommend that you stick your ballast wire directly to your lamp socket without jumpering the socket first." So they told me to wire it up like the right picture. Do you think doing it the middle picture way would ruin the lights?
 

someotherguy

Active member
Veteran
I talked to Fulham about how everyone I have seen wire it up is like the middle picture, they replied "Please do not wire up the way you wire in the drawing. we do not recommend that you stick your ballast wire directly to your lamp socket without jumpering the socket first." So they told me to wire it up like the right picture. Do you think doing it the middle picture way would ruin the lights?

high man, below i've posted the pics and wiring info i followed to wire mine up and i'm running 4x 55watters (although most of the time i only run 3 bulbs).

anyway, i forget who posted this originally, maybe ScrubNinja, but who ever it was helped me very muchly and maybe these instructions can help you too.

peace, SOG

btw, if you take a look through my clone box build linked in my sig i think i posted some stuff you can use.


-------------------------------------------------------

Parts
A Fulham Workhorse 8 220w ballast
2G11 Sockets
55w Dulux-L lamps
4 small screws (not pictured)

Tools
Wire cutters
Wire strippers
Screwdriver
Drill (optional for pre-drilling holes)


As you can see from the measuring tape, 22" is plenty of clearance for a 55w lamp and socket while still leaving room to replace the lamp easily. There MAY be other lamps that will not fit in this space that are 55w, be sure to check your lamp length before ordering for a small space like 22".

picture.php


This is a closeup of the front and back of the socket, 2G11.

picture.php


The sockets have a total of 6 places to insert wires. We’ll only be using 4 on each socket and these are the ‘paired’ holes closest to the edge on either side of the socket. The two holes in the middle of the socket will NOT be used.

The wire you see in the photo has less than half an inch of the end stripped to the bare wire. When the bare end of the wire is pushed into one of the holes, the metal contacts inside automatically grab it.

If you want to remove a wire you pushed in, insert another bare wire end ‘next’ to the wire you want to remove. Inside it will push against a release, freeing the wire. (It may take a bit of messing around with before you get used to doing it easily/quickly)

Socket With 2 Wires Inserted

picture.php


Here I’ve stripped the ends of a piece of wire, inserted both ends into two of the holes closest to the edge of the socket and cut them off at an equal length. You may want to leave a few more inches of wire than I did in the photo, to make things easier on yourself.

Socket with Paired Wires

picture.php


Here I’ve stripped the ends of the wires and twisted them together to make a good contact with each other. It is important to connect the wires together like this to make a single wire before connecting to the ballast wires.
If you’re overdriving your lamps you would only do this to the side of the socket you’ll be connecting the yellow lead from the ballast. The other side you would strip the ends of two red leads straight from the ballast and just push one into each of the paired holes closest to that edge of the socket.

Both Sides of the Socket Wired and Ready

picture.php


This socket is ready to be put in place and used. I’m sorry that the photo uses red wiring for both sides of the socket, I don’t have any yellow wire. One wire will be attached to a yellow lead from the ballast and one will be attached to a red lead from the ballast.

Socket with added wires connected to ballast leads

picture.php


As per the wiring diagram for the Fulham ballasts, one set to the red lead, one set to the yellow lead. The socket itself is mounted to the wood with two simple screws. I pre-drill my screw holes to allow easier insertion and to prevent MDF board from splitting.

And here's a shot of the cab lit up with 110w of mounted and wired Remote CFL power.

picture.php


Well, there they are, all lit up and happy. I know, the photo really sucks but I have too much to do right now to replace it.

NOTE: The ballast has a black and a white lead wire that need to be connected to a standard 110V plug. Black to black, white to white. These lamps do not have a ground wire.

The fuzzy dots to the right of the end of the lamps are screws in the ceiling. I have a thin piece of metal wire wrapped around the end of each lamp, holding it to the screw to keep the lamp from sagging. (The sockets are designed to be used in reflectors that have a retaining clip built into it that the lamp snaps into.)

I wired the sockets according to the pdf on fulham ballasts. The diagram only shows 3 lamps (for simplicity) but the Workhorse 8 ballast has 6 leads for connecting up to 6 lamps. This cab is using 2 55w lamps for a total of 110W while my flower cabinet uses 4 55w lamps at 220w.

The cab currently has 2 5400K 55w lamps. The package states 3000lm which I imagine is 3000 lumens, not the 4,800 lumens that was stated on the 1000bulbs.com website. Not really an issue as the spectrum is dynamite for veg.

Hope this clears up any confusion for folks, I know it took me a few minutes of digging to find this stuff over the last few months. Enjoy!!y!
 
Thanks for the help SOMEOTHERGUY. Ive seen that post before but I wasnt sure why the guys at Fulham told me to do it the other way. I also didn't understand what "shunted" meant, or "jumper" in the fulham diagrams.
 

someotherguy

Active member
Veteran
Thanks for the help SOMEOTHERGUY. Ive seen that post before but I wasnt sure why the guys at Fulham told me to do it the other way. I also didn't understand what "shunted" meant, or "jumper" in the fulham diagrams.

you're welcome man, helping each other is what we do.

anyway, a 'shunt' is the same thing as a 'jumper' and basically it just means making a connection, jumping as it were, from one socket to another and socket isn't the right word either, maybe pin-hole. (look at the pics above and if you still don't get it let me know)

anyway, before you plug anything in make sure you understand how everything connects because electricity can be lethal if done wrong, ...and i'm not trying to scare you either 'cause it really isn't all that complicated, it's just essential that you really 'get it' so you don't burn your house down, lol.

i don't mean to belabor the point but too many growers have suffered fires because they didn't fully understand the dangers. ...and electricity IS dangerous, but it's also simple to understand!

anyway, below i've listed a couple links for you, the first to help you on the road to educating yourself about electricity, the second is to one of ScrubNinja's excellent threads, this one on PC fans, and finally to a thread by SuperPedro whose cab is second to none, absolutely a freeken mad scientist's la-bor-a-tory, lol.

peace, SOG


Growroom Electricity and Wiring

The ultimate beginner's guide to PC FANS

Preview of my pl-l micro closet.
 
Wow thanks for the info. Is it okay to use heat shrink instead of wire nuts?
Also If you dont mind showing me how you hooked up all the yellow wires.
Thanks again

"You must spread some Reputation around before giving it to someotherguy again"
 

Latest posts

Latest posts

Top