What's new

OmniscientOnus' Grow Journal #2 v1.0

O

OmniscientOnus

So, this is my first thread on icmag! Thanks for having me!!

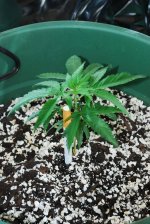
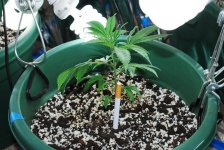
This is my second grow, the first one had to be terminated because time was an issue and apparently hitting the light switch every 12 hours was just too difficult for me...

I started my journal on another forum, but I'm just not getting the feedback that I was hoping for. I'm hoping to see more responses around here. I guess I'll just have to wait and see.

I am going to keep a journal of this grow, and intend to keep journals of all my future grows. If you're new to growing and are looking for some hints or tips, you may want to turn back. However, since I'm new myself, and I intend to include any problems and how/if they were solved, this may be end up being a decent guide. Since that is not it's intent, I'll let you make that decision.

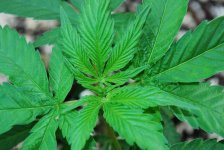
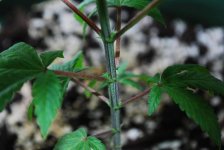
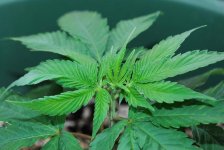
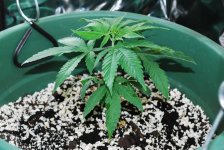
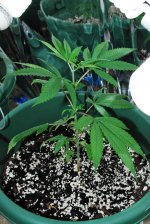
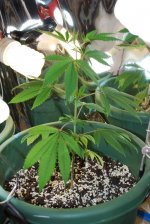
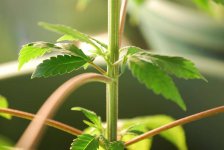
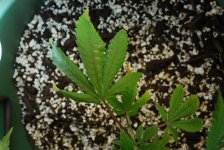
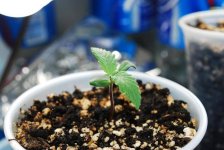
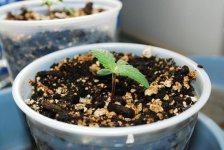
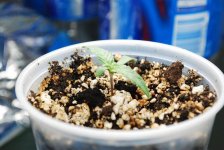
No detail will be spared in this journal that I am privy to. If I see it, you'll hear about it.

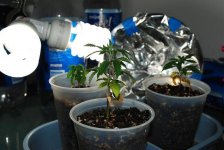
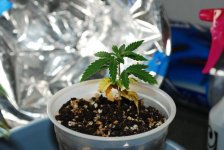
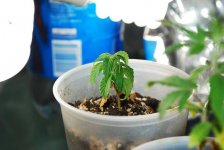
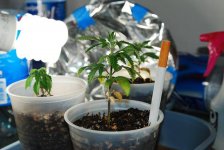
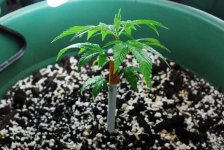
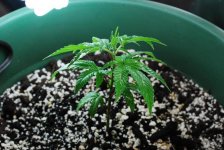
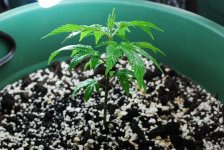
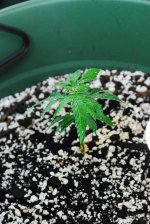
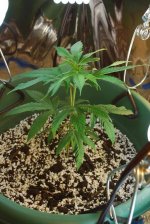
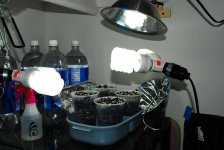
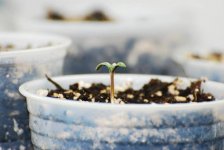
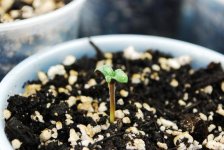
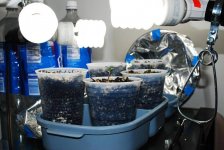
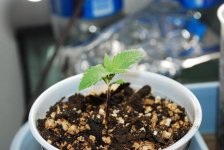
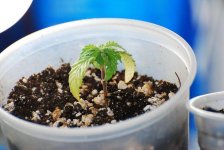
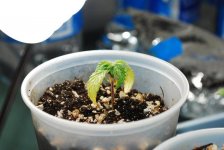
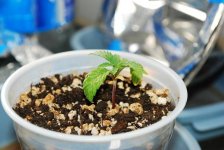
I will however skip over the days where absolutely nothing happened. I check on my plants at least once a day, but there's no need to report no changes. You're about to see 11 days jump up one right after another. That's because the grow journal was started on the other forum.

All tips, criticisms, praise, and words of encouragement are not only permitted, but are encouraged!
Feedback is always appreciated, just try to be nice about the criticisms. I don't mind being told I'm wrong, but being called a brainless dumbass is something else all together. That's just not productive.

With that said, on to the journal.
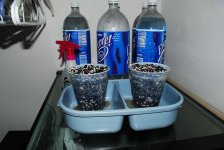
 
O

OmniscientOnus

2nd Grow

Number of plants: 3-5
Indoor/Outdoor: Indoor
Seed/Clone: Seed
Strain: Bag Seed
Medium: Soil
6 parts Peat
3 parts Perlite
3 parts Compost/Manure
1 teaspoon Dolomite Lime (per Gallon)
Grow Space: 2 8 Gallon Pots
Lighting: 1 CFL 68 watt 2700k Soft White (Veg/Flower)
1 CFL 42 watt 2700k Soft White (Flower Only)
4 CFL 27 watt 6500k Daylight (Veg Only)
Water: pH Balanced Tap Water (5.8-6.2)
Aids/Accessories: 1 3 Speed Oscillating Fan
3 Work Clamp Light ballasts
3 2-Way "Y Socket Adapter"
Goal: Successfully grow at least 1 female plant from seed to harvest
 
O

OmniscientOnus

Pre-Grow:
-Bought Materials
-Set Up Grow Room (partially)
-Determine Seeds to be Used
-Planted seed 1 into party cup approximately 1" deep
-Planted seed 2 into party cup approximately 1" deep

Notes for Day "Pre-Grow":
I picked the seeds I was going to be using by making sure they had a nice dark, rich color and then squeezed them gently between my fingertips. The ones that did not pass this test were discarded.

I germinated the seeds in a tupperware container using 3 wet paper towels; 1 as a bottom layer, and 2 more on top. I set the seeds on top of the first layer, then put the other two layers on top of that. In only about 16-20 hours, I had 3 seeds send out taproots.

I then planted 2 of the seeds into plastic party cups (I only had two left, I'll pick up some more and plant the third seed tomorrow) that were filled with soil and watered until runout before planting.

Lesssons Learned for Day "Pre-Grow":
-Always expect to put in more money than you first anticipated (even on a second grow...)
 

Attachments

  • 1.jpg
    1.jpg
    53.9 KB · Views: 13
  • 2.jpg
    2.jpg
    92.8 KB · Views: 10
  • 3.jpg
    3.jpg
    36.7 KB · Views: 11
  • 4.jpg
    4.jpg
    35.1 KB · Views: 16
O

OmniscientOnus

Day 2 "Let There be Light!"
-Planted seed 3 into party cup approximately 1" deep
-Planted seed 4 into party cup approximately 1" deep
-4 CFL 27 watt 6500k Daylight lights placed approximately 4-6" above soil

Notes for Day 2:
Everything is going smoothly so far. I started germinating my seeds a little early this time around because I got overly excited, so things went a little faster than I had thought. But, I got the room set up in time, and I'm pretty sure I got just about everything for the room that I'm going to end up using now with the exception of an accurate pH testing "wand", and potentially a soil pH tester. Frankly, I'm terrible at judging where I am at on the color table of my aquarium pH tester with the little vial and droplets, and I always feel as if my tests are... contaminated somehow, despite taking every effort imaginable to make sure they are not (including control tests, multiple sampling, etc).

It looks as though seed 5 may be starting it's taproot, although it's hard to judge whether or not it's going to make it. I'm ok with just the four for now, but I'll make room for five if it comes up.

I'm going to research ways to sex early (if possible) as I currently only have enough pots to plant 3 full plants. I could switch out the large ones I have and get 5 properly sized ones, but I am quickly running low on funds. I think I'm just going to make due with what I have.

Lessons Learned for Day 2:

-Make sure you are completely prepared before undergoing a new task
-You'll NEVER be completely prepared for anything
 

Attachments

  • 4.jpg
    4.jpg
    52.4 KB · Views: 10
  • 3.jpg
    3.jpg
    78.9 KB · Views: 15
  • 2.jpg
    2.jpg
    49.4 KB · Views: 12
  • 1.jpg
    1.jpg
    53.4 KB · Views: 11
O

OmniscientOnus

Day 3 "A New Growth":
-Seed 1 broke soil (will now be referred to as seedling 1)
-Seed 2 broke soil (will now be referrred to as seedling 2)
-Seedling 1 begins 1st leaf set (1 blade fan leaves)
-Seedling 2 appears as though it broke soil too early
-Watered (Small spritz from water bottle to wet leaves)
-Fan placed in grow room
-Lights placed 4-6 inches from top of plants

Notes for Day 3:

I'm once again reminded of why I began this grow. It's so spiritually fulfilling to me to see something that I am responsible for caring for, grow.

Seedling 1 (soon to be named) is looking very healthy so far from what I can tell. Seedling 2 on the other hand... well, it looks like it just broke the soil a little early, or maybe that's just what they all look like when they FIRST come up. It's only been out of soil for a few hours at most, so I'm just going to keep an eye on it's progress. All of this quick growing makes me want to do a time elapse set so I can literally "watch" the growth. I don't have a camcorder, or even timed shots on my camera, so at the moment that is just a dream.

I used a small squirt bottle to spritz (sp?) my plants, just to give the leafs a healthy glow for the camera really. It looks as though I may be watering tomorrow. I put my fan in the room finally, but I don't have a way to get it up that high as of yet. I'm probably going to pull some boxes from another closet and set it on top of there. Right now, I think the fan I have will probably be a bit too strong for direct windflow anyways. It only has 3 settings, and last time, even on low, it blew my plants all around when they were 6" or more tall. So, I think I'm ok at the moment.

I moved the lights (4 of them, 1 will not move any closer at the moment until I rig it up differently) 4-6" from the top of the plants so they won't stretch. I'm going to be keeping an eye on those lights really closely for the next few weeks, to make sure my plants don't grow into them.

Lessons Learned from Day 3:
-Growing plants is spiritually fulfilling... every time
 

Attachments

  • 1.jpg
    1.jpg
    34.9 KB · Views: 12
  • 2.jpg
    2.jpg
    58.1 KB · Views: 14
  • 3.jpg
    3.jpg
    76.9 KB · Views: 12
  • 4.jpg
    4.jpg
    55.1 KB · Views: 11
O

OmniscientOnus

Day 4 "Creative Title Here":
-Seed 3 breaks soil (will now be referred to as Seedling 3)
-Seed 4 breaks soil (will now be referred to as Seedling 4)
-Seedling 1 begins new leaf set (Serrated)
-Seedling 3 begins new leaf set (1 blade fan leaves)
-Seedling 4 begins new leaf set (1 blade fan leaves)
-Seedling 2 shows no sign of returning health
-Watered until runout appeared in all cups

Notes for Day 4:
Seedling 1, 3 and 4 are all looking great! I'm very excited with the growth I'm getting in the time frame it's coming in. Seedling 2, however, is not showing any signs of improvement which saddens me. For now, I see no harm in leaving it as it is, but I don't have high hopes for it.

I don't have any names for any of my girls (let's hope!) yet. I guess naming things isn't exactly my strong point. Any suggestions? Keep them girls names please to help promote positive energy through positive thinking.

There's not much to report on today, but since there's growth, I figured I might as well post pics.

Lessons Learned from Day 4:
-None
 

Attachments

  • 4.jpg
    4.jpg
    87.7 KB · Views: 14
  • 3.jpg
    3.jpg
    88.8 KB · Views: 15
  • 2.jpg
    2.jpg
    70.9 KB · Views: 14
  • 1.jpg
    1.jpg
    60.5 KB · Views: 15
O

OmniscientOnus

Day 7 "Going Good":
-Watered until runout appeared in all cups

Notes for Day 7:

I've been very careful this time around to not overwater (I believe this was one of the issues from previous grow). There's some overall growth all around, but it seems slower than last time. It may be that I'm just less patient, or maybe it was because I was gone for days at a time last time, but these plants are a lot healthier than my last bunch. It seems that the choice to go to a natural soil was a great improvement over the time released nutrient soil.

I'm going to research using molasses during watering in attempt to keep the microherd happy in my soil so that it will continue to break down the soil in a healthy, natural manner. One of my hopes of this grow is to go sans artificial nutrients. I imagine that I can get a larger yield with the proper use of the right fertilizers, but this is a lot easier.

I can't wait to get some comments, suggestions, criticisms... anything, on this grow! I know once the plants get bigger and closer to harvest, there will be a lot more interest. I agree, big, healthy, resin-laden plants are much more interesting and enjoyable to look at than new sprouts, but I still feel like I'm just getting my feet wet and some comments and suggestions would make me more comfortable that I'm doing things right.

Lessons Learned from Day 7:
-Natural soil mixes seem superior to time released fert soil with regards to the marijuana plant
-Natural soil mixes are easier to maintain and take almost all the guess work out of growing (great for 1st timers)
 

Attachments

  • 1.jpg
    1.jpg
    53.8 KB · Views: 18
  • 2.jpg
    2.jpg
    57.4 KB · Views: 12
  • 3.jpg
    3.jpg
    61.9 KB · Views: 14
  • 4.jpg
    4.jpg
    63.7 KB · Views: 12
O

OmniscientOnus

Day 11 "The First Bump in the Road":
-Seedling 1 will be known as Dylan
-Seedling 2 will be known as Natalie
-Seedling 3 will be known as Alex
-Alex shows signs of yellowing leaves and drooping

Notes for Day 11:
Alex's leaves have been drooping for a few days now. At first I thought I may be overwater her, but now her leaves are starting to turn yellow and I don't understand why. I'm going to post some pics of her here (the last two) and in the sick plant section of the forums.

Other than that, Dylan and Natalie look great. They're growing great and I'm very happy. I can't wait until I can sex them.

Lessons Learned for Day 11:
-None
 

Attachments

  • 4.jpg
    4.jpg
    74.8 KB · Views: 12
  • 3.jpg
    3.jpg
    57 KB · Views: 13
  • 2.jpg
    2.jpg
    64.5 KB · Views: 17
  • 1.jpg
    1.jpg
    51.8 KB · Views: 12
O

OmniscientOnus

Day 17 "Worry, Worry, Worry":
-Dylan shows healthy growth throughout
-Natalie's lower leaves are starting to droop
-Alex's leaves continue to droop, and are yellowing more

Notes for Day 17:
I watered the plants yesterday until runout appeared.

I'm digging the growth on Dylan, but Natalie and Alex are worrying me. I know the whole goal of this growth was to get at least one plant to harvest, but one plant doesn't leave me much hope for a female. Hopefully I can figure out what's wrong before they get worse.

Lessons Learned for Day 17:
-Always prepare for the worst, because it's inevitable...
 

Attachments

  • 4.jpg
    4.jpg
    50.5 KB · Views: 14
  • 3.jpg
    3.jpg
    47.2 KB · Views: 14
  • 2.jpg
    2.jpg
    55.2 KB · Views: 9
  • 1.jpg
    1.jpg
    34.8 KB · Views: 15

Maj.PotHead

End Cannibis Prohibition Now Realize Legalize !!
Mentor
Veteran
whats the PH of the water being given to the plants ?? i adjust to 6.5 PH improperly PH'd water is the root of most problems a plant will have. normally it starts with not adjusting the waters PH 1-2wks later in fresh soil problems begin because nutirents are being locked out above PH 6.8 and below PH 6.0 in soil. PH of 6.5 allow all available nutrients to be available to the plant

do you use tap water or R/O [reverse osmosis} water
if tap water dose your city use cloriene to sanitize the drinking water ? if so allow the water to sit in open jugs for 12-24 hrs before use. if theres cloriene in your water and you dont allow it to evaporate before use the water will kill the good microbes in the soil. this will cause problems.

i noticed your using a dyi soil mix did you mix this mixture throughly for 1-2 wks before use if not there could be hot spots in the soil which will cause problems

just a few questions from us so we can better assist you to a sucessful harvest and beyound.

1 other thing are you allowing the soil to mostly dry before watering again ???

i use the lift method when i water i do untill drainage is achieved i move to next plant so on so forth. after i smoke a cig i go back inside and lift the plants container this is my plants approx weight when freshly watered. every day lift the containers you'll notice the moisture level drop as each day passes when my plants are between 15-20% moisture left i water again. i try to never allow my plants to become to dry and light they wilt some this causes stress on the plants. stressed plants because of no water can and do hermi
 
O

OmniscientOnus

I use tap water, set out for a minimum of 24 hours after being pH balanced to, what I hope, is 6.5. Unfortunately all I could find was some aquarium pH testing kits (I had them laying around, but couldn't find a digital wand in stores...). I'm not the best at judging the color of my tests with the colors on the box.

When I did a pH test of the runoff, it appeared to be 6.8, but between the already difficult color match up, and the fact that the water started brown (not sure how that affects the end result of the color test) I can't say I'm even entirely confident of this reading.

I would love to get my hands on a digital pH wand, but I have no idea where to get one, or which ones are better.


The whole grow was kind of last minute, so the mixture did not sit for more than a few days, although it was thoroughly mixed. The soil that these plants will be moved to has sat for about 20 days, so after transplanting, I should be all set on this part.


I use approximately the same method to water, although I'm letting them dry a little more than I would normally feel comfortable with because the last time I grew, over watering was a big issue.


So far, these aren't looking good from what you say.
 

Maj.PotHead

End Cannibis Prohibition Now Realize Legalize !!
Mentor
Veteran
set out for a minimum of 24 hours after being pH balanced to, what I hope, is 6.5.

sitting out for 24 hrs is good but PH water now whilst it sits before use isnt good. reason the city water has PH buffering agents and your waters PH will raise back to where it began by the next day. theres a few ferts that are stable in water General hydroponics 3 part flora series is 1 of them. i used to allow my unused portions of ferted water sit untill next time needed thats when i noticed the PH raises again by the next day.

i allow the water to sit open like you do but i dont adjust my waters PH untill i use the water then and only then do i adjust the waters PH to 6.5 and use right away. i dump any left over out


{aquarium pH testing kits (I had them laying around, but couldn't find a digital wand in stores...). } aquarium pH testing kits and pool testing kits do ok but to find a digital PH meter a local hydro shop will carry them a basic non water proof hanna is approx 40-50$. the basic hanna only tests the waters PH, i had 1 untill i learned what my water dose with the ferts i use.


{So far, these aren't looking good from what you say. }

the 1st pic plant looks ok but 2nd plant seems to be starting down same road as other 2
last 2 look like to high of PH.

i noticed a cfl in the pic good choice for veg i love em use em myself i suggest to raise the cfls 4-6 inch above plants untill they become more healthy.

another suggestion
dont adjust your waters PH untill your ready to use said water and dont save leftovers :) allways use freshly PH'd water.
 
O

OmniscientOnus

sitting out for 24 hrs is good but PH water now whilst it sits before use isnt good. reason the city water has PH buffering agents and your waters PH will raise back to where it began by the next day. theres a few ferts that are stable in water General hydroponics 3 part flora series is 1 of them. i used to allow my unused portions of ferted water sit untill next time needed thats when i noticed the PH raises again by the next day.

i allow the water to sit open like you do but i dont adjust my waters PH untill i use the water then and only then do i adjust the waters PH to 6.5 and use right away. i dump any left over out

I just ran another test of the water I have sitting in my grow room (I keep 8-10 2 liters filled with pH balanced water so I can get them all ready at the same time). The pH came out to be 6.5, so I'm not really sure if this is accurate information. I don't use ANY fertilizer, I'm going for an all natural grow.

aquarium pH testing kits and pool testing kits do ok but to find a digital PH meter a local hydro shop will carry them a basic non water proof hanna is approx 40-50$. the basic hanna only tests the waters PH, i had 1 untill i learned what my water dose with the ferts i use.

I'll have to check that out. Unfortunately the closest hydroponics store is approximately 15 miles away, and I am without a car at the moment.


the 1st pic plant looks ok but 2nd plant seems to be starting down same road as other 2
last 2 look like to high of PH.

i noticed a cfl in the pic good choice for veg i love em use em myself i suggest to raise the cfls 4-6 inch above plants untill they become more healthy.

another suggestion
dont adjust your waters PH untill your ready to use said water and dont save leftovers :) allways use freshly PH'd water.

I'm only using CFL's for the entire grow. I keep them 4-6 inches away from my pants at all times. The pictures aren't very accurate as to where my lights are because I move the lights in order to take pictures, otherwise they would be in the way.

Again, I tested my pH just now, after the water I checked had been sitting for about 20 days now, and it still reads 6.5, so I'm not sure where you're getting that information from...
 

Maj.PotHead

End Cannibis Prohibition Now Realize Legalize !!
Mentor
Veteran
I just ran another test of the water I have sitting in my grow room (I keep 8-10 2 liters filled with pH balanced water so I can get them all ready at the same time). The pH came out to be 6.5, so I'm not really sure if this is accurate information. I don't use ANY fertilizer, I'm going for an all natural grow.


I'll have to check that out. Unfortunately the closest hydroponics store is approximately 15 miles away, and I am without a car at the moment.


I'm only using CFL's for the entire grow. I keep them 4-6 inches away from my pants at all times. The pictures aren't very accurate as to where my lights are because I move the lights in order to take pictures, otherwise they would be in the way.

Again, I tested my pH just now, after the water I checked had been sitting for about 20 days now, and it still reads 6.5, so I'm not sure where you're getting that information from...


{Again, I tested my pH just now, after the water I checked had been sitting for about 20 days now, and it still reads 6.5, so I'm not sure where you're getting that information from... }

very nice your water must be clean then, because in the mohave desert under the rock i live anywhere in the valley water is 7.2 PH 400-600ppm right from the tap. my information comes from experince using fox farm ferts, and pure blend pro ferts in soil. general hydroponics 3 part flora series in soil and coco. i can right now fert some water adjust PH to 6.5 by tomarrow morning it'll be 7.2 unless i use general hydroponics 3 part flora series. it stays stable for most of a wk with them ferts :)

so if after 20 days your waters PH is still 6.5 then your problems are overwatering i would guess. droopy plants turning yellow from bottom up

i have 5 - 1 gal jugs filled and 3 - 5 gal bottels filled allways, i keep 20 gal of cloriene free water on hand just for the plants. i rotate through and refill my 5 gal jugs every week so oxygen levels stay good. water that sits to long before use will have no oxygen unless you use a fish tank air pump and air stone to bubble it over night. this is another instance where waters PH will raise because of bubbling action
 
O

OmniscientOnus

Day 31 "Not Much Has Changed"
-Dylan is yellowing from the bottom up
-Natalie is yellowing from the bottom up
-Alex is yellowing from the bottom up

Notes for Day 31:

I watered the plants 2 days ago until runout appeared.

People are telling me that I'm overwatering, so I cut back significantly. Unfortunately, it doesn't seem to be helping. If only I had an idea. At this point, it seems to me that growth is stunted on all three plants, with Alex being the worst case, and Dylan being the best of the three. I wonder if my "all natural" approach is faulted. Maybe I still need to add nutrients. Given the results I had with the last grow, I'm starting to wonder if growing isn't for me. I don't want to start growing, but I read on how to grow for months before ever starting because I really wanted this to grow right the first time around. Despite all the research, nothing seems to help. I'm not sure what to think.

The really depressing thing is that I've seen these plants growing in ditches, uncared for (around where we camp). If they can grow in those poor conditions, why can't they grow under my control?

Lessons Learned for Day 31:

-I wish I knew...
 

Attachments

  • 1.jpg
    1.jpg
    53.1 KB · Views: 15
  • 2.jpg
    2.jpg
    53 KB · Views: 12
  • 3.jpg
    3.jpg
    41.9 KB · Views: 15
  • 4.jpg
    4.jpg
    53.9 KB · Views: 12

Hydro-Soil

Active member
Veteran
I watered the plants 2 days ago until runout appeared.
If you're flushing the plants, that's great but for plants that small a watering should consist of only a small amount of water. A way to measure how much is to think of how much of a cup would be filled if you jammed the leafy part of the plant into a cup. Fill the cup that far and water around the base of the plant. Do NOT completely saturate the soil until you have a sturdy plant with roots throughout the soil.

People are telling me that I'm overwatering, so I cut back significantly. Unfortunately, it doesn't seem to be helping.
It will be a few days before you'll see results, they've been stressed for quite a while.

The really depressing thing is that I've seen these plants growing in ditches, uncared for (around where we camp). If they can grow in those poor conditions, why can't they grow under my control?.
Don't let that discourage you. Those plants in the ditches are NOT the same kind of plants. They're mainly hemp now since they've acclimated to the environment in your area and most of it will do nothing but give you a headache.


I spent 6 months reading, before I started growing, and ended up choosing Lucas Formula and Hydro. The only thing I would have changed with that would be to have gone with E&F instead of DWC. :D Starting out can be tough, but as you keep at it things will begin to make more sense. KEEP READING! :D
 
O

OmniscientOnus

Day 40 "A New Hope"
-Terminated Alex
-Transplanted Dylan
-Transplanted Natalie
-Watered approximately 16oz each

Notes for Day 40:
So, I transplanted my plants a few days back because I ran out of ideas. After transplanting I ran some water through the cups that my plants were originally in. I could have walked around with them and drank from them! They barely let any water out. So, it turns out poor drainage was the problem. I know a couple of people told me about this, so thank you guys so much!

I still don't understand why runout appeared so readily after watering when my plants were in the cups. Maybe the soil was helping to break the water's surface tension around the holes which made it drain better with soil in it then without. Next time I grow, I'll be sure to make the drainage holes larger.

Other than that the girls are looking great! The dying leaves have all fallen off now and all of the remaining foliage is a nice, healthy green. I'm so excited. The next issue to tackle is when to start flowering.

I meant to update last night, but I took the pictures in .raw format and I couldn't re-size them in paint. Normally I use a "fine" image, but I went to the renaissance festival the other day and wanted to shoot in .raw so I could have better options when editing the photos. Anyways, I took these pictures right after watering, so they look all sexy like they just got out of the shower. :smoker:

Lessons Learned for Day 40:
-Drainage holes are very important to your plants survival. Make them big!
 

Attachments

  • 4.jpg
    4.jpg
    66.6 KB · Views: 16
  • 3.jpg
    3.jpg
    63.2 KB · Views: 17
  • 2.jpg
    2.jpg
    68.2 KB · Views: 13
  • 1.jpg
    1.jpg
    73.3 KB · Views: 15
O

OmniscientOnus

Day 45 "Pride":
-Dylan shows signs of growth
-Natalie shows signs of growth

Notes for Day 45:
I'm getting pretty excited right about now. Things are looking really good so far, and my girls are shooting up faster than I expected. Dylan looks to be tall and kinda lanky, whereas Natalie is kind of short and stubby. I'm assuming that's just because they are different strains. I really hope that they both end up being female so I can sample the differences first hand. However, as long as one of them is a girl, I'll be happy. If all goes according to plan, I will finally taste my first home grown bud! I'm so excited!

There's still some time before that happens though. Right now, my biggest concern is when to start flowering them. I originally anticipated flowering when they reached about 2 feet tall. This still may be a possibility with Dylan, but I'm not so sure Natalie will reach that height anytime soon.

Lessons Learned for Day 45:
-None
 

Attachments

  • 4.jpg
    4.jpg
    68.7 KB · Views: 11
  • 3.jpg
    3.jpg
    41.1 KB · Views: 14
  • 2.jpg
    2.jpg
    97.3 KB · Views: 11
  • 1.jpg
    1.jpg
    86.7 KB · Views: 12
O

OmniscientOnus

Day 48: "You Can Call Me Flower":
-Dylan and Natalie start 12/12 for flowering
-Watered approximately 12oz each

Notes for Day 48:

So, the bigger of the two girls is only 9 1/2" tall at the moment, which is a bit shorter than I was planning on for flowering, but I think it will be alright. After all, I'm not looking for the best bud or the huge yield, I just want to know that I can do it. I noticed some of the tips appear to be yellowing a bit, and on the smaller plant, two of the bottom ones died completely. I think it might be a lack of light (among other reasons), so I'm going to pick up a few more work lamps to fit with the extra CFL's I have.

I was originally planning to flower under just Soft White, but I don't think I'll have enough light if I do that, so I'm going to keep all of the Daylights in there and put in the other Soft White's that I have.

Hopefully this time around I won't have such a big problem with flowering. I bought the light timer and have been using it with amazing results thus far on 18/6. This was my biggest enemy of the last grow as I apparantly couldn't be bothered to hit a stupid light switch every 12 hours. However, I've been keeping the closet door open to help keep my temps down since I don't have to worry about anyone seeing them, but this also means that now I have to remember to close the door every 12 hours. I just pray that this won't be too difficult on me.

A few weeks ago I was in a house that had a grow going on. Immediately when I walked in the door I thought that a skunk died in there or something (it wasn't overpowering, but was definately strong enough to make me take notice). At first I just tried to be polite and pretend like I hadn't noticed anything because I thought the smell was just from their house, but then I saw a book on how to grow weed on their table and immediately made the connection. This now has me worried about my grow. If the smell of pot reached through the concealed closet (fully equipped with special exhaust), up the stairs and into the living room (or even just up through the floorboards), what's going to keep my entire apartment building from smelling? I don't have any kind of special exhaust for my grow room as I can't really pipe it out anywhere without cutting big walls into what is essentially someone elses property. I knew the smell was going to be strong as my plants from my first grow started to smell, but I had no idea it would be so strong.

So, I guess my next task is going to be to figure out how to mask the odor without creating a much stronger, but less recognizable one...

Lessons Learned for Day 48:

-Marijuana has (can have) a very strong smell during flowering.
 

Attachments

  • 4.jpg
    4.jpg
    32 KB · Views: 14
  • 3.jpg
    3.jpg
    53.5 KB · Views: 14
  • 2.jpg
    2.jpg
    82.7 KB · Views: 15
  • 1.jpg
    1.jpg
    92.4 KB · Views: 14
O

OmniscientOnus

Day 55 "No News is Good News":
-Watered approximately 16 oz each

Notes for Day 55:

My plants have now offically been in flowering for one week. I was hoping that I would be able to start to determine gender at this point, but I don't think I can. I've never made it this far before, so I can't be exactly positive of what to look for, but I've done enough research to say that I'm fairly confident that they are not showing yet. I have minor concerns that there may be a small light leak, but I'm going to take care of that tonight by hanging a heavy blanket over the doorway to ensure that no light is slipping through the cracks.

One of the attached pictures (should be the third one) shows where I believe I should be looking for signs of sex, just in case a more trained eye than mine catches something that I have not. If you guys want, I can post more pictures of soon to be bud sites for a more thorough check for gender. If you want more pics, just let me know!

Other than that I have a little issue on a few leaves, primarily only present in one (the last picture). I'm not overly concerned by this, but I put a picture up just so I can get an expert opinion. Other than that, the plants are looking really good, and I hope to be able to sex them any day now. Please wish me luck on girls.

If I can finish out these plants to harvest, I want to try a better strain on my next grow. There are many prospects I haven't quite figured out yet, but I still have a little time before any of that is an issue. Do I go hydro, aero (I'm VERY interested in aeroponics, but I'm not sure if I'm ready to try a whole new system after having so little experience), keep with soil, what strain do I want, etc.

I almost forgot. I found a thread on taking care of the odor issue that gave a very simple, cheap and effective solution. Mix 9 cups of water, 1 cup ONA gel, and 1 cup Soil Moist in a 5 gallon bucket. For maximum effectiveness, place a round fan over the top of the bucket to help spread the scent. All-in-all I spent less than $30, and not only does my grow room (closet) smell fresh and clean and weed free, but so does the room it's attached to. I opted out of the fan on top of the bucket as I couldn't find one that fit snugly into the top of the bucket, so I just put it next to the fan that's already in there. I'm VERY impressed with the results and recommend this solution to anyone, regardless of how you currently deal with smell. My bedroom always smells like freshly laundered bedsheets (the ONA is "fresh linen" scented)! I love it. While I can't take credit for the idea, I'll be more than happy to post a "how-to" if one already doesn't exist on this site (I found the idea on another forum after searching google, so I don't want to post links).

Lessons Learned for Day 55:
-Always Have Patience (this lesson never gets old)
 

Attachments

  • 1.jpg
    1.jpg
    75.1 KB · Views: 13
  • 2.jpg
    2.jpg
    80.5 KB · Views: 13
  • 3.jpg
    3.jpg
    37.5 KB · Views: 11
  • 4.jpg
    4.jpg
    70.6 KB · Views: 11
Top