
-
Happy Birthday ICMag! Been 20 years since Gypsy Nirvana created the forum! We are celebrating with a 4/20 Giveaway and by launching a new Patreon tier called "420club". You can read more here.
-
Important notice: ICMag's T.O.U. has been updated. Please review it here. For your convenience, it is also available in the main forum menu, under 'Quick Links"!
You are using an out of date browser. It may not display this or other websites correctly.
You should upgrade or use an alternative browser.
You should upgrade or use an alternative browser.
Home TLC Thin layer chromatography
- Thread starter NotGuilty
- Start date
yeah i have nfi regarding the homemade plates, so it'll be interesting when the pro ones arrive so you can compare! it'd be great though if your homemade ones ended up just as viable for this
if your mobile phase is only taking 5 mins youve possibly got too much eluent in the developing jar ... i only use 12mL which is only a few millimeters deep. My jar is just a regular strawberry jam/jelly glass jar with screwlid.
btw in regards to how little 1uL is (i use two or three x 1uL dots per lane), try just dipping the head of a pin into the solution, and use whatever liquid sticks to the pinhead dot ... that's probably about 0.5uL. Sacrifice one plate with five lanes of varying amounts of pinhead drops per lane to suss out the sweetspot.
Here's a quick scan of the pipette tips i use, and using the magic of Photoshop ive demonstrated approximately what 1uL looks like. Again we're talking bees dicks, which is why overloading is so easy if youre not using pipette tips
I tried about that size of a drop a few times, but it wasn't much better in terms of streaking. The length of the streaks seemed to be similar regardless of dilution ratio or the amount of solvent in the developing chamber. (400mL griffin beaker with 90mm watchglass & plastic wrap as lid, piece of wet filter paper lining one wall.) I will definitely buy a set of 1uL tubes & pipette.
I tried more, and less, solvent in the developing chamber. The griffin beaker has a fairly flat bottom (although not perfectly flat), and I've started with as little as about 3-4, 10-ish, and 15mL-ish but that didn't seem to make much difference. It was never more than about 2mm deep. (Pictures coming shortly.)
FWIW the aluminum backing had a noticeably better adherence to the stationary phase.
Did your chloroform have 0.5-1% ethanol added? (I highly doubt this is the cause, but just checking.)
my chloroform is AR grade, minimum assay 99.8%, stabilised with ethanol ~1%, probably the same as yours yeah
for extraction i use hexane, but ive also seen chloroform used with success in this thread and separation seemed fine
btw, you're developing plates in those thin vials? then yes the mobile phase will be very quick compared to my jar lol. Not sure how youre gonna fit the 5 x 10 tho!?
ps. just in regards to making your own plates, there should already be a bucketload of info available out there as it's just general science and not specific to cannabis, so while i cant offer any help with homemade plates id say google can answer most of your Q's about that part!
for extraction i use hexane, but ive also seen chloroform used with success in this thread and separation seemed fine
btw, you're developing plates in those thin vials? then yes the mobile phase will be very quick compared to my jar lol. Not sure how youre gonna fit the 5 x 10 tho!?
you're one step ahead of me then in regards to that edge effect!piece of wet filter paper lining one wall
ps. just in regards to making your own plates, there should already be a bucketload of info available out there as it's just general science and not specific to cannabis, so while i cant offer any help with homemade plates id say google can answer most of your Q's about that part!
Regardless of how the pro-made plates perform, I'm going to have to try an aluminum backing with less gypsum binder, probably gonna try 5% (if it doesn't just all fall off) and 10% since it sticks a little better than glass plates. I have to know whether it was the high levels of gypsum that caused this, or something else.
I followed all the directions for making gypsum binder plates to the T except for the ratio, because the 10-15% recommended had trouble sticking on glass microscope slides.
I used the test tubes only for mixing FBBB into water. After that it's poured into a rectangular pyrex dish for dipping
I used the test tubes only for mixing FBBB into water. After that it's poured into a rectangular pyrex dish for dipping
Last edited:
hopefully if it all works out well and you get it dialed in you can write a tutorial for homemade plates, seems a good way to save a few bucks if they work just as well as the pro plates
likewise small rectangular pyrex dish for the bath. Ive read a lot of ppl spray dyes on, i guess that would upset the plate a little less but im not keen on turning it into an aerosol as both FBB and FBBB have carcinogen concerns.
cool. it seems your fancy Sigma FBBB isnt as clumpy as mine haha, maybe thats just a result of some moisture in mine (simply from opening it) and being frozen. anyway if you get clumps just run it through some (eg. coffee) filter paper first, too easyI used the test tubes only for mixing FBBB into water. After that it's poured into a rectangular pyrex dish for dipping
likewise small rectangular pyrex dish for the bath. Ive read a lot of ppl spray dyes on, i guess that would upset the plate a little less but im not keen on turning it into an aerosol as both FBB and FBBB have carcinogen concerns.
My tutorial will tell you to buy premade plates because it's not economical to make your own, even if they performed the same.
For most people who don't ALREADY have silica gel on hand, it is probably going to be more expensive all the way around: initial out-of-pocket investment as well as recurring per-plate.
Unless your time is worth exactly $0.00, in which case it will be very close $$-wise.
For most people who don't ALREADY have silica gel on hand, it is probably going to be more expensive all the way around: initial out-of-pocket investment as well as recurring per-plate.
Unless your time is worth exactly $0.00, in which case it will be very close $$-wise.
Last edited:
ahh ok. Good to know either way. Anyway only one more sleep til ya get the pro plates lol, rock n roll
(and if you still have no success with those you can just blame the f254 indicator, i see what you did there!)
(and if you still have no success with those you can just blame the f254 indicator, i see what you did there!)
you're in the ballpark hahUnless your time is worth exactly $0.00
Hungry Hungry Hippos.
Loved that game.
Here's some plates I developed today.
The one on the right (#4) had the smallest spot, by far. #3 is upside-down:
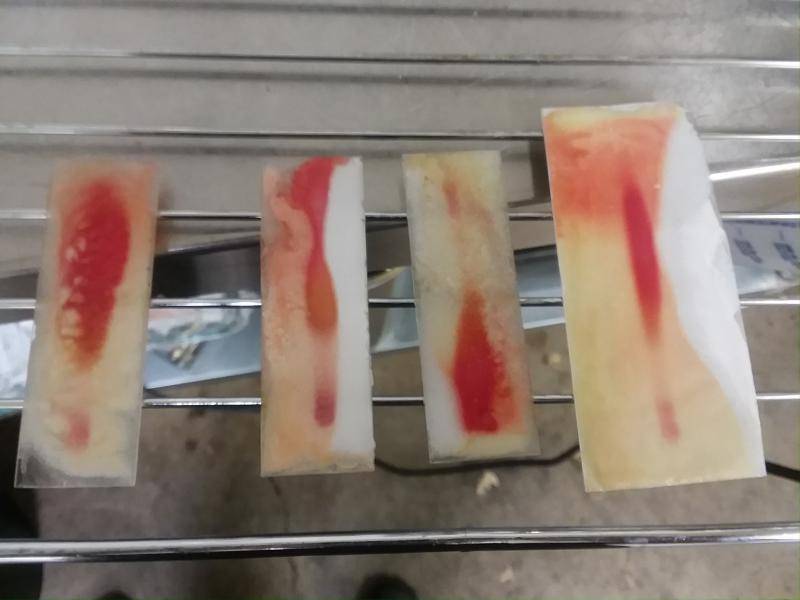
3 spots, experimented with drop sizes. The top lane had the largest spot, but my finger or thumb got in the way when dipping so most of it's not dyed.
The one on the top has 3 spots:
Here's some plates I developed today.
The one on the right (#4) had the smallest spot, by far. #3 is upside-down:
3 spots, experimented with drop sizes. The top lane had the largest spot, but my finger or thumb got in the way when dipping so most of it's not dyed.
The one on the top has 3 spots:
Last edited:
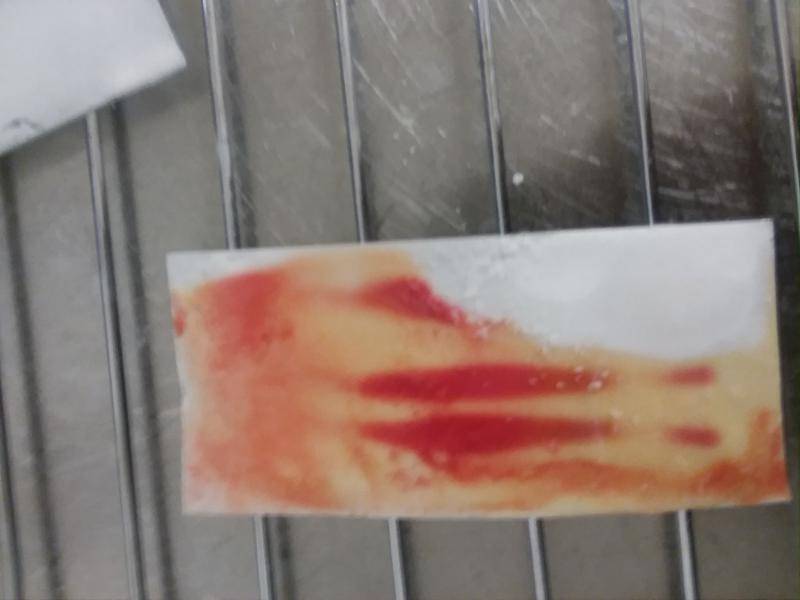
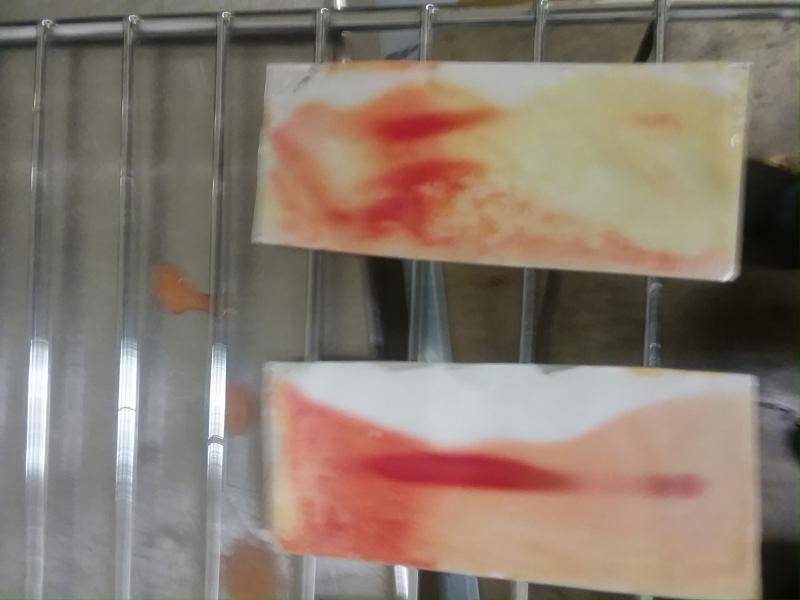
you should end up with a fairly clean vertical line in each lane, with the rest of the plate clear, so im not sure why youve got so much color all over the plates... also especially weird in that last one how there's lots of color all over the plate, but a large part is white
i just use tweezers, gripping from the bottom of the plate (below the origin points), lay it in, and then gently push it down until the FBBB liquid comes over the top of the plate too, so i know the full plate has good contact. I like to give it at least 3 seconds but try to get it out by 5. Not sure what would happen if you leave it in for several minutes, probably lose a lot from the plate, but might have to try that sometime.
* ensure that your sample origin points are well above the eluent level, otherwise youll be polluting the eluent with the sample, which might be one way to spread color over the board. And if youve accidentally done that once youll need to discard that eluent, clean it out and pour in fresh eluent.
* Also be careful to avoid vibrations while its developing, and be gentle when taking it out until its dried.
* And when youve taken it out of the tank, keep it upright to dry
* Make sure plates are fully DRY before FBBB bath. I just stand them somewhere away from direct light with a window open for gentle breeze and usually give them at least 15 mins. At this stage (after the mobile phase(s)) there's nothing more to do with the TLC other than to make the FBBB bath, so I take advantage of this time to clean up bits im finished with and hit the bong now that all the solvents are back in storage.
* not sure if itll make much difference, but you might wanna cut a little bit off the bottom of your plates, just to the point where the silica is in full cover so that the capillary action gets an even start across the full width of the plate
Cant really think of anything else for now
ah. hope you mean gloved finger lol, not just due to carcinogen concerns but because its a fkn dye!but my finger or thumb got in the way when dipping so most of it's not dyed.
i just use tweezers, gripping from the bottom of the plate (below the origin points), lay it in, and then gently push it down until the FBBB liquid comes over the top of the plate too, so i know the full plate has good contact. I like to give it at least 3 seconds but try to get it out by 5. Not sure what would happen if you leave it in for several minutes, probably lose a lot from the plate, but might have to try that sometime.
* ensure that your sample origin points are well above the eluent level, otherwise youll be polluting the eluent with the sample, which might be one way to spread color over the board. And if youve accidentally done that once youll need to discard that eluent, clean it out and pour in fresh eluent.
* Also be careful to avoid vibrations while its developing, and be gentle when taking it out until its dried.
* And when youve taken it out of the tank, keep it upright to dry
* Make sure plates are fully DRY before FBBB bath. I just stand them somewhere away from direct light with a window open for gentle breeze and usually give them at least 15 mins. At this stage (after the mobile phase(s)) there's nothing more to do with the TLC other than to make the FBBB bath, so I take advantage of this time to clean up bits im finished with and hit the bong now that all the solvents are back in storage.
* not sure if itll make much difference, but you might wanna cut a little bit off the bottom of your plates, just to the point where the silica is in full cover so that the capillary action gets an even start across the full width of the plate
Cant really think of anything else for now
The color all over the plates is largely due to some of the stationary phase washing away upon dipping into the FBBB solution.
#1, check
#2, check
#3, negative -- dried flat, but I'd bet any amount of money this has nothing to do with the streaks
I'd bet an elote that it's primarily the gypsum causing problems, both in the rate of elution up the plate as well as the streaks. Additionally, I might still be overloading the plate with too much sample making it even worse.
Hoping I can find some 1uL tubes at a retail location tomorrow, so I don't have to wait for it to get shipped.
I suppose if push comes to shove and the pro-made plates fail and it becomes obvious that it's primarily the spot size/dilution that's wrong, I can try alternative methods of loading the sample onto the plate using different instruments,
I'll probably get a better idea of how it's going to work out even before dipping the plate into the dye. Such as rate of elution
#4, check. tried air-drying, gentle heatgun, convection oven
Last edited:

