Here is my lil setup, but I guess it could scale however big your want. This is my first setup, I did tons of reading and decided the autopot systems was for me. I liked the idea of "the plants controlling waterings". My wallet did not like the idea of the autopot system. Also, with my grow space things needed to be smaller that the normal system. I found out that you can buy the smartvalve separately for $20USD. One thing I have read in a few places is that autopots can keep things a little too wet. Also, the roots can clog the pots with bottom feeding. So to prevent the rot and clogs I place a piece of root control fabric (the stuff for lawns) at the bottom of my pots to stop root lock and clogs. On top of that, I place 1" of perlite as a buffer and for drainage. Lastly, I use pure coco for the rest of the pot. I have already done a soil grow this way and the roots end up in the middle of the pot with small thin roots at the top/bottom. The fabric keeps the roots at bay, and always easy feedings.
Here are a very pics with my crappy cam. My normal cam broke
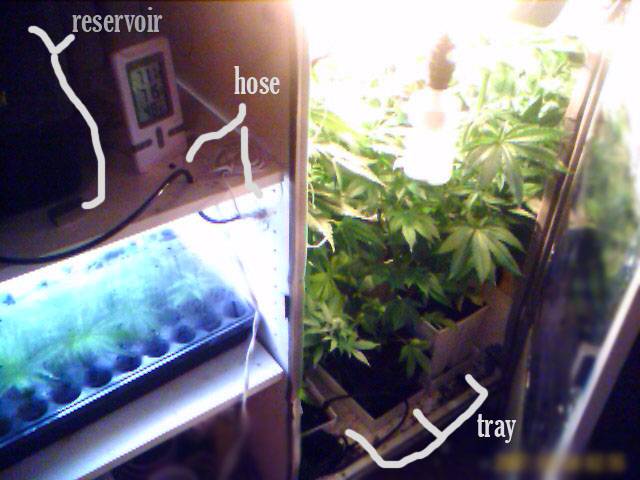
Pic one is an outside the cab shot. You can see my reservoir (kind of). It is kept high since the valves are gravity fed. I use a 4' flexable diffuser to aerate, and a small pump to circulate, the nutes in the res. The tube for the nutes passes through the wall of the cab. (I want my nutes cold please.) The tube then leads down to a three-way splitter. The splitter allows me to shut of sections if they aren't in use. From there, each smarvalve is fed. The smart valves are place in the middle of a small tray. The trays are those kitchen drawer organizer types. They fit perfect with my square 6-7" pots. I do not want a huge flood area. The idea of the autopot is the breathing of the roots. We want more flood and drain, not sit and soak, so the pots and valve fit tightly together.
Cost normal autopot - about $70 per 2 pots and tray with smartvalve
Cost el cheapo pot - $20 smartvalve + $2 tray + $2 for (2) pots = $24.00

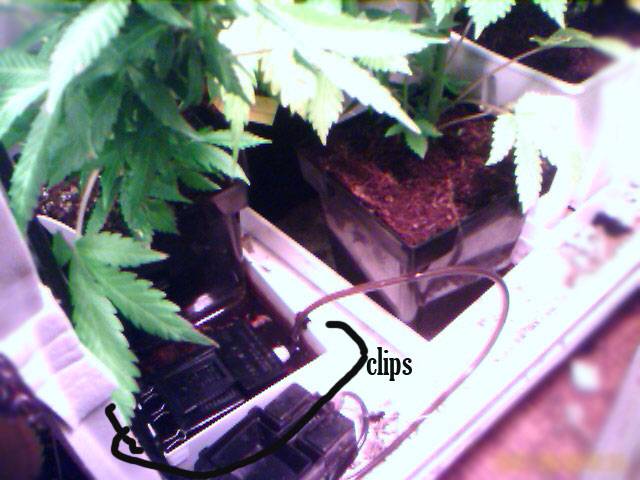
This pic shows the tray with some liquid in it. You want to hold the valve down. It you don't the tray will flood too high and the smart valve floats. I use those office document clips to hold the tube and the valve in place. In a two plant setup I place it in the middle.
The rest of the cab is a 250w HPS with a 42w CFL and 28w 10.0 uvb CFL in the front and in the back for side lighting. I pull the uvb's out to not cook my plants too much.
I flushed at the beginning of flower and two times during my final flush for my first grow in soil. For my first grow I got about 2 ounces dry from one papaya grown in soil in a 6" pot. I am now in my second grow with pure coco.
I up the ppm every time I see the lower leaves lighten up. The res right now is feeding a speed queen in soil 16ml pure blend pro + 5ml liquid karma + 12ml sweet + 5ml Calmag. It end up around 1600-1800ppm in the res. She gets that every feeding, but I wont go any further since she is showing some burn. The plants that are 19" tall that just started 12/12 are getting 12ml pure blend pro bloom + 4ml calmag + 5 liquid karma. I add 5ml sweet, 5ml silica blast, or 5ml of hydroguard every so often.
So thats it as of right now, I am curious to see how things will improve for my second grow now that things are dialed in.


Here are a very pics with my crappy cam. My normal cam broke
Pic one is an outside the cab shot. You can see my reservoir (kind of). It is kept high since the valves are gravity fed. I use a 4' flexable diffuser to aerate, and a small pump to circulate, the nutes in the res. The tube for the nutes passes through the wall of the cab. (I want my nutes cold please.) The tube then leads down to a three-way splitter. The splitter allows me to shut of sections if they aren't in use. From there, each smarvalve is fed. The smart valves are place in the middle of a small tray. The trays are those kitchen drawer organizer types. They fit perfect with my square 6-7" pots. I do not want a huge flood area. The idea of the autopot is the breathing of the roots. We want more flood and drain, not sit and soak, so the pots and valve fit tightly together.
Cost normal autopot - about $70 per 2 pots and tray with smartvalve
Cost el cheapo pot - $20 smartvalve + $2 tray + $2 for (2) pots = $24.00
This pic shows the tray with some liquid in it. You want to hold the valve down. It you don't the tray will flood too high and the smart valve floats. I use those office document clips to hold the tube and the valve in place. In a two plant setup I place it in the middle.
The rest of the cab is a 250w HPS with a 42w CFL and 28w 10.0 uvb CFL in the front and in the back for side lighting. I pull the uvb's out to not cook my plants too much.
I flushed at the beginning of flower and two times during my final flush for my first grow in soil. For my first grow I got about 2 ounces dry from one papaya grown in soil in a 6" pot. I am now in my second grow with pure coco.
I up the ppm every time I see the lower leaves lighten up. The res right now is feeding a speed queen in soil 16ml pure blend pro + 5ml liquid karma + 12ml sweet + 5ml Calmag. It end up around 1600-1800ppm in the res. She gets that every feeding, but I wont go any further since she is showing some burn. The plants that are 19" tall that just started 12/12 are getting 12ml pure blend pro bloom + 4ml calmag + 5 liquid karma. I add 5ml sweet, 5ml silica blast, or 5ml of hydroguard every so often.
So thats it as of right now, I am curious to see how things will improve for my second grow now that things are dialed in.