Ok rule, so your using very soft water, this will make your water much more likely to foam than herd water, btw what is your (pH) and (ppm) of your tap-water? And how much of a waterfall effect or drop do you have in your reservoir? And what brand of nutrients are you using and did you buy the appropriate nutrients for soft water?

-
Happy Birthday ICMag! Been 20 years since Gypsy Nirvana created the forum! We are celebrating with a 4/20 Giveaway and by launching a new Patreon tier called "420club". You can read more here.
-
Important notice: ICMag's T.O.U. has been updated. Please review it here. For your convenience, it is also available in the main forum menu, under 'Quick Links"!
You are using an out of date browser. It may not display this or other websites correctly.
You should upgrade or use an alternative browser.
You should upgrade or use an alternative browser.
BigTokes ~ "How-To" Of The Bio-Buckets 101
- Thread starter BigToke
- Start date
R
rule35sub1
BT, I iust wanted to know if the foam was bad or good. I don't have a bio-bucket setup going yet. I have a recirculating dwc/bio-bucket setup going tho. (just something i was tinkering with to get cooler res temps.) Take a look at my grow thread (page 4) and see. I should have my bio-bucket grow up and running in the next week or two.
Man that picture was worth a thousand words!! I have a whole lot better understanding from were your coming from now that I can see your setup…………were to began, let’s start with that foam thing your so worried about, imo that foam looks healthy to me now that I can see what your talking about looks just fine. Now that I can see what’s going on let’s talk about something else, the waterfall effect thing you got going on looks a little short coming, not meaning to knock your mini-bio-system because I think you did a swell job but if I were you I would add some extra air like I think you already have? Plus I would not allow those hoses to have any slack in them, put something under them to raise them up to give a better return, but all in all you did a great job!!
R
rule35sub1
Yes BT, I do have a 12 inch air stone in there too. I know that this is not a true bio-bucket system. I am going to make a bigger res next time. then I will have a nifty little 2 bucket system, for right now I just needed those temps to stay down and I thought this would be a fun new thing to goof around with. Wait until you see how I set up my 8 bucket system for the new grow, pretty cool.
I can't wait to get it up and running, this weekend I should be finished with it.
I can't wait to get it up and running, this weekend I should be finished with it.
cannabisman
New member
Question
Question
can anybody out there please tell me how long the pump remains on in a biobucket system. Is it all the time? Part of the time? I need to have a scheldule.
Peace and Thanks much.
Question
can anybody out there please tell me how long the pump remains on in a biobucket system. Is it all the time? Part of the time? I need to have a scheldule.
Peace and Thanks much.
Roaddog
Member
Hey there BigToke!
Soon I will be plumbing a line into my growspace.
I dont think I will ever get larger than 12 buckets here.
What size waterline,and water pressure, would you advise?
Right now, there is a 1" line that I will replumb,
so the options are open.
I also wanted to let you know the info I have on our water here.
I estimate its 7+ to 8, and I know it's hard.
Saline.
If you let a glass of water evaporate there's a lot of salt, ect.
I only have ph paper at this point, so.......
I'm makin progress.
What's that they say about wine, and not before it's time??
Thank's for your input!
RD
Soon I will be plumbing a line into my growspace.
I dont think I will ever get larger than 12 buckets here.
What size waterline,and water pressure, would you advise?
Right now, there is a 1" line that I will replumb,
so the options are open.

I also wanted to let you know the info I have on our water here.
I estimate its 7+ to 8, and I know it's hard.
Saline.
If you let a glass of water evaporate there's a lot of salt, ect.
I only have ph paper at this point, so.......
I'm makin progress.
What's that they say about wine, and not before it's time??
Thank's for your input!
RD
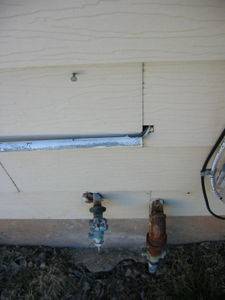
Nice pic roaddog, looks like you’ve got ¾ copper plumbing in your house: I have two main water supplies in my grow/room, one is a ¼ size clamp kit that clamps to your cold water line underneath your house and then connects to my float valve that’s in my reservoir, and the other is a ¾ water hose that I have for doing refilling of inter system, all of this is tap-water, (pH) 7.0 and (ppm’s) 140.
I must say that a (pH) and (ppm) meter is a must in hydroponics……..so you’ve tested your tap-water and your estimating that it is at 7.0 to 8.0? Is this city water or treated water from the county that you live in? And are you going to use this in a bio-system? If so just use some (pH-down) to get it between 7.0 to 6.0 before you put your plants in ok…….remember it’s always easier to maintain that natural buffering zone by going down than it is by going up, so you already have a head start in the right direction.
I must say that a (pH) and (ppm) meter is a must in hydroponics……..so you’ve tested your tap-water and your estimating that it is at 7.0 to 8.0? Is this city water or treated water from the county that you live in? And are you going to use this in a bio-system? If so just use some (pH-down) to get it between 7.0 to 6.0 before you put your plants in ok…….remember it’s always easier to maintain that natural buffering zone by going down than it is by going up, so you already have a head start in the right direction.
question, professor...
question, professor...
hey, BT...
this will make me sound dense, but we have to do what we do best, right?
>the beneficial bacterium already exist in the tap water, correct? you are not physically adding them to the rez, right?
>with the waterfall effect and proper temp/nute management you are giving them a happy home, and they are colonizing the lava rocks, right?
the reason i ask is i'm trying to figure out where the BB came from in the first place...
>you use the lava rock as grow medium for their high measure of suface area, right?
>is it possible to simulate the waterfall effect in a DWC system with airstones?
thanks for a very informative primer in Bio Buckets!!!
the Beneficial Bacterium that I use is air born spores………fill system up with plain old tap-water let it run 24/7 and after 24 hours the chlorine will be gone and then the air bone spores will begin to colonize in the system (lava rocks), btw if you will place a fan to blow over the reservoir it will speed up the process a great deal and should be able to start putting your cuttings in the Bio-System within a week, it really depends upon amount of lava rocks your using and how well you have them submerged and the exchange rats of each Bio-Bucket, plus a very good waterfall!! If every thing pan’s out I would say you would be safe to put them in the system within a week, btw I do not add anything to speed up the colonization process other than put a fan to blow over my reservoir……….it is very important that your reservoir is not sealed, it needs to have anywhere from 2” to 4” cracks to let gas’s out and to get fresh air in. this is were your 02 is added in the Bio-System, as the waterfall turns the water it mixes the 02 back into the system, so if you seal it up there will be no were to get the 02 from.the beneficial bacterium already exist in the tap water, correct? you are not physically adding them to the rez, right?
BigTokes: "How-To" Of The Bio-Buckets 101

BigTokes: Hard-Core Bio-Buckets, First Big Run!!

BigTokes: Secound Big Run!! :friends:
BigTokes: AK-47 Plus H.D.F Bio-Bucket Style
Interesting, to say the least!
Interesting, to say the least!
Have you heard how they make Belgian Lambic (Ale)?
-similar method-instead of pitching yeast by hand, the unfermented "beer" is pumped into the attic, then the roof is opened up. overnight,wild yeast settles in to colonize...then its pumped back down to ferment.this is only done in an 8 square mile area around the town of Lembeek, Belgium...spontaneous fermentation...bio bucket/BigToke style!! :friends:
Interesting, to say the least!
Have you heard how they make Belgian Lambic (Ale)?
-similar method-instead of pitching yeast by hand, the unfermented "beer" is pumped into the attic, then the roof is opened up. overnight,wild yeast settles in to colonize...then its pumped back down to ferment.this is only done in an 8 square mile area around the town of Lembeek, Belgium...spontaneous fermentation...bio bucket/BigToke style!!
:friends:Never heard of that before but sound very interesting, I’ll have to check it out.
BigTokes: "How-To" Of The Bio-Buckets 101
BigTokes: Hard-Core Bio-Buckets, First Big Run!!
BigTokes: Secound Big Run!! :friends:
BigTokes: AK-47 Plus H.D.F Bio-Bucket Style
BigTokes: "How-To" Of The Bio-Buckets 101
BigTokes: Hard-Core Bio-Buckets, First Big Run!!
BigTokes: Secound Big Run!! :friends:
BigTokes: AK-47 Plus H.D.F Bio-Bucket Style
J.R.R.Toking
New member
OK, So I guess I posted this in the wrong thread, so I'll repost here in case anyone else can use the info:
_________________________________
How's it going, BT? After 3 hours in Home Despot today, it brought on more questions than answers...almost.
If you don't mind, let me run this by you. I have decided to take your advice to go with 6 buckets, two 600w HPS lights, and make the feed line external, but I have a few questions.
For the external feed line, you advocate use of "reducing Ts" for the access lines to the buckets: 1 1/2 on either side and 3/4 to the 3/4 valve/nipple setup (hose is then connected to nipple, and then leads to the bucket). Q: For my setup, I was going to buy 1/2 in Ts (no reduction; 1/2 on all three sides) to match the 1/2 feed line and 1/2 in hose leading from the T and feeding the buckets. Is this right, each of the Ts holes being the same size? I'm concerned there will not be enough pressure, as you stressed the "Reducing" part of the T. I'm planning on using @ a 375 gph submersible pump, FYI. In my setup, how would you handle the last two buckets, so they don't get all the water pressure? I think somewhere you said you need to use smaller hoses/Ts, or put glue inside them and drill out a smaller hole to reduce flow? Q: Could you just use the same fittings throughout, and adjust the ball valves on the last two buckets to lesson the flow to them? How'd you handle this? You'd need five Ts and one elbow (for the last bucket) right? The PVC feed line terminates at the last bucket with the elbow, correct?
How is the pump attached to the feed line? I'm assuming I want to get a pump with 1/2 in pipe out. Also, can you explain in more detail how the feed line is connected through your buckets? Is it a water-tight seal? (Exact parts here would be most helpful!)
Sorry to lay so much crap on you, but I need to get up-and-running, as I have seeds germinating in Oasis cubes at the time of this writing (they seem to be working out OK). Any other knowledge you'd like to impart would be most welcome; don't worry about boring me.
Thanks professor. I really appreciate it!
J.R.R.
__________________________________________
Your reply:
Supp Toking, looks like your determined to make this thing work. Ok let’s get down to it:
Quote:
For my setup, I was going to buy 1/2 in Ts (no reduction; 1/2 on all three sides) to match the 1/2 feed line and 1/2 in hose leading from the T and feeding the buckets. Is this right, each of the Ts holes being the same size? I'm concerned there will not be enough pressure, as you stressed the "Reducing" part of the T. I'm planning on using @ a 375 gph submersible pump, FYI. In my setup, how would you handle the last two buckets, so they don't get all the water pressure? I think somewhere you said you need to use smaller hoses/Ts, or put glue inside them and drill out a smaller hole to reduce flow?
first off, that’s good detailed info bro so here’s what I would do if it were me; if the supply line is ½ “ I would run that all the way to the last/end bucket and would put a ½ “ elw and turn it right into the last bucket and put another elw at the bucket, hope I explained that right?
Quote:
Could you just use the same fittings throughout, and adjust the ball valves on the last two buckets to lesson the flow to them? How'd you handle this? You'd need five Ts and one elbow (for the last bucket) right? The PVC feed line terminates at the last bucket with the elbow, correct?
if you look at my photos you well see my ball valves on the floor and I adjust them to get the proper pressure at each bucket in my system, but if I were you I would put a ½ “ ball valve right up next to each bucket, right before it gets to the elw at the bucket and adjust each one to do the same as I did.
Quote:
How is the pump attached to the feed line? I'm assuming I want to get a pump with 1/2 in pipe out.
whatever size the outlet is on the pump that your going to use that’s the same size you want to stick with; for example my pump is a Mag-Drive 5000, with a 1” ½ outlet so that’s what I used, so if yours has a ½ outlet on your pump that’s what you use or whatever the size is get it. Btw if you use a size larger than the size is on the outlet of your pump you will over-shot the ratings of what that pump is and also if you use a size smaller than whatever the outlet of what your pump is you would have undersized the ratings of what that pump is, I’m sure your getting all of this, it’ll all kick in after a little latter. For a better explanation of how the supply lines hook-up to your pump you’ll have to take a photo of the pump for me so I can see what they look like? Btw post it in the “How-To Of The Bio-Buckets 101” thread.
Quote:
Also, can you explain in more detail how the feed line is connected through your buckets? Is it a water-tight seal? (Exact parts here would be most helpful!)
I do believe I have some photos of that in my “How-To” thread check it out and if that doesn’t answer your questions ask me again.
___________________________________________________________
J.R.R.Toking
New member
Now that we're up to speed, I do need some clarification.
Quote by Big Toke: "first off, that’s good detailed info bro so here’s what I would do if it were me; if the supply line is ½ “ I would run that all the way to the last/end bucket and would put a ½ “ elw and turn it right into the last bucket and put another elw at the bucket, hope I explained that right?"
So you're saying to use 1/2 in Ts all the way through, then for the last bucket (instead of a T) use a 1/2 in PVC elbow (thus terminating the feed line) then a short run of 1/2 in PVC to the bottom of the bucket, then another 1/2 in elbow going straight up the bucket. Then, at that point, insert the ball valve, nipple, and hose going to the actual fill elbow (90 degree, barbed on both sides) that goes through the bucket at the top? The two elbows thing is a little unclear, mainly (I'm sure) because I'm a plumbing idiot!
Quote by Big Toke:"if you look at my photos you well see my ball valves on the floor and I adjust them to get the proper pressure at each bucket in my system, but if I were you I would put a ½ “ ball valve right up next to each bucket, right before it gets to the elw at the bucket and adjust each one to do the same as I did."
This is confusing me as well. How would you install the ball valves at the top? Would you have the nipple first, then the hose, THEN the ball valve, THEN the elbow going into the bucket for the feed? You'd need different parts/connectors/elbows to set it up this way, right? As long as the ball valve is after the feed lines Ts/final elbow, would it make a difference where the valve is placed (if I wanted to use the ball valves to control the flow to the last bucket or buckets)?
Sorry to be a PITA, but I want to get this done in the next 24-48 hours man.
BTW, Oasis cubes are working out really well for the seedlings so far. I kept the seeds in a covered mug of water on the monitor till they popped, then inserted into the cubes. I made new, smaller holes rather than use the "pre-fabbed" ones: too deep IMAO. I flood the germinating tray (no dome, 24 hour flouros) once a day for a couple minutes, dump the water, then gently shake off each cube. Water has 2 tsp/gallon of B Seaweed pure liquified B.C. Kelp. After 3 days, two have the taproot popping out under the cube, and are just opening their first two leaves! The other four are soon to make their entrance as well, so far, so good!
I hope this helps somebody, and thanks loads for the help you're giving me.
Yes, that’s right!!So you're saying to use 1/2 in Ts all the way through, then for the last bucket (instead of a T) use a 1/2 in PVC elbow (thus terminating the feed line)
I have no idea what your talking about putting a line in the bottom of the bucket? There is no line that goes in the bottom of the Bio-Buckets!! Your thinking about the {KBS} they use a line in the bottom of there buckets, but not the Bio-Buckets!! Are you looking at the bucket part of this thread? It shows you were the supply line goes!!then a short run of 1/2 in PVC to the bottom of the bucket
Yes, that’s right!!Then, at that point, insert the ball valve, nipple, and hose going to the actual fill elbow (90 degree, barbed on both sides) that goes through the bucket at the top?
it’s really very simple, if you look at my photo’s you will see that I do not run pvc up to the bucket, I used a water hose; so if you do this you can buy a ½ “ plastic ball valve with a barbs on both sides, just slide your hose up on the valve and clamp it!! Now adjust the valves to get equal parts per bucket.How would you install the ball valves at the top? Would you have the nipple first, then the hose, THEN the ball valve, THEN the elbow going into the bucket for the feed?
I would put the ball valve right up next to the top of each bucket.would it make a difference where the valve is placed (if I wanted to use the ball valves to control the flow to the last bucket or buckets)?
Ps……….It’s good to hear that your seeds are working out for ya.
BigTokes: "How-To" Of The Bio-Buckets 101
BigTokes: Hard-Core Bio-Buckets, First Big Run!!
BigTokes: Secound Big Run!! :friends:
BigTokes: AK-47 Plus H.D.F Bio-Bucket Style
the protege
Member
Hey BigMO,
Been a little while. I love your system
I have an idea, but do you think it would be possible to fit a modified version of bio-buckets in a C22 cab? Or would you recommend a different hydro system?
The idea I have is 2 bubbling buckets hooked up to a 5 gallon reservoir that pushes the water the same way as your bio buckets but wouldn't have as steep of a water fall (3-6 inches), but the lack of oxygen would be more than made up by the airstones in the bottom. The idea is to have more water so I don't have to make daily updates and I can keep the reservoir chilled with some 2 liter bottles of ice.
Instead of using a sump hose and the big 4" PVC return pipe, i would just use 2 or 3" pvc as a return and use some size of PVC or the red rubber hoses you used as the feedline going to the main return pipe. Do you believe this would be an alright substitution.
the p
Supp Protégé, yes I believe that’s a sweet idea and could possibly work if designed right………first off I’ve never done a C22 cab grow before but I have seen them and thought that it could work…….I’m not for sure about the measurements of those cab’s? two bucket Bio-Cabs seems fishable to me. I will have to think about this further and let you know.
the protege
Member
Thanks BigToke, just wondering have you finished your excel sheet? Have you thought out the plans for a mini bio-bucket lay out? I just read Ron Gotti's thread and have to say you have surpassed how much I thought of you already. You are a gentleman and a scholar. I salute you ")

Latest posts
-

-

-
-
 Australian Dead Head (mullumbimby madness x Neville's haze)?
- Latest: StickyBandit
-
Latest posts
-
-
-
-
Australian Dead Head (mullumbimby madness x Neville's haze)?
- Latest: StickyBandit
-
