What's new

70w HPS Micro Hydro SCROG Grow + Stealth Cab Build

70wDreams

Active member
Its been a while since I've had the opportunity to do a grow and here we go!

It started with a dumpster-grade bookshelf and a dream.


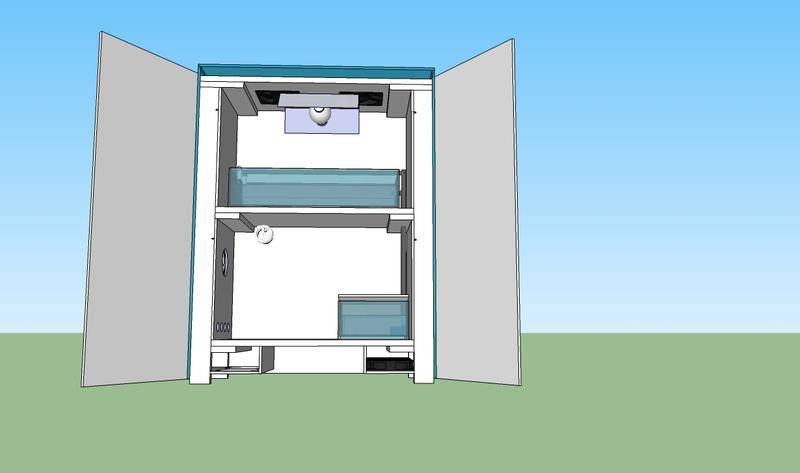
The Dream: A Stealth, low power, small growbox.

picture.php


[there have been some revisions to The Dream in Reality]

The bookshelf had some flashing that was quickly removed.


I drilled lots of 1" holes for ventilation (diagram further down)


And picked up a $45 Home Depot 70W HPS


and tore it apart promptly...


I removed the darkness indicator and bypassed the connection. Simple hot wiring.

Ok, back to work. I had to disassemble the whole bookshelf to drill the holes. This presented me with the opportunity to reinforce the structure...


Installing the back...


The back sanded and stained Ebony. It looks great.


And the doors were a total bitch...


[...]
 

70wDreams

Active member
FYI, you are limited to 25 images per post. Good to know.


Custom Spacers...


First look at it standing with doors


Drillin' holes again...


She gets a countersunk lock!


Pretty sloppy, but it works...


Side panels!


HPS Mount with wire duct.


It was a little longer than I had wanted originally.


VISUALIZE~!


Mumspace, the clone army, and the reservoir go on the bottom

She just needs a slide-up removable top now!


And she needs the inside paneling and fans to complete the air ducts.

Airflow:


The white circles are 120mm fans. There is a negative air pressure in both flower and veg chamber.


To Do:
Top
Inside Panels
HPS Mount
Stain outside
Paint inside
Wire
Veg chamber lighting solution
Install Fans
Hydro
Silicone Sealant

4 strains are germinating in a hobo setup right now.


I haven't updated the sketchup model yet, but when I do, I'll post more images.

Um... So I am totally stoked about this 70w HPS Stealth Hydro uber tech project here. So far I've spent maybe $125 on the cab so far and I am guesstimating a total of $200-$250 to finish, including hydro supplies.

I have faith in the 70w HPS and will be joining the club.

Comments/suggestions/questions about my design are welcome!

Grow On!
 

gdbud

Member
Nice Cabinet and documentation of it! I like it!
One problem I saw was by having the exhaust at the bottom that it would be sucked back into the intake reheating the cabinet.
 

70wDreams

Active member
gd, you have a point, but the system produces very little heat. Also, as the air is traveling down the entire right side of the cabinet it is being cooled by the ambient room temperature; the board that I used is very thin. If it becomes a problem I can find a solution.

Thanks for the props, the both of yous.

So, we have germination! We don't have photos, though.

Purple Kush #1 is 2cm, and is just pushing out the first set of leaves.
Purple Kush #2 taproot popped.
Purple Kush #3 taproot popped.
6 #1 taproot popped.
6 #2 taproot popped.
Kush x Monster about to break though and see light
H4 taproot popped.
Kush taproot popped.

Note: these are not the real strains from the seed co.'s - they are from plants I've grown previously that have acquired funny names. Funny, but oddly accurate. Heavy on the Indica - very nuggy and strange tendencies. More info to come as they grow, but one interesting bit is that the H4 is a strain that has self-pollinated 4 times, each pulling out recessed genetics (or whatever) and producing some really fun, delicious results. Tiny, nuggy, and easy to please.


The cab is going well. this is what I've crossed off the to do list:
cut fan holes
fabricate passive air intake duct air dam
install all weather stripping
mount inside panels with screws for easy maintenance of fans
paint interior white - 2 coats.

the humidity is slowing the drying process... i want her to dry out asap so I can move the seedlings out of hobobucketville and into a wooden mansion.

To Do:
Paint various parts black
install fans and wire
top assembly
stain black
bottom fan exhaust assembly
add more screws to back panel
Wire HPS, CFL(s)


Eventually:
Hydro tubes and fittings
screen solution
carbon filtration
and more!

stay tuned. ideas about more image storage are welcome. I may reupload all of them at 50% or less... that would be a pain.

(I reuploaded at around 300x250 or so)
 

70wDreams

Active member
Completed:
Paint various parts black
Wire HPS, CFL(s)
Installed a temporary fan

To Do:
install fans and wire
add more screws to back panel
top assembly
stain black
bottom fan exhaust assembly

The little buggers are in the veg chamber! I can't wait to install the fans and be at a stopping point for a while. temps are GREAT just with the top-most fan on. The top is not assembled yet, and there is a lot of work to do, but it is currently "working."

Day 1. The Dream becomes incredibly more lucid.
 

70wDreams

Active member
And here is where things start getting fun...

The tried and true paper towel method. enjoy the funky names


The HoBoGrOwBoX:


Perfect size for the 120mm fans that are due to arrive soon...


And her paint job is done!

picture.php


Doesn't this just look beautiful?

picture.php


This is a brightness comparison. I had no idea this little 70w had so much spunk! I've got the Aviators near the cab at all times now. Even the CFL is REALLY bright, but the HPS is walking-on-the-surface-of-the-sun bright. I smell nuggs!!!

picture.php


Utility Box Porn:


And my favorite photo I've taken since this project began:

picture.php


PEACE!!
 

70wDreams

Active member
The fans are in and installed!

picture.php


picture.php


I used speaker wire to extend the lines and twist caps to connect all of them. I used hot glue in place of some twist caps when the wires were too thin for a twist cap (namely for the power cord to the fan's AC adapter - needed to shorten it by a few feet)

And the interesting bit:

picture.php


We have 5 seedlings now. Purple Kush#1 and #2 are chilling in the back. Kush x Monster is front left and two random seedlings are in the front right. They can only be a few different strains. Time will tell...

I'm checking what temps the cab maxes out at now, but the real numbers won't be in until another two 120mm fans are added to the bottom right corner of the box for uber exhaust techniques.

All of the fans are very slow moving, nearly silent, and awesome. i ordered four cooler masters and one other Master Cooler (I know, right?) for the top-most HPS vent fan and it is significantly faster than the other two that are currently installed - that is so great! That is really the only area heat is a concern. i would like to place a piece of aluminum right above the light so the radiant energy doesn't hit the top, but right now it is warm-to-the-touch! My airflow has proven to be, in fact, tight.

I've found the 70w HPS ballast to be very hot - too hot to touch after being on for a while. It really needs to be cooled and raised off of the wood, so I want to mount it on a ceramic tile on the opposite side of the utility area - near or above the exhaust holes. I'm even considering mounting a computer heatsink on it... something to dissipate the heat, because that little guy is really hot. Really hot.

I guess I'll be posting pics about once a week or so. I may post a bunch each week and then delete most of them to save space. I'm still looking for a solution to photo storage here...


It feels GREAT to be growing again!


To Do:
Bottom Fan Exhaust Assembly
Top Assembly + air dam
Sand and Stain!
Rehang doors so they close easier
ceramic tile for the ballast to sit on
mount all the utility hardware to the cabinet to prevent moving
Hydro~

If any one has comments/suggestions/questions - bring it!

~!~Peace~!~

70 watts is going to be so crazyfun...
sometimes when I visualize the bonzai forest of cannabis buds...
whoa... going to need that carbon.
 

King of LOL

New member
Hey there 70wDreams, thanks for checking out my diary.

I came across yours even before I started mine, so this is not my first time here. I'm just too shy to comment :whistling:

As someone said, lots of creativity here. A true inspiration!
Everything looks great.

Cheers
 

70wDreams

Active member
Update

Things are getting greener. Slowly, but surely. I think the curved leaves are due to overwatering and root shock from transplanting.


Front left: Kush x Monster - the primary growth tip was damaged just after the cotyledons and it is set back a bit, but I see new growth.
Front right: ??? x2 I like the taller one a lot. Very broad leaves, but not dark green. It looks the healthiest of the bunch and I am rooting for it.
Back left: Purple Kush #1 - the oldest and most progressed, it is just pushing out its second set of leaves and working on the third. It looks a bit mangled.
Back right: Purple Kush #2 - also, not so much another looker.

They will stay in these containers for at least another 3 weeks or so.

picture.php


Time to look into some nutrients...

I still need to finish up the cab...
 

70wDreams

Active member
Update (2wks & 3days old)

I haven't had much time to finish the cab, but I did solve a huge problem - the heat caused by the HPS ballast. I had two CPU heatsinks laying around and put them to use doing what they do best - dissipating heat. I simply used a wire coat hanger to hold them together. The heatsinks have a great clasp to tension the unit to a motherboard and I used those to hold it all together. Super cheap and simple solution!

picture.php


The ladies are looking better and worse. The new growth is not as disfigured as the old, but the old has signs of nutrient or other issues. I need to add some nutes soon.

picture.php


Stay tuned, kids!
 

70wDreams

Active member
9 WKS

9 WKS

Ok, so I haven't updated my journal in a LONG time. Sorry, followers. First off, here is some eye candy:

picture.php


Things have been good so far. Two plants are definitely more stalky and Indica (the PK 1&2 plants). The other two have a little more Sativa (Kush x Monster & the unknown one). The PKs haven't had much training, I just started after I topped them and they started bushing-out, though the other two have been LST'd for a long time. I want to see which method produces the most, healthiest, robust, successful cuttings the fastest.

I've taken a cutting of Kush X Monster a few weeks ago and it rooted OK, I just shouldn't have taken the humidity tent off so early--better late than sooner, really. I just took a cutting of one of the PKs yesterday. Both cuttings are in soil... because. I really don't have plans for these two yet. They both happened because those growth tips needed to go.. so.. who knows...

My real plan here is not to keep these mothers. I want to restart them using their cuttings to maximize room.

I have repotted the mothers once so far and the soil mixture I chose was much too "hot" - I thought I had a PH problem or something, but after a few hours of flushing, and a few days of recoop'ing, they are looking much better and really jumped up.

I have done absolutely no improvements on the cabinet. I still need to finish:

-the bottom exhaust fan assembly
-the bottom intake filter assembly
-top utility box assembly
-re-hang doors so they close nicely
-complete wiring
-install permanent vegbox lights
-everything hydro related
-install two red spectrum CLFs in the flowerbox

I want to install the two red spectrum CLFs in the flowerbox to use for the first few weeks before kicking on the HPS. I think it will be a nice adjustment period and the lower intensity light will make a bit more stretching, which is ideal for the SCROG I want to install.

That's all for now, folks. Stay tuned.
 

GreatLakes THC

an Arthur P. Jacobs production
Veteran
Nice work...

Nice work...

Awesome build documentary. This is going to be one pimped out cab when you're finished with it.

GreatLakes THC :joint:
 

70wDreams

Active member
Ok, so I just took 12 cuttings into soil and worked a bit on the cab. I devised an easy way to mount two red spectrum CLFs in the flower partition, but that will require a trip to the hardware store. I want the two CFLs to use for the first few weeks of flower and then kick on the HPS when they need it. It is a low energy/low heat solution. Speaking of heat, I've worked a bit on the fan wiring and the whole setup (total of 2 CLFs and 4 fans) is humming quietly away right around 80f.

No photos for now, but know that things are looking up.

Stay tuned, kiddos.
 
Top